
One of the fundamental components of setting up Office 365 is installing Azure AD Connect. This tool is used to connect your on-premises Active Directory to Azure AD.
It works by synchronizing a copy of objects in the directory, such as users, groups, contacts and devices from Active Directory to Azure AD every 30 minutes. When you use Azure AD Connect, your local Active Directory remains the master copy and only selected attributes, such as those needed to support Exchange Hybrid, are written back. A full list of synced attributes is available here.
Azure AD Connect supports many topologies, including a single Active Directory, multiple Active Directories and even multiple Office 365 tenants.
Before we begin, it’s worth outlining that there is a variety of configuration options available and these should be considered if you have more than basic requirements. For example, if you cannot synchronise hashes of passwords to the cloud, then you may wish to consider options like pass-through authentication. If you still run older clients or do not plan to use Hybrid Azure AD join to provide single sign-on to PCs, then you might wish to configure Seamless Sign-On.
In this guide, we’re not going to cover every option for installation of Azure AD Connect, as there’s a variety of ways to configure it.
The key purpose of this guide is if you are installing and configuring Azure AD Connect to support using a tool like Microsoft Teams, and plan to update your configuration to support wider needs in the future. We’ll show you how to install it in a similar way to the Express option which uses the most common deployment settings.
Prerequisites for installing Azure AD Connect
Before you begin, ensure you meet the pre-requisites for installation. As a minimum, you need Windows Server 2012 or later, on a domain-joined server (or domain controller) with .NET Framework 4.5.1 and PowerShell, with at least 4GB RAM and a 70GB HDD. The server will need access to the internet, in particular access to the Azure AD Connect service. IP ranges are listed here.
It is always recommended to analyse your Active Directory for issues that will prevent accounts synchronising to Azure AD. The best way to do this, is to use the IDFix tool. The process to run this is documented here. In particular, it is common to ensure that the User Principal Name matches user’s email addresses for easy sign-in and to meet the requirement of matching one of your Office 365 tenant’s custom domains.
And, if you haven’t already, follow our guide on adding a custom domain to match (at a minimum) your primary SMTP domains (the ones you’ll use for sign-in) and if you will be migrating mailboxes to Exchange Online, all domains you use to receive email.
Learn more: What is Azure AD Connect Cloud Provisioning and should you plan to use it?
In this guide we’ll show you how to user Alternate Login ID for rapid identity provisioning to Office 365 applications like Microsoft Teams. If you are planning to use Exchange Hybrid, however, then you should plan to move to matching against the User Principal Name at a later date. This can be achieved fairly simply, by staging the switch of User Principal Names to match user’s Primary SMTP address, then when complete updating Azure AD Connect to use the User Principal Name instead.
Steps for installation
Once pre-requisites are in place we’ll begin. First, download a copy of Azure AD Connect. You’ll find this at the Microsoft Download site.
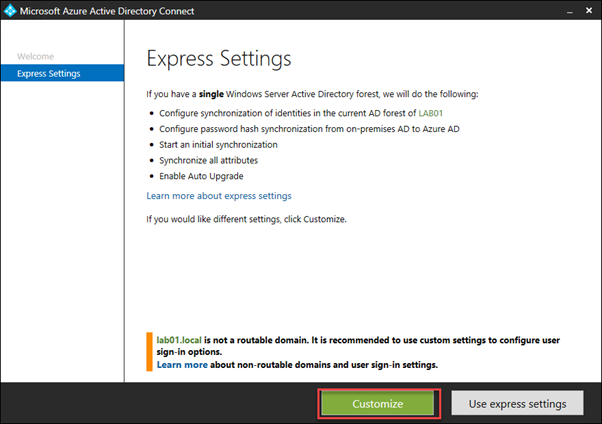
Next, run the installation tool on the server you’ll install Azure AD Connect on to, then when given the opportunity, we’ll choose the Customize option, unless you want to install with the Express Settings, which include synchronizing all accounts:
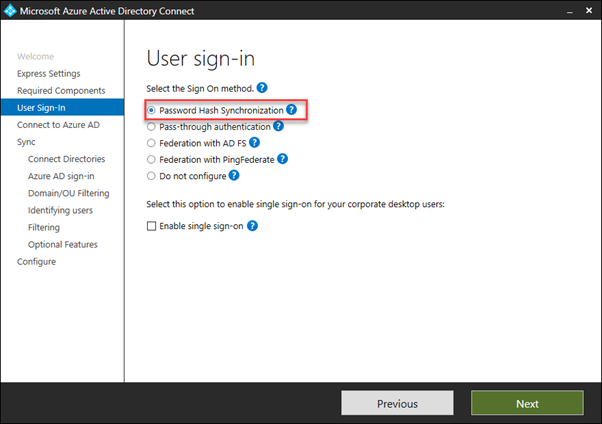
Next, we’ll choose sign-in options. As mentioned above, we’ve got a variety of options available, and you need to select the right one for your organization.
However, most organizations should choose Password Hash Synchronization, then choose Next:
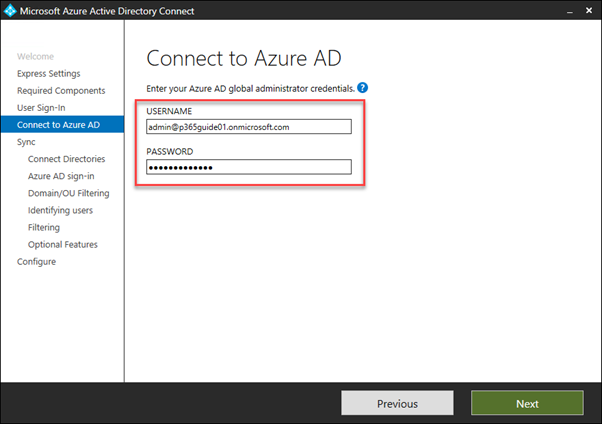
Next, enter your Office 365 Global Administrator credentials. These will be used to create a synchronization account inside the Office 365 tenant, and not stored by the server:
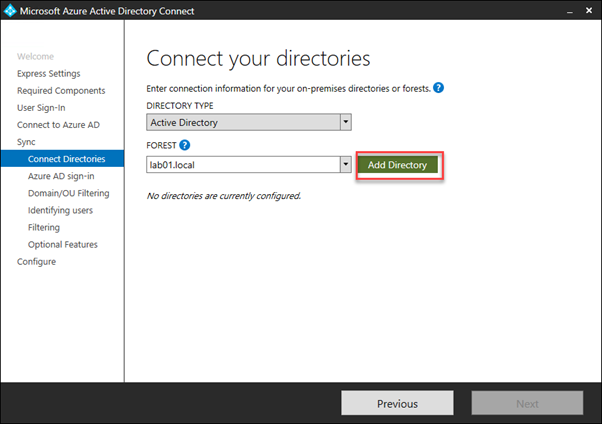
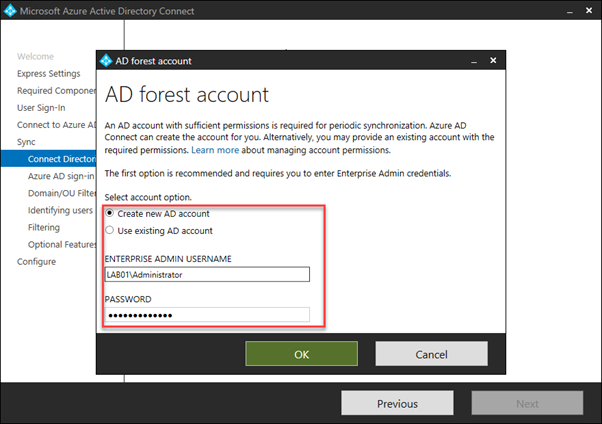
We’ll then need to add our local Active Directory. In this guide, we’re assuming you are using a single AD to synchronise to Office 365. Choose Add Directory:
At this point, use enterprise administrator credentials to add an Active Directory connection. The wizard will, like with Office 365, create a synchronization account with the pre-requisite permissions, then choose OK, then Next.
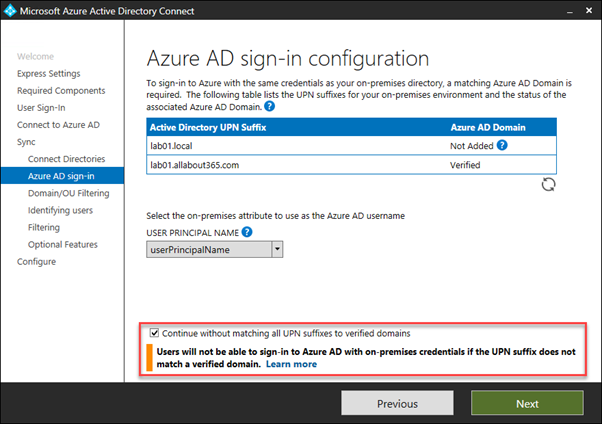
On the next page of the wizard, we’ll see the sign-in configuration already chosen and select the on-premises attribute to use as the Azure AD username.
If you plan to use Exchange Hybrid immediately, then you should select the default, userPrincipalName as described earlier in the article – and ensure you have run IDFix and aligned your primary SMTP address values to the UPN.
In the example below, you’ll see a warning that will show if you have a UPN suffix in your environment that is not routable, or not registered in your Office 365 tenant.
We see the warning below because the UPN suffix lab01.local is not routable and therefore cannot be verified in the tenant. However we do have the lab01.allabout365.com domain (which is also our Primary SMTP address registered), therefore we can select Continue without matching all UPN suffixes to verified domains.
If you cannot match your User Principal Name value to your custom domains right now and don’t plan to enable Exchange Hybrid immediately – for example, if you are planning on just enabling Microsoft Teams, or other services like SharePoint or OneDrive, then you can workaround this using Alternate Login ID.
This is when your scenario matches the example user below. You’ll see on the left the email value is using the correct custom domain, however you haven’t yet been able to update the User logon name on the right to match the custom domain value.
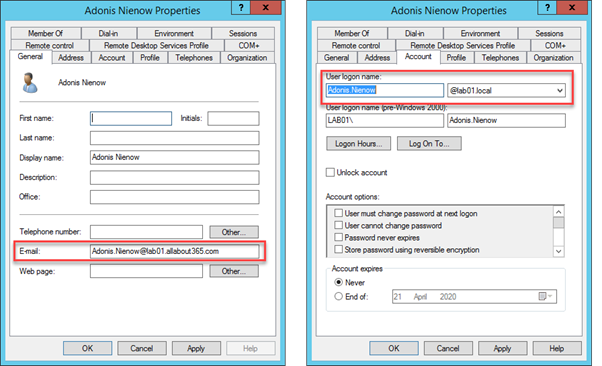
To use Alternate Login ID as a temporary measure, use the User Principal Name drop-down to select the mail attribute:

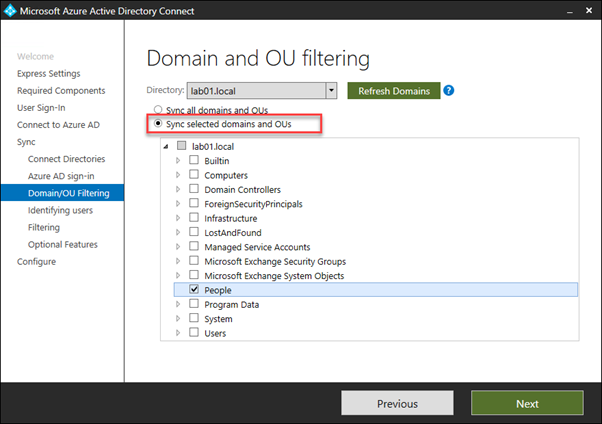
Next, we’ll select the Domain and OU filtering options. You may not wish to synchronize every object in your Active Directory to Azure AD and Office 365.
For mail routing and Exchange Hybrid in particular you will want to synchronize (at a minimum) every recipient including mailboxes, mail users, mail contacts and distribution groups.
However, you may not wish to synchronize leavers’ accounts, service accounts and built-in accounts and non-mail enabled security groups. Therefore, it’s useful to use the Domain and OU filtering to select the OUs that contain valid recipients.
In the example below, we know that all recipients are within the People OU, and we’ll only select the Sync selected domains and OUs radio box, then select the checkbox for the OU, then choose Next:
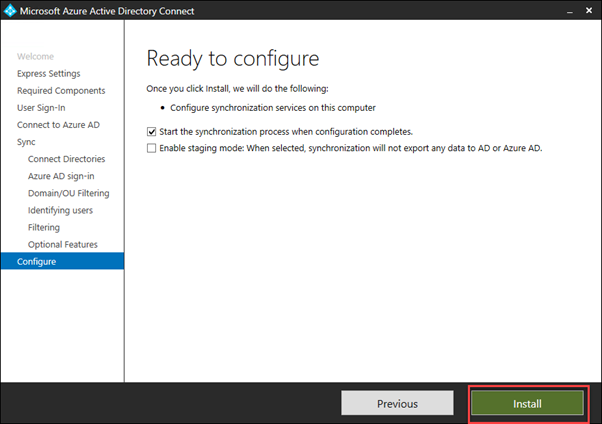
After completing the configuration and selecting any optional features to enable, we are ready to configure and perform our initial sync.
After the sync completes, navigate to the Microsoft 365 admin center to validate the synchronization task is completing successfully. You should see within Users and Groups copies of your Active Directory objects.

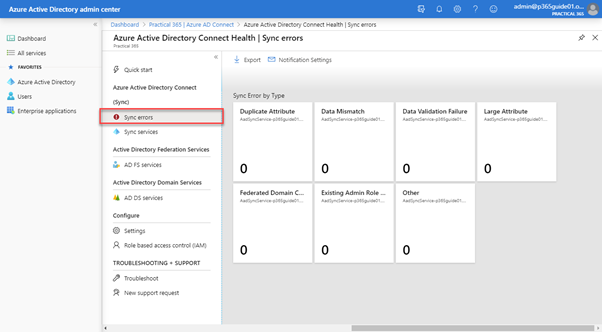
If things don’t look right, then navigate to the Azure AD Connect Health portal. This will provide you the option to monitor Sync errors that the service is experiencing. A good result should show no sync errors to the service. You’ll resolve sync errors by following the recommendations from IDFix.


” follow our guide on adding a custom domain to match”
Where is the guide? =)
Hello Steve Goodman,
Thank you for shared information.
I have question following.
Now, Azure AD Alternate Login ID in preview mode.
1. What time line will GA?
2. Can we use Alternate Login ID in production ?
3.I use mail attribute for Alternate Login ID instead UPN.
4. This Alternate Login ID can continue work?
Hello Steve, can you explain more, I have a customer who can’t add UPN (at all), we plan to use the mail attribute. They also want a Exchange Hybrid. Why is this scenario not possible?
Sorry for my bad English.
Hiya,
This scenario in the article is supporting a series on a quick Teams deployment – so it’s not intended for a Hybrid deployment.
But that said, the primary issue is that the Autodiscover redirection, when configuring clients or reconfiguring clients after migration won’t work as expected, especially for external clients.
Steve
Thanks steve,
We have two exchange forest syncing to azure ad we have some mail contacts created in one forests and other forest they are mail users is there any aad connect sync rule to exclude the mail contacts (where mail users should have presidence).