
In this article, we’re exploring how to make SharePoint automatically extract text from images using the Azure OCR service. This could be used to build your own receipt scanning system, or scanned invoice processing and so much more.
In my opinion, this considerably enriches the SharePoint platform for users. If this is something you’re looking to do in your organization, you should also check out my similar article which integrates SharePoint and Azure OCR ‘The Azure Ink Recognizer: How it Works and Integrates into SharePoint’.
Optical Character Recognition (OCR) can convert images that contain text printed in the computer-encoded text. OCR is widely in IT processes, ranging from printed text recognition of electronically scanned information to reading identification documents. This can then be stored in systems like SharePoint and indexed to facilitate search and sorted by metadata.
Azure OCR and SharePoint Integration
Over the years, Microsoft has offered several different types of software for OCR with integrations into familiar Office programs such as Word and PowerPoint. In Azure, Microsoft offers OCR as a ‘Computer Vision API’ service in 25 languages at the time of writing this article.
For the images to be recognized, they must be between a minimum of 40×40 pixels and a maximum of 3200 x 3200, and no larger than 10 megapixels. The text within the images can be rotated at any angle, this is because the API takes care of setting it so that it can be read horizontally.
The only minor downside to this is that the API cannot accurately recognize all types of letters yet, especially if they have ‘artistic’ styles, complex background images, very small or large letters, or crossed-out text. However, I say this is minor because the text-recognition rate, for the most part, is high, and Azure ‘learns’ to recognize more and more text over time.
Configuring the Azure Computer Vision API
If you want to use the Computer Vision API, you need to create this service in Azure. Below are the steps on how to do this:
- Go to the Azure Management Portal, log in using your credentials, then go to the Resource Groups section and create a new one
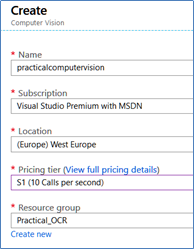
- In the Resource Group, use the +Add button to create a resource. Search for “Computer Vision” then name the service, in the Pricing tier box, select a level depending on the number of calls per second, which determines the service price
- Once you’ve created the service, click on its name in the Resource Group resource list, go to Keys and copy the value of Key1
Using the Azure OCR with SharePoint
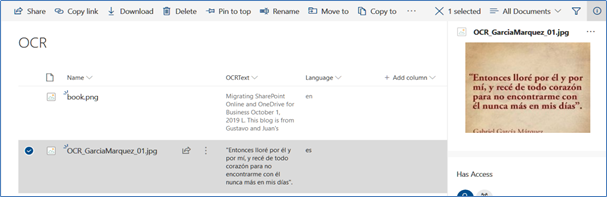
In the following example, as previously noted, we will use a SharePoint library with two extra text fields for the text, OCRText, and for the language Language. When you upload an image to the library, a WebHook triggers the Azure Function to start working, this then extracts the text and language from the image using the OCR service, and finally populates the information into the additional fields.
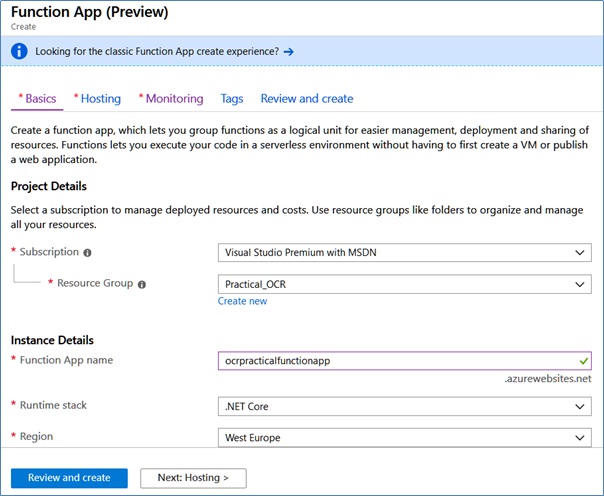
4. In the Azure Resource Group, create a Function App and assign it a name, Service Plan and Azure Storage account. When the Function App is created, open its configuration window, go to Platform Features, then Function App settings and change the Runtime version to ~1.
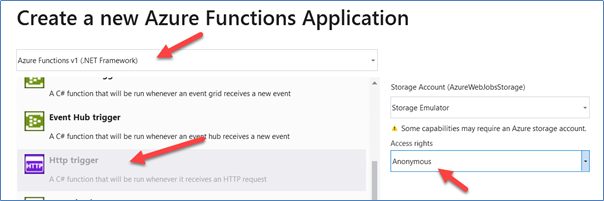
5. Using Visual Studio 2019 (or Visual Studio 2017/2016), create a new solution using the Azure Functions template, then add a Http Trigger function with Anonymous access rights and Azure Functions v1 (.NET Framework) functionality.
6. Add to the solution the NuGet packages AppForSharePointOnlineWebToolkit and Microsoft.Azure.CognitiveServices.Vision.ComputerVision
7. Replace the entire ‘Run’ routine with the following code:
[FunctionName("FunctionOCR")] public static async Task<HttpResponseMessage> Run([HttpTrigger(AuthorizationLevel.Anonymous, "post", Route = null)]HttpRequestMessage req, TraceWriter log) { string validationToken = GetValidationToken(req); if (validationToken != null) { var myResponse = req.CreateResponse(HttpStatusCode.OK); myResponse.Content = new StringContent(validationToken); return myResponse; } var myContent = await req.Content.ReadAsStringAsync(); var allNotifications = JsonConvert.DeserializeObject<ResponseModel<NotificationModel>>(myContent).Value; if (allNotifications.Count > 0) { string siteUrl = ConfigurationManager.AppSettings["whSiteListUrl"]; foreach (var oneNotification in allNotifications) { ClientContext SPClientContext = LoginSharePoint(siteUrl); GetChanges(SPClientContext, oneNotification.Resource, log); } } return new HttpResponseMessage(HttpStatusCode.OK); }
GetValidationToken and LoginSharePoint are standard SharePoint routines that can be found in the GitHub download which I’ve listed at the end of this article.
After the WebHook is registered, each query is processed to extract the contained notficiations. Each notification detects the change in the List using the GetChanges routine. “whitelist URL” variable in the App Settings function, is the Site URL where the List resides (“https://[Domain].sharepoint.com/sites/[SiteName]”)
8. The GetChanges routine receives the SharePoint context and List ID:
 static void GetChanges(ClientContext SPClientContext, string ListId, TraceWriter log)
 {
     Web spWeb = SPClientContext.Web;
     List myList = spWeb.Lists.GetByTitle(ConfigurationManager.AppSettings["whListName"]);
     SPClientContext.Load(myList);
     SPClientContext.ExecuteQuery();

     ChangeQuery myChangeQuery = GetChangeQueryNew(ListId);

     var allChanges = myList.GetChanges(myChangeQuery);
     SPClientContext.Load(allChanges);
     SPClientContext.ExecuteQuery();

     foreach (Change oneChange in allChanges)
     {
         if (oneChange is ChangeItem)
         {
             int myItemId = (oneChange as ChangeItem).ItemId;

             ListItem myItem = myList.GetItemById(myItemId);
             Microsoft.SharePoint.Client.File myFile = myItem.File;
             ClientResult<System.IO.Stream> myFileStream = myFile.OpenBinaryStream();
             SPClientContext.Load(myFile);
             SPClientContext.ExecuteQuery();

             byte[] myFileBytes = ConvertStreamToByteArray(myFileStream);

             TextAnalyzeOCRResult myResult = GetAzureTextAnalyzeOCR(myFileBytes).Result;

             myItem["Language"] = myResult.language;
             string myText = string.Empty;
             for (int oneLine = 0; oneLine < myResult.regions[0].lines.Count(); oneLine++)
             {
                 for (int oneWord = 0; oneWord < myResult.regions[0].lines[oneLine].words.Count(); oneWord++)
                 {
                     myText += myResult.regions[0].lines[oneLine].words[oneWord].text + " ";
                 }
             }
             myItem["OCRText"] = myText;
             myItem.Update();
             SPClientContext.ExecuteQuery();
         }
     }
 }
A change query (variable myChangeQuery), gets the new items added last minute:
  public static ChangeQuery GetChangeQueryNew(string ListId)
 {
     ChangeToken lastChangeToken = new ChangeToken();
     lastChangeToken.StringValue = string.Format("1;3;{0};{1};-1", ListId, DateTime.Now.AddMinutes(-1).ToUniversalTime().Ticks.ToString());
     ChangeToken newChangeToken = new ChangeToken();
     newChangeToken.StringValue = string.Format("1;3;{0};{1};-1", ListId, DateTime.Now.ToUniversalTime().Ticks.ToString());
     ChangeQuery myChangeQuery = new ChangeQuery(false, false);
     myChangeQuery.Item = true;  // Get only Item changes
     myChangeQuery.Add = true;   // Get only the new Items
     myChangeQuery.ChangeTokenStart = lastChangeToken;
     myChangeQuery.ChangeTokenEnd = newChangeToken;

     return myChangeQuery;
 }
After executing the query, each change is examined and an object is obtained with the added image, which is then converted to a bytes-array by means of the ConvertStreamToByteArray routine:
  public static Byte[] ConvertStreamToByteArray(ClientResult<System.IO.Stream> myFileStream)
 {
     Byte[] bytReturn = null;

     using (System.IO.MemoryStream myFileMemoryStream = new System.IO.MemoryStream())
     {
         if (myFileStream != null)
         {
             myFileStream.Value.CopyTo(myFileMemoryStream);
             bytReturn = myFileMemoryStream.ToArray();
         }
     }

     return bytReturn;
 }
In the same routine, GetAzureTextAnalyzeOCR is called to query Azure, using the bytes-array as the input parameter. This routine returns a TextAnalyzeOCRResult object containing the results of the query (see the object classes in the GitHub site with the source code).
Azure returns a result with multiple elements, one for each line of text found. The values are chained through a loop. Finally, the values of language and myText are inserted into SharePoint fields.
9. The routine GetAzureTextAnalyzeOCR receives as input parameters the image bytes-array, and returns an object with the value found by Azure:
  public static async Task<TextAnalyzeOCRResult> GetAzureTextAnalyzeOCR(byte[] myFileBytes)
 {
     TextAnalyzeOCRResult resultReturn = new TextAnalyzeOCRResult();

     HttpClient client = new HttpClient();

     client.DefaultRequestHeaders.Add("Ocp-Apim-Subscription-Key", ConfigurationManager.AppSettings["azVisionApiServiceKey"]);

     string requestParameters = "language=unk&detectOrientation=true";

     string uri = ConfigurationManager.AppSettings["azVisionApiOcrEndpoint"] + "?" + requestParameters;
     string contentString = string.Empty;

     HttpResponseMessage response;

     using (ByteArrayContent content = new ByteArrayContent(myFileBytes))
     {
         content.Headers.ContentType = new MediaTypeHeaderValue("application/octet-stream");

         response = await client.PostAsync(uri, content);

         contentString = await response.Content.ReadAsStringAsync();

         resultReturn = JsonConvert.DeserializeObject<TextAnalyzeOCRResult>(contentString);
         return resultReturn;
     }
 }
Each query uses a REST call to a pre-specified URL from the search service (this is saved in the App Settings value azVisionApiOcrEndpoint as https://westeurope.api.cognitive.microsoft.com/vision/v1.0/ocr.
Here, it uses the parameters in the QueryString and the language (unk, to force a return result), to determine whether it’s necessary to detect the orientation of the image, detectOrientation. In the App Settings, azVisionApiServiceKey is the value of the key I referred to in step 4.
10. Three other auxiliary classes define objects used by the WebHook (can be found in the source code GitHub repository mentioned at the end of this article)
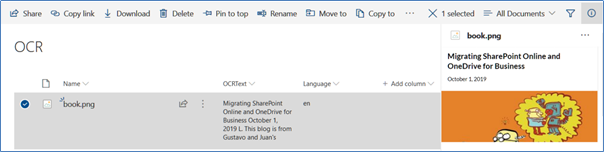
11. Register the WebHook in the SharePoint Library and upload an image that contains text. The WebHook delivers the results found by Azure, and displays the language and text in the image:
Conclusion
The Azure Computer Vision API OCR service allows you to enrich the information that users save to SharePoint by extracting text from images. The OCR service is easy to use from any programming language and produces reliable results quickly and safely. The API uses Artificial Intelligence algorithms that improve with use, so you don’t need to create or train your own algorithms.
Here’s the source code to GitHub which I’ve mentioned throughout this article.


Fix your code blocks please.
Review your own content.
Sorry for the entanglements. I sent your comment to the redaction of the blog. I am only the author; I cannot edit it. I hope it will be speedily corrected. Gustavo
Hi, this is really excellent content. Is this something that can be used from SharePoint on-prem too?