
In this article, we’re going to create an adaptive card to use within Microsoft Teams to give a more professional look and feel to our notifications triggered by Microsoft Flow. Whilst it might look daunting at first when you hear terms like JSON we’ll show you that it’s much simpler than it looks.
What are adaptive cards?
Adaptive cards are a way to show and interact with data in a clear and consistent way. You’ll often see adaptive cards being used by bots and notifications to allow rich display of information in chats and operating system notifications.
You can use them to display rich text with graphics, provide buttons to allow people to interact with the chat or notification, display dynamic information, collect feedback and even use them to create interactive forms. You’ll see a couple of examples of adaptive cards in Microsoft Teams below:
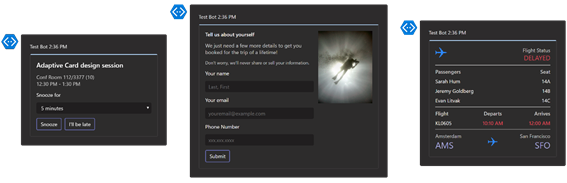
Because they are not limited to Microsoft Teams, the same adaptive card code can be used across a range of different scenarios, including Windows Notifications and Timeline, Cortana, Bot Framework’s web chat and Outlook’s actionable messages.
Adaptive cards are constructed in JSON, which stands for JavaScript Object Notation. This is a lightweight data-interchange format. It is used by adaptive cards to contain the data that defines the adaptive card and its corresponding data in a human-readable format.
Our example scenario
We’re going to use an adaptive card within Microsoft Teams to provide a way for users to see information about a new document that’s been automatically created by Microsoft Flow.
Our adaptive card will show some metadata, like the project and client the document relates to, who requested the document and it will have a button that opens the document in SharePoint Online.
It’s quite a simple scenario, but even a simple adaptive card defined in JSON is fairly complex. Here are the first few lines of an example adaptive card that will do what we want:
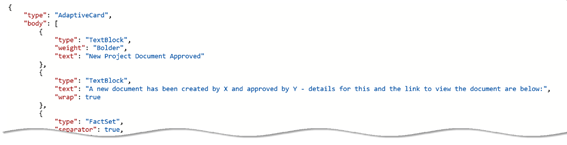
What we’re not going to do in this article is teach you how to master creating adaptive cards in JSON from scratch – because there’s no good reason to do so.
The Adaptive Card Designer
Instead of creating an adaptive card from scratch and spending hours debugging our first Hello World example, we’ll use Microsoft Adaptive Card Designer to create the card. This is an online tool, available at adaptivecards.io that provides a GUI-based form designer to create the look and feel.
The Adaptive Card designer doesn’t integrate directly with Microsoft Teams and doesn’t allow us to save and work on projects – but it does give us the ability to create the JSON data we need. We’ll then take the JSON and use it in Microsoft Flow, adding the dynamic elements there.
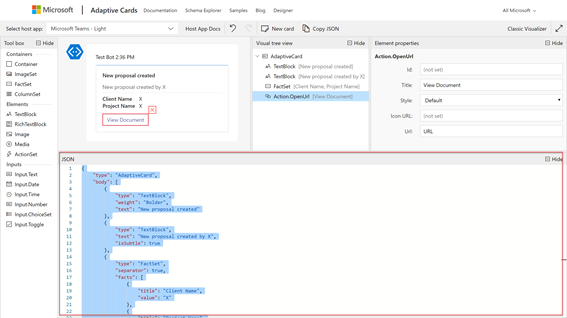
The Adaptive Cards designer user interface is shown below:
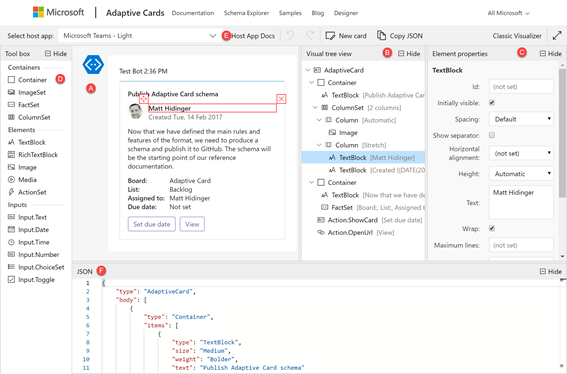
It consists of the following areas:
A) The visual representation of our adaptive card, allowing us to select and re-arrange objects
B) A visual tree view of the adaptive card that corresponds to the actual JSON data
C) Properties for the selected object, allowing us to customise data such as label text
D) Our toolbox, providing a menu of elements we can drag and drop into our adaptive card
E) Finally, the live JSON data for the card that we can copy and paste into Microsoft Flow
Creating our adaptive card
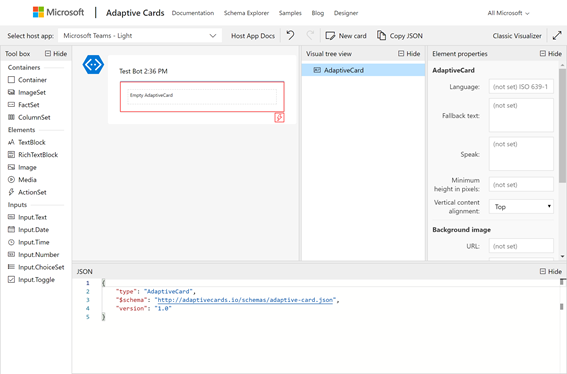
In the UI, we’ll first choose New Card and create a blank adaptive card canvas to use as our base, selecting Microsoft Teams as the Host App:
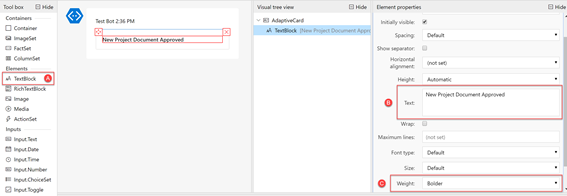
Next, we’ll add our title. Add a new TextBlock from the Tool box (A) by selecting it and dragging it on to the canvas. Then select it and update the Text field (B) and set the Weight (C) to bold:
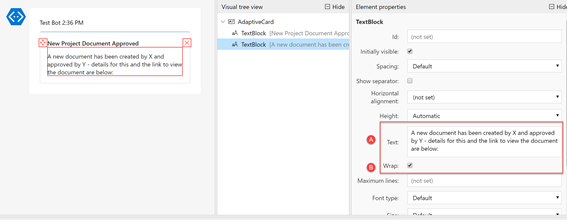
We’ll then add another TextBlock for some free-form descriptive text (A). In this section we’ll plan to add in dynamic text later, so we’ve used placeholders – X and Y – within the text itself.
To ensure that the text flows correctly within the adaptive card, I’ve chosen the Wrap option (B):
We’ll also add a table of text. This will show the Client Name and the Project Name. These will be populated by data Microsoft Flow retrieves from a SharePoint List item later.
To add the table, we’ll add a FactSet from the toolbox (A) and drag it on to the canvas. We’ll then select the element properties and add two facts (B) – the client name and project name; leaving Value 1 and Value 2 as-is for us to replace later on in Microsoft Flow:

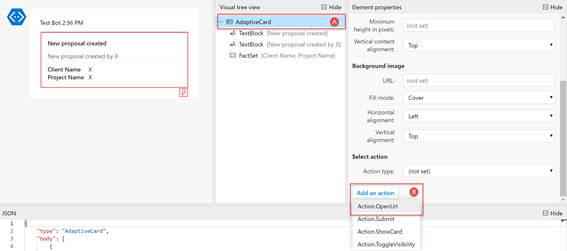
Finally, we need to add a button to the adaptive card that we can use to add a URL that the user can press. To do this, we’ll select the adaptive card canvas (A) and then in the element properties, scroll down and choose Add an action and then select Action.OpenURL (B):
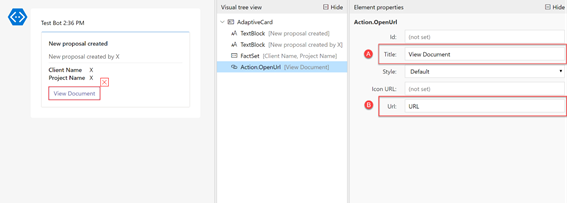
A new Action.OpenURL element is added to our adaptive card. We’ll select this and, in the Title (A), enter the text that the user will see and in the URL field (B) we’ll add placeholder text, like URL:
In just a few steps we’ve created the look and feel for our adaptive card. Now it’s time to bring that into Microsoft Flow.
Using the JSON from the adaptive card designer into Microsoft Flow
The bottom section of the Adaptive Card Designer is a real-time view of the JSON code that we’ll use for the adaptive card. Simply select the JSON code in the pane (CTRL-A) and copy (CTRL-C) the text:
We’ll then switch over to Microsoft Flow and edit the existing Flow we have created to add an action. The action we will add will create an adaptive card.
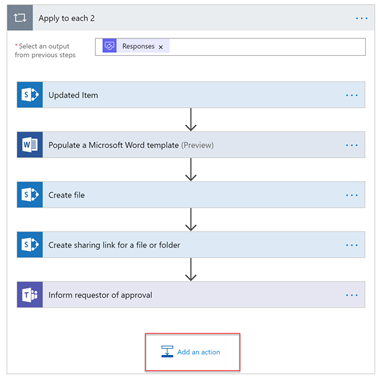
Begin by choosing Add an action in Microsoft Flow:
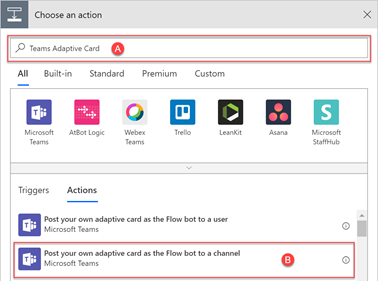
To create an adaptive card, search in the Choose an action screen for Teams Adaptive Card as shown in (A). Then select Post your own adaptive card as the Flow bot to a channel (B):
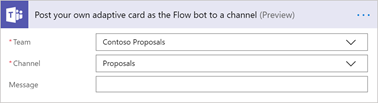
A new action will be added to the flow. In the new action, choose the Team and the Channel that we’ll post the adaptive card into:
We’ll then paste in the JSON code. This is where it gets a little bit more complicated – but don’t worry, this is as tough as it gets.
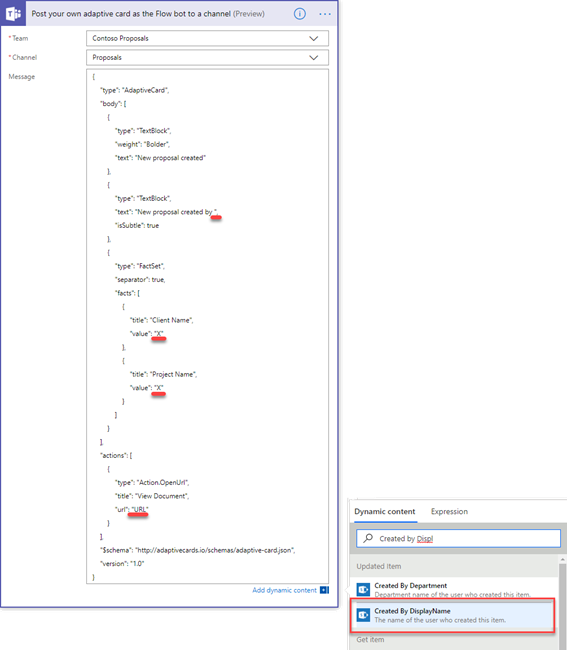
After pasting in the JSON code, examine it for the placeholders added in the designer. You’ll see these have been underlined in red in the example below. For each placeholder, move the cursor to the placeholder text, delete it, then choose Add dynamic context and add the corresponding dynamic text.
In the example below, we’ve looked for New proposal created by X. We’ve then deleted X and with the cursor at that location, used Add dynamic content and searched for Created by displayname from our SharePoint List item:
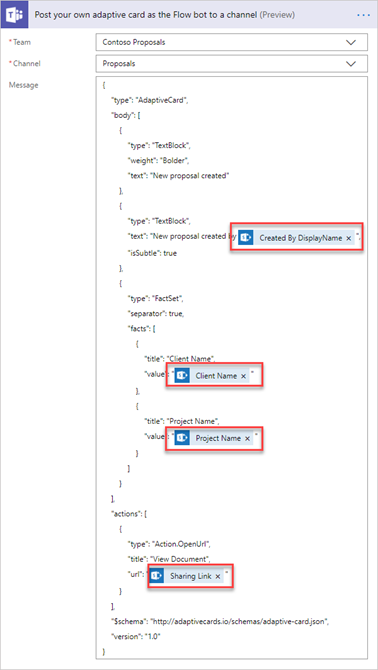
We’ll perform this action for all the placeholder items within the JSON code. You’ll see these highlighted below. Ensure when you do this you do not delete any quotation marks or other code apart from your placeholder text, otherwise, the adaptive card may not work:
Once we are happy with the updates we have made to the JSON data to insert the dynamic content, we’ll save the Flow.
Testing it out
As we have a Flow ready to use, upon saving the Flow we can test it out by performing the normal set of actions that would trigger it.
At the end of the Flow’s run, it should correctly show a new adaptive card, with the corresponding dynamic content:
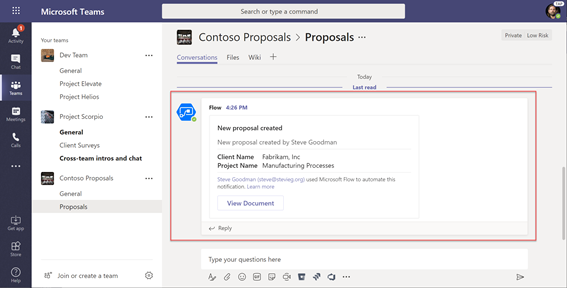
As you can see, our example adaptive card has the look and feel we saw in the designer, along with the dynamic content from the flow.
Summary
Using adaptive cards provides a more professional look and feel to the content you generate using tools like Microsoft Flow. Rather than just post a message to a channel, why not use an adaptive card to format the data in a consistent way. And don’t forget to use the adaptive card designer to easily construct the look and feel without needing to try and debug the underlying JSON data.


Love the clear instructions. However, my users, would like to see the description of the alerts they create on the card. Is there a way to display the text from multi-line text field? My flow posts a message to team channel when a new SharePoint list item is created.
how can i make the field to be mandatory, so that user should not be able to submit if they haven’t felt in those fields.
I made a simple adaptive card that posts to teams. Everything works, but in the card in Teams has a blank line (or two) above the first text block that aren’t there in the Adaptive Cards designer.
Surely, AdaptiveCards are great thing, however, there is a limit to the amount /complexity of message you can post. i.e. up to 28kbs
This professional hacker is absolutely reliable and I strongly recommend him for any type of hack you require. I know this because I have hired him severally for various hacks and he has never disappointed me nor any of my friends who have hired him too, he can help you with any of the following hacks:
-Phone hacks (remotely)
-Credit repair
-Bitcoin recovery (any cryptocurrency)
-Make money from home (USA only)
-Social media hacks
-Website hacks
-Erase criminal records (USA & Canada only)
-Grade change
-funds recovery
Email: onlineghosthacker247@ gmail .com
When I try this I get the following error:
Request to the Bot framework failed with error: ‘{“error”:{“code”:”BotNotInConversationRoster”,”message”:”The bot is not part of the conversation roster.”}}’.
Any ideas on how to resolve?
THANKS
Just what I was looking for! Thanks for the quick step-by-step!
Thank you, Steve! This is exactly what I needed!
This is awesome! I would love to see a JSON example of a list of cards (carousel) – I don’t seem to be able to find an example of JSON which posts a carousel to a Teams channel. Thank you!!
Hi I just want to publish a card in Teams conversation without any interaction with Flow. Is there any way to do it? I just upload the .json file but does not show the card.
thanks!
This is awesome! have you found a way to make it work when you send an email?
Documentation claims that it is possible to add mentions to adaptive cards, so users can be alerted.
I was, however, unable to make mentions owrk with either users (members) or the whole channel. Can you follow-up with @mention examples?
Thanks
Great article! It was straight forward and really helped me see the potential of custom Adaptive Cards in Flow. I’ve attempted to apply this and have found that there doesn’t seem to be any integration back into Microsoft Flow for the submit button. Have you come across how to integrate the Submit action? So far, my Flow immediately proceeds without waiting for a response. I’ve not been able to find any documentation, forums, posts, etc, that explain how (if) to integrate the Submit action so that Flow waits for the response from the adaptive card (the way their out of the box Flow action does).
Have you had any experience/luck in using Flow with the adaptive card in that way?
Hiya,
The integration should be when you set up a Flow for approvals. If you use one of the templates, such as the one for waiting for an approval in Teams for a new List item, you’ll see an example adaptive card added by the template to give you the approve/deny and comment integration in an adaptive card, along with the approval action that can use adaptive cards.
Steve
Ah, ok. So the custom adaptive card does not stand alone if you’re looking for integration or a return of a custom input?