Microsoft’s “broadcast” features have been quietly improving over time, and when compared to the features announced at Ignite 2022 in Microsoft Teams Premium for webinars, still offer the best overall experience.
If you want to reach your audience on third-party platforms, like LinkedIn Live or YouTube, or pre-record events and webinars to edit and publish online later, this is the best option. People presenting get the convenience and consistent experience of Microsoft Teams, and your marketing people can use the platforms they already use for webinars, with additional flexibility and customization.
In this article, we’ll use the NDI-out Teams broadcast feature to allow us to use a normal Microsoft Teams meeting as both the green room and “stage” for a webinar or event, taking the individual presenter video & audio feeds & screen sharing, and then use OBS 28 to provide a professional quality output. NDI is an industry-standard protocol for network video, and OBS is the de-facto standard software for live streaming.
In our first article on Teams broadcast features back in June 2021, we used this feature when it first launched. Additional capabilities arrived in early 2022; then this April Microsoft launched a built-in capability to steam to platforms like YouTube & LinkedIn Live directly from Teams. The NDMP-out feature works but lacks flexibility.
Since then, Microsoft has improved the NDI-out feature. It is now very reliable – and appears to work the first time, every time. Good audio quality comes thanks to the Satin codec in Teams; the NDI-out feature now provides the option for isolated audio tracks attached to each video feed.
Use Cases
We’ll focus on the following use cases, with two different workflows for people to use depending on what they want to do:
1: Live Streaming
We’ll focus on two platforms: LinkedIn Live and YouTube, and in this scenario, the producer will organize a Teams Meeting and invite the presenters, then run OBS as a live streaming control panel, allowing waiting room videos and graphics to be pushed to the live stream.
Use it for:
- Webinar Broadcasts with several remote presenters and a screen share, shown individually or together on the live stream, with company logos and branding.
- Live Event Broadcasts, using a Microsoft Teams Room system in an event space to allow hybrid events with remote presenters to the room, and live-streaming to people outside the business.
2: Recording Video for Post-Production
In the second use case, we’ll use OBS as a method to record a full-fidelity copy of the meeting, so that each video feed and the screen share is captured to a separate output video file. A video editor (often one of your marketing team) will use software such as Adobe Premier Pro or Camtasia to create a professional output once the meeting concludes. Like the first use case, the producer will be responsible for capturing the audio and video.
Use it for:
- Pre-recorded webinars that will be available on-demand
- Interviews, such as podcasts/vodcasts that will be edited together later
Pre-Requisite Setup for IT Admins
Tenant Configuration
You’ll need to perform steps in the Teams Admin Center to enable NDI-out, and you’ll need to set up OBS 28 on the PC, that the producer will use, and show them how to enable NDI Broadcast features.
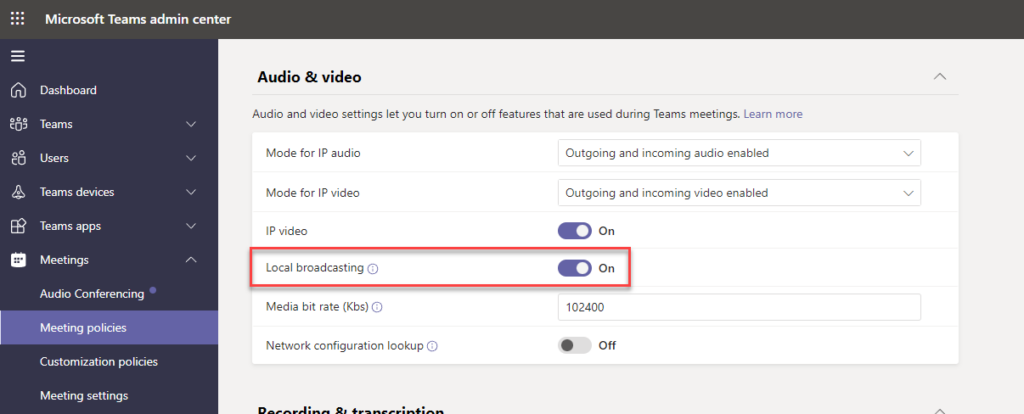
NDI is enabled as part of the Local broadcasting feature in a Teams Meeting Policy. Visit the Teams Admin Center, and within Meeting Policies either use an existing Meeting Policy that is assigned to the Producer user or create a new policy. Under the Audio & video heading, switch Local broadcasting to On (figure 1):
Teams One-Time Configuration
In the Microsoft Teams desktop client on the PC of the user who will be the producer, enable the NDI-out feature and the isolated audio sub-feature in the Teams settings, under App Permissions:
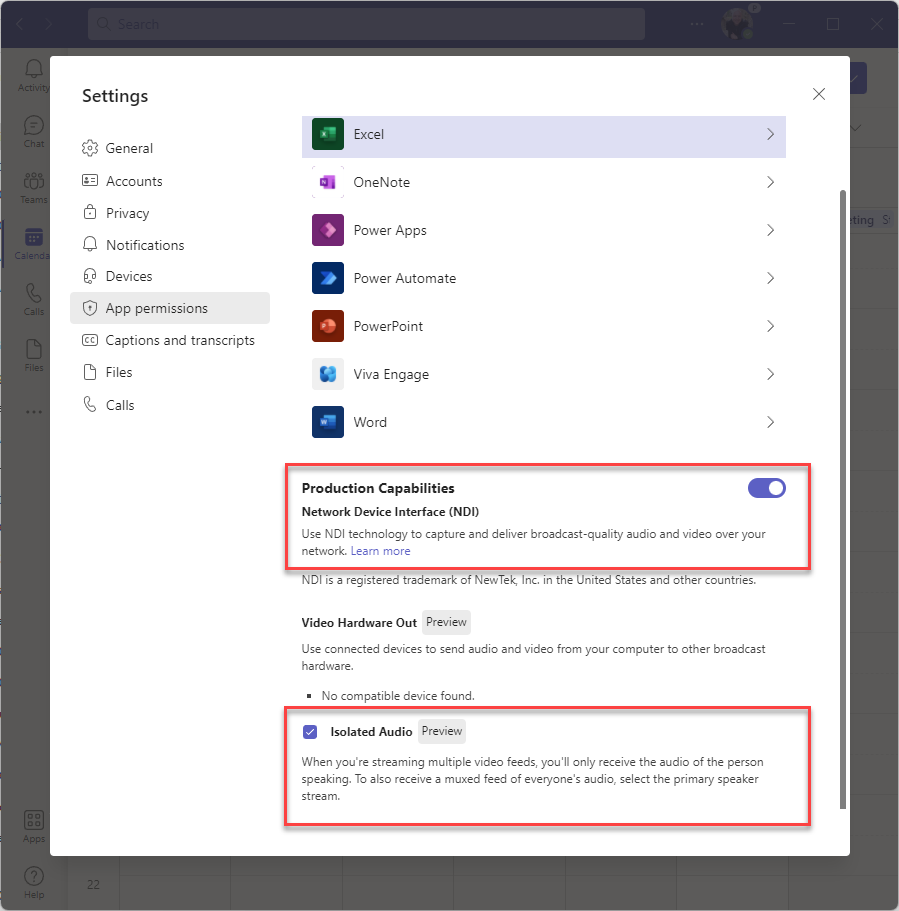
The setting will persist between reboots, but will not follow the user between machines, and will need to be switched on by them if their PC is replaced.
OBS (Open Broadcaster Software) Studio Setup
The setup of OBS v28 is straightforward. OBS can be installed as a full installer, or as a portable version.
The full installer is recommended because it includes a virtual webcam that can be used by the producer to show a live feed of the output back to presenters.
Download OBS v28 from OBSProject.com
To use NDI, you will need to download and install the NDI SDK & Tools first, available from NDI.TV. Then install the OBS 28 compatible NDI plug-in, currently v4.9.2 from this GitHub repo. Extract to the OBS installation folder, into the folder obs-plugins\64bit.
To record individual video files for each presenter, install the Source Record plugin. Version 0.3, available from the OBS website works with OBS 28.
Pre-Configure OBS Settings
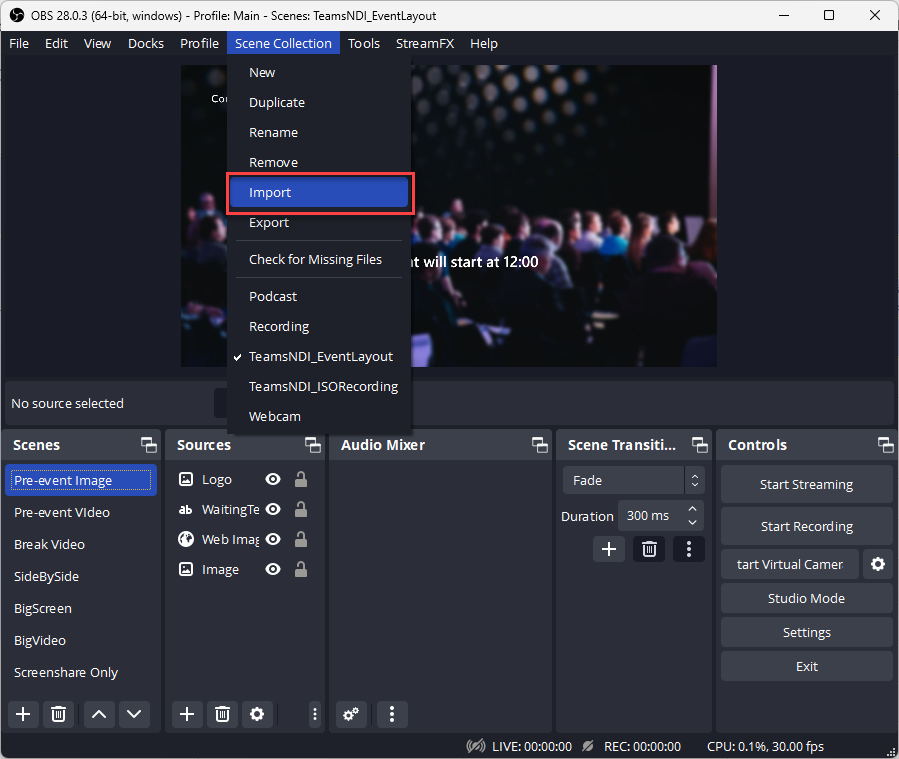
After launching OBS, pre-configuration is helpful before providing the software to the person who’ll act as a producer. You can create and export OBS scene collections so that the layouts available (known as scenes) can be easily selected by the producer and have the correct branding for your business.
You can download starter scene collections that we’ve created, which you can then import into OBS and customize:
Practical 365 Teams NDI Resources on GitHub
After importing the TeamsNDI_EventLayout, replacing the Logo, Background, and Waiting images with your own branding will retain the overall sample layout look and feel. By default, the scene collection links to online images hosted in my GitHub, edited from source royalty-free images from Unsplash.
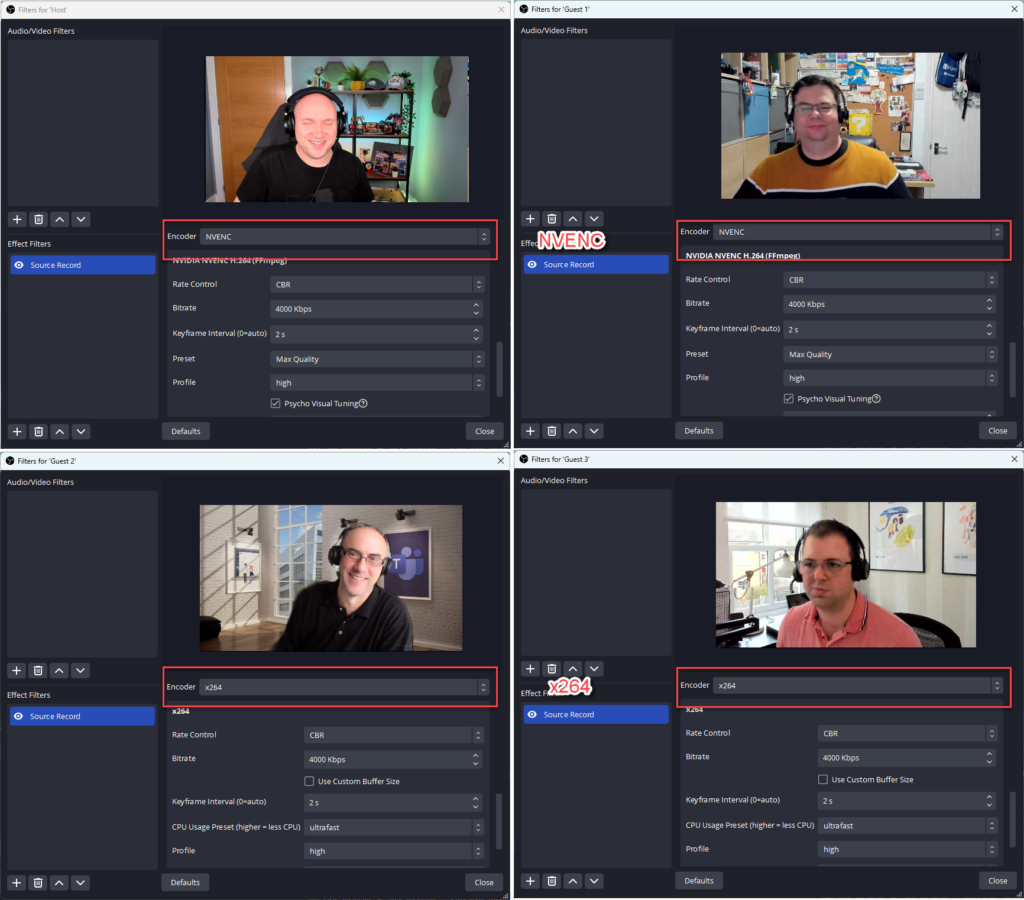
If you plan to use the capability to record individual videos for editing in post-production, then after importing TeamsNDI_ISORecording, you will need to select each source and ensure that you’ve customized the Encoder and set output file locations. For a PC using an Nvidia graphics card, we recommend only using two NVENC encoders and then using software x264 encoders for other people’s video feeds:
Workflow 1: Live Event Streaming
For each event, you’ll need to perform several steps prior to the event. OBS can be pre-connected to your scheduled event.
Event Service Setup
For LinkedIn Live, you can configure a scheduled event on the LinkedIn Live Go Live page. The Stream URL and Stream Key can be copied from the scheduled LinkedIn Live event, and entered in the OBS Settings, within Stream>Service by choosing a Custom service:
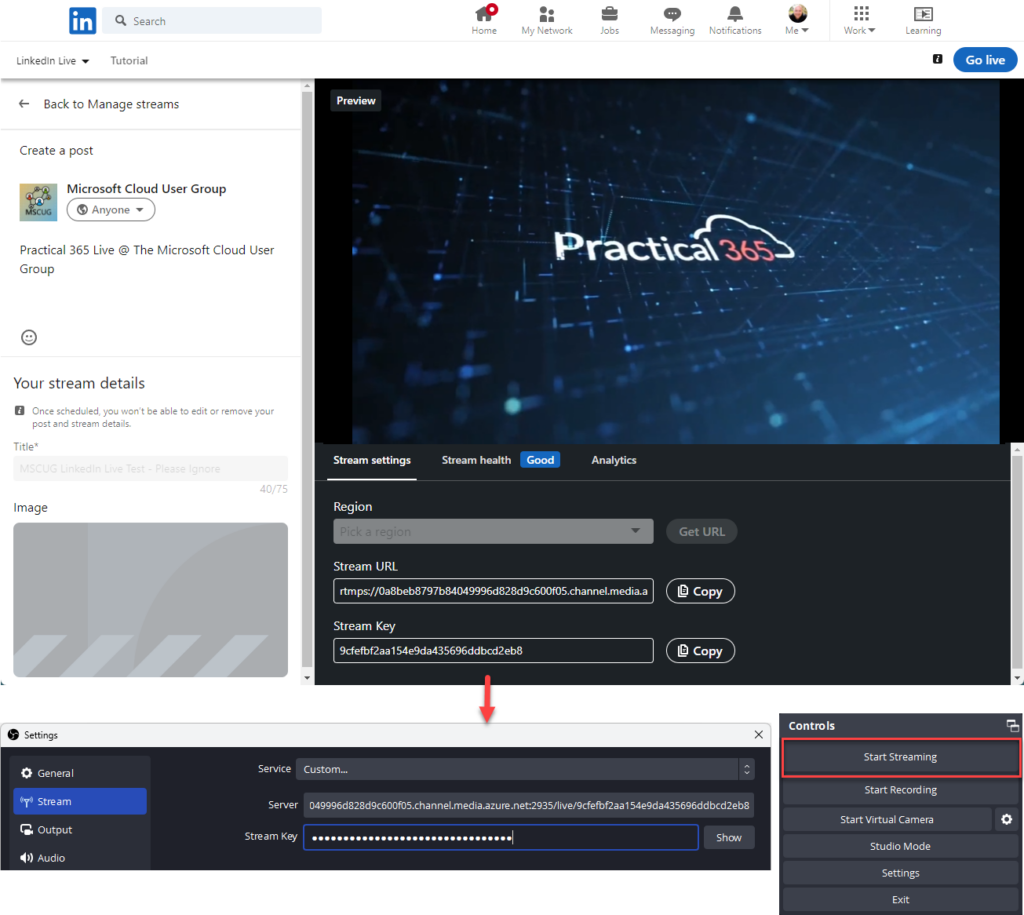
You’ll perform this action on a per-event basis, for each scheduled event.
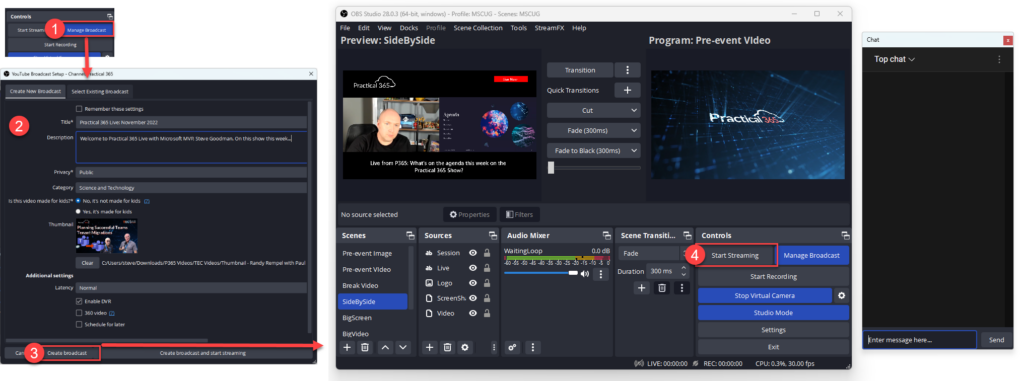
For YouTube, use the one-time connection wizard available in Settings>Stream by choosing YouTube as a source. This will redirect you to sign in on the web. On a per-event basis, you can then select Manage Broadcast in the main OBS window to schedule a new YouTube broadcast, and then begin the event at the time you choose. You’ll also see live chat from YouTube in a pop-out window in the OBS client:
Teams Setup
Schedule a normal Microsoft Teams meeting, without specific webinar options. Optionally, select attendees who will be presenters in advance from the Teams Meeting options.
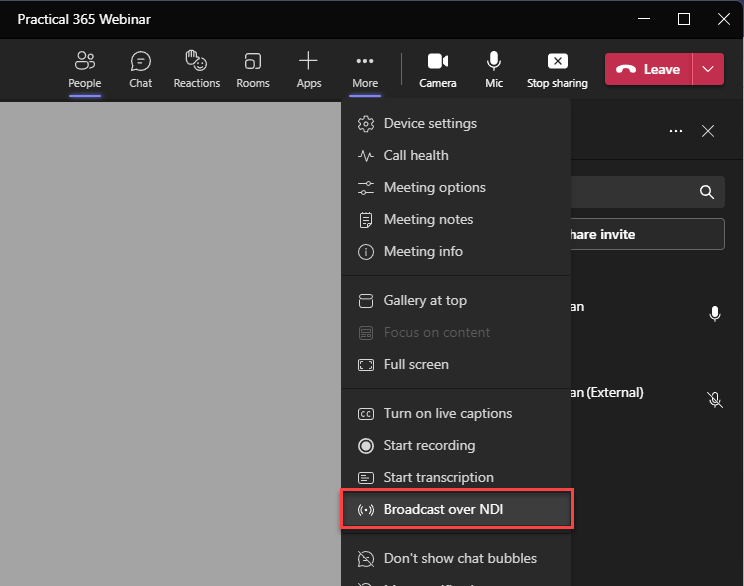
When the meeting that will host the event starts, choose Broadcast over NDI from the More menu. This will allow OBS to receive the feeds from the meeting:
Within OBS you should see the layouts available to use for the broadcast if it is set up using the TeamsNDI_EventLayout we’ve provided. If you are using the same presenters or broadcasting from a Microsoft Teams Room that you regularly use, you shouldn’t need to perform additional steps and should be ready in the “green room” for the event:
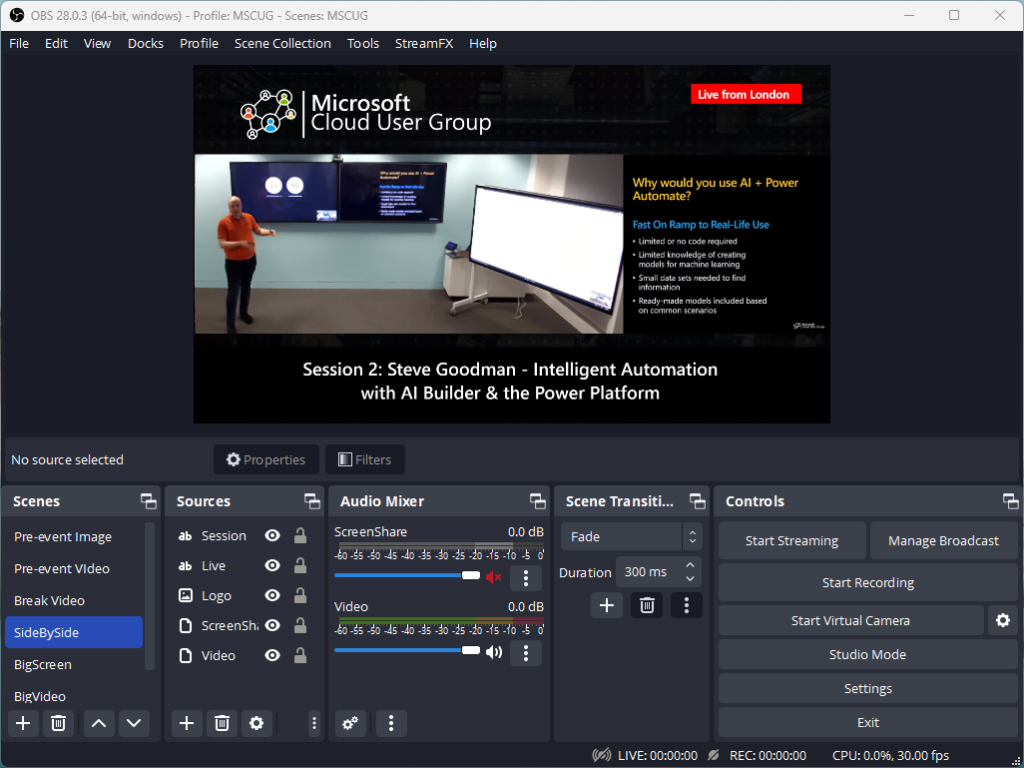
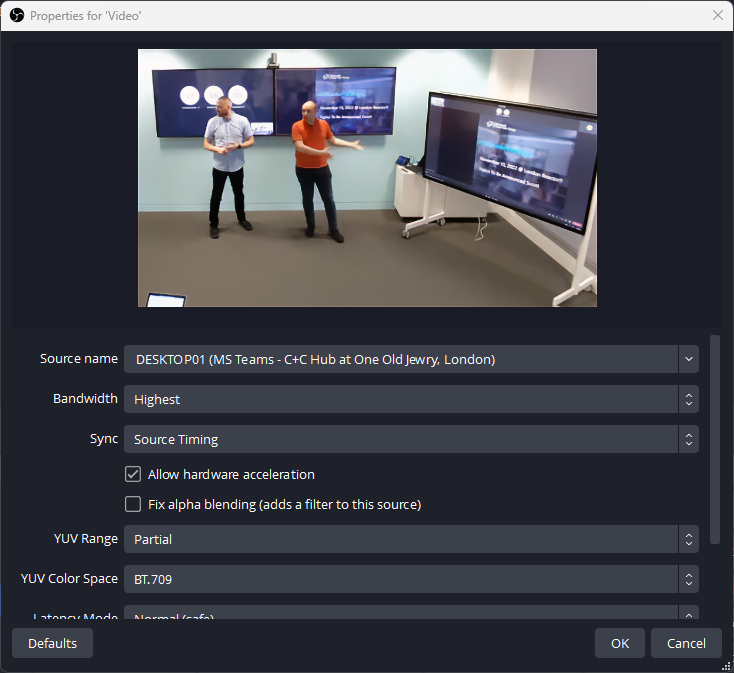
If you don’t see the feeds from presenters, then you’ll need to select them from the NDI source. In the example above, these are the Sources named Video and Screenshare. Double-click each to open the properties, then select the Source Name from the drop-down:
If you want to show the feed of the event back to the presenters, or just show a specific view, then you can use OBS as a webcam source in Microsoft Teams. By default, this will show the same output as broadcast to the audience watching on YouTube or LinkedIn Live. To configure a specific source, select the Settings Cog next to Start Virtual Camera, and then either choose the preferred output view or scene from the list, then choose OBS Virtual Camera as your webcam in Microsoft Teams:

You’ll now be ready to broadcast. If you are using a pre-event waiting image or video, select this in OBS, then choose Start Streaming to begin, and optionally choose Start Recording to also keep a local copy of the webinar or event on disk.
After the event, choose Stop Streaming, and then feel free to end the Microsoft Teams meeting.
Workflow 2: Recording Video for Post-Production
Schedule a normal Microsoft Teams meeting, without specific webinar options.
When the meeting that will host the event starts, choose Broadcast over NDI from the More menu as shown above in figure 7. This will allow OBS to receive the feeds from the meeting.
Assuming you are using the TeamsNDI_ISORecording setup provided above, the source recording options should be pre-set to save video as part of the pre-requisite setup steps, in figure 5 earlier in the guide.
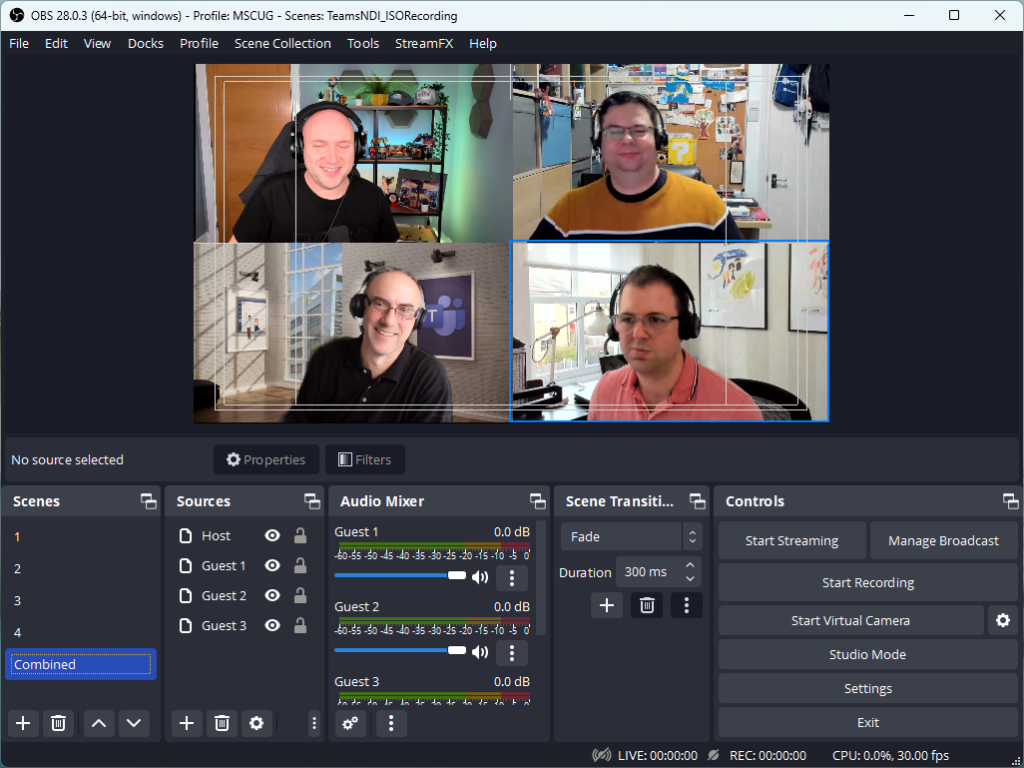
Using the Combined scene will allow you to see all participants in the recording, and to make a combined 2×2 recording alongside the source recordings. If you don’t see all the presenters, then within Sources double-click each source and select the Teams meeting attendee video feed as shown earlier in the guide, in figure 9.
Before you begin the main recording, perform a quick test recording by choosing Start Recording, then stop the recording after approximately 10 seconds, and validate that the output files for each presenter are present and working. In the configuration provided these will be MKV format files, which can be converted to MP4 video file format at a later date in video editing software or using the OBS menu option File>Remux Recordings.
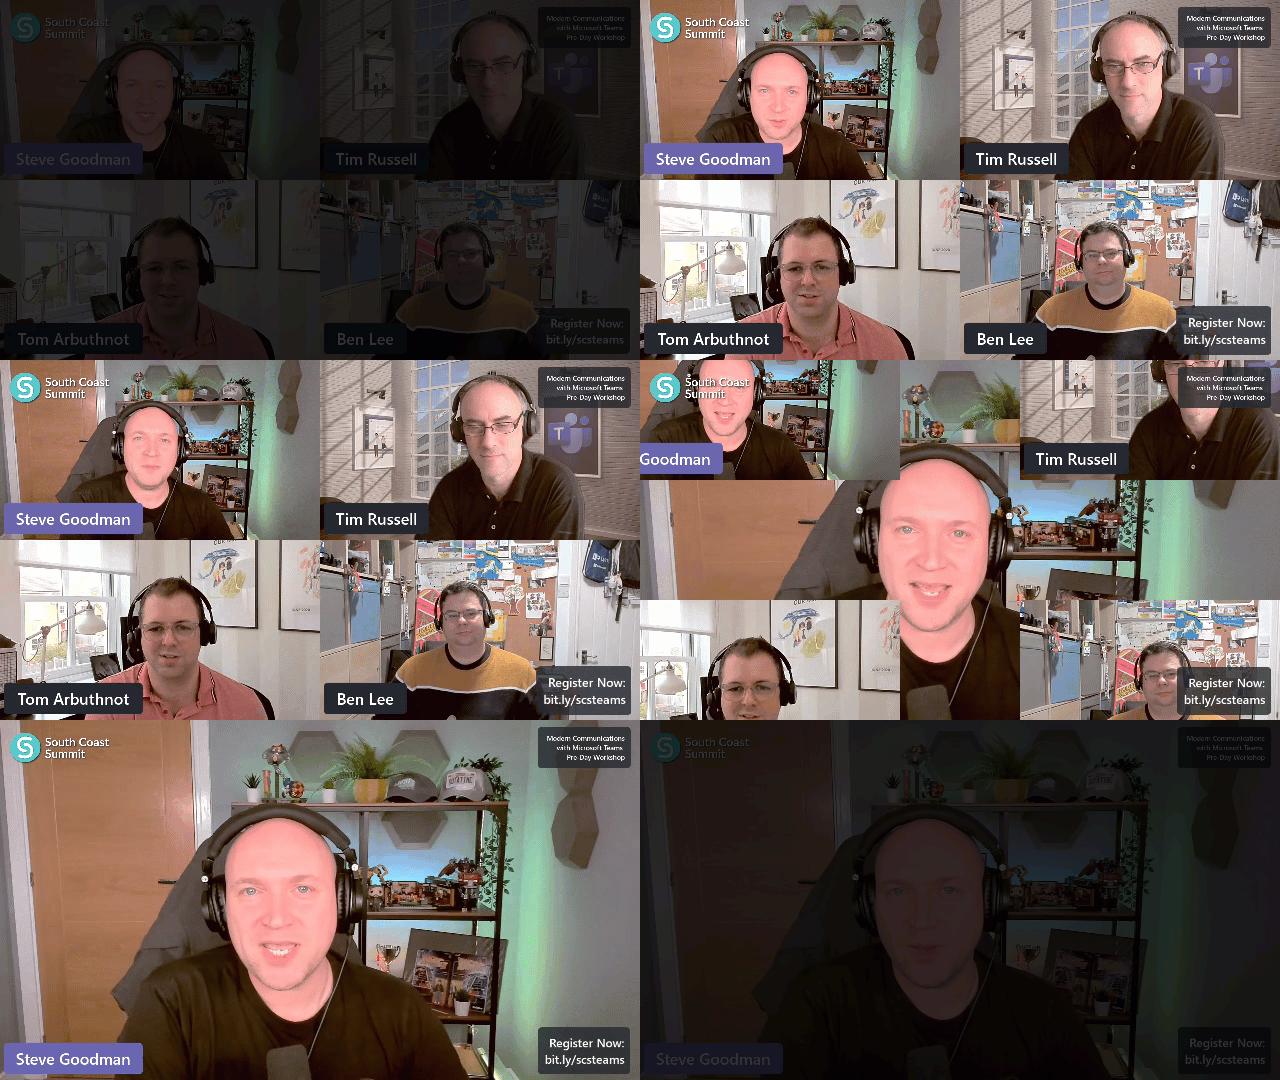
After recording your presenters, you can then perform editing in an app such as Clipchamp, Adobe Premier, or Camtasia. In the example shown below, we used the 5 output files to create a video with bespoke titles, logo, and transitions:
Summary
Microsoft Teams’ broadcast features, thanks to improved audio capabilities and more reliable video over NDI, are one of the best options available for producing live webinars, events, and for recording remote participants for post-production. Combined with the latest version of OBS, which is the de-facto standard app for live streaming, you can easily produce live events.


Hiya, generally if using OBS, anything with Quick Sync Video and capable of running Teams should be sufficient; the OBS component when using QSV for encoding uses very little CPU. I use a desktop PC, but doing a live event this way we found that a 2016 Surface Book was also sufficient using QSV rather than a mobile NVidia chipset
Hello Steve, thank you for sharing these exciting new capabilities!
Do you prefer streaming to external platform with OBS or Teams RTMP feature?
What kind of minimum computer specs do you recommend to use Teams and OBS via NDI on the same computer?
Can teams ingest an RTMP stream from an external encoder?
Thanks again,
Mark