An efficient approval process and data management are essential for businesses to grow and expand. A common challenge experienced by businesses is to have a seamless and effective approval process. No matter how small or big the company is, decisions must undergo a formal review process to maintain accountability, quality, consistency, and audit records.
Utilizing low-code tools like Power Apps and Power Automate can help tackle this problem. Let’s explore a real-world scenario and how to manage an approval process using a Power Apps application and Power Automate flow.
Use Case: A Machinery and Equipment Tracker Approval Process
Take XYZ Construction Company as an example. Before employees can order new machines and equipment or fix old ones, they must go through than approval process. This process involves sending an email to the person responsible for reviewing and approving requests explaining the item’s necessity, cost, and potential benefits to the company. Similarly, when equipment or machines must be repaired, an employee sends an email stating when the equipment stopped functioning and provides any other needed information. Information about requests and approvals is documented in a notebook.
Unfortunately, the company has problems with missing dependencies in the recorded data, which has made it difficult to track their records accurately and resulted in inefficiencies and possible misunderstandings on who requested or approved a repair or new machine order. These gaps in their data have caused delays and interfered with the business’s ability to operate smoothly.
Seeking a Solution
How can the company fix its approval process?
Now that we understand how their current process works and what their problem is, we can move this approval process to Power Platform by using Power Apps to create a user-friendly interface for both the approvers and requesters, automate the approval process, and use a SharePoint list to store the data.
In the solution I created, the components are:
- A Canvas Apps application.
- A Power Automate flow.
- SharePoint list.
- SharePoint Site and SharePoint List.
- The right permissions and licences, to create custom applications in Power Apps and design automated workflows in Power Automate.
The new approval process addresses the problem that the company has. Understanding the end-to-end solution is important if you plan to use or build the process. Let’s go ahead and explain how it works.
The SharePoint List
To track approvals in the company’s previous process, they entered their data into a notebook. To improve this process and make sure the data is saved, updated, and secure, we use a SharePoint list.
By adopting a SharePoint list, the company not only secures its data but also enhances its approval process, making it more efficient and reliable. This transition is a significant step towards a more organized operation.
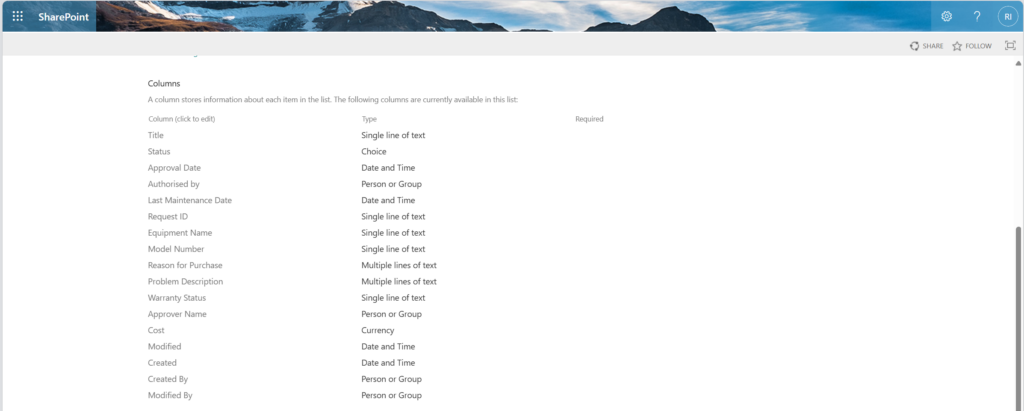
Let’s take a look at the columns and data types for the SharePoint list used to track approvals (Figure 1).

types
To create a SharePoint list, you first need to have a SharePoint site set up. Once you have your SharePoint site, navigate to the site and create a blank list. This will serve as the place for your data. From there, you can start adding columns to your list, each with its data type. For example, the Equipment Name column’s data type is a single line of text, the Cost column’s data type is currency and the Status column’s data type is choice.
You can make the SharePoint list is easier to read by applying custom formatting to your columns. To achieve this, click on the header of the column, choose “Column settings,” and then choose “Format this column.” You can specify custom rules for the column’s data display using JSON, such as applying colors to various statuses or highlighting specific values. This setup ensures that your data is well-organized, easily accessible, and that your approval processes are streamlined and efficient.
The Canvas Power Apps Application
The Canvas Apps application provides both approvers and requesters with an interface to submit and review records, whether it’s for new equipment and machine orders or repairs of existing machinery, all within the app. Requesters input their data directly into the app, while authorized approvers can approve or reject these requests inside the application.
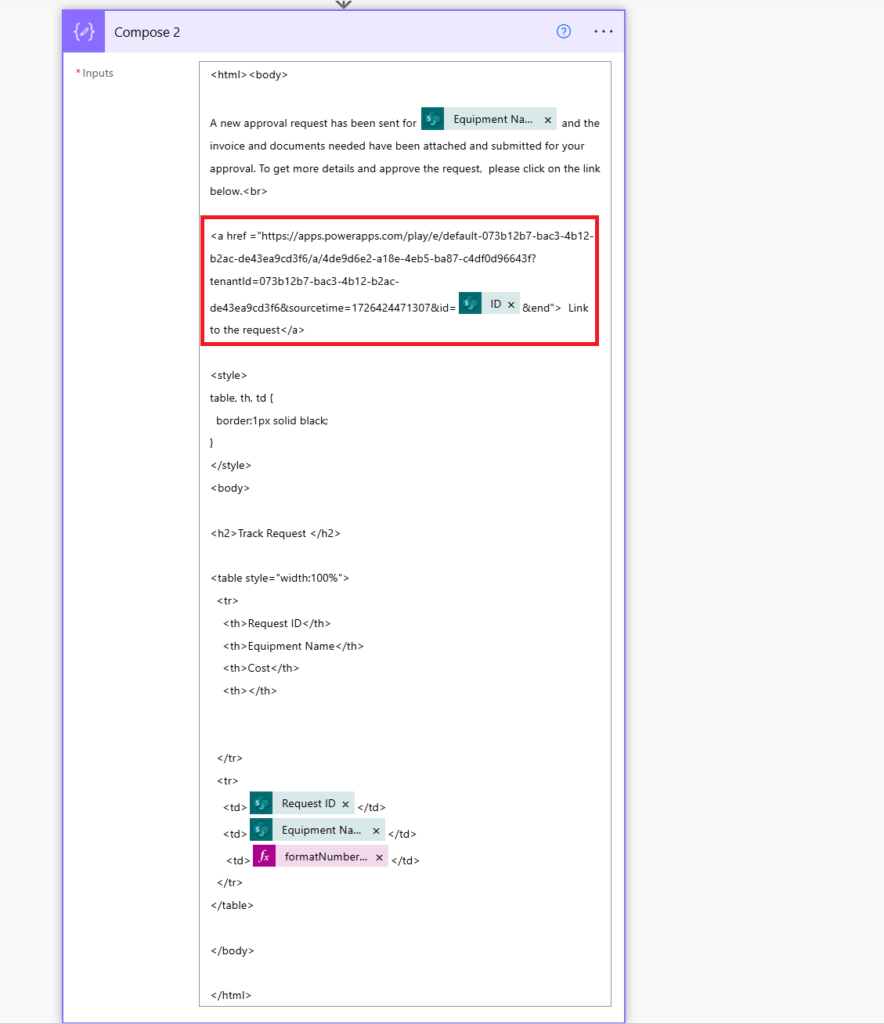
Deep Linking in Canvas Apps allows users to navigate directly to a specific screen or record through the URL of the Canvas Power Apps application. To obtain the URL, go to the Canvas application, click on the three dots next to the App, Details, and then copy the Web link. Figure 2 will guide you on how to place the link in the Compose action.
This increases productivity and saves time. For example, when an approver receives an email concerning the approval request for the repair of a machine or new order with a link to the request, they can click on the link and be taken to the request record in the application (Figure 3).


Power Automate Flow
The SharePoint list “Track Request” is used as a data source in the Power Apps application. Each time a new record is added or updated in the Canvas apps application, the Power Automate flow starts running in the background. We accomplish this in the Power Automate flow by creating an automated cloud flow. An automated cloud flow is when an activity must happen for the flow to be triggered; as shown in Figure 4, an item must be added to the Application or saved in the SharePoint list for the flow to start running.

Now, let’s understand the actions performed by the Power Automate flow:
1. Pick the Attachment submitted in the Application as an Email Attachment for the Approver’s Email.
Actions exist in the Power Automate flow to retrieve the invoice and document attachment saved in the application and SharePoint list. When a request for a new order or repair is made with the document and invoice, the Power Automate flow retrieves the invoice attachment and includes it in the email forwarded to the authorized approver. The actions below can be used to do this: Initialize variable, get attachments, get attachment content, compose, and append to array variable action as shown below (Figure 5).

2. Send an email to the Approver.
The final step of the Power Automate flow uses the Compose Condition and send an email v2 action. The compose action has the body of the email and also the link to the app, and the send an email V2 action defines who the email is being sent to, the output of the compose action, and also the output from the actions used to get the file content in the approval request.

Managing the Approval Limits and Escalation
Effectively managing the approval limits and escalation is very important for maintaining an efficient and secure approval process. This can be done by sending out reminders when an approval request is not responded to within a specific timeframe, defining thresholds by creating condition-based actions, and triggering notifications for higher authorities when needed. For instance, where an approval request exceeds a specified threshold or amount as seen in Figure 3 where we had a $900,000 request, Power Automate flow can easily notify the necessary approvers. This approach ensures that significant financial decisions undergo thorough review, and risk is minimized.
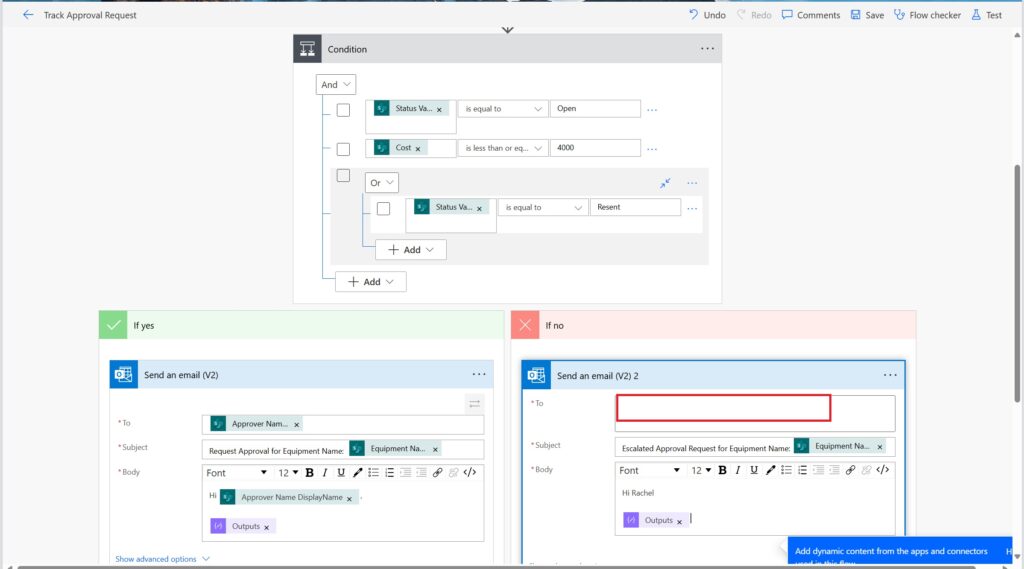
When setting an escalation limit for cost exceeding $3000, follow these steps in Power Automate: click on the + Add button in the Condition, add a row, and set the value of the Cost to less than or equal to $3000 and then add a send an email V2 action in the If No of the condition as shown in Figure 7. This way, the flow will automatically escalate requests that surpass this amount using the If No branch of the condition, ensuring proper oversight and sending an email to the appropriate approver.

Conclusion
Businesses can streamline approval processes using SharePoint, Power Apps application, and Power Automate actions. The data entry, approval email creation, and invoice attachment retrieval from the SharePoint list helped increase productivity and efficiency, help keep track of all the approval activities, and reduce errors and losses for all parties involved.
The Company’s new approval process has increased productivity by improving the timeframe, enabling better analysis of approval trends, cost monitoring, and reducing data loss. The digital system ensures accurate data, accessibility, and enhanced security. Additionally, the system allows for the generation of reports using PowerShell, providing actionable insights and better decision-making.


