Microsoft Teams Phone System offers a range of features and add-ons, making it a viable alternative to traditional PBX systems. Two of these features are the Auto Attendant and the Call Queue feature. Both features belong to a feature-rich and strong call flow engine. Auto Attendant and Call Queue are coming with the first Teams Phone add-on license and don’t require any additional payable licenses. Both features enable a customer to accept an inbound (PSTN) Teams Call and route it based on a rule set and conditions. This article focuses on a special feature of the Teams Call Queue that enables a caller to request a callback after a specified wait time in a Call Queue.
This article provides an overview of the general feature, explains how to enable it in the Teams Admin Center, and outlines what is crucial for a Teams Administrator to ensure the feature works as expected.
Understand the Call Back feature
The Call Back feature has been available since the end of 2024. The Teams Administrator can enable this feature in a Teams Call Queue using either the Teams Admin Center or PowerShell. The administrator can define three different parameters as thresholds in a Call Queue: wait time in the Call Queue, number of waiting calls in the Call Queue, or number of available agents in the Call Queue. If one threshold hits, the caller is eligible for a callback. In this case, the Call Queue plays an announcement when the Music on hold ends, and informs the caller about the callback option. The caller needs to press a button to enable the callback. Microsoft Teams plays a predefined system announcement to the caller, asking them to record their name. It also informs the caller that the next available agent will call back and that the callback may take up to X minutes. Additionally, the announcement informs the caller that if the callback is missed, they should call the hotline again at a later time.
As soon as a Teams agent of the Call Queue ends an ongoing call and becomes available in Teams, the Teams platform calls the available agent, starts a conference when the agent picks up the call, informs the agent about the callback wish by the caller, and Microsoft Teams starts to call back the caller.
For more details, refer to the official Microsoft Learn article on Call Queues.

Requirements for the Call Back feature
There are some requirements to get this feature to work. The first thing to note is the caller ID. The Call Back feature requires that the inbound phone number, used by the caller, is a publicly dialable, non-premium phone number. Also, the phone number must be in E.164 format. Please note that there are some special exclusions regarding the inbound phone number for North America. These limitations are outlined in the aforementioned Microsoft Learn article.
Another requirement is the wait time of a caller in the Call Queue. A caller becomes eligible for a callback after a 60-second wait time. This is the minimum time a caller must wait in the Call Queue. Also, the wait time depends on the Call Queue time-out value. The Call Queue time-out value must be higher than the wait time of the Call Back configuration.
Microsoft Teams uses the resource account of the Auto Attendant or Call Queue for the callback.
Enabling Call Back
The Teams Administrator can use the Teams Admin Center or PowerShell to enable the Call Back feature of a Call Queue.
When using the Teams Admin Center, the Teams Administrator opens the Call Queue overview in the Voice section, selects a Call Queue to configure the Call Back feature, and then jumps to the Call Back configuration.
As previously mentioned, the Teams Administrator can configure three different types of conditions to make the caller eligible for a callback. The first condition is the wait time in a Call Queue. If the caller waits at least 1 minute in a call queue, they become eligible for a callback.
The second condition is the number of callers waiting in the Call Queue. The Teams Administrator can configure a threshold and maximum value for the number of waiting callers in the Call Queue. If this number is reached, a new caller gets offered the Call Back feature.
The third option is the ratio between callers waiting in the Call Queue and agents signed up or opted in to a Call Queue. For example, suppose three agents are signed in to a Call Queue and the Teams Administrator has configured one as a ratio value. In that case, the fourth caller entering the Call Queue is eligible for a callback.

Additionally, the Teams Administrator needs to configure a greeting message. Teams plays this message when a caller is eligible for a callback. The message should include information about the button that the caller needs to press to enable the callback. The button can be any character available on a classic dial pad: 0 to 9, #, or *.
To complete the configuration, the Teams Administrator needs to enter an M365 group. This group will receive a mail notification if the requested callback fails.
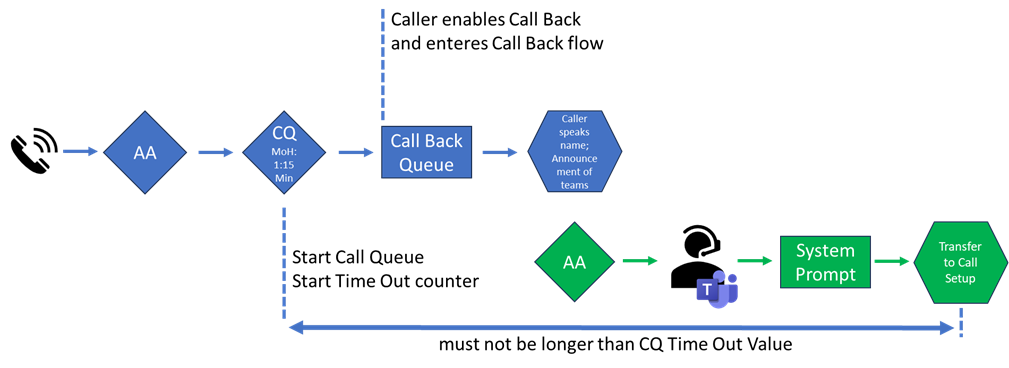
It’s all about Timing
As mentioned above, the Call Back feature depends on the Call Queue time-out value and the Music on Hold. The option to enable the Call Back feature is offered to the caller each time the Music on Hold ends and restarts. The default Music On Hold has a length of 2 minutes. So, even though a caller may be eligible for a callback after 1 minute, they will have the option to enable it after 2 minutes when using the default Music On Hold by Microsoft.
However, what is more crucial is that the Call Back feature relies entirely on the Call Queue time-out value. Microsoft failed to implement a dedicated timer for the Call Back feature.
What does it mean? Assume that the Teams Administrator configured 10 minutes as the time-out value in the Call Queue. Also, the administrator enabled the Call Back feature and set the wait time to 2 minutes.
The entire process of wait time in the Call Queue, enabling the caller to initiate a callback, finding an available agent, and initiating the Callback by the Teams platform, cannot exceed the Call Queue timeout value itself, which is 10 minutes.
When I first used the feature, I configured a wait time of 1 minute and a call queue timeout of 2 minutes. During the tests, the caller enabled the callback, and my test agent received the “callback” call. However, when the agent picked up the call, they heard only the callback message (sometimes the full message, sometimes just a few words), and then the call was ended by the system. And I didn’t understand why. I couldn’t find any error message or indication of why the call abruptly ended. And because Teams was able to connect to an agent and start playing the callback message, the callback was successful, and no one was informed about a failed callback.
After extensive testing and re-reading the Microsoft Learn article, I discovered the above-described dependency and set the timeout to 5 minutes. From then on, the callback worked as expected. Because there was enough time for the platform to play the callback message to an agent, start to call back to the caller, and transfer the call to the agent.

Conclusion
The Call Back feature is a great extension for Microsoft Teams Call Queues, and there are several good scenarios for utilizing this feature. But as often at Microsoft, the solution is good but has some room for improvement.
A customer who would like to use this feature must consider different scenarios and plan the configuration very carefully. The dependency between the Call Queue Time Out value and the time frame for a callback is critical and not really plannable. Why, for example, doesn’t Microsoft stop the Call Queue Time Out ticking when the caller enables call back and starts a new dedicated timer? Of course, a timer for a callback is required. Some further minor issues could be improved.
However, as mentioned earlier, it’s better to have this feature built in than not to have it and implement a third-party solution.


Thanks for this explanation, there is a lot here that MS fail to mention! One question; after the callback has been requested, it plays a message that they will get a call back in one minute and to call back if they don’t. This seems a bit presumptuous! Can this message be changed? We don’t want to commit to getting back to them in one minute.
Hi MattY, and thank you for your feedback. Based on my recent testing, the system prompt always uses the Call Queue Timeout value defined in the queue configuration. For example, if the Call Queue Timeout is set to 5 minutes, the system prompt will announce a callback within 5 minutes — regardless of how long the caller has already waited before choosing the callback option. A custom message option is not available today.
Thank you. I will have a play around with the settings and test the experience. We are an MSP with a small team so we can guarantee when an agent will be free as they could be on the phone for 30 minutes or more. I had high hopes for this feature, but but it appears to be a bit lacking. Thanks again for your article and help.