Users rely on SharePoint search to quickly find the right document, record, or page. In reality, information is often scattered across multiple platforms like CRM solutions, file shares, or cloud services outside Microsoft 365. When information is fragmented, search becomes frustrating, productivity slows, and efficiency breaks down. Microsoft 365 Copilot connectors address the problem by extending the Microsoft Search and Copilot index to include external content sources. By crawling and indexing data from third-party systems, connectors allow Microsoft 365 search to surface external content alongside native Microsoft 365 items. The result is reduced time wasted hunting for information.
To include external data in search, organizations must configure connectors. At a high level, this involves defining a schema with a unique ID, core properties (like title), a content field for full-text indexing, and an access control list (ACL) to enforce permissions. Once Microsoft 365 search crawls and indexes content made available through the connector, external information can appear in the All search vertical or in a dedicated tab.
This article describes the steps to configure Microsoft 365 Copilot connectors. It also covers checks to make sure that connectors remain operational.
Implement it, Wire it in, Automate it
Configure the Connection and Schema
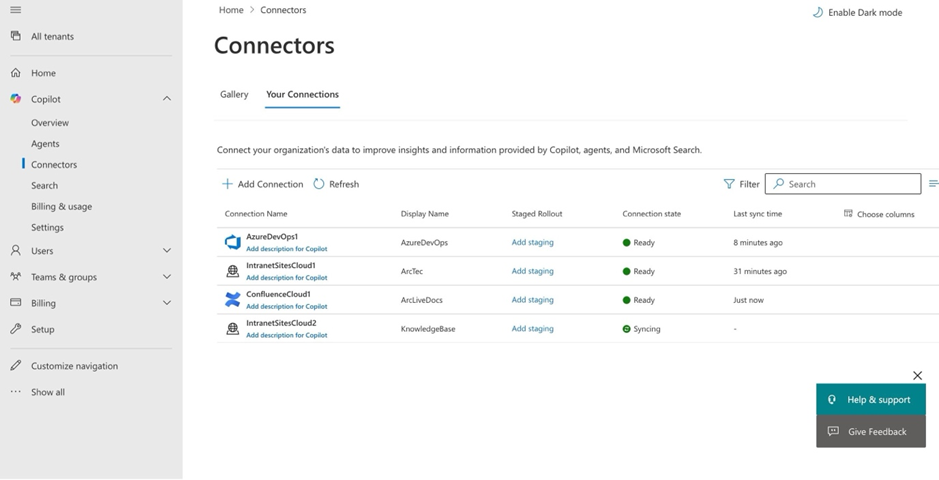
In the Copilot section of the Microsoft 365 admin centre, open Connectors and then go to the Your Connections tab, choose the source from the gallery, then create the connection. In the Copilot Connectors, the Gallery is simply the catalog of prebuilt Microsoft and partner connectors you can light up with a few clicks, think Confluence, Jira, Azure DevOps, ServiceNow, Salesforce, common web sources, and more, so their content is indexed into Microsoft Graph and shows up in SharePoint Enterprise Search and Copilot results. Saving a connector configuration starts indexing; Use Custom setup to adjust who can see items, how they’re indexed, and how often they sync across the Users, Content, and Sync tabs. Figure 1 shows how multiple connectors (like Azure DevOps and Confluence) appear once configured in the Microsoft 365 admin center, with their connection state and sync status displayed.
Next, ensure that the connector’s identity and permissions are properly registered in Microsoft Entra ID (via App registrations). Custom connectors authenticate using the registered app to call Microsoft Graph APIs and read external content. In API permissions, configure these required permissions:
- ExternalConnection.ReadWrite.OwnedBy: Create and manage external connections
- ExternalItem.ReadWrite.OwnedBy: Create and push items into the connection
- External data source permissions: Read content from the source system (e.g., Azure DevOps API)
Microsoft’s official documentation specifies these permissions; they’re not trial-and-error. Figure 2 shows an example with Microsoft Graph and Azure DevOps permissions, the first two for indexing into Search, the third for reading from Azure DevOps. After configuring, request admin consent to authorize the app.

Next, we shape the information for Search to retrieve through the connector. In Content, pick a clear title and assign semantic labels (especially title and URL). Without these labels, items may not surface or may render poorly, as Copilot and Search rely on the title for display and URL for opening the source item, and Copilot requires iconUrl, title, and URL to be set to participate fully. Ensure a main content body is present. The main content body is the substantive text placed in the externalItem.content property of your connector item. It is critical because Copilot and Microsoft Search rely on title plus content for semantic and full‑text matching, so items without a meaningful content body won’t rank or summarize well. The platform uses the main content body for full-text indexing, snippets, ranking, and it’s what powers the relevance of your search results. Mark properties with the right search attributes following Microsoft’s search schema rules (Search/Query/Retrieve/Refine) so they behave correctly in results.
After configuring the connector, define who can access each indexed item through access control lists (ACLs). In the admin center, choose whether items are visible to Everyone or only people with access to this data source. When you select scoped access, the connector must include an ACL with each item it indexes, specifying which users or groups can view it.
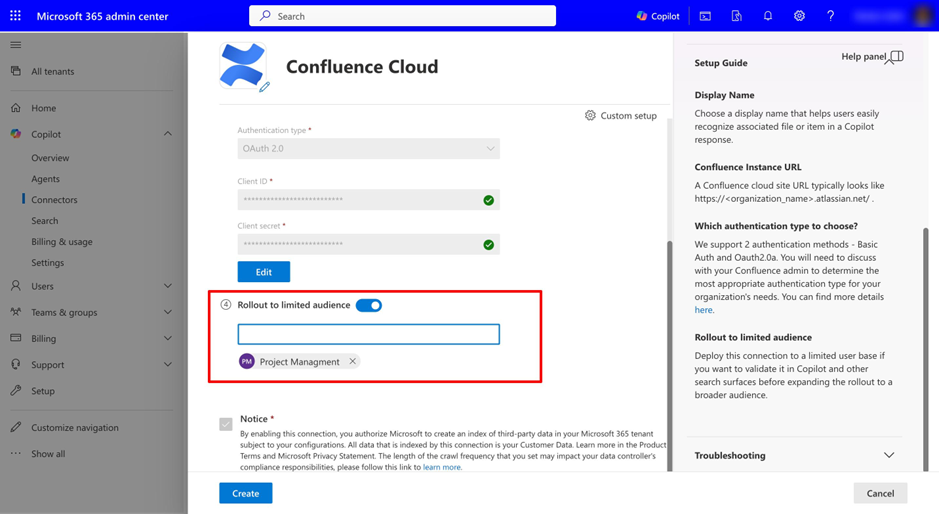
When setting up the Confluence Cloud connector, you can optionally enable a staged rollout before deploying it across the entire tenant. This allows administrators to validate the integration with a smaller group of users, ensuring that permissions and synchronization behave as expected before full-scale deployment. For instance, as shown in Figure 3, the Rollout to limited audience option is enabled, and a specific group, Project Management, has been selected to test the connection.
Finally, we set Sync. Schedule full and incremental crawls, and remember that permission or ACL changes are processed only during a full crawl; incremental crawls do not update permissions. If source permissions change, trigger a full re-index that will re-ingest the entire data source, refresh all items’ content, delete items removed at the source, and reapply security so Microsoft experiences enforce the latest permissions; depending on volume, updates can take up to a day to appear. To initiate this process, open the Microsoft 365 admin center, go to Copilot, then Connectors, and finally Your connections. Select the connection and choose Start full crawl. Use this option after making any permission changes to ensure the index is updated to reflect the new access control lists (ACLs). Keep an eye on connection state, crawl health, and failures in the Search & intelligence dashboards.
A healthy connector means that every indexed item carries a clearly labelled title and URL plus a populated content body so Microsoft Search can rank and display it correctly; access is enforced with an item-level ACL that resolves to the right identities (user/group or, when intended, everyone in the tenant); and the connector runs on a steady crawl plan, routine incremental for content changes and periodic full crawls for permission updates, monitored in the admin dashboards for item counts, failures, and state.

Integrate Results into SharePoint Search
Once your connector is configured and indexing content, the next step is to decide how those results appear in SharePoint search. By default, they won’t show up until you explicitly integrate them into the search experience. You have two main choices:
Inline in the “All” Vertical
With this approach, users see external content side by side with native Microsoft 365 results. Depending on the configuration, they may appear inline with other items or grouped together in a result cluster that links back to the connection. This option works best when connector content is relevant across many scenarios and should feel like part of the main enterprise index. For example, if a connector indexes customer support tickets, product documentation, and policy guidelines, employees across sales, support, and operations may need quick access to this information. Displaying external data inline with SharePoint search results ensures all employees can find critical information in one unified search experience, rather than switching between systems.
Dedicated Vertical (Custom Tab)
For scenarios where connector content deserves its own space, you can create a custom search vertical. A custom search vertical is a dedicated tab on the search results page that filters results to a specific content source or type. For example, you might create a “Knowledge Base” tab to show only external knowledge articles, or an “HR Policies” tab to display HR-related documents from your connector. When users click these tabs, they see results filtered to that vertical only, making it easier to find the right information without sifting through unrelated content.
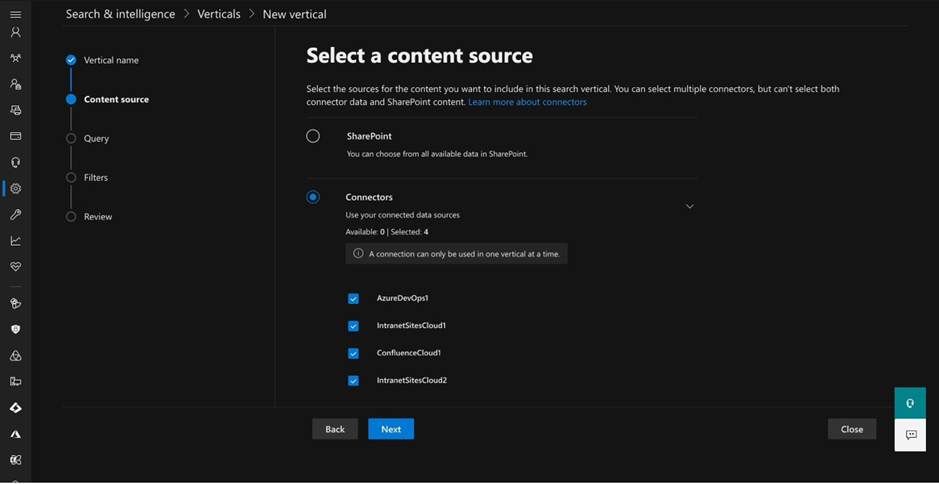
When you create a new vertical in the Microsoft 365 Admin Center under Search and Intelligence in the Verticals section, you are prompted to select the content source. The admin can choose either SharePoint or any of the configured Copilot connectors. Figure 3 shows the Content source step of this wizard, where multiple connectors like AzureDevOps1, IntranetSitesCloud1, and ConfluenceCloud1 are selected to feed results into the new vertical.
Result types: Defining how Results are Displayed
Even after the connector content is surfaced, the way results appear matters. This is controlled by result types, which define the layout of the search card, which is a visual container that displays a single search result. It includes information like a title, description, thumbnail image, and links, all formatted for easy reading. Result types map your connector’s schema fields (such as title, description, or owner) to the elements that users see. For instance:
- HR connector example: display Employee Name (title), Job Title, and Review Notes (description), with a link to the HR record (URL).
- Knowledgebase connector example: display Article Title (title), Summary (description), with a direct link to the article (URL).
Well-designed result types make connector results immediately recognizable and scannable, ensuring users can quickly decide which item is relevant. Without them, results may appear as generic links that offer little context. While result types improve how connector items appear, it’s equally important to ensure that only the right users can see the right content. The next section covers enforcing security trimming to respect source-system permissions.
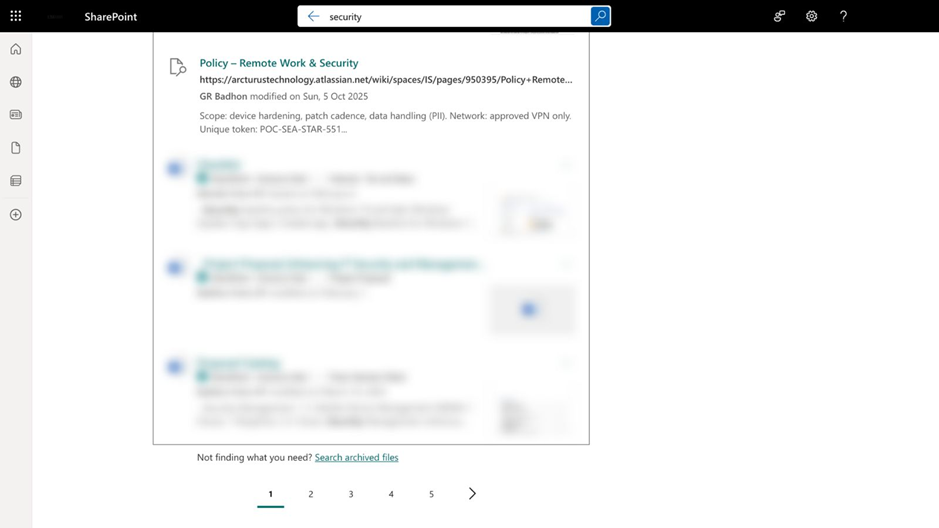
Once result types are properly configured and security trimming is in place, users immediately benefit from a unified search experience. Connector content, such as HR policies or knowledge articles, appears directly in SharePoint search alongside native Microsoft 365 items, as shown in Figure 4.
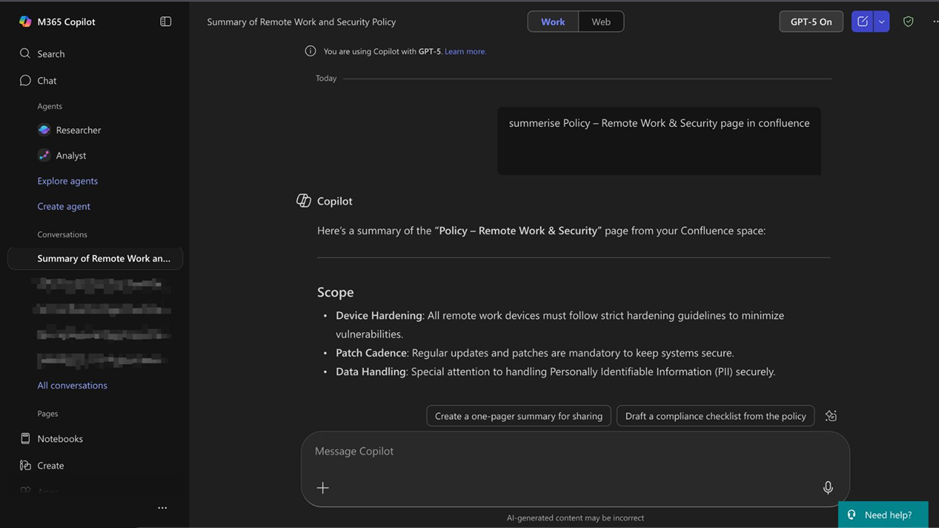
In addition, Microsoft 365 Copilot can leverage the same indexed external content to provide AI-powered insights, such as summarizing a Confluence policy page directly in context, as illustrated in Figure 5.
Enforce Security Trimming
We don’t ship a connector without security trimming. Security trimming in Microsoft 365 connectors means search results are automatically filtered so users only see content they’re permitted to access, based on source permissions. Every item indexed by a connector includes an access control list (ACL) specifying what users or groups have rights to view it; items outside a user’s ACL never appear in their search results. When a connector pushes an item to the index, it includes an ACL for the external Item. Individual ACL objects can target a user, a group, or Everyone in the tenant. Microsoft uses the ACL to decide who can see the item, and items outside their ACL never appear. For built-in connectors that carry file permissions, the connector preserves and reuses what’s there. For example, the Azure File Share connector indexes content adhering to NTFS permissions, so users only discover what those ACLs already allow.
When your source uses group constructs outside Entra ID (ServiceNow profiles, Confluence groups, etc.), the connector sync them as external groups and references those groups in each item’s ACL, meaning that the search layer honors the same audience you maintain in the source.
If the content is intentionally tenant-wide, the connector sets the ACL entry to Everyone; otherwise, the connector grants permission for specific users or groups to the item following the guide from Microsoft mentioned earlier (The “Everyone” entry is a first-class ACL type in connectors).
When visibility looks off (too much or too little information appears in search results), use the index browser to inspect the item’s metadata and ACL, correct identity mappings if needed, and then update.
Summary
Custom Copilot connectors help organizations to create a unified and secure enterprise search experience. Integrating data into Microsoft 365 breaks down information silos and puts knowledge directly at users’ fingertips, regardless of where the data lives. The ultimate goal is to enable users to find the right document or record quickly and efficiently using Microsoft Search, boosting productivity and reducing frustration.


