What is Windows 365?
Windows 365 was released on the 2nd of August 2021 and is marketed by Microsoft as the Next-Gen Cloud PC that’s perfect for End Users who need their PC in the cloud.
The announcement of Windows 365 left many people confused, like me – Microsoft already has a virtual desktop service called Windows Virtual Desktop, which provides a very similar service. There is one major difference between the two, Windows 365 is easy to set up, and once the Cloud PC has been created, the hardware is managed by Microsoft, and the operating system can be managed in Microsoft Intune.
There are two versions of Windows 365, Business and Enterprise. Windows 365 Business is typically used by smaller companies who need an Azure AD-joined workstation, but features such as monitoring, troubleshooting, and Universal Print are not supported. Whereas Microsoft 365 Enterprise can allow companies to join the Cloud PCs to their Azure Virtual Network, which enables the Cloud PC to be on the same network as Azure-based virtual machines such as Domain Controllers or File Storage. Windows 365 Enterprise will also use the full capabilities of Microsoft Intune. For a full comparison, see the following: Compare Windows 365 Business and Enterprise | Microsoft Learn
As the Enterprise version of Windows 365 allows for more integration with other Azure services and Intune, the remaining of this article is a deep dive into its setup.

Prerequisites
The prerequisites for Windows 365 Enterprise are optional, depending on the organization’s requirements. The following list is required:
- Users must be licensed for the following:
- Windows 365, licenses for Windows 365 are based on storage, CPU, and memory requirements. For a full list, follow this link.
- A Microsoft 365 E3 or E5 license is usually the best option, but as long as users have the following licenses alongside the Windows 365 license, this will be sufficient:
- IntuneAzure AD P1 or P2
- Windows Enterprise E3
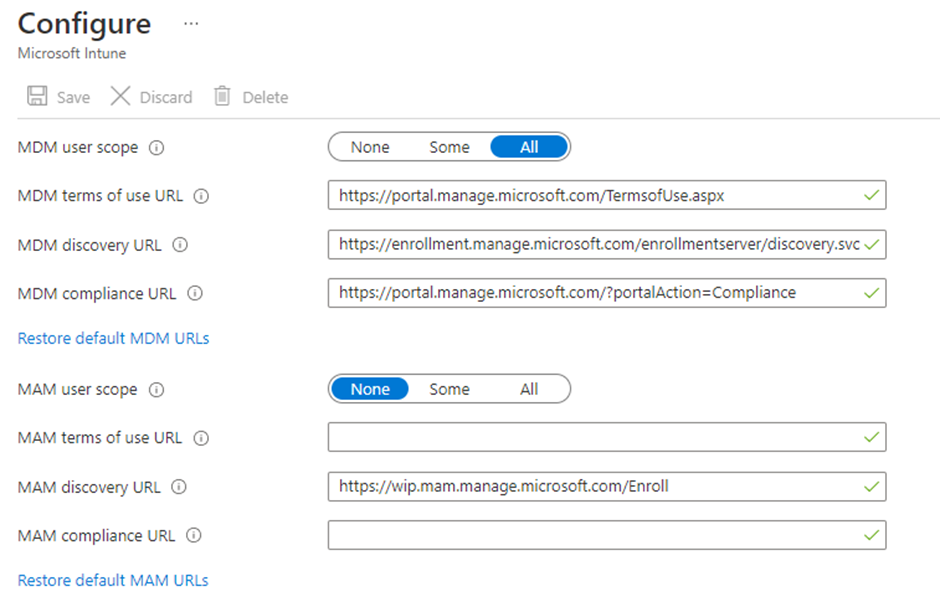
- Ensure Windows (MDM) is set to enabled, which can be found here (Figure 1):
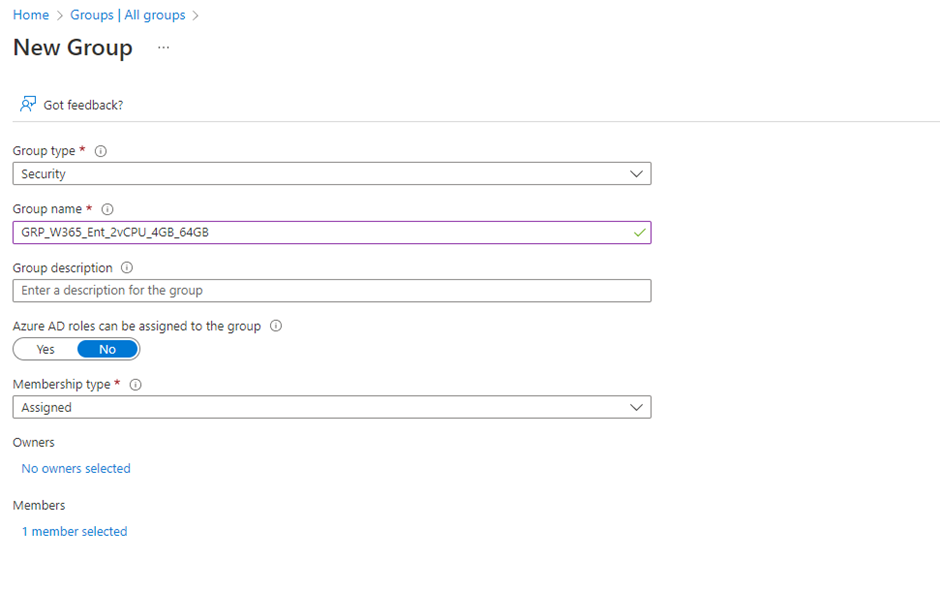
- Create an Azure AD Group to populate with the users who use Windows 365. The Group Name should represent the Cloud PC to which it will be assigned, and this will ensure that users get the right Cloud PC (Figure 2):
- Ensure that MDM enrolment for Intune is enabled for all users. This can be configured by clicking here (Figure 3):
The following list is optional:
- An Azure Virtual Network and subnet if your company wants the Windows 365 environment to reside on the same network as other resources in your Azure environment.
- A custom cloud image can be used if your organization wants to deploy pre-installed apps or configurations. With Windows 365, I do not believe there is much need for this, as Microsoft Intune can quickly deploy applications and configuration.
- If you decide to Hybrid Azure AD Join your Cloud PCs, the following requirements are needed:
- An On-Premise Domain Controller
- A specific OU for Windows 365 devices.
- Azure AD Connect
- User accounts that use Windows 365 will need to be synced from Active Directory to Azure Active Directory.
- An On-Premise Domain Controller
On Demand Migration
Migrate all your workloads and Active Directory with one comprehensive Office 365 tenant-to-tenant migration solution.
Configuring Windows 365
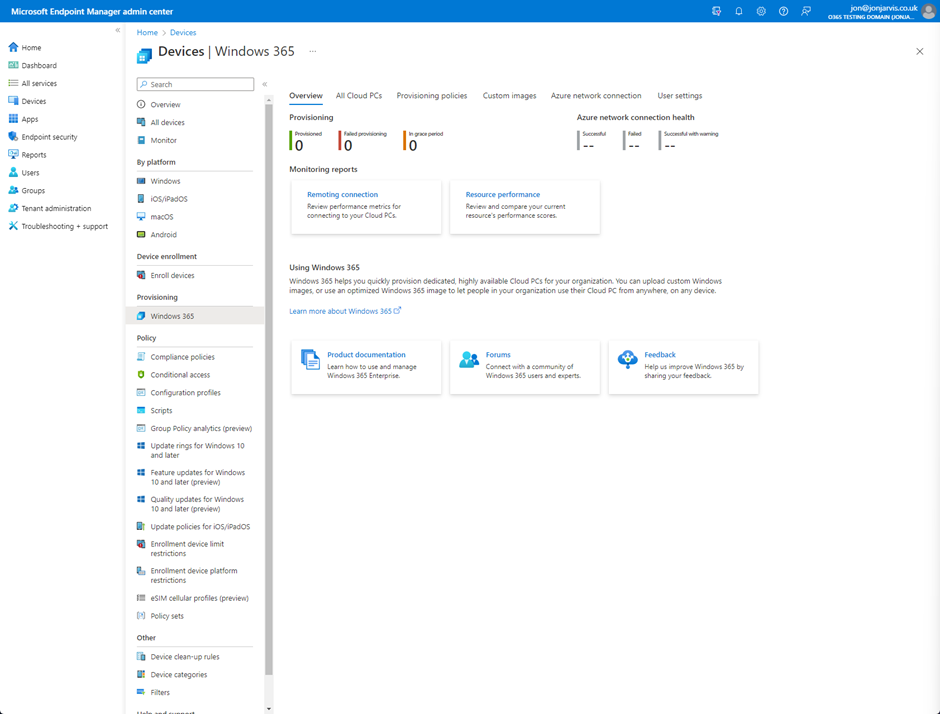
To start configuring Windows 365, go to endpoint.microsoft.com, click on devices, then Windows 365, or, better yet, click here.
There are 6 tabs on the Windows 365 tab (figure 4):
User Settings
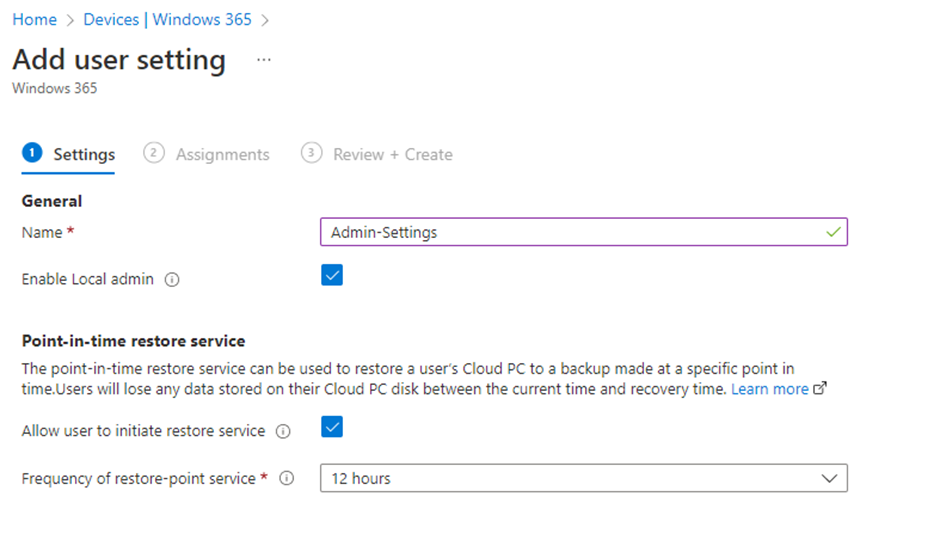
In user settings, you can allow users to be local administrators of the Cloud PC to specified Cloud PCs. This is done by assignments, which is step 2 of Figure 5 below. When configuring User Settings, I recommend two User Setting policies, one for Power Users and one for regular Users. Enabling Local admin will allow the user to install applications onto the Cloud PC, which, although decreases management overhead and increases users’ satisfaction, you are opening the possibility of unwanted 3rd party applications being installed on the Cloud PCs. An example of user settings is shown below (Figure 5). User settings can only be assigned to Azure AD groups and not individual users.
Recently, Microsoft has enabled a Point-in-time restore service to allow users to restore Cloud PCs and their devices to a previous point:

Azure Network Connection
Configuring an Azure Network Connection allows Cloud PCs to join the virtual network of your organization’s Azure Landing Zone. There are two options for this:
- Azure AD Join with Azure Virtual Network support
- Hybrid Azure AD with Azure Virtual Network support
It should be noted that if you do not wish to set up Azure Network Connection, Azure AD Join without Azure Virtual Network support is available with no additional setup.
To setup Azure AD Join with vNet support, the following is needed:
- Name – A name for the connection
- Join Type – Azure AD Join
- Subscription – An Azure subscription is needed for vNet integration
- Resource Group – Create a Resource Group for the Azure Network Connection
- Virtual Network – Select your Virtual Network
- Subnet – Select the subnet where your Cloud PCs will reside
After the Azure Network Connection has been created, you will see that its status is set to “Running Checks.” And after around 30 or so minutes, the status will show as “Checks Successful”
Provisioning Policies
Provisioning Policies is where we set up Cloud PCs and assign them to users. If your environment has multiple sizes of Cloud PC to deploy, you should create multiple Provisioning Policies. Go to Provisioning Policies, then press Create Policy. To create a policy, the following information will need to be given:
- Name – It is recommended to name the provisioning policy after the hardware spec of the Cloud PC that you’re deploying; this makes it easily distinguishable for management purposes.
- Description – As above, give your Provisioning Policy an accurate description.
- Join Type – Pick the Azure AD join type that you would like for your Cloud PC. Please note that if you would like network integration, you will need to create an Azure Network Connection as described earlier in this document.
- Network – Pick the ANC created earlier in this article.
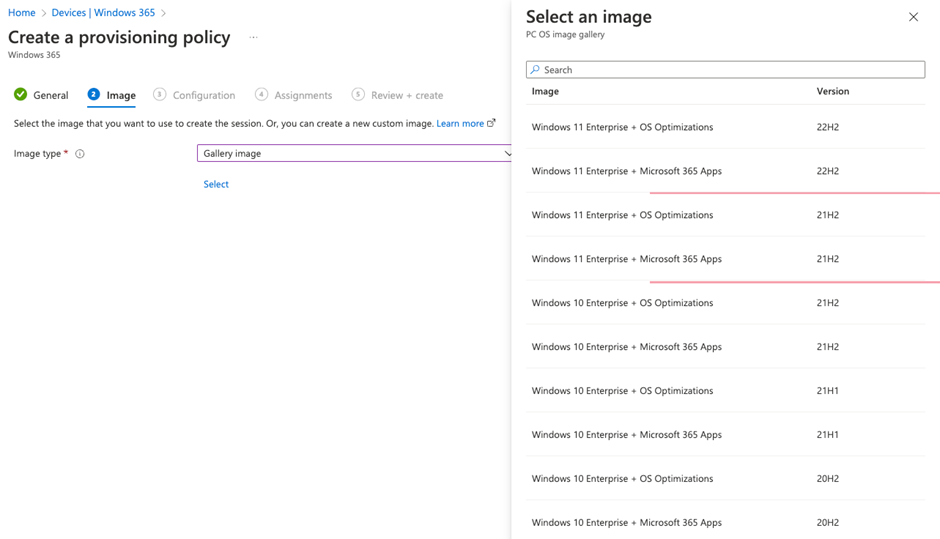
Next, choose the image which will be provisioned to the Cloud PC. Microsoft provides the option to choose from multiple images in their Image Gallery, where the options are between different versions of Windows 11 and 10, including options between installing Microsoft 365 Apps or not. Microsoft has full control over these images, and they can only be customized by using Microsoft Intune.
The following images are available in the Image Gallery as of the 1st of November 2022 (figure 6):
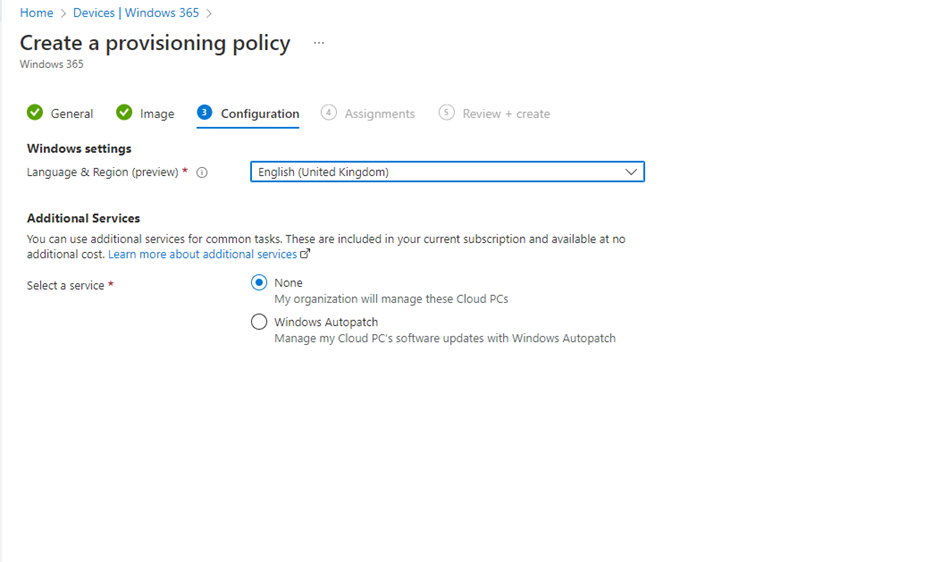
Once you have chosen the image for your Cloud PC, you can choose the Language & Region settings of the Cloud PC. Additional services need to be configured next, one of the options which organizations can select is Windows Autopatch, which is a service where Microsoft takes control of the patching for devices. For more information, click here. But, if you would like Intune/Windows Updates for Business to take care of your updates, choose None (figure 7):
Next, assign the provisioning policy to the group created earlier. Press next to go on Review + Create, then complete the provisioning policy by pressing Create.
Review the settings for the new policy then press create.
The provisioning policy is successfully configured if you see Supported under Image Status in the Provision Policies tab (figure 8):

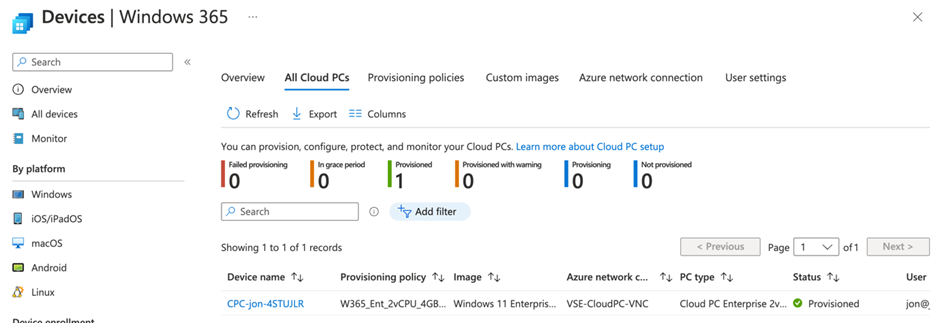
Now go to the All Cloud PCs tab, your new Cloud PC will at first be shown as provisioning and will then show as provisioned, which takes roughly 20 minutes (figure 9):
Connecting to your Cloud PC
Several ways exist to connect to a Cloud PC, you can either use a browser to sign into windows365.microsoft.com, or you can download the Windows 365 app which was announced at Ignite 2022. After downloading the app and authenticating to Windows 365 using Azure AD credentials, you can connect to and manage Cloud PCs within the app (figure 10).
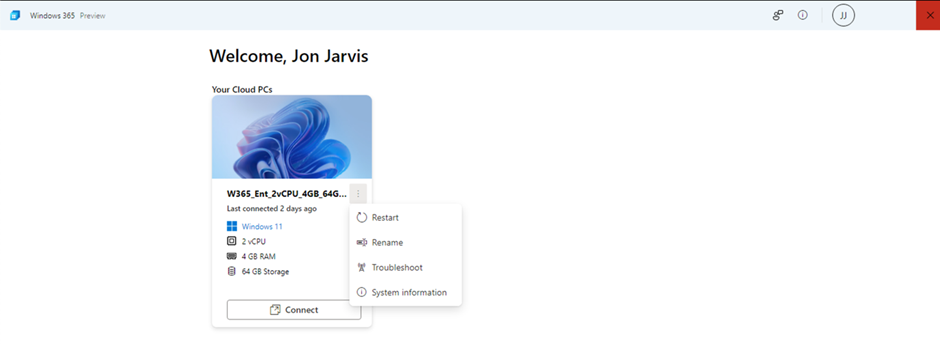
Pressing Connect within the Windows 365 app will take you straight to your Cloud PC Desktop.
Conclusion
Microsoft’s Windows 365 Cloud PC offering can be the perfect fit for organizations that require remote workers to log into a PC that can access their network without the need for a VPN. Having a Cloud PC enables users to log into an IT-approved workstation from anywhere in the world, ensuring that the correct applications and access are given to the users. Is Azure Virtual Desktop a more complete product with more features? Yes, but Windows 365 allows a similar virtual experience with less infrastructure to manage. The main sticking point will always be pricing, as Windows 365 does not provide a more scalable (and cheaper) pricing model than Azure Virtual Desktop. Whilst Windows 365 is still in its infancy compared to Azure Virtual Desktop, it is getting regular feature updates, including a bunch of updates that were announced at Ignite 2022. There is plenty of potential for Windows 365 in the next couple of years to become a major player in the virtual desktop space.
Microsoft Platform Migration Planning and Consolidation
Simplify migration planning, overcome migration challenges, and finish projects faster while minimizing the costs, risks and disruptions to users.


