
One of the most common scenarios for SharePoint Online and Microsoft Flow is approvals. Having a formal workflow in place for document review, expenses approval and other similar day-to-day business processes is ubiquitous across most organizations.
In this three-part guide, we’ll go beyond simply approving documents and use the power of Microsoft Flow to automatically create documents based on pre-defined templates.
We’ll keep our example pretty simple and contained so that you can build upon it – but the possibilities are nearly endless. Microsoft Teams can take data from a multitude of systems meaning you could extract data from your CRM or other tools to initiate and create documents automatically.
Our example scenario
We’ll take a fairly common scenario that occurs in most businesses that work with customers – creating a sales or project proposal.
In our scenario, we want to provide a form for people to enter relevant information for the new proposal.
We then want a manager to review the information entered and approve or reject it.
Finally, we want the information provided to be used to create the actual proposal document, ensuring it is entered in a consistent, repeatable way. Once that is created, we want the document to be saved into SharePoint Online so it can be customized further if needed or sent to a prospective customer.
Our solution
To solve this, we’ll use the following parts of Office 365 and the Power Platform:
- Microsoft Teams, which we can use to:
- Access the PowerApp form once it is created by adding the SharePoint List as a Tab to a Team (though this is optional).
- As the place where approval notifications and requests are shown to users.
- Optionally use Teams to edit the Word document after it’s been created.
- Microsoft Word to create (or update) a document template to use as the foundation
- A SharePoint Online List to store the information used to populate the Word template
- A PowerApp Form connected to our SharePoint List to provide a modern and functional method to add, review or edit the information
- Microsoft Flow to provide:
- The approvals process
- The creation of the Word document
- The upload and storage of the document in SharePoint Online
Our Microsoft Team
Although we could call the Microsoft Team used for this the foundation for what we are doing – it isn’t really. The solution is held together by different parts of Office 365 – SharePoint in particular, but also Flow and PowerApps.
From a user perspective though, we avoid the need for users to jump between applications for approvals and requests, and provide a common Office 365 Group for membership management by creating a Microsoft Team.
Our underlying Team will be called Contoso Proposals:

Creating the Word Document Template
Our first step is to convert our existing document template into a format that is suitable for use with Microsoft Flow.
Microsoft Flow has a premium connector for use with Word Online. This has a number of actions, including Populate a Word template.
To use this connector, we’ll need a Word document (not an actual template, despite its name) that contains fields corresponding to the text we wish to populate.
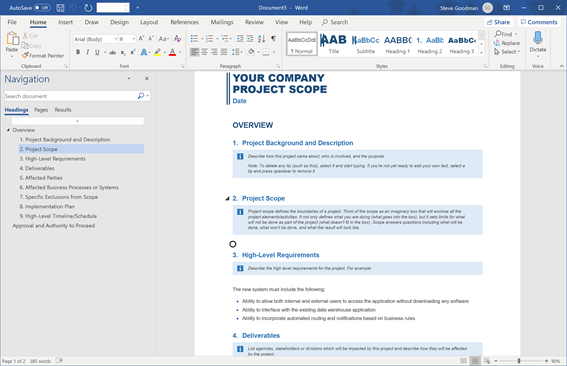
We’ll start with our example document template (this is one of the built-in Word templates for proposals, if you were wondering):
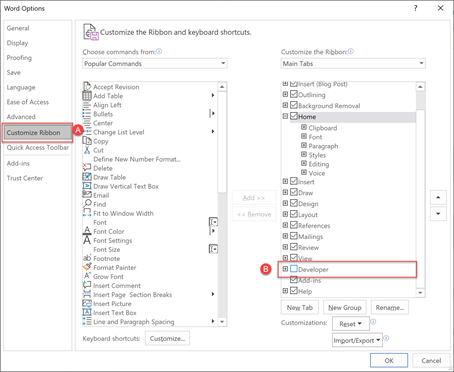
We need to change this document so that each of our sections can consume text from Microsoft Flow. To do this, we’ll need to be able to add fields to the document. So, we’ll add the Developer tab by navigating to Options, then from the Customize Ribbon tab (A) we will select Developer (B):
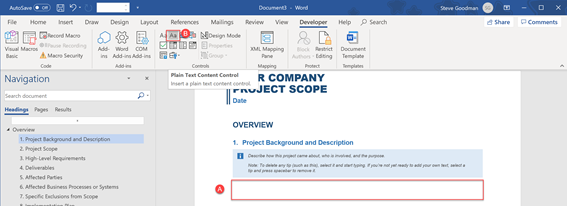
With the Developer tab now available, we’ll move the cursor to each section within the document (A) and from the Developer tab on the ribbon, then we need to add a New Plain Text Control (B)
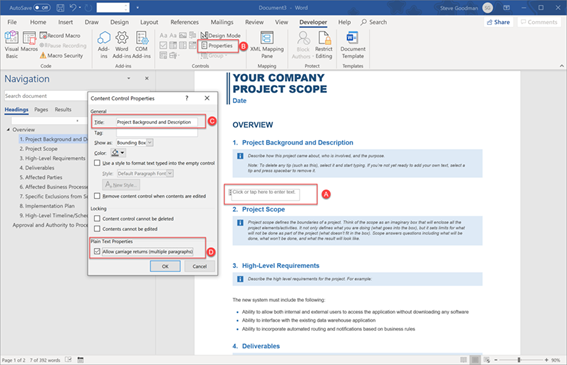
We will then select the new field (A) and then choose Properties (B). The Properties dialogue window will open, and we’ll set the Title (C) and also check the Allow carriage returns option (D):
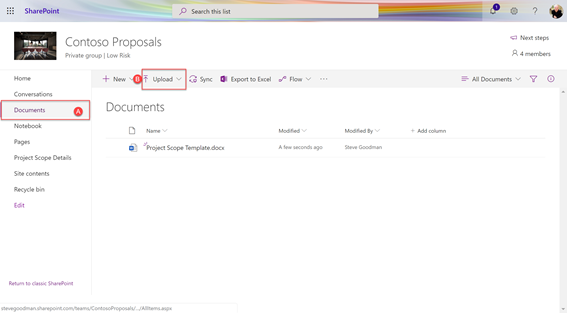
After performing this action throughout the document, we’ll then navigate to the Contoso Proposals team site that’s linked to our Microsoft Team. Within the Documents section (A) we’ll upload our template (B):
Creating our SharePoint List
The information entered by users for approval and subsequently used to populate the Word Template will be stored within a SharePoint List. We’ll create the SharePoint List in the SharePoint Site associated with the Microsoft Team Contoso Proposals, to ensure that the same membership list has access to the list and the output document.
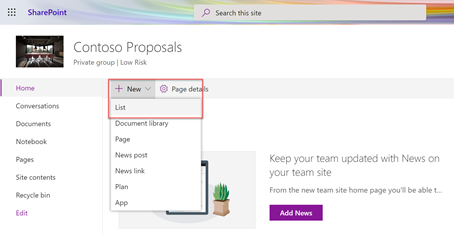
As we’re already in SharePoint Online, so we’ll navigate to Home for our Contoso Proposals SharePoint Site and then choose New List:
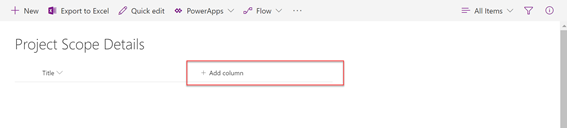
After the new SharePoint List is created, we’ll use the modern view to add columns that correspond to the fields within the word document. Begin by choosing Add column:
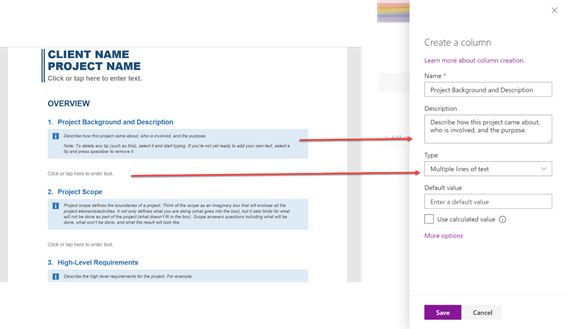
In the example below, we’re comparing our Word Template to the column we are creating. We’ve named the column with the same name as our field. Because our template already had some descriptive content within it, we’ll cut and paste that data into the Description field, so it isn’t lost, then delete it from the template.
If your template text is usually edited to meet requirements each time, then a better location for that text might be the Default Value. If you set it as the default value it will show in the PowerApp Form allowing the user to customize it as they go along. It’s up to you.
We’ll next change the type to something suitable. In this case, Multiple lines of text:
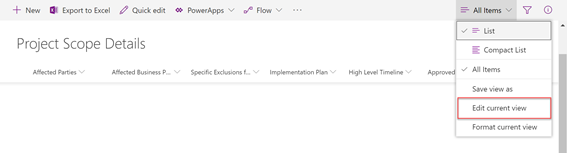
Customizing Views
After creating columns to match the template, you may find you have a large number of columns. If you don’t want to see all these cluttering up the default view, select All Items in the list and choose Edit current view:
We’ll then be shown the Settings>Edit View page. De-select the Display checkbox for the columns you do not wish to be shown when scrolling through the list items. In this case, we’ve decided it is best to just show the Title, Client Name, and Project Name columns:
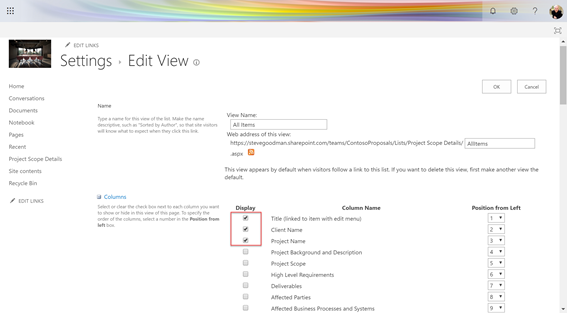
Of course – when editing the form in the PowerApp all columns we wish to have visible will be shown; and the list will retain the ability for us to access those columns within the Microsoft Flow.
Summary
In the first part of this series, we examined what our overall problem was, and how we’ll solve it using Office 365’s automation capabilities. Then we created the foundations for our solution – the Word Document we’ll use as a template, and the SharePoint List that will be used to store the data that will populate the Word document.
In part two of this series, we’ll create our PowerApp and create the Flow that will be used to populate the Word document and power the approvals process.


Nice Job Steve! Thanks for putting this together. It is extremely helpful.
I got stumped when I read the section on “Our Solution”. It reminds me of the days when I had to learn the commands for word processing. I had to insert a command for each editing action. And then multiply that effort 4 times, because so many apps are involved. Please, can we skip a few years of user interface development for workflow design, like what Apple did to word processing 30 years ago?
Truly practical example my small nonprofit can immediately put to good use. I anticipate it will further promote the adoption of Teams and enhance collaboration. Thank you for the clear and concise step-by-step instructions.
I really hate when people write an article that says the story will be continued in part 2 and then part 2 isn’t linked anywhere. Could you post the link to the 2nd part of the document?
Hi Bryan,
Find part two here:
https://www.practical365.com/collaboration/teams/automating-document-creation-and-approvals-with-teams-and-microsoft-flow-part-two/
and part three here:
https://www.practical365.com/teams-2/automating-document-creation-and-approvals-with-teams-and-microsoft-flow-part-three/
Steve