
An Introduction to Entitlement Management
A few weeks ago, we talked about a new method to promote applications for your Office 365/Azure AD users, via the Workspaces functionality. Workspaces allow you to create custom “views” of applications and assign them to a group of users for easier access. While these are very easy to configure, all a Workspace does is surface a tile to open a given application, without taking care of any provisioning steps. Therefore, if the user hasn’t been granted access to the application already, they’ll be unable to access it.
In most cases, provisioning applications is just one of the tasks you’ll be performing for onboarding a new user or partner. You will likely want to add them to some Azure AD security groups (for managing license assignments or access to resources), Office 365 Groups and/or Teams (for collaboration), or SharePoint Online sites. Creating a list of resources is only a small part of the access management process, and it’s likely that you’ll want to add some automation via approval workflows or enable self-service, delegate management tasks or enable periodic reviews of access to the given resource(s).
Enter Entitlement management.
What is Entitlement management?
Here’s Microsoft’s definition of Entitlement management: an identity governance feature that enables organizations to manage identity and access lifecycle at scale, by automating access request workflows, access assignments, reviews, and expiration.
In other words, it’s a feature that allows you to grant access to a set of resources, either manually, as a self-service or even automate it. On top of that, it offers a built-in approval workflow, expiration controls, and integrates with the Access Reviews feature, and more!
The building block of the Entitlement management feature is an Access package, basically a set of permissions/roles on given resources and policies that control just how access will be granted. The policy controls describe who can request access, who is responsible for approving it, does access to the given package expire and when, and so on. The set of resources available for role assignment, along with the Access package(s) that govern the assignment process are in the form of a Catalog. A Catalog can contain multiple Access packages, and in turn you can have multiple Catalogs in the organization. The picture below, taken from the BRK3109 presentation at Ignite, should illustrate how the different Entitlement management concepts relate to each other:
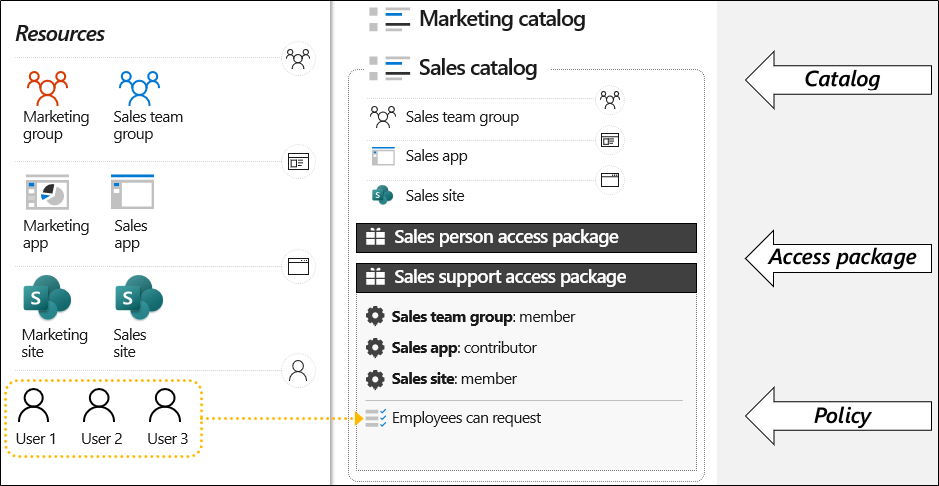
Once created, Access packages can be requested by or assigned to users, effectively granting them access to the resources within – with the roles selected when creating the package. It might take up to 24 hours for the changes in assignment to be reflected, but the process should usually complete a lot faster than that. If an Access package is removed from a user, or the expiration date is reached, access to the (set of) resources is removed. In addition, periodic Access Reviews can be configured as needed.
Another concept that is core to the entitlement management feature is delegation. By default, only Global administrators and User administrators can create and manage Catalogs, however, in most larger organizations you will want to delegate this task to people in a managerial position. Both Catalogs and Access packages can be delegated, allowing you to offload the governance to people in the corresponding department or team. Furthermore, as part of the policy creation you can define who can approve access to a given package, as we will see in the next section.
To gain a better understanding of what entitlement management is all about, we’ll take these core concepts and put them in the context of a real-world scenario. Let’s say our organization has a development department, and we are tasked with preparing a set of resources that will be relevant to a new project starting within the said department. A new Team will be used for the project, and all relevant users will be added as members of the Team and assigned a set of Azure AD integrated applications to use.
Creating an Access package
To start working with the feature, navigate to the Azure AD blade -> Identity Governance -> Entitlement Management or use this link. Under the Access packages tab, we will create a new package by pressing the New access package button and following the steps of the wizard-like interface. We start by providing a Name and Description for the package under the Basics tab. Both fields are mandatory and should be properly filled in so that a single glance will be sufficient to understand who the package is intended for.
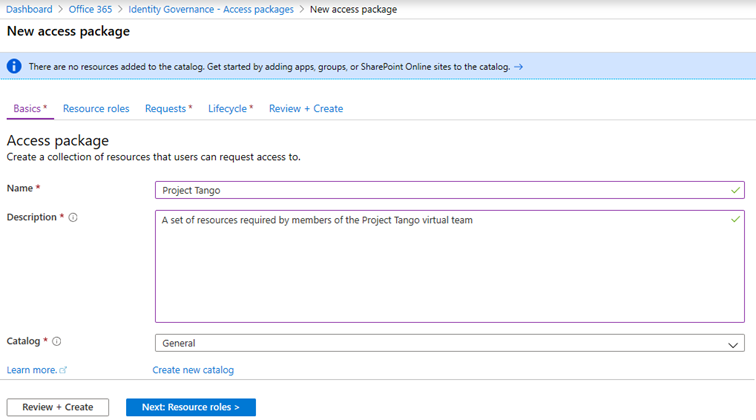
The last field on this page is the Catalog one, also mandatory. As mentioned in the previous sections, Catalogs are basically containers for resources and Access packages, allowing you to group them together and/or delegate management. Depending on the role/permissions the person creating the Access package has, he might be restricted to selecting resources from a specific Catalog only.

Provisioning access to resources
On the next page of the wizard, namely Resource roles, we will specify the set of resources to be assigned as part of the package, and the corresponding permissions users will get. You do so by pressing the corresponding Groups and Teams, Applications and/or SharePoint sites buttons.
Note that the corresponding resource must already exist in the directory. In addition, the list of resources you will be able to add will depend on the permissions you have in the directory, or on the Catalog under which you are creating the Access package. You can find a detailed explanation of this in the official documentation.
You will also need to provide the type of permissions (or Role) that users get for a given resource. For groups and teams, this means you can designate the user as a member or even an owner; for SharePoint sites, you can use any of the default permissions groups (Owners, Members, Visitors) and for applications, you can use any of the roles/scopes as determined from the application’s manifest.
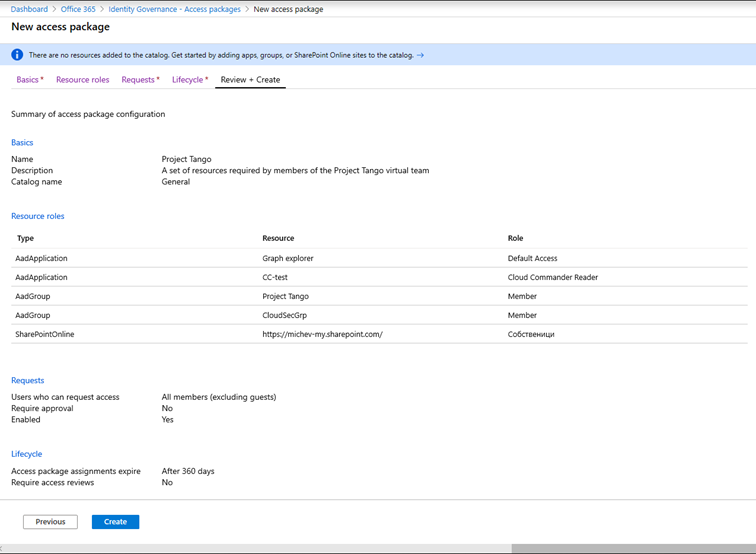
In the example below, we’ve added one app with Default access and another one with a custom defined role. In addition, the access package will add users as a member of the Project Tango team, add them as members of an Azure AD security group and grant them Owner permissions to a SharePoint Online site collection.
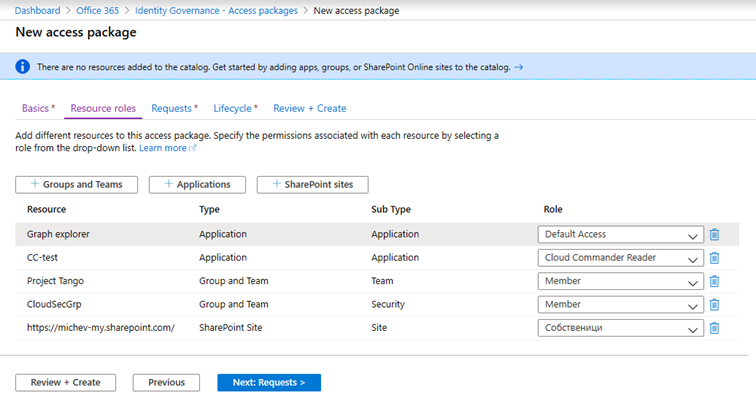
When it comes to resource types, there are some restrictions to keep in mind. Firstly, on-premises groups are not supported as their membership cannot be updated. Exchange Online distribution groups and mail-enabled security groups are not supported either. Dynamic distribution groups are also not supported. Azure AD groups with dynamic membership are supported, however, the only Role you can assign for those is Owner, so be careful when adding them (should you want to add the user as a member, you need to adjust the corresponding membership rules).
It is also interesting to note that the selection pane actually enumerates all the SharePoint Online Sites in the tenant, so unlike some other admin interfaces (*cough* SCC *cough*) you can simply point and click to select a given site instead of typing the full URI. It’s not perfect though, as it exposes some “system” site collections which you should not mess with, but overall this approach is a great improvement.
Who gets access to a package?
Next, we proceed to the Requests page, where we will define who will be able to request access to the package, in other words the policy. We have three options here: allow all or specific users in your tenant to request access, allow users form an external organization to request access or disallow requests altogether (in which case only admins can assign the access package). For the purposes of this article, we will focus only on the first scenario, namely For users in your directory. In a later article in the series, we’ll discuss the more advanced For users not in your directory scenario.
Read more: How to Manage Guest Access in Azure Active Directory
Once you’ve made the selection, you can further tune the policy by specifying a list of users or groups allowed. Or, you can go all in by selecting the All members option, or even allow (existing) Guest users to submit requests by selecting the All users option. In addition, you have the option to configure an Approval workflow. This is another functionality we’ll cover in the next article in the series, but in a nutshell, it allows you to configure a one- or two-step approval process and optionally require a justification from both the requestor and approver(s).
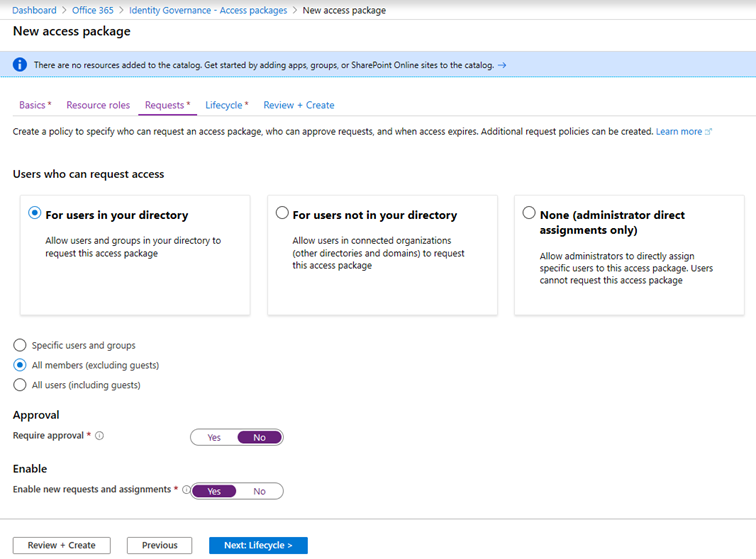
The last setting to configure on this page is the Enable new requests and assignments one, which basically controls whether this access package is ready to be assigned to users.
Access package lifecycle
The final page is the Lifecycle one. Here we can define the maximum age for assignments in the given access package, or when the package will expire. For the Expiration control, we can select a specific date, a timespan (number of days) or “Never”. The maximum timespan is set to 10 years (3660 days), but if you specify a date you seem to be able to go beyond that. You can also configure some additional settings by clicking the Show advanced expiration settings link. Those include the Allow the user to extend access setting, which when selected will notify the user 14 days before expiration and prompt them to request extension, and the Require approval to grant extension setting, which applies the same approval requirements as defined in the request policy on the previous page.
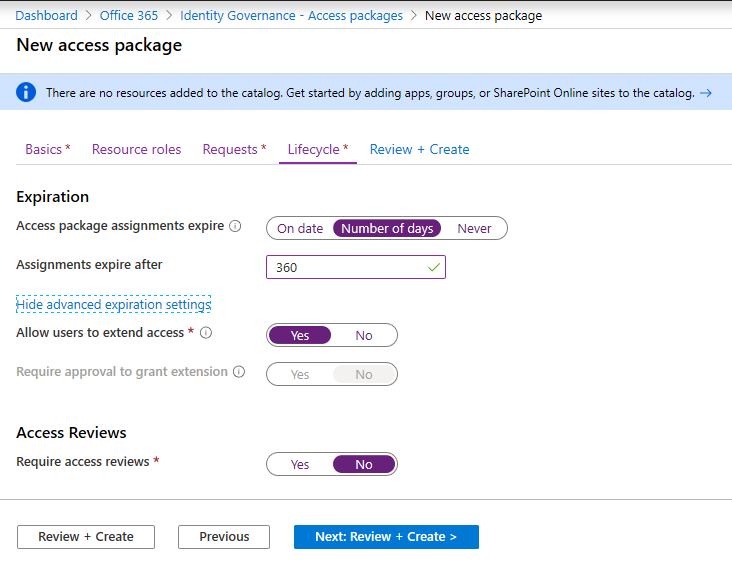
Lastly, we have the Access review settings, which present the corresponding controls to configure an Access review for the given package. Since we’ve already covered Access reviews in the context of group membership, application assignments and Azure AD admin role assignments, we won’t go into too much detail here.
Additional settings
On the final page of the wizard, you can review the settings and if everything checks OK, Create the access package.
Once you do that, you will be taken to the Overview page of the newly created package, where you can get some information about it, such as when the package was created, how many current assignments and pending requests it has, and a link to the package’s URL over at the My Access portal. Some additional controls are exposed, which were not available in the “create access package” wizard. One such control is the Hidden toggle, which controls whether the package is visible to users under the My Access portal. If this setting is toggled to Off, only users that have the direct URI to the package can request to join it.
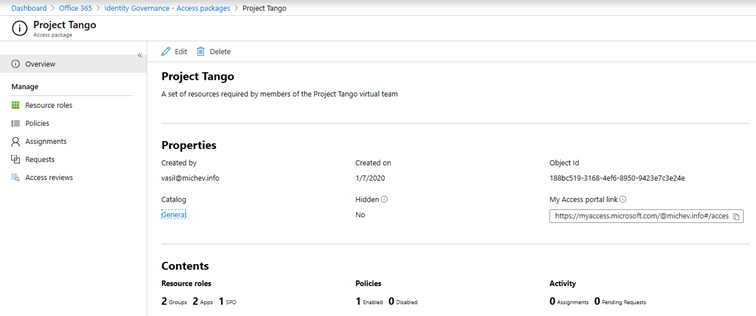
At any time, you can adjust the set of Resources included in the package or the roles/permissions users will be given. You can also use the Assignments tab to create or remove assignments for the given package if it’s enabled for an assignment that is. We’ll cover this and the rest of the tabs in the next article in our series.
This concludes our “introduction” to Entitlement management. In our next article, we will see how the process works from and end user perspective and configure some more advanced scenarios. For part two of this blog, follow this link.


Hi Vasil, in your article, you state “It might take up to 24 hours for the changes in assignment to be reflected, but the process should usually complete a lot faster than that”. Could you provide a reference to the documentation where this is stated? I’m currently using ELM to manage access and the processing time is wildly inconsistent, usually ranging from just a few seconds to almost an hour, even though I could manually grant the exact same access in less than 5 minutes consistently.
Hi Vasil,
Thanks for the article, very well written and easy to follow.
Reading your definition for “Entitlement management” which is :
“In other words, it’s a feature that allows you to grant access to a set of resources, either manually, as a self-service or even automate it”
I have a question on the “even automate it” part, I am trying to get my head around the possibility of automating the assignment of an access package to a user based on an a AD attribute for example such as their position.
So, in an ideal world, creating a user with the title “Marketing manager” will trigger an action to dynamically assign a specific Access package to them,
Is that what you meant by “automate it” or you did you mean to refer to the workflow automation part ?
I was referring to the cross-tenant experiences (“connected organizations”), which was supposed to be the third part of the series. Nowadays though, it can also mean doing things programmatically, as we now have Graph API support: https://docs.microsoft.com/en-us/graph/api/resources/entitlementmanagement-root?view=graph-rest-beta