
Introduction to the Azure Ink Recognizer
SharePoint, as we know, is a powerful and efficient service which enables us to solve collaboration issues in the modern enterprise.
With SharePoint, we can maintain a central repository for any information generated within the company. We can then secure that data, offer versioning, facilitate the implementation of workflows, which is just a handful of the extensive possibilities the service offers.
However, SharePoint is limited when it comes to interaction with human beings. For example, you can only upload and download documents; you cannot interact directly with the service in a way that is more suitable and comfortable for us, such as speaking, notetaking, handwriting, connecting pictures and images with written information, etc.
If you want to integrate handwriting, shapes, and inked documents in any of your systems, or, in this case, with SharePoint, the new Azure Ink Recognizer service is an interesting option now available. This is a new Azure service, which is currently in preview, that can distinguish digital handwriting and the layout of inked documents. For example, the Recognizer identifies this in the forms of notetaking, form-filling, and document annotations. The service has an API that can be used to read and upload handwritten information to SharePoint, which is utilized in the built-in search engine, and any other relevant text manipulations and automated processes.
Digital Ink, Electronic Ink, or shortly, E-Ink, has been used since the end of the 1990s for signing for the receipt of packages and registering credit card transactions. Since then, due to the immense popularity of tablets and smartphones with notetaking and manual data entry capabilities, E-Ink has become a paramount technology across the industry.
Microsoft has been experimenting with E-Ink for years, and you’ll find many of their products have several ink competencies. To name a few, it’s currently integrated into most of the Office 365 suite of products such as Word, Excel, PowerPoint, OneNote, ToDo, and also Edge, Maps and Windows 10 in general.
According to studies made by Microsoft “… more than 70% of people spend more than one hour a day using a pen; productivity can increase by incorporating writing into the computing experience…”
E-Ink in Azure
When we speak about E-Ink for text recognition, there is a distinction between two main technologies:
- OCR (Optical Character Recognition), where images of typed, handwritten or printed text are converted into machine-encoded text. Meaning that the image of the text is translated to similar text that is optically recognized by computers
- Strokes recognition, where the way the text is drawn (known as the strokes) is arranged in a collection of bidimensional points that the computer can convert to letters through geometric transformations. Or, as Microsoft defines it: “Digital ink strokes are time-ordered sets of 2D points (X, Y coordinates) that represent the motion of input tools such as digital pens or fingers”
OCR is a recognized technology which has been used for years, but it has several limitations. For example, OCR is unable to convert characters with very large or small font sizes, important non-textual characters or glyphs. When OCR has reached its maximum ability, Strokes recognition provides more accurate results because it gets structural information about how the content is created and breaks it into writing regions, paragraphs, lines, words and bulleted lists.
In Azure there are different services for E-Ink recognition: The Azure Computer Vision Service (part of the Cognitive Services) and the Azure Media Analytics OCR can be used for OCR recognition, and the Azure Ink Recognizer Service can be used for Strokes recognition of text.
The Azure Ink Recognizer API is a RESTful web service that accepts formatted Ink Stroke data as JSON input and sends a response with the parsed text as a JSON message.
The Ink Strokes input format
The Azure Ink Recognition Service API receives the linear coordinates (X, Y) when an ink stroke is drawn by an input device from the moment the sensor touches the surface until it’s lifted.
The coordinate points for each stroke should have an identifier and are composed as a series of comma-separated values in JSON format. Below is an example of how this looks:
  {
   "version": 1,
   "language": "en-US",
   "unit": "mm",
   "strokes": [
     {
       "id": 1,
       "points": "336,168.8,335.2,168,..."
     },
     {
       "id": 2,
       "points": "368,176.8,368,177.6,..."
     }
   ]
 }
As I previously mentioned, Windows can work with E-Ink and generates the strokes data, making it available to be used by other applications. Essentially, there are three development platforms in Windows that support digital ink: The Tablet PC Windows Forms platform, the Tablet PC COM platform, and the Windows Presentation Foundation (WPF) platform.
The Windows Forms and COM platforms share a similar object model, but the object model for the WPF platform is substantially different. In the second part of this article, we will see how we can create a simple Command Line application that accepts E-Ink in a canvas, processes the strokes using the System.Windows.Ink namespace (from the WPF platform), and generates the JSON in the correct format for the input of the Azure Ink Recognizer Service.
The Ink Recognizer Service API doesn’t just identify text characters, but also several shapes, such as triangles, rectangles, parallelograms, circles, and ellipses. Making the service extremely useful as it’s proficient in identifying notes mixed with shapes, which is common in most notetaking.
The Ink Recognizer output format
The Ink Recognizer API returns a JSON response describing the objects it recognized from the ink content. The response includes units that define the relationships between different Ink Strokes. The following example is an extract of a recognized string:
  {
   "recognitionUnits": [
     {
       "alternates": [
         {
           "category": "inkWord",
           "recognizedString": "gustaro"
         },
         {
           "category": "inkWord",
           "recognizedString": "gustar O"
         }
       ],
       "boundingRectangle": {
         "height": 121.61000061035156,
         "topX": 280.79000854492188,
         "topY": 132.80000305175781,
         "width": 484.01998901367188
       },
       "category": "inkWord",
       "class": "leaf",
       "id": 4,
       "parentId": 3,
       "recognizedText": "gustavo",
       "rotatedBoundingRectangle": [
         {
           "x": 278.35000610351562,
           "y": 138.22000122070313
         }
       ],
       "strokeIds": [ 2, 3, 1, 4, 5, 6, 7, 8 ]
     }
   ]
 }
Creating the Azure Ink Recognizer Service
To create the service in Azure you need to login in the Azure Portal. If you don’t have an account, you can create a temporary account from here.
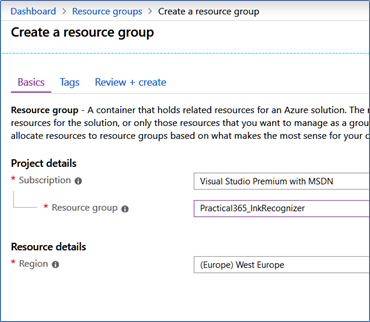
1. Login into the Azure Portal and open the Resource Group section (vertical menu on the left-hand side). Create a Group for the service using the +Add button, which indicates the Subscription you want to use and the data center location. Here, you also need to assign a name for the Group.
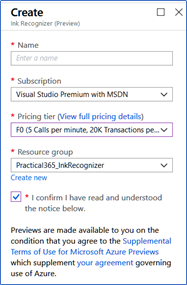
2. When you’ve finished creating the Group, open it and add the Ink Recognizer Service: use the +Add button and search for Ink. The Ink Recognizer (Preview) item will be shown. Use the Create button:

3. In the new window, enter a name for the service, select the Resource Group created in step 1, and confirm that you have read the terms of use. The Pricing tier has two options:
- F0: 5 calls per minute, 20K transactions per month. This is a free option.
- S0: 10 calls per second that cost €1.687 per 1,000 transactions, a request of 200 strokes counts as one transaction.
For testing purposes, the F0 account will suffice. But make sure you take into consideration that the final prices will probably be different when the service is out of preview.
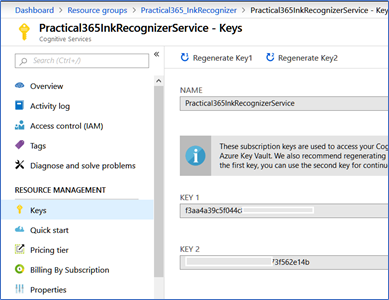
4. When you’ve created the service, open it and go to Keys on the left-hand side menu. Copy the Key 1 value, that will be used in the software to validate the connection with the service.
What to expect in Part Two?
In the second part of this article, we’ll explore the creation of an application that accepts E-Ink, extract the Strokes, format them as JSON and send a request to the Ink Recognizer Service. The response will also be processed in different ways, including sending it to SharePoint, so that the text can be indexed and integrated with the knowledge sharing system.