Three Steps to Prepare Your PowerShell Scripts
PowerShell scripts come in all shapes and flavors. Many scripts fall into two categories: they need to process a lot of data, or the code must run on a scheduled basis. In these situations, I usually opt to an Azure Automation runbook. Executing scripts as Azure Automation runbooks is inexpensive, and a reliable scheduling engine is available that’s more secure and dependable than Windows Task Scheduler.
It is unusual (for me) to write PowerShell from scratch as Azure Automation textual runbooks (workflow and graphical runbooks are ignored in this discussion). Running code in a headless server environment makes debugging an adventure, so it’s best to make sure that code runs interactively before adjusting for Azure Automation. The theory is that code that runs satisfactorily in an interactive session has a good chance of working in Azure Automation.
As more organizations use Azure Automation, it makes sense to build scripts from the start so that code works equally well in both environments. I’ve recently started to incorporate three simple principles in my scripts to help my code run without problems interactively or in Azure Automation. Here’s what I do.

Include Code to Detect the Environment
My first step is to include code to detect the environment the script is running in. Once the script figures out if it’s running interactively or in Azure Automation (I assume that if not interactive, the code is running in Azure Automation), it can execute whatever commands are needed to establish the correct state for the script to run.
The code below checks whether the script is running interactively or not. If interactive, the code loads the necessary modules using the permissions available to the signed-in user. If not, a managed identity connects to each of the required endpoints. Notice how the default domain is determined to allow the Exchange Online management module to connect to the correct tenant.
If ([Environment]::UserInteractive) {
    # We're running interactively...
    Write-Host "Script running interactively... connecting to the Graph" -ForegroundColor Yellow
    Connect-MgGraph -NoWelcome -Scopes User.Read.All, Group.Read.All
    $Interactive = $true
    [array]$Modules = Get-Module | Select-Object -ExpandProperty Name
    If ("ExchangeOnlineManagement" -Notin $Modules) {
        Write-Host "Connecting to Exchange Online..." -ForegroundColor Yellow
        Connect-ExchangeOnline -ShowBanner:$false
    }
} Else {
    # We're not, so likely in Azure Automation
    Write-Host "Running the script in Azure Automation"
    $Interactive = $false
    Connect-MgGraph -Identity
    $Tenant = Get-MgOrganization
    # Connect with a managed identity
    $TenantDomain = $Tenant.VerifiedDomains | Where-Object {$_.isDefault -eq $true} | Select-Object -ExpandProperty Name
    Connect-ExchangeOnline -ManagedIdentity -Organization $TenantDomain
    $CurrentFolder = (Get-Location).Path
}
Use a Flag to Control Environment-Specific Processing
I don’t tend to worry too much about permissions when running in Azure Automation because of the way that Graph permissions must be added to the service principal of the automation account used to run a script. This is a one-time operation, and once it’s done, the permissions usually remain undisturbed. More attention needs to be paid to permissions for scripts that run interactively because delegated permissions are used instead of application permissions, so some data might be inaccessible unless the administrative roles held by the signed-in user permits that access.
The $Interactive flag is set by the code shown above when the connection is made. The flag is used to guide processing that must be done in a specific environment. In this case, it’s to invoke some code to check that two permissions needed by the script are available.
If ($Interactive) {
# Check permissions available to the signed-in account and disconnect from the Graph if the requisite permissions are not available
  [string[]]$CurrentScopes = (Get-MgContext).Scopes
  [string[]]$RequiredScopes = @('AuditLog.Read.All','User.ReadBasic.All')

  $CheckScopes =[object[]][Linq.Enumerable]::Intersect($RequiredScopes,$CurrentScopes)
  If ($CheckScopes.Count -ne 2) {
    Write-Host ("To run this script, you need to connect to Microsoft Graph with the following scopes: {0}" -f $RequiredScopes) -ForegroundColor Red
    Disconnect-Graph
    Break
  }
}
Pay Attention to Input and Output
Input for runbooks often comes through parameters or input files. Parameters are handled differently in Azure Automation, so some adjustments might be necessary to the parameters used interactively. However, in many cases, the same parameter definitions can be used interactively and in Azure Automation. The difference is how the parameter values are passed.
For example, let’s assume that a menu of jobs is available. Each option in the menu launches an Azure Automation runbook to process information in the background. In this kind of setup, the parameter values are declared as key-value pairs in a hash table, which is then passed as a parameter to the Start-AzAutomationRunbook cmdlet.
To illustrate the point, here’s some code that connects to an Azure account identified by a subscription before creating a hash table for parameters and submitting an automation runbook for processing. If the job is submitted successfully, a loop checks the status of the job every ten seconds until it finishes and then displays the output stream.
Connect-AzAccount -Subscription 35429342-a1a5-4427-9e2d-551840f2ad25
$AutomationAccountName = "M365Automation"
$AutomationResourceGroup = "ExoAutomation"
$Parameters = @{"DestinationEmailAddress"="tony.redmond@office365itpros.com"}
$Job = (Start-AzAutomationRunbook -AutomationAccountName $AutomationAccountName -Name "LastAppsAccessedByUsers" -ResourceGroupName $AutomationResourceGroup -Parameters $Parameters)
# Find out if the job is working
If ($Job) {
$LoopInProgress = $true
While ($LoopInProgress) {
Write-Host "Checking job status…"
$Job = Get-AzAutomationJob -AutomationAccountName $AutomationAccountName -Id $Job.JobId -ResourceGroupName $AutomationResourceGroup
$Status = $job.Status
$LoopInProgress = (($status -ne "Completed") -and ($status -ne "Failed") -and ($status -ne "Suspended") -and ($status -ne "Stopped"))
Start-Sleep -Seconds 10
}
} Else {
Write-Host "Unable to submit automation job"
Break
}
# Get Output Stream and display it to the user
Write-Host ""
Write-Host "Output from job"
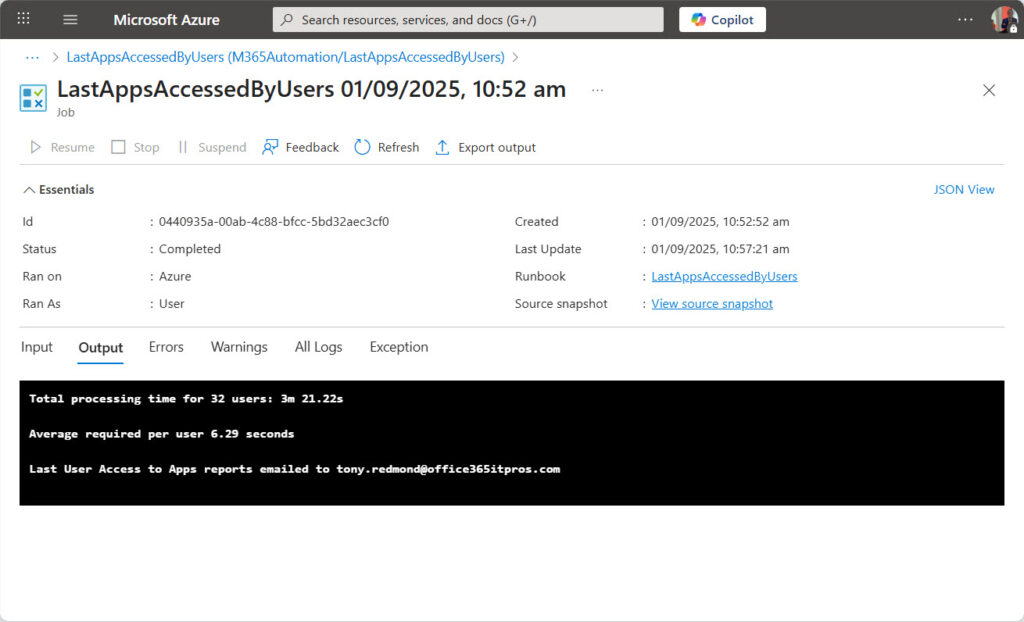
Get-AzAutomationJobOutput -AutomationAccountName 'M365Automation' -Id $job.JobId -ResourceGroupName 'ExoAutomation' -Stream Output | Format-Table Summary
Summary
-------
Total processing time for 32 users: 3m 21.22s
Average required per user 6.29 seconds
Last User Access to Apps reports emailed to tony.redmond@office365itpros.com
The information shown above is the same that you see in the test pane when running a script there or when checking the output information for a run of a runbook through the Azure portal (Figure 1). The value of any input parameters passed to the runbook are available through the input tab.
Parameters can be defined when scheduling a runbook. This is fine if the parameter is static, but when dynamic values are involved (such as redirecting an output email to a different address), it’s more effective to use another source for runbooks to extract parameter information when they run. Examples of potential sources include a file stored in a SharePoint Online document library or web site, or an item in a SharePoint list.

Handling Write-Host and Write-Output
Interactive scripts often include copious Write-Host commands to keep those who run the code up to date with its progress. Other scripts feature the Read-Host command to look for user input, and some scripts feature complex GUIs. None of this works in Azure Automation because the “streams” used by Azure Automation don’t appear until the code is finished executing.
You can leave Write-Host commands in place for Azure Automation to ignore (because the headless server is the target host). Insert a Write-Output command for any information you want displayed but remember that output is only visible at completion. I use the $Interactive flag to control the output I want to see like this:
If ($Interactive) {
    Write-Host ("Total processing time for {0} users: {1}m {2}s" -f $users.count, $Minutes, $Seconds) -ForegroundColor Cyan
    Write-Host ("Average required per user {0} seconds" -f [math]::Round($TimeRequired.TotalSeconds / $users.count, 2)) -ForegroundColor Cyan
} Else {
    Write-Output ("Total processing time for {0} users: {1}m {2}s" -f $users.count, $Minutes, $Seconds)
    Write-Output ("Average required per user {0} seconds" -f [math]::Round($TimeRequired.TotalSeconds / $users.count, 2))
}
Other methods to accept input for scripts must be implemented (reading parameters from an item in a SharePoint list is a good approach), and GUIs eliminated. Anything designed to facilitate user interaction makes no sense when running on a headless server.
Generation of output files also falls into the “pay attention to output” category. When running interactively, report and other files are probably created on a local drive and it’s easy to access the files afterwards. When files are created in Azure Automation, the files must be retrieved and placed somewhere they can be accessed because once the job finishes, all files are removed from the headless host server where the runbook executed. Remember to check the folder where files are created because there’s no guarantee that a folder chosen as an appropriate destination for a script running on a workstation will exist on a headless server.
Adding files as attachments to mail messages sent by the script is an easy way to make sure that reports are kept. Uploading files to a network location or a SharePoint document library is another way to save information, as is writing or updating items in a SharePoint list.
No Rocket Science
None of this is rocket science. I’m sure that professional PowerShell developers already take these steps and do more to smoothen how their code works when run by Azure Automation. But many occasional PowerShell developers are found in the ranks of Microsoft 365 tenant administrators, and that’s my target audience. Hopefully, the information presented here will help your automation processes work a tad better.


