
When you create an Office 365 Group, you’ll find that it can be helpful to ensure that anyone accessing it has a clear idea of what the team should be used for, or the sensitivity of the data within the group. Classifications are a great way to accomplish this and don’t require extensive configuration to use.
The user experience with classifications is straightforward. Behind the scenes, classifications are tied to Office 365 groups and defined at a group level, rather than tied to the data or SharePoint, Exchange, Microsoft Teams or other services.
User Experience
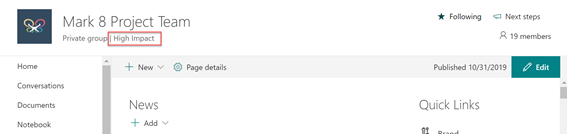
Group Classifications are displayed alongside the privacy of the group – for example, Private Group |Classification Name. You’ll see an Office 365 Group with a classification shown below, displayed prominently within the SharePoint Team site:
One important thing to remember is that the Group Classification is strictly advisory to users and usually form part of your overall governance strategy. The data within isn’t marked in a particular way and a classification can’t be tied to a different technology, like sensitivity labels to enforce policies that apply to data. You’ll need to combine these different features together to build a solution – but it does make it easy for you to send the right signals to an end user.
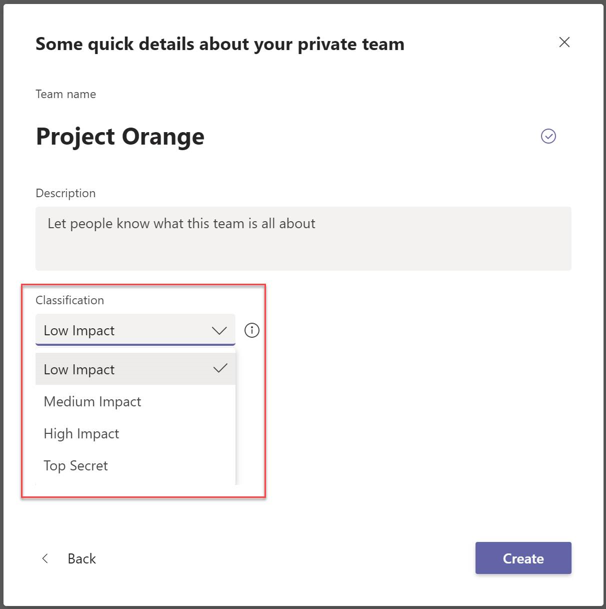
Not only will the send the right message to users accessing a, but Group Classifications are intended to be chosen by end users at the time of Team creation. When we create Group Classifications these will be made available as a drop-down list when people create a Team:
As you can see – Group Classifications are simple in use and don’t have a high overhead. One overhead you do need to be aware of though is that Group Classifications are an Azure AD Premium P1 feature, or included with EMS E3 or Microsoft 365 E3 licencing.
What type of classifications should you create?
You’ve taken a look at Group Classifications and you think they look great. So, what should you use them for?
Considering that they have no effect on the treatment of the data by Office 365 (i.e. they don’t affect permissions, retention, DLP or encryption) you have ultimate freedom over how you use them.
However, you want the usage to be consistent and act as a way to guide your users to the right behaviour. This might either be to indicate how they use Teams, or how they use the data within – or even a combination of the two:
Classifications based on usage
You could choose to define Group Classifications based upon the intended usage. This should be drawn from the internal use cases you’ve defined within the business when planning your Teams roll-out. When users then create Teams, for example, they’ll have a clear understanding of why they’ve created the team – and when they invite others in, everyone else will understand.
For example, a business that works on projects, bids for work and has multiple departments working together on initiatives might benefit from using classifications such as these:
- Project – A type of team used for storing the data associated with a project or defined initiative with a longer lifecycle
- Bid – A short-lived team using for storing data relating to making a bid to win a new project
- Virtual team – A cross-department initiative including multiple people working together on an initiative that spans bids and projects and has a longer lifecycle
- Department – A team setup to reflect a manager and their reports
Classifications based on data type
More commonly though you will choose to create Group Classifications based on the intended sensitivity of the data. It may be that you want to allow some flexibility in how the data is used, but allow people to set the classification and send the right signals to their colleagues.
When creating classifications like these, you will benefit from using as few as possible, for example:
- High Impact – Information that is commercially sensitive or subject to regulation and should be treated with care (such as internal price books, employee data or financial information)
- Medium Impact – Information that is not commercially sensitive but should not be shared outside of the company.
- Low Impact – Not sensitive to the commercial operation of the business, but likely work-related (such as sales brochures, retail price lists or Christmas party plans)
By ensuring that restrictions based on data type are kept to the minimum required, you can then easily combine classifications together where required, within creating too many classifications.

Creating Classifications
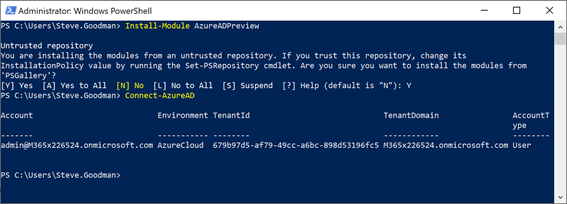
Once you have decided that you plan to use Group Classifications then creating them is reasonably straightforward. You create Group Classifications using the Azure AD PowerShell module, using the following steps:
First, connect to Azure AD PowerShell. Below we install the module, if it’s not available, then connect:
 Install-Module AzureADPreview
Connect-AzureAD
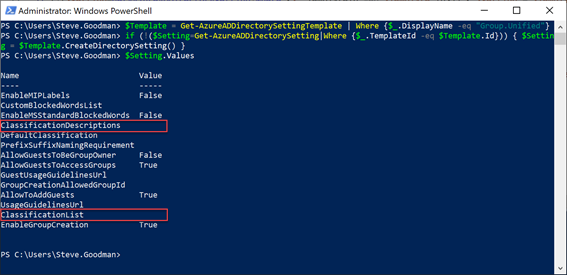
We’ll then examine any Group Classifications that already exist. The below cmdlet will first, retrieve the Office 365 Groups template from Azure AD’s Directory Settings templates. In the next line, it will attempt to find existing settings configured, and if the exist use them. If they don’t already exist it will create a blank template. Finally it will list the available settings:
<Example>
$Template = Get-AzureADDirectorySettingTemplate | Where {$_.DisplayName -eq "Group.Unified"}
 if (!($Setting=Get-AzureADDirectorySetting|Where {$_.TemplateId -eq $Template.Id})) {$Setting = $Template.CreateDirectorySetting}
 $Setting.Values
In the screenshot below you will see the ClassificationList and the ClassficiationDescriptions fields listed. These are the fields that contain the necessary information for Group Classifications within comma-separated lists.
If no Group Classifications exist, then we’ll need to add new classifications.
In the example below, we’ll create a list of new Group Classifications and then upload them to Azure AD. The Classification List is created as a plain-text, comma-separated list of classifications. The Classification Descriptions is created as a plain-text, command separated list too, but for each value it contains a both the classification and the relevant description, separated by a colon.
We’ll configure those in the first two lines, and in the third line we will check again if settings exist – if the don’t we’ll create new settings and if they don’t, we’ll update the existing settings:
$Setting["ClassificationList"] = "Classification 1, Classification 2"
$Setting["ClassificationDescriptions"] = "Classification 1 : Description 1, Classification 2, Description 2"
 if (!(Get-AzureADDirectorySetting|Where {$_.TemplateId -eq $Template.Id})) {New-AzureADDirectorySetting -DirectorySetting $Setting} else {Set-AzureADDirectorySetting -Id $Setting.Id -DirectorySetting $Setting}
In the screenshot below we’ve created three new classifications, based on one of the examples above. This is then saved to Azure AD:

However, if you already have Group Classifications then we have two options. First, we could choose to replace the existing Group Classifications and re-create new ones by following the approach above.
Or, we could add additional classifications. To add more, we’ll need to add text to each field rather than simpler replace it. We do that by using the += operator and add text preceded by a comma to ensure that each field is interpreted by Azure AD correctly. As we know the settings already exist, we simply update the settings with the final line of code:
 $Setting["ClassificationList"] += ",Classification 3"
 $Setting["ClassificationDescriptions"] += ",Classification 3 : Description 3"
 Set-AzureADDirectorySetting -Id $Setting.Id -DirectorySetting $Setting
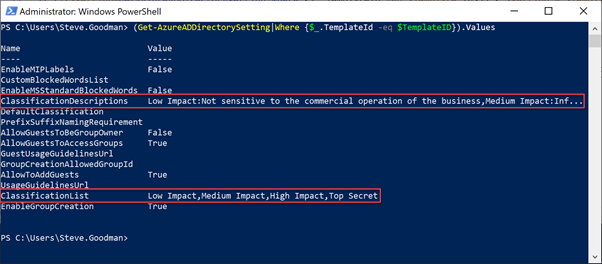
In the screenshot below, we’ve added a fourth classification – Top Secret:

After either adding new classifications or updating existing ones we should then check these have been successfully saved. We can verify this by running the following command:
(Get-AzureADDirectorySetting|Where {$_.TemplateId -eq
$TemplateID}).Values
The changes should take effect within a couple of minutes – but may take longer to propagate to all services like Teams.
You’ll then be able to update existing groups with classifications, and users will see the option to set a classification when they create a new Office 365 Group (such as via Teams):

Summary
In this article, we’ve examined what Group Classifications are and why we’d want to use them within Office 365 to assist with governance. Before creating any it’s important to understand why and how we’ll use them, then define the classifications we’ll create. Finally, we’ve examined how to create and modify classifications.


If you wanted to migrate classification list to MIP labels then will it just automatically removed the previous classification list ?
any good process to follow !
Hey Steve,
Thanks for this valuable resource.
I believe there is a slight typo in some of your code.
Instead of $Setting = $Template.CreateDirectorySetting
it should be $Setting = $Template.CreateDirectorySetting()