In this post I’m going to discuss data loss prevention (DLP) in Office 365, which I feel is an under-utilized feature by a lot of organizations. I’ve been meaning to write this post for some time now, and a conversation on Facebook today reminded me that I hadn’t gotten around to it yet.
Data loss prevention is a compliance feature of Office 365 that is designed to help your organization prevent the intentional or accidental exposure of sensitive information to unwanted parties. DLP has its roots in Exchange Server and Exchange Online, and is also applicable in SharePoint Online and OneDrive for Business.
DLP uses a content analysis engine to examine the contents of email messages and files, looking for sensitive information such as credit card numbers and personally identifiable information (PII). Sensitive information should typically not be sent in email, or included in documents, without taking additional steps such as encrypting the email message or files. Using DLP you can detect sensitive information, and take action such as:
- Log the event for auditing purposes
- Display a warning to the end user who is sending the email or sharing the file
- Actively block the email or file sharing from taking place
Sometimes customers dismiss DLP because they don’t consider themselves to have the type of data that needs protecting. The assumption is that sensitive data, such as medical records or financial information, only exists for industries like health care or for companies that run online stores. But any business can handle sensitive information on a regular basis, even if they don’t realize it. A spreadsheet of employee names and dates of birth is just as sensitive as a spreadsheet of customer names and credit card details. And this type of information tends to float around more than you might expect, as employees quietly go about their day to day tasks, thinking nothing of export a CSV file from a system and emailing it to someone. You might also be surprised how often employees send emails containing credit card or banking details without considering the consequences.
How Sensitive Information is Detected by DLP
Sensitive information is identified by regular expression (RegEx) pattern matching, in combination with with other indicators such as the proximity of certain keywords to the matching patterns. An example of this is credit card numbers. A VISA credit card number has 16 digits. However, those digits can be written in different ways, such as 1111-1111-1111-1111, 1111 1111 1111 1111, or 1111111111111111.
Any 16 digit string is not necessarily a credit card number, it could be a ticket number from a help desk system, or a serial number of a piece of hardware. To tell the difference between a credit card number and a harmless 16-digit string, a calculation is performed (checksum) to confirm that the numbers match a known pattern from the various credit card brands.
Furthermore, the proximity of keywords such as “VISA” or “AMEX”, along with the proximity to date values that might be the credit card expiry date, is also considered to make a decision about whether the data is a credit card number or not.
In other words, DLP is usually smart enough to recognize the difference between these two texts in an email:
- “Can you order me a new laptop. Use my VISA number 1111-1111-1111-1111, expiry 11/22, and send me the estimated delivery date when you have it.”
- “My laptop serial number is 2222-2222-2222-2222 and it was purchased on 11/2010. By the way, is my travel visa approved yet?”
A good reference to keep bookmarked is this TechNet page on sensitive information types that explains how each information type is detected.

Where to Start with Data Loss Prevention
When the risks of data leakage aren’t entirely obvious, it’s difficult to work out where exactly you should start with implementing DLP. Fortunately, DLP policies can be run in “audit mode”, allowing you to gauge their effectiveness and accuracy before you turn them on.
DLP policies for Exchange Online can be managed through the Exchange admin center. But you can configure DLP policies for all workloads through the Security & Compliance Center, so that’s what I’ll use for demonstrations in this article. In the Security & Compliance Center you’ll find the DLP policies under Data loss prevention -> Policy. Click on Create a policy to start.
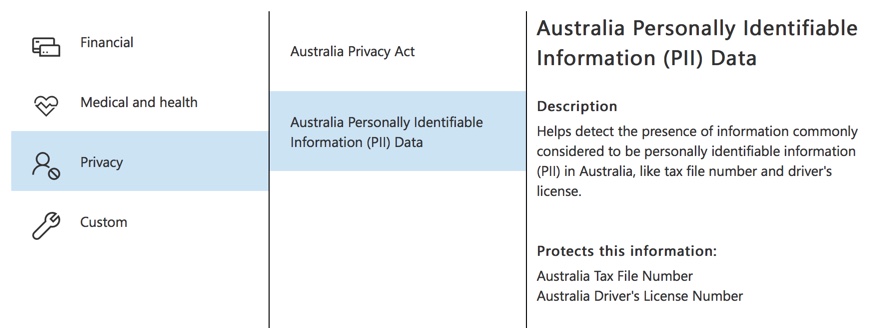
Office 365 provides a range of DLP policy templates you can use to create DLP policies. Let’s say that you’re an Australian business. You can filter the policy templates to display only those that are relevant to Australia, which fall into the general categories of Financial, Medical and Health, and Privacy.
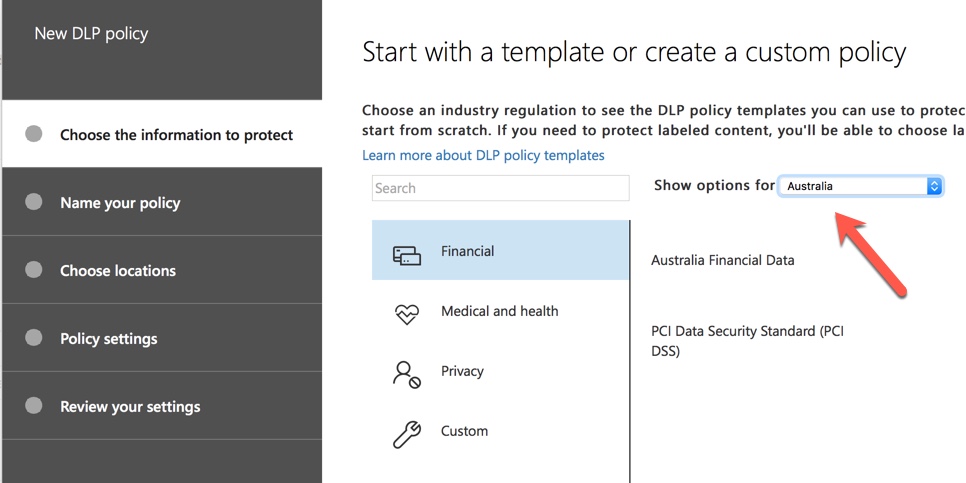
For this demonstration I’ll choose Australian Personally Identifiable Information (PII) Data, which includes the information types of Australian Tax File Number (TFN) and Driver’s License Number.
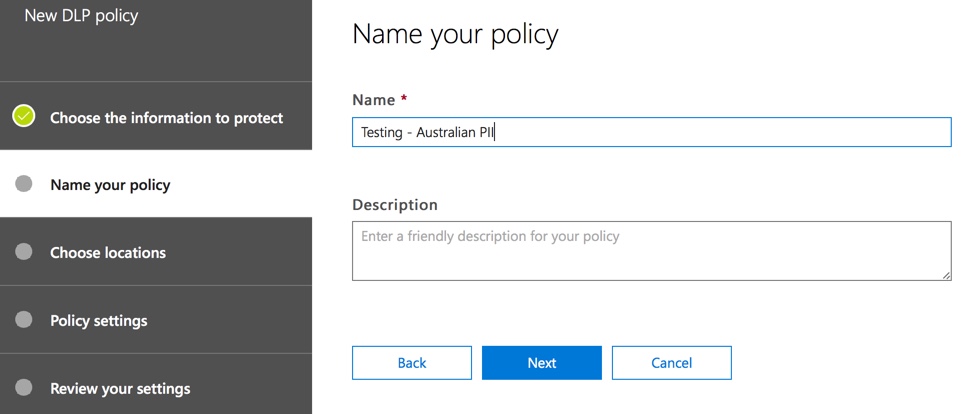
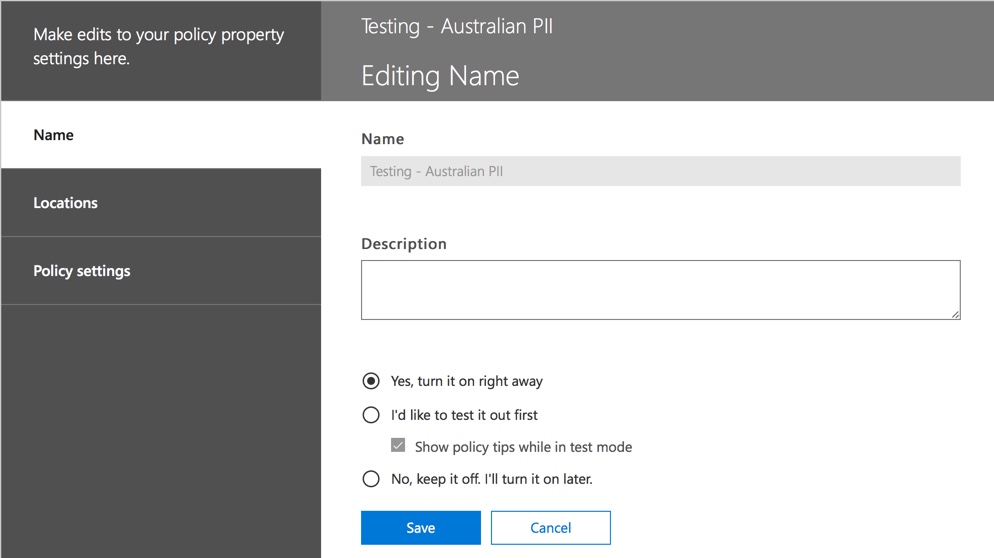
Give your new DLP policy a name. The default name will match the DLP policy template, but you should choose a more descriptive name of your own, because multiple policies can be created from the same template.
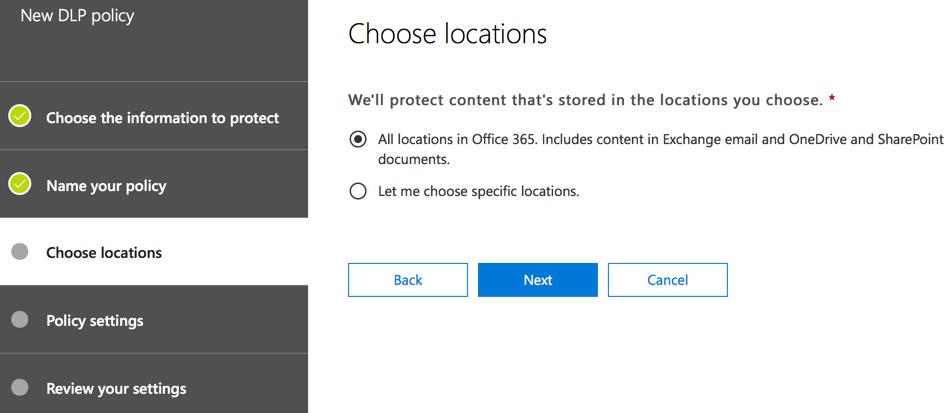
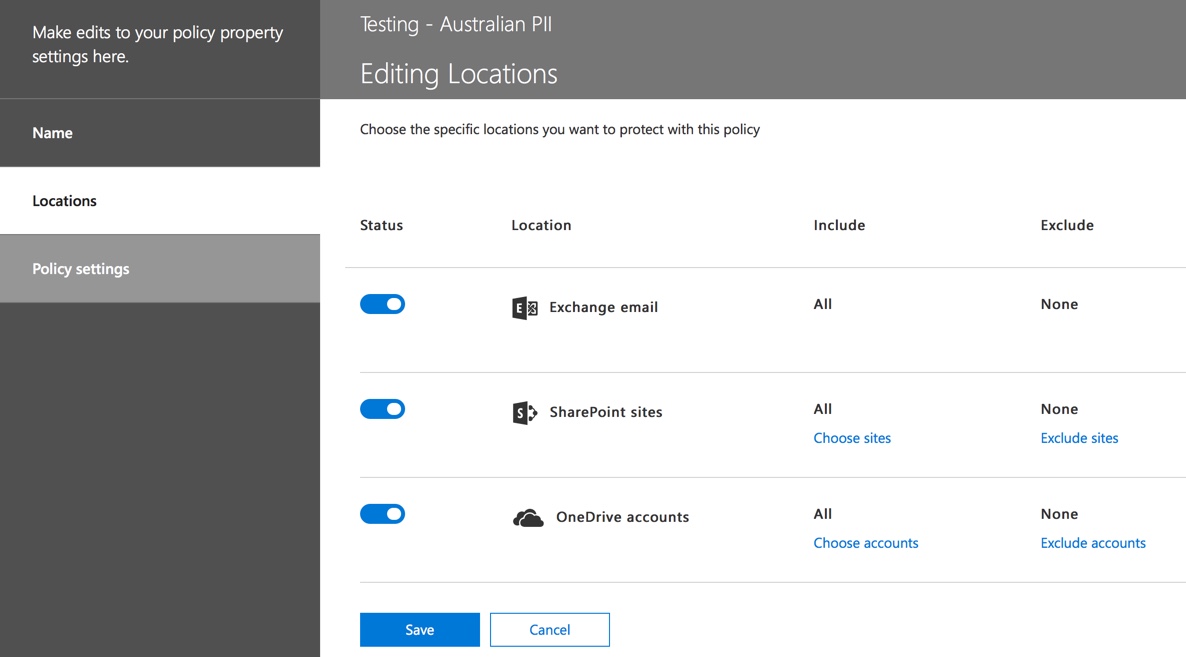
Choose the locations that the policy will apply to. DLP policies can apply to Exchange Online, SharePoint Online, and OneDrive for Business. I am going to leave this policy configured to apply to all locations.
At the first Policy Settings step just accept the defaults for now. There is quite a lot of customization you can do in DLP policies, but the defaults are a fine place to start.
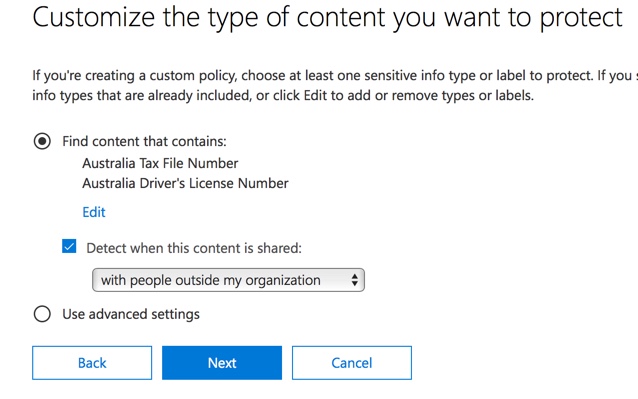
After clicking on Next you’ll be presented with an additional Policy Settings page with more customization options. For a policy that you are just testing, here’s where you can start to make some adjustments.
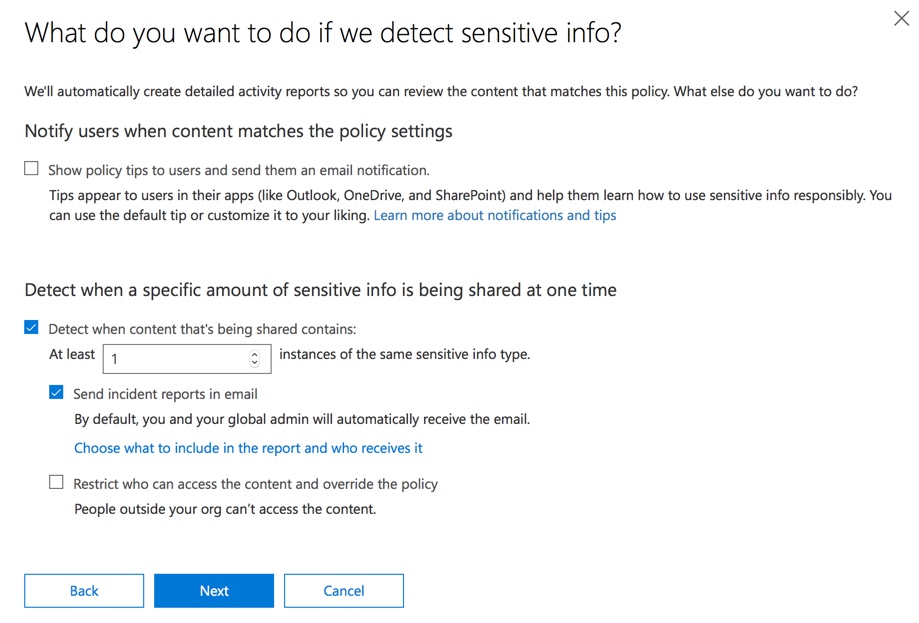
- I’ve turned off policy tips for now, which is a reasonable step to take if you’re just testing things out and don’t want to display anything to users yet. Policy tips display warnings to users that they’re about to violate a DLP policy. For example, an Outlook user will see a warning that the file they’ve attached contains credit card numbers and will cause their email to be rejected. The goal of policy tips is to stop the non-compliant behaviour before it happens.
- I’ve also decreased the number of instances from 10 to 1, so that this policy will detect any sharing of Australian PII data, not just bulk sharing of the data.
- I’ve also added another recipient to the incident report email.
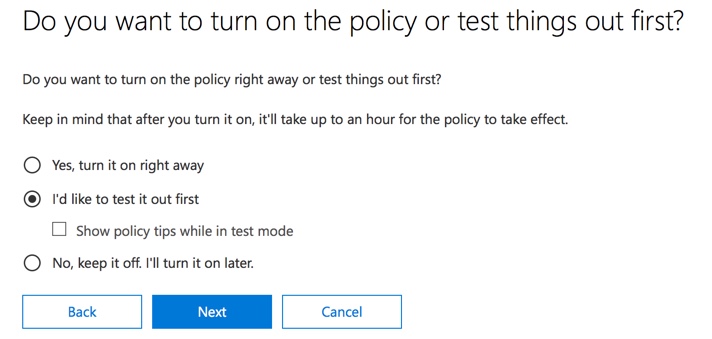
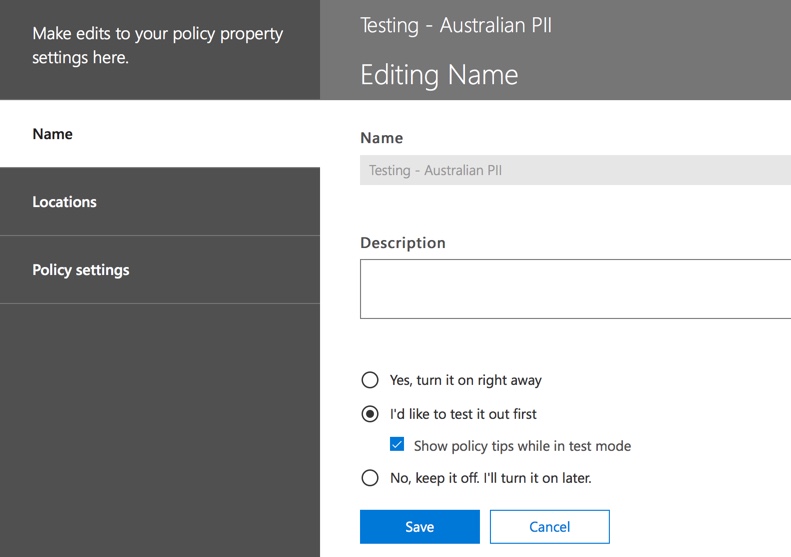
Finally, I’ve configured this policy to run in test mode initially. Notice there’s also an option here to disable policy tips while in test mode. This gives you the flexibility to have policy tips enabled in the policy, but then decide whether to show or suppress them during your testing.
On the final review screen click on Create to finish creating the policy.
Testing a DLP Policy
Your new DLP policy will begin to take effect within about 1 hour. You can sit and wait for it to be triggered by normal user activity, or you can try to trigger it yourself. Earlier I linked to this list of sensitive information types, which provides you with information about how to trigger DLP matches.
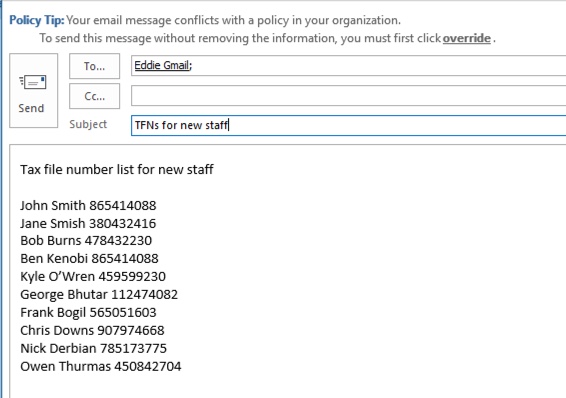
As an example, the DLP policy I created for this article will detect Australian tax file numbers (TFN). According to TechNet, the match is based on the following criteria.
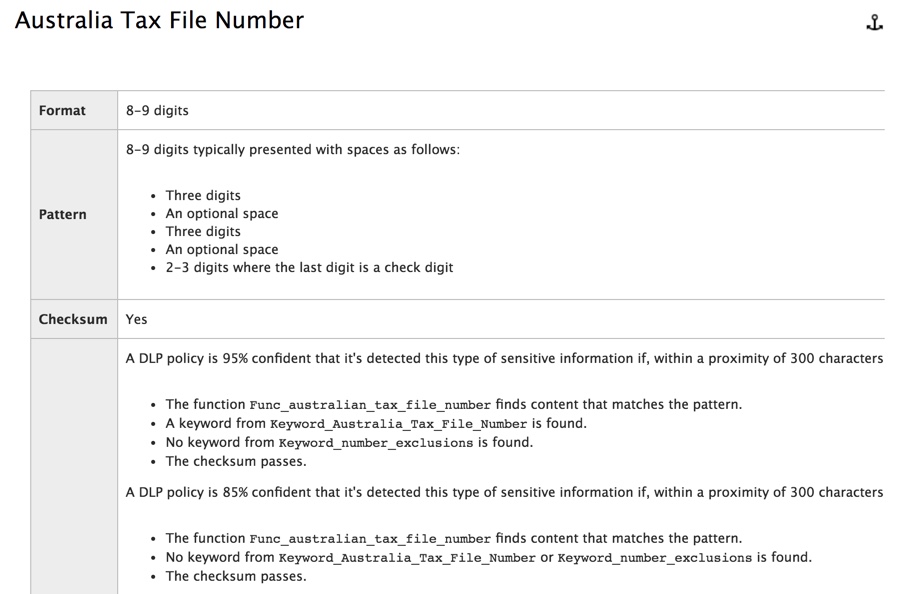
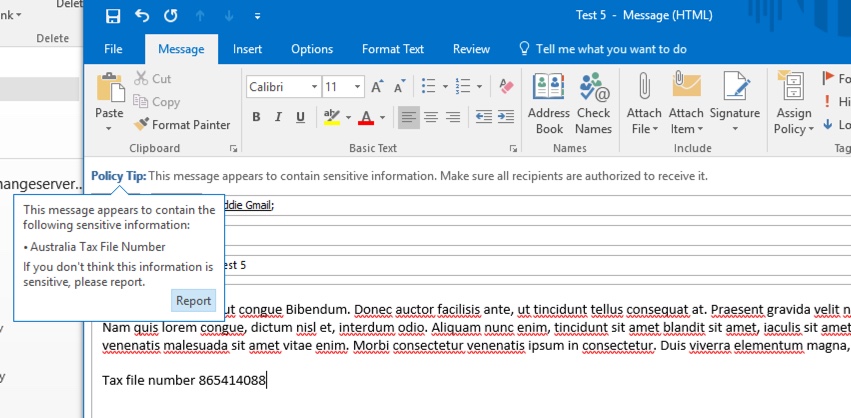
To demonstrate TFN detection in a rather blunt manner, an email with the words “Tax file number” and a 9 digit string in close proximity will sail through without any issues. The reason it does not trigger the DLP policy is that the 9 digit string must pass the checksum that indicates it is a valid TFN and not just a harmless string of numbers.

In comparison, an email with the words “Tax file number” and a valid TFN that passes the checksum will trigger the policy. For the record here, the TFN I’m using was taken from a website that generates valid, but not genuine, TFNs. The same detection

The email alert includes the type of sensitive information that was detected, how many instances were detected, and the confidence level of the detection.
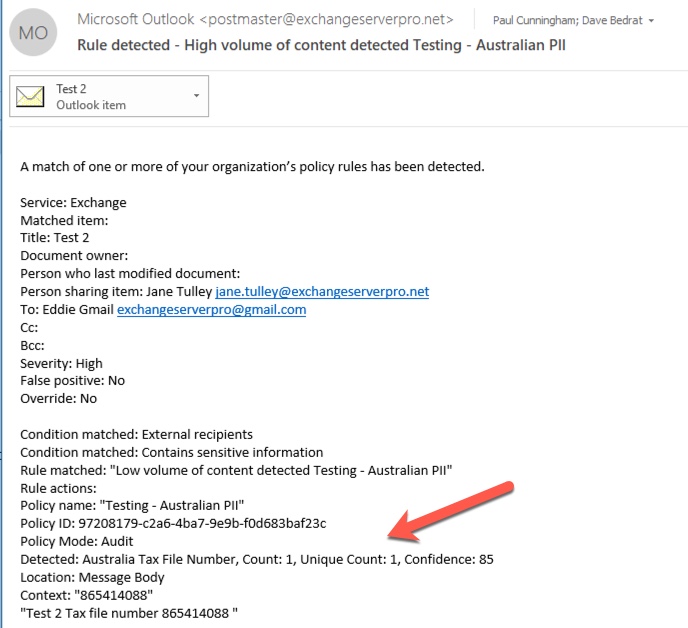
If you leave your DLP policy in test mode and analyze the alert emails, you can start to get a feel for the accuracy of the DLP policy and how effective it will be when it is enforced.
Tuning DLP Policies
As you analyze your policy hits you might want to make some adjustments to how the policies behave. As a simple example, you might determine that one TFN in email is not a problem (I think it still is, but let’s go with it for the sake of demonstration), but two or more instances is a problem. Multiple instances could be a risky scenario such as an employee emailing a CSV export from the HR database to an external party, for example an external accounting service. Definitely something you would prefer to detect and block.
In the Security & Compliance Center you can edit an existing policy to adjust the behaviour.

You can adjust the location settings so that the policy is applied only to specific workloads, or to specific sites and accounts.
You can also adjust the policy settings and edit the rules to better suit your needs.
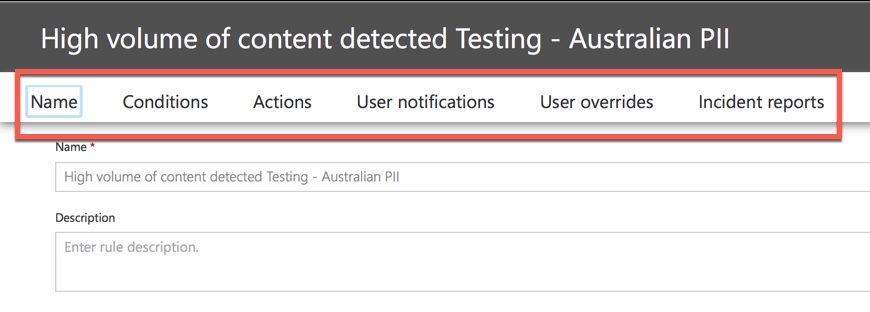
When editing a rule within a DLP policy you can change:
- The conditions, including the type and number of instances of sensitive data that will trigger the rule.
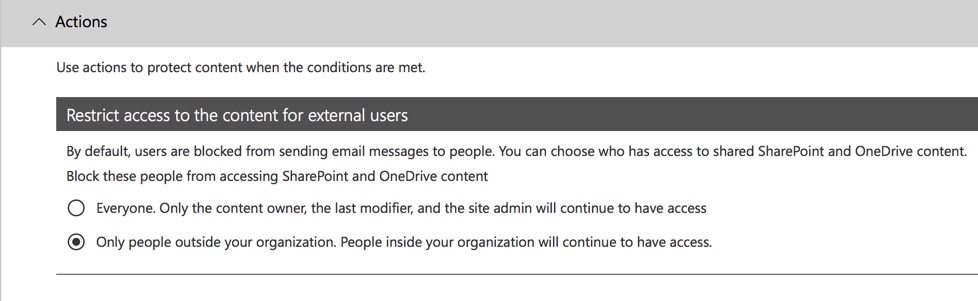
- The actions that are taken, such as restricting access to the content.
- User notifications, which are policy tips that are displayed to the user in their email client or web browser.
- User overrides, which determines whether users can choose to proceed with their email or file sharing anyway.
- Incident reports, to notify administrators.
For this demonstration I’ve added user notifications to the policy (be careful of doing this without adequate user awareness training), and allowed users to override the policy with a business justification or by flagging it as a false positive. Note that you can also customize the email and policy tip text if you want to include any additional information about your organization’s policies, or prompt users to contact support if they have questions.

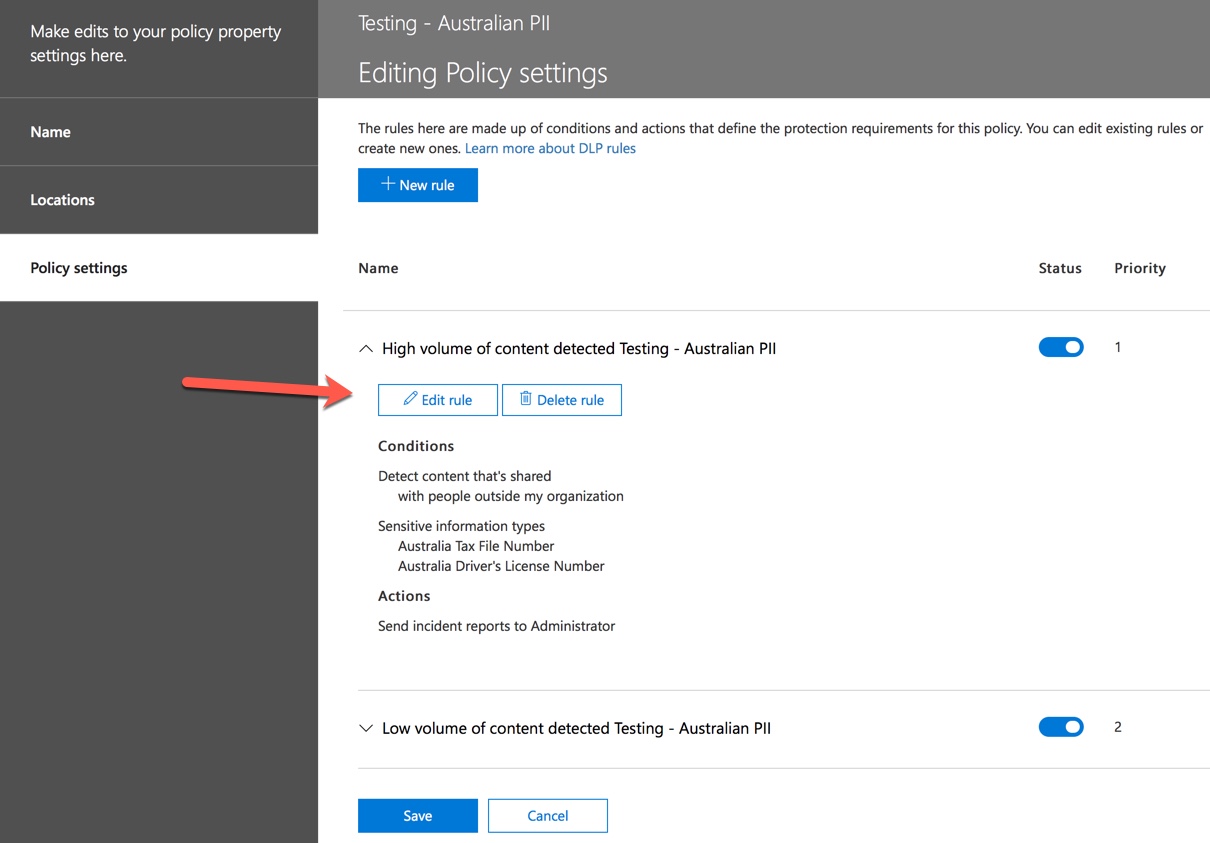
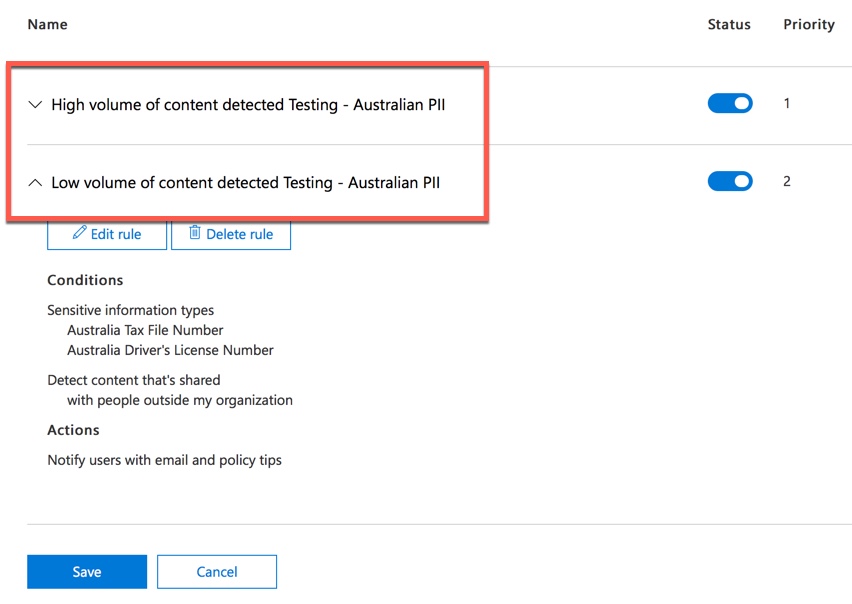
The policy contains two rules for handling of high volume and low volume, so be sure to edit both with the actions that you want. This is an opportunity to treat cases differently depending on their characteristics. For example, you might allow overrides for low volume violations, but not allow overrides for high volume violations.
Also, if you want to actually block or restrict access to content that is in violation of policy, you need to configure an action on the rule to do so.
After saving those changes to the policy settings, I also need to return to the main settings page for the policy and enable the option to show policy tips to users while the policy is in test mode. This is an effective way to introduce DLP policies to your end users, and do user awareness training, without risking too many false positives that impact their productivity.
On the server side (or cloud side if you prefer), the change may not take effect immediately, no doubt due to various processing intervals. If you’re making a DLP policy change that will display new policy tips to a user, the user may not see the changes take effect immediately in their Outlook client, which checks for policy changes every 24 hours. If you want to speed things up for testing, you can use this registry fix to clear the last download time stamp from the PolicyNudges key. Outlook will download the latest policy information the next time you restart it and begin composing an email message.
If you have policy tips enabled, the user will begin to see the tips in Outlook, and can report false positives to you when they occur.

Investigating False Positives
DLP policy templates are not perfect straight out of the box. It’s likely that you’ll find some false positives occurring in your environment, which is why it’s so important to ease your way into a DLP deployment, taking the time to adequately test and tune your policies.
Here’s an example of a false positive that came up during the Facebook discussion I mentioned earlier. This email is quite harmless. The user is providing their mobile phone number to someone, and including their email signature.
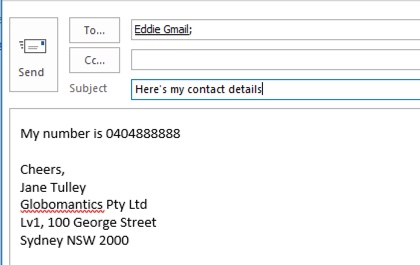
But the user sees a policy tip warning them that the email contains sensitive information, specifically, an Australian driver’s license number.
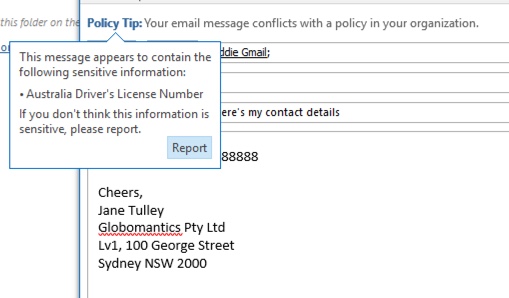
The user can report the false positive, and the administrator can look into why it has occurred. In the incident report email, the email is flagged as a false positive.

This driver’s license case is a good example to dig into. The reason this false positive has occurred is that the “Australian Driver’s License” type will be triggered by any 9-digit string (even one that is part of a 10-digit string), within 300 characters proximity to the words “sydney nsw” (not case sensitive). So it’s triggered by the phone number and email signature, only because the user happens to be in Sydney.
Interestingly, if “Sydney, NSW” has a comma, the DLP policy is not triggered. I have no idea why a comma makes any difference here, nor why other cities and states in Australia aren’t included in the keywords for the Australian driver’s license information type, but there you go. So, what can we do about it? There’s a couple of options.
One option is to remove the Australian driver’s license information type from the policy. It’s in there because it’s part of the DLP policy template, but we’re not forced to use it. If you’re only interested in Tax File Numbers and not driver’s licenses, you can just remove it. For example, you can remove it from the low volume rule in the policy, but leave it in the high volume rule so that lists of multiple drivers licenses are still detected.
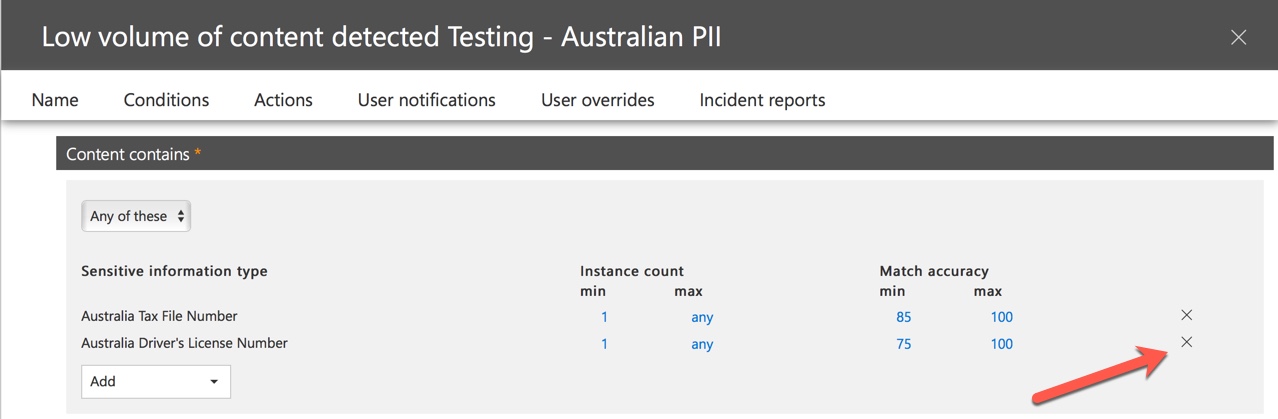
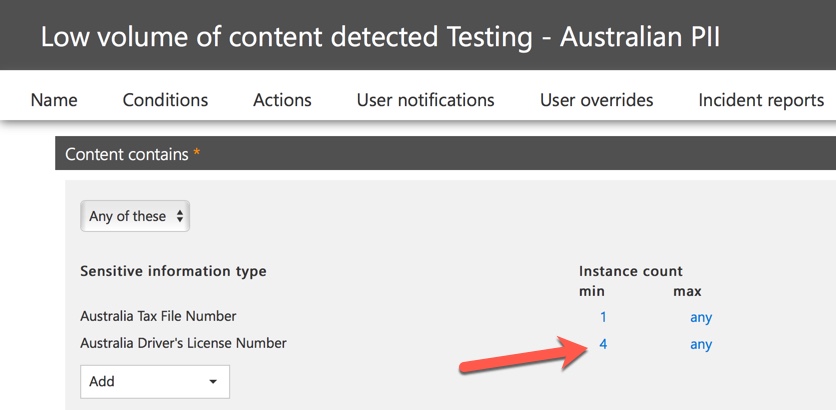
Another option is to simply increase the instance count, so that a low volume of driver’s licenses is only detected when there are multiple instances.
Turning on DLP Policies
When you’re happy that your DLP policy is accurately and effectively detecting sensitive information types, and that your end users are ready to deal with the policies being in place, then you can enable the policy.
If you’re waiting to see when the policy will take effect, connect to the Security & Compliance Center using PowerShell and run the Get-DlpCompliancePolicy cmdlet to see the DistributionStatus.
PS C:\> Connect-IPPSSession


PS C:\> Get-DlpCompliancePolicy "Testing - Australian PII" | Select DistributionStatus

DistributionStatus
------------------
Pending


PS C:\> Get-DlpCompliancePolicy "Testing - Australian PII" | Select DistributionStatus

DistributionStatus
------------------
Success
After turning on the DLP policy, you should run some final tests of your own to make sure that the expected policy actions are occurring. If you’re trying to test things like credit card data, there are websites online with information on how to generate sample credit card or other personal information that will pass checksums and trigger your policies.
Policies that allow user overrides will present that option to the user as part of the policy tip.
Policies that restrict content will present the warning to the user as part of the policy tip, and prevent them from sending the email.

Summary
Data loss prevention policies are useful for organizations of all types. Testing some DLP policies is a low risk exercise due to the control you have over things like policy tips, end user overrides, and incident reports. You can quietly test some DLP policies to see what type of violations are already occurring in your organization, and then craft policies with low false positive rates, educate your users on what is allowed and not allowed, and then roll out your DLP policies to the organization.


can I apply the Dlp policies for the users who are running with exchange plan1 & business-standard licenses?
Hi Paul,
Great article, thanks!
But i have a good question, how can I know who approved the message? This information will be logged on some place?
Great article mate!
Is there a way to do this easily for NZ data instead of Aussie?
If you configure and setup backend DLP policies within O365, will the DLP policies still work and get applied with the older Outlook 2010 SP2 client (short term majority of our end-users will still be on this version until Jan 2020)?
@Sam – the portion of the policy which runs “in the cloud” (blocking, logging, etc.) will work, regardless of the client used. Items like Policy tips, may not work. They certainly don’t work with non-Windows/non-Browser Outlook clients (and certainly don’t work with 3rd Party email clients).
Thanks for an excellent article. I have a very basic question as I am a novice. If DLP is triggered with a tip suggesting to report false identification of a message, does that message still sent to the recipients outside the organization or the admin has to modify/enable override rules?
If you have blocking (“restrict access”)enabled, the following may occur:
– Windows client: user cannot send message
– Browser client: user cannot send message
– Client that doesn’t match the above: User can click “send”, but message will actually be blocked “in the cloud”
If you don’t have blocking enabled, the user can send the message by reporting the message as a false positive (if you have that option enabled).
It’s always a good practice to develop a test rule (that your users are not likely to trigger accidentally), and test/watch the behavior.
My notes about DLP Policy:
– Give them a while to sync across your O365 environment. DLP Policies that apply to Exchange are usually pretty quick to sync up (15 minutes?). OneDrive/SharePoint sync’ing can take hours. Try deleting a policy that involves those apps and watch how long it actually takes to be removed from your list of policies. I’ve deleted SharePoint/OneDrive policies and seen their entry in the policy list showing a status of “deleting” for several hours before they finally disappeared from the policy list.
– Policy Tips sync once every 24 hours to the Windows clients. From my searching and testing, you cannot force a resync (despite all the of the file deletions and registry changes Google might point you to). You can test Policy Tips more quickly with a browser.
– Policy Tips do not wrap to additional lines in the Windows thick apps. Therefore, keep your policy tips short.
How o Exclude numbers or add numbers to exception list in DLP policy?
We will be supporting client with case appended to email subject that are getting caught in DLP!
Ex: CSxxxxx ==> x = unique case numbers
Great article! I’m having a problem though. Our DLP policy itself works fine, but we’ve allowed overrides with justification. SCC powershell and admin center shows the override with justification on, but I never see the option in Outlook or OWA to override and enter a justification. Any ideas on that?
Is there a way to only show content that matches this rule ? I just uploaded a ton of invoices from the auditors and i’m finding that there is a lot of files with ssn numbers. I would like to a, be able to find all the files so I can black out the SSN numbers or automaticly remove the visitor access to the files that are taged with this policy ..
is this possible
than you
Good question. Do these reports give you what you are looking for?
https://support.office.com/en-us/article/view-the-reports-for-data-loss-prevention-41eb4324-c513-4fa5-91c8-8fbd8aaba83b
Good article Paul!
Is there a way to exclude email from getting scanned by DLP engine?
For Ex: If I’m going to mention “confidential” in the sub line, I do not want that eamil to be scanned by DLP engine and trigger an alert (the email might contain content matching to some rule/sensitive info type by still I don’t need any alert to be triggered)
Yes. If you’ve implemented the DLP policy in Exchange, it will appear as Exchange mail flow rules that you can customize with any exceptions that you need.
If you’ve implemented the DLP policy in the Office 365 Security & Compliance Center, you can edit the policy there to set any exclusions you need.
Thanks for your reply! have created DLP policy in O365 Security & Compliance Center, however, I do not see any option where I can go ahead and exclude email from DLP scan if subject or body of the email contains “confidential” keyword. I know that we can exclude distribution group but not sure on how to exclude emails when certain keywords gets matched.
Thank you for this article. Could you clarify, does this apply to E3 versions as well? Our MS sales rep indicates that we need to have E5 to apply DLP rules globally versus by individual user. They indicate E3 only provides the latter. I have had a difficult time finding good information on the DLP differences between the two. Thanks!
They may be referring to Office 365 Advanced Data Governance, which is an E5 feature. But if your sales rep is giving you confusing information, I would suggest the best course of action is to ask them to explain themselves better.
Great article but am i missing something can this be used to stop sensitive data from coming into the organisation ?
Thanks
If you manually construct the mail flow rules, I don’t see any reason why it wouldn’t work.
Do the DLP policies for e-mail still live in the Global Transport rules with the method in the article? I originally configured the DLP policies directly in exchange and then modified the rules to apply Office Message Encryption for any e-mail that is overridden or reported as a false positive. I didn’t see this capability in the Security and Compliance center to apply OME.
Great article, thanks!
However, it wasn’t mentioned which subscriptions and Outlook versions allow to setup DLP policies. It is very important as Interface for configuring DLP is available for all versions of Exchange Online in Office 365 portal and it is possible to create all rules, but it will actually work with O365 E3 and E5 subscriptions only. It’s not obvious and MS doesn’t inform customers about such limitations explicitly.