In my previous article, I wrote about Exchange 2019 Mail Flow and Transport Services, including the transport pipeline, receive connectors, and protocol logging. The default frontend receive connector can accept email sent by anyone and any device for local delivery. If an application or device, like a multi-function scanner, needs to deliver email messages to an internal Exchange 2019 mailbox, then there’s no need to change anything. Just submit the messages to the Exchange server on port 25, and Exchange will deliver the messages.
To relay email messages to external recipients, you can use authenticated SMTP. For authenticated SMTP, Exchange Server uses the client front-end on port 587, but you must have a mailbox to authenticate and use port 587.
Not all applications can use authenticated SMTP to relay email messages, and it can only send messages on port 25. To relay these messages through Exchange 2019, you must configure a new Receive Connector that allows SMTP relay.
I always recommend to avoid changing the default Receive Connectors on an Exchange server. Leave those connectors alone and create dedicated Receive Connectors to serve whatever purpose you have.
Two options exist for a Receive Connector to relay email messages:
- A dedicated Receive Connector, IP restricted, where the account ANONYMOUS LOGON has permission to relay SMTP messages. This is more difficult to configure since its configuration is only possible using Exchange Management Shell, but this configuration uses the least number of privileges.
- A dedicated Receive Connector, IP restricted where hosts are authenticated using permissions groups. This is easier to configure using the Exchange Admin Console, but more permissions are assigned.
I will discuss both in the following sections.
Using ANONYMOUS LOGON
In this scenario, you create a new Receive Connector using the Front-end Transport Service on the Exchange 2019 server that listens in on port 25. Access is restricted to IP addresses to prevent unauthorized relaying by spammers. The account NT AUTHORITY\ANONYMOUS LOGON grants the Ms-Exch-SMTP-Accept-Any-Recipient permission on this Receive Connector. Hosts listed on the Receive Connector can relay through this connector.
Creating a Relay Connector is a two-step process. First, create the Receive Connector using the New-ReceiveConnector PowerShell cmdlet, followed by granting the permission with the Add-ADPermission cmdlet. Here’s an example of creating a new Receive Connector on an Exchange server:
New-ReceiveConnector -Name "SMTP Relay (EXCH01)" -Server EXCH01 -TransportRole FrontendTransport -Custom -Bindings 0.0.0.0:25 -RemoteIpRanges 10.83.4.56 -PermissionGroups AnonymousUsers

Identity                   Bindings     Enabled
--------                   --------     -------
EXCH01\SMTP Relay (EXCH01) {0.0.0.0:25} True
The TransportRole parameter must be set to FrontendTransport to make sure that the new Receive Connector uses the Frontend Transport service on the Exchange 2019 server. The Bindings parameter has the value 0.0.0.0:25, which tells the Receive Connector to use all network interfaces on port 25. The RemoteIpRanges parameter contains the IP range for hosts that can connect to this Receive Connector. In this example, only one IP address is used, but in a typical environment, more IP addresses are used. Hosts not listed in this range cannot connect to this Receive Connector and are automatically connected to the Default Frontend Receive Connector on the Exchange server.
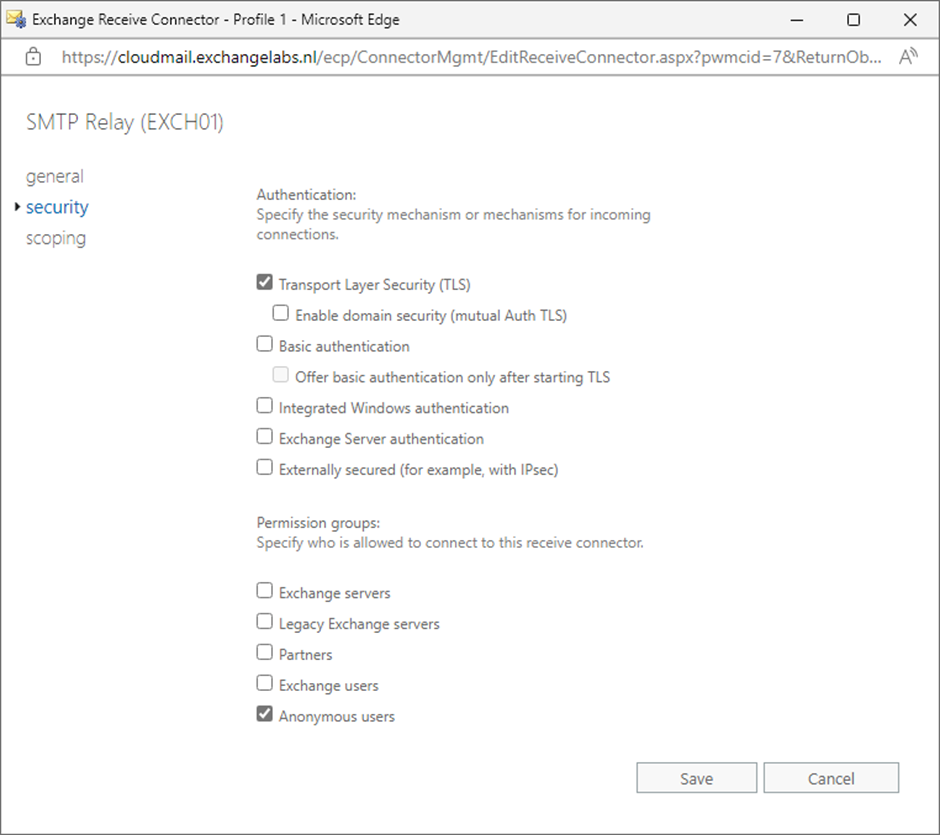
It is possible to create the Receive Connector in the Exchange Admin Console. When you use the Exchange Admin Console, make sure the new Receive Connector uses the Frontend Transport service and that the connector type is set to custom. The network adapter settings must be set to (All available IPv4) on port 25 and the Remote network settings must contain the IP address of the host that need to connect to this Receive Connector. On the new Receive Connector’s security tab, select Transport Layer Security (TLS) and Anonymous users, as shown in Figure 1.
The second step is to assign permissions to the NT AUTHORITY\ANONYMOUS USER account. This is only possible in the Exchange Management Shell. Here’s an example:
Get-ReceiveConnector -Identity "SMTP Relay (EXCH01)" | Add-ADPermission -User "NT AUTHORITY\ANONYMOUS LOGON" -ExtendedRights "ms-Exch-SMTP-Accept-Any-Recipient"

Identity             User                 Deny  Inherited
--------             ----                 ----  ---------
EXCH01\SMTP Relay... NT AUTHORITY\ANON... False False
This will grant the minimum required permission to allow SMTP relay on the new Receive Connector.
To check if the permissions are applied successfully, you can use the Get-ReceiveConnector cmdlet to fetch the details of the connector and pipe the output into the Get-ADPermission cmdlet:
Get-ReceiveConnector -Identity "SMTP Relay (EXCH01)" | Get-ADPermission | where {$_.extendedrights -like "*Any-Recipient"} | ft -a

Identity                   User                         Deny  Inherited
--------                   ----                         ----  ---------
EXCH01\SMTP Relay (EXCH01) NT AUTHORITY\ANONYMOUS LOGON False False
Hosts that connect to this connector are treated as anonymous senders. As a result, the built-in Exchange 2019 anti-spam measures and message size limit checks are applied to the messages that are relayed through this server.
Tip: when creating the Receive Connector, change the banner of the Receive Connector displayed when an SMTP client creates a connection to the Receive Connector. To change the banner of the Receive Connector, use the following command in Exchange Management Shell:
Set-ReceiveConnector -Identity "SMTP Relay (EXCH01)" -Banner "220 Server EXCH01 SMTP Relay Connector"

Using Permission Groups to Allow SMTP Relay
The second option is to create a dedicated Receive Connector for SMTP Relay to use Permission Groups defined in the Exchange organization. A Permission Group is a set of predefined permissions that is granted to a security principal and assigned to a Receive Connector. Using Permission Groups, you can define who can use the Receive Connector and what permissions they get. Permission Groups are built-in Groups, you cannot modify Permission Groups, and you cannot create new Permission Groups.
An Exchange 2019 server has the following Permission Groups:
- Exchange Servers
- Legacy Exchange Servers
- Partners
- Exchange Users
- Anonymous Users
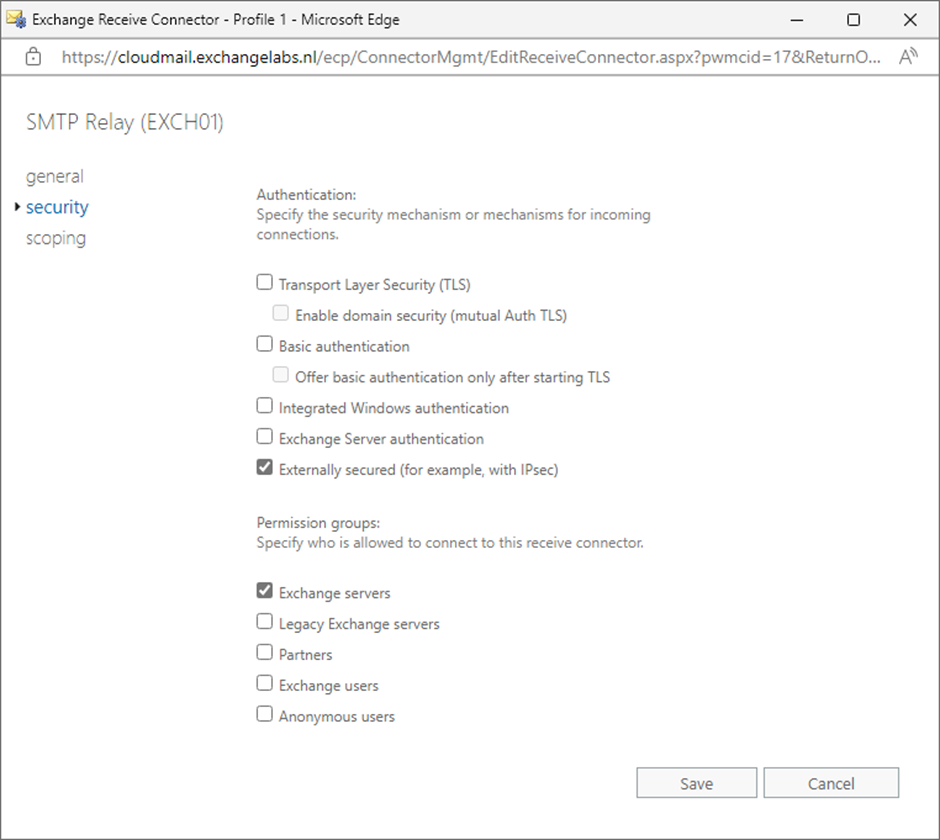
These permission groups can be selected for a connector in the Exchange Admin Console, as shown in Figure 2.
This type of Receive Connector is easier to create as it consists of only one step. To create a new Receive Connector that uses permission groups for SMTP Relay, execute the following command in Exchange Management Shell:
New-ReceiveConnector -Name "SMTP Relay (EXCH01)" -Server EXCH01 -TransportRole FrontendTransport -Custom -Bindings 0.0.0.0:25 -RemoteIpRanges 10.83.4.56 -AuthMechanism ExternalAuthoritative -PermissionGroups ExchangeServers

Identity                   Bindings     Enabled
--------                   --------     -------
EXCH01\SMTP Relay (EXCH01) {0.0.0.0:25} True
Just like the first example, the TransportRole parameter is set to FrontEndTransport, the connector type is custom, the Bindings parameter has the value 0.0.0.0:25 to use all network interfaces, and the RemoteIPRanges parameters contain the IP addresses allowed to connect to this Receive Connector. The difference with the first example is that the AuthMechanism property is set to ExternalAuthoritative, and PermissionGroups is set to ExchangeServers (as shown in Figure 2).
The Receive Connector can be created using the Exchange Admin Console. This is also like the previous example, but on the security tab, you must check the Externally Secured and Exchange Servers checkboxes.
You can use the Exchange Management Shell to check for the ms-Exch-SMTP-Accept-Any-Recipient permissions, which allows SMTP relay. In the following example, you can see that more security principals have this permission than in the first example:
Get-ReceiveConnector -Identity "SMTP Relay (EXCH01)" | Get-ADPermission | where {$_.extendedrights -like "*Any-Recipient"} | ft -a

Identity                   User                                   Deny  Inherited
--------                   ----                                   ----  ---------
EXCH01\SMTP Relay (EXCH01) LABS\Exchange Servers                  False False
EXCH01\SMTP Relay (EXCH01) MS Exchange\Hub Transport Servers      False False
EXCH01\SMTP Relay (EXCH01) MS Exchange\Edge Transport Servers     False False
EXCH01\SMTP Relay (EXCH01) MS Exchange\Externally Secured Servers False False
The Security Principals listed above are all associated with the “Exchange Servers” Permission Group that was used on this connector. Hosts that connect to the Receive Connector are considered authenticated senders. They are considered completely trustworthy, and messages coming from these hosts bypass the Exchange server’s anti-spam measures and message size limit checks.
SMTP Relay tests
After creating a new Receive Connector, you should test it. The quickest way to test a connector is by using Telnet to execute the SMTP commands to send a message. Be aware that the hosts you run Telnet on must be in the RemoteIpranges defined for the Receive Connector.
Open a connection to the Exchange server on port 25 and look for the response. My earlier tip was to change the banner of the receive connector, so if all goes well you should see the following output:
Telnet EXCH01 25
220 Server EXCH01 SMTP Relay Connector
If, for some reason, you cannot connect to the Receive Connector, you are automatically connected to the Default Frontend Receive Connector. In this case, you should see something like the following output:
Telnet EXCH01 25
220 EXCH01.labs.local Microsoft ESMTP MAIL Service ready at Thu, 15 Jun 2023 13:04:46 +0200
If you connect to the correct Receive Connector, you can execute the SMTP commands in your Telnet session to send email. If connected and the Receive Connector permissions are incorrect, you cannot send to external recipients, and you will see the following output:
220 Server EXCH01 SMTP Relay Connector
HELO server
250 EXCH01.labs.local Hello [10.83.4.254]
mail from:noreply@exchangelabs.nl
250 2.1.0 Sender OK
rcpt to:jaapwess@gmail.com

550 5.7.54 SMTP; Unable to relay recipient in non-accepted domain
In this example, when you use a local recipient in your Exchange organization, Exchange accepts and delivers the message.
When the Receive Connector is configured correctly, you can create a message. It will be accepted and queued for delivery as shown in the following output:
220 Server EXCH01 SMTP Relay Connector
HELO Server
250 EXCH01.labs.local Hello [10.83.4.11]
mail from:noreply@exchangelabs.nl
250 2.1.0 Sender OK
rcpt to:jaapwess@gmail.com
250 2.1.5 Recipient OK
data
354 Start mail input; end with <CRLF>.<CRLF>
subject: do you receive this?
Is this message received?
.
250 2.6.0 <38eedf29-270c-42f0-9e08-c47d44e815e8@EXCH01.labs.local> [InternalId=678604832773, Hostname=EXCH02.labs.local] 1559 bytes in 0.326, 4.665 KB/sec Queued mail for delivery
The Exchange server will pick up the message and deliver it to the external recipient.
Which Option Is Best for You?
In this article, I explained two ways of creating a Receive Connector for SMTP relay purposes.
- Create a new Receive Connector and grant the relay permission to the anonymous user. This is more difficult to configure but more secure since anti-spam measures and message size checks are applied.
- Create a new Receive Connector and use permissions groups to create a relay configuration. This option is easier to configure, but no anti-spam measures or message size checks.
It is up to your organization to decide which option best fits your needs.
Microsoft Platform Migration Planning and Consolidation
Simplify migration planning, overcome migration challenges, and finish projects faster while minimizing the costs, risks and disruptions to users.


could use some help we are running Exchange se, also Active Directory windows 2025. had external company sending email from an account using port 587, we created a receive connector allowing their IP address. Was working until end of April. Microsoft seemed to change something now no longer works getting error 451 4.7.0 Temporary server error. Please try again later. PRX4. How can we get external servers to be able to connect to exchange server. Do we need to change ports? Appreciate any suggestions.
Thanks
The command “Get-ReceiveConnector -Identity “SMTP Relay (EXCH01)” | Get-ADPermission | where {$_.extendedrights -like “*Any-Recipient”} | ft -a” does not work on Exchange 2019. Thanks
Error: “The input object cannot be bound to any parameters for the command either because the command does not take pipeline
input or the input and its properties do not match any of the parameters that take pipeline input.”
Hi Dang,
I have to disappoint you, but the command does work fine on Exchange 2019. I don’t have any server here at the moment so I cannot check, but the error indicates another issue I’m afraid.
It helped me to write the command as follows:
Add-ADPermission (Get-ReceiveConnector “v-exch\Anonymous Relay”).DistinguishedName -User ‘NT AUTHORITY\Anonymous Logon’ -ExtendedRights MS-Exch-SMTP-Accept-Any-Recipient
If you start the Exchange Management shell as admin it will work.
Thanks for the post!
Am I right in saying that in a hybrid environment both the ways you explained will be tagged by Exchange Online with the header AuthAs=Anonymous and not AuthAs=Internal?
And this means emails relayed can’t be delivered to 365 Groups.
Roberto
Fun fact. If you’re on CSP agreement you can’t have SMTP servers with outbound SMTP port hosted on Azure. AWS you can if you complete a form and explain how your service isn’t going to be abused for spam. https://learn.microsoft.com/en-us/azure/virtual-network/troubleshoot-outbound-smtp-connectivity#all-other-subscription-types
Ran it to this last month and had to tinker a bit to get it to work. Is it possible to require a specific TLS Cert name on the connecor to only accept mail from a specific host? Scoping to one allowed IP is possible but it’s still anon email so would be great if you can use a certificate to close it up even more.
Nice read!