Make sure you don’t miss Part 1: What is Privileged Access Management, and how to enable it.
Now that we have enabled PAM and have configured a default approver group, it’s time to set restrictions on specific tasks, roles, or cmdlets. This is achieved by means of configuring PAM policies, which are basically rules describing which operation to restrict, who will be responsible for approving access to it, and whether the approval should be automatic or manual. PAM policies can be configured either in the Office 365 Admin Center or via PowerShell. A total of 30 PAM policies can be configured per tenant currently, with plans in place to increase this limit in the near future.
To configure policies via the Office 365 Admin center, first go to the Privileged Access Requests page by expanding the Settings menu on the left, selecting Security & Privacy and then under the Privileged access group, selecting Manage access policies and requests, or use the direct link: https://portal.office.com/adminportal/home#/Settings/PrivilegedAccess. To create a new PAM policy, select Configure policies and then Add a policy. This will bring the Create New Access Policy pane, where you will have to provide the following details:
- Policy type: The available choices are a Task, Role, or Role Group and depending on the choice you make here, the options in the other dropdown menus will be adjusted accordingly.
- Policy scope: The workload to which the policy will apply. The only supported value currently is Exchange.
- Policy name: Depending on the above selection, a list of all available cmdlets, roles or role groups will be presented here. If an entry is not listed, it’s likely that you can still add it to a policy via PowerShell.
- Approval type: Either Manual or Auto. Manual means a member of the designated approver group must authorize the action, automatic means the action will be auto-allowed.
- Approver group: the mail-enabled security group, members of which will be able to approve or deny requests for the given policy.
As an example, if we want to create a PAM policy that will automatically grant access to the Recipient Management role group in Exchange Online, we can use the following settings:

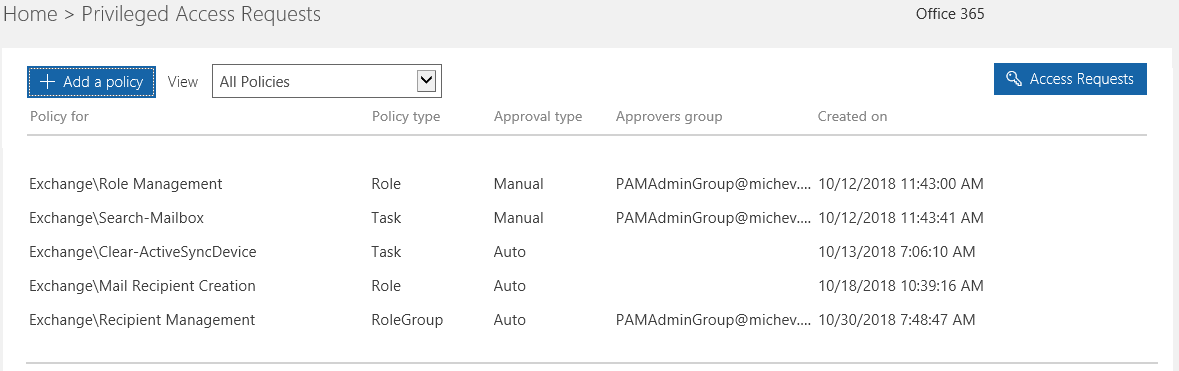
On the same page, you can find a list of preconfigured policies, as shown on the screenshot below. You can filter the policies by Type or Approval type using the View dropdown menu. Clicking a given entry will bring the Review Access Policy pane on the right, where you can edit the Approval type or the Approval group, or if needed, Remove policy.
In case you want to use PowerShell to configure policies, the cmdlet you will need is New-ElevatedAccessApprovalPolicy. In the examples below, we are creating two different policies: one for the “Role management” Exchange role and another one for the Search-Mailbox cmdlet. The syntax is a bit different depending on the policy type, but in general it’s fairly straightforward:
New-ElevatedAccessApprovalPolicy -Role “Exchange\Role Management” -ApprovalType Manual -ApproverGroup PAMAdminGroup

New-ElevatedAccessApprovalPolicy -Task “Exchange\New-MoveRequest” -ApprovalType Manual -ApproverGroup PAMAdminGroup

In case you were wondering – you cannot create a policy for the same task, role, or role group if one already exists, which means that you cannot have both manual and automatic approval for the same type of request.
To get the list of PAM policies for the tenant, you can use the Get-ElevatedAccessApprovalPolicy cmdlet. To modify an existing policy, you can use the Set-ElevatedAccessApprovalPolicy cmdlet, and to remove a policy, the Remove-ElevatedAccessApprovalPolicy one. You can of course perform the corresponding operations from the UI as well, and should you need detailed instructions on how to perform those actions, you can consult the official documentation here.
Testing a Privileged Access Management policy
Now that we have some PAM policies configured, we are finally able to show what the feature is all about. As explained in the previous sections, PAM allows you to restrict access to specific tasks, down to the individual cmdlet level. For example, due to the policy we created above, even Global admin accounts in my tenant are no longer able to run the Search-Mailbox cmdlet:
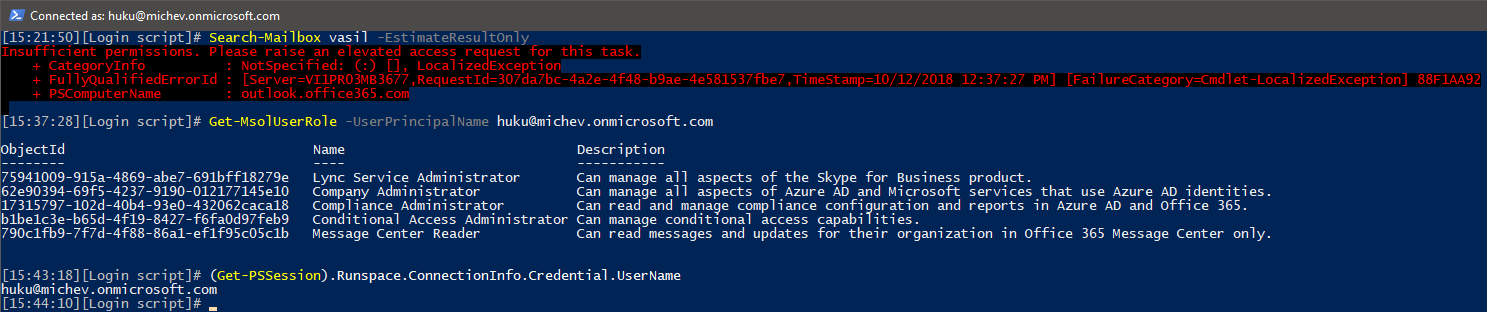
To be able to perform the action, the user must submit an approval request. Be aware that it might take a few minutes for a newly created policy to be enforced, and that the restrictions will not apply within an already-connected session.
When it comes to Role or Role group-based PAM policies however, the feature works differently. Creating such a policy does not prevent admins from assigning access to said role/role group directly. Instead, the policy makes the role/role group “eligible”, very similar to how the Azure AD Privileged Identity Management feature works. This means that a user can now request access to a given role or role group via PAM and be granted just-in-time access to it. More on this in the next section.
Privileged Access Management Approvals
PAM approval requests can be submitted either via the UI, in the same Manage access policies and requests page, or via PowerShell and the New-ElevatedAccessRequest cmdlet. As the UI controls are part of the Office 365 Admin Center however, only users with standing admin roles assignments can actually access the relevant page, all others will get an “You don’t have permission to access this page or perform this action” message. This looks like a strange decision that goes against the principle of Zero Standing Access, so perhaps Microsoft should address this in the future by exposing the PAM requests page via a different endpoint.
In contrast, everyone in the organization has access to the New-ElevatedAccessRequest cmdlet by default, as it is included in the MyBaseOptions role:

In case you find this fact troubling, you can use the familiar RBAC controls to customize the Role assignment policies, so that only specific users will get access to the cmdlet.
To submit an approval request, you must specify which task, role or role group you want access to, the desired Duration for the access (default is 4 hours, and there is no upper limit), and a Reason or justification. As an additional security measure, each approval request is signed via the access token of the user submitting it, which in turn means that you can only submit requests via the ADAL-enabled ExO PowerShell module. If you try to use the “legacy” method, the following error message will be thrown:

Once a request is submitted, you can get its status and the Signature property via the Get-ElevatedAccessRequest cmdlet output:

It’s also important to note that you can only submit requests for tasks/roles for which PAM policies have already been created, otherwise an error will be generated. As a possible improvement to the feature, the UI controls can be updated to dynamically filter out any unavailable entries from the New access request pane’s dropdown menus. This prevents users from accidentally submitting a request for which no PAM policy exists.
Approving requests
When a request is submitted, members of the corresponding approver group are notified via an email message, with the requestor added to the CC line. Only a single approve/deny response is needed, and any of the members of the approver group can decide on the request. A request is valid for 24h before it expires, and it’s automatically declined if no action is taken. As you can see from the below screenshot, no links or action buttons are included in the email notification, so the actual approval process cannot be completed within Outlook.

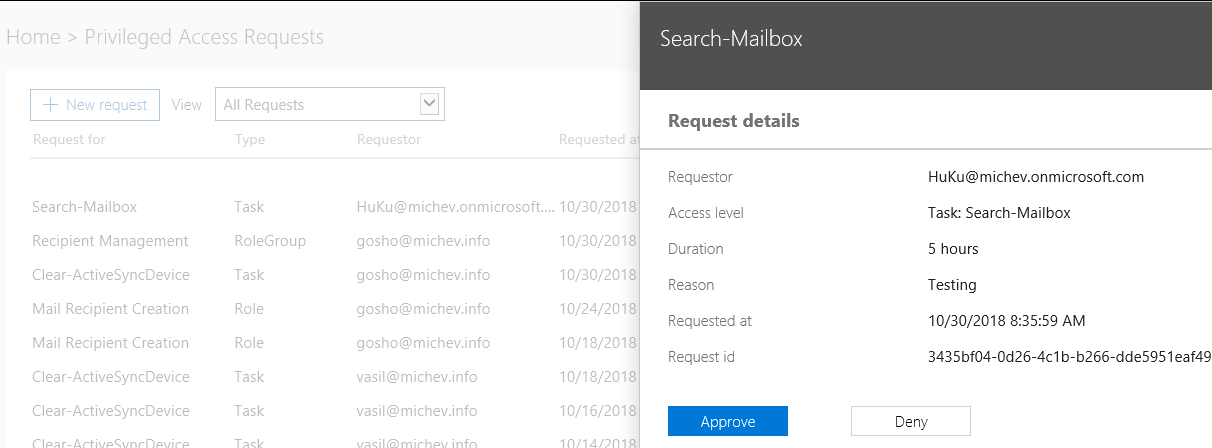
The approver must accept or deny the request by logging in to the Office 365 portal and navigating to the familiar Manage access policies and requests page. A list of recently submitted requests will be shown here with some basic information detailing what the request is for, who submitted it and at what time, as well as its current status. You can use the View dropdown to filter requests based on their status, but no other filtering, searching, or sorting options are available. Clicking any entry in the list will bring up the Request details pane, where you can see some additional information such as the RequestId and decide whether to Approve or Deny the request.
Alternatively, you can use the Approve-ElevatedAccessRequest/Deny-ElevatedAccessRequest cmdlets accordingly, after logging in with the ADAL-enabled ExO PowerShell module. The only parameters needed in order to use those cmdlets are –RequestId (to designate the request) and the –Comment one (basically a reason given by the approver). As there can be multiple requests at any given time, the Get-ElevatedAccessRequest cmdlet can be invoked to make sure the right RequestId value is being used. Do note that similar to the New-ElevatedAccessRequest cmdlet, everyone in the organization can use the Get-ElevatedAccessRequest and see the details for all requests, which might not be desirable.
Once a decision is made on a given request, another email notification is sent, this time addressed to the requestor and with the approver group put in CC. Since the email is almost identical to the “request pending” one showcased above, we have not included a screenshot. In case you are wondering – there is no way currently to change the display name or the email address from which those notifications are being sent.
If the requestee has been granted access, they can immediately perform the corresponding task, from any endpoint that exposes the relevant actions. We can simply retry the same cmdlet we failed on previously:

Access will persist for the duration requested, within any existing or new sessions. After the approval period expires, or if the approval has been revoked at any time (either in the Office 365 Admin center or via Revoke-ElevatedAccessAuthorization), the user will again run into an error message when trying to perform the action.
Note that for task-based requests, you must have been assigned to any role containing the corresponding cmdlet beforehand – obtaining an approval does not automatically assign you the role. Therefore, if the user above did not have access to the Search-Mailbox cmdlet, they will still be unable to run the task. In contrast, for Role or Role group PAM policies, access to the corresponding roles is assigned upon obtaining approval, similar to the way Privileged Identity Management works with Azure AD roles. This in turn means that the user will have to connect to a new session in order to get access to the newly assigned roles.
Automatic approvals
A PAM policy can also be configured for automatic approval of requests. In a nutshell, a policy like this skips the approval workflow, but still allows you to grant scoped, time-bound permissions to a user and audit any actions performed. Automatic approval of PAM requests will still generate an email notification, similar to the one shown in the previous section.
Generally speaking, the auto-approval setting doesn’t make much sense for task-based PAM policies. As described above, such policies serve to enforce an additional approval workflow on sensitive cmdlets, to which the user already has access via the corresponding RBAC role. Since the execution of such cmdlets is already audited, configuring an auto-approval PAM policy only brings an additional email notification as a benefit, which you can configure using other functionalities as well. Still, since approval requests are signed via the access token and cannot be generated by using legacy authentication alone, this adds an additional layer of security. Another possible use case is auditing, which we will discuss in a minute.
Role or Role group-based PAM policies are more suitable for auto-approval, as they are very similar to the concept of eligible roles in Azure AD PIM in the way that they function. Configuring such a policy enables users to quickly gain access to the necessary roles when needed, without having to go over the full approval workflow, but still remaining compliant with the principle of zero standing access.
Some additional notes
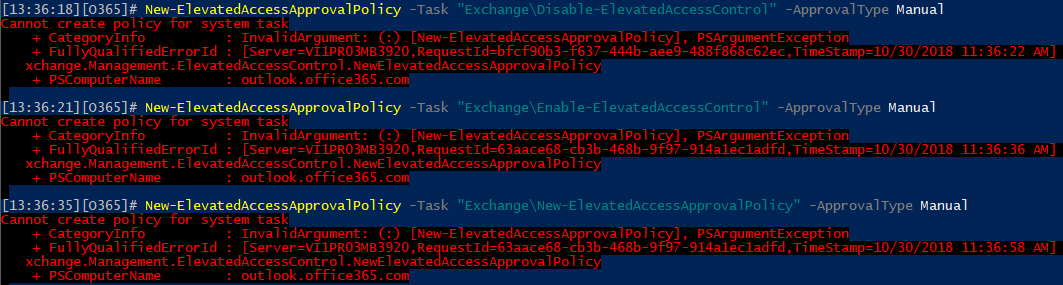
Hopefully, the information presented thus far has convinced you that PAM security is a very useful feature. That said, it’s not without some rough edges. For example, the feature can be fully managed by any user that has the Role management role assigned, as already mentioned above. No Global Admin permissions are needed to disable the feature, and neither is any sort of approval. You might be inclined to address this by creating a new PAM policy to restrict access to the relevant cmdlets, however this is currently not possible. Any attempt to create such policies results in the following:
Microsoft is already working on better processes around PAM configuration and management, so the above scenario should be addressed in the coming weeks. I’m confident that the same will be true for the numerous glitches I run into when using the UI controls, such as “regular” DGs showing in the dropdown menu even though they are not officially supported as an approver group, error messages when trying to approve requests, or the filtering functionality not working as expected.
In addition, during my tests I experienced some odd issues with approvals failing to grant access to the corresponding functionalities. For example, the auto-approval policy I created for the Clear-ActiveSyncDevice cmdlet zealously prevented users from using the cmdlet, even though every request submitted for access to the cmdlet was auto-approved, and the notification email sent. Similar issues were observed with a policy I created for getting access to the Mail Recipient Creation role.
Another thing to keep in mind is that even when users successfully gain access to a Role group via PAM policy, the Role group membership is not updated to reflect this fact. Instead, only users with permanent access will be listed as members. This is in contrast with the PIM feature, where changes in role assignments are immediately visible in the portal or via PowerShell.
On the positive side, PAM is so robust that it allows you to configure policies for even basic cmdlets such as Get-MailboxPermission or Get-Recipient. While most organizations are OK with people having access to Get-* cmdlets, a common complaint is that Exchange auditing doesn’t cover the execution of these cmdlets. This means that you could use the PAM approval workflows and auditing functionality to keep track of who’s using such cmdlets, if needed.
Audit trail
As part of the feature design, Privileged access management includes robust auditing controls at every step of the workflow. Actions including, enabling or disabling the feature, configuring policies, and making changes to the approver groups are all diligently recorded in the Exchange Admin Logs, and then syphoned into the Office 365 Unified Audit Log. Unfortunately, some issues with auditing were experienced during the preparation of this article, most likely because the tenant has not yet received all the underlying elements.
For example, the only events related to PAM that were visible in the Unified Audit logs were those corresponding to the management of the approval policies. Events related to enabling or disabling PAM did not make it to the Unified Admin log, even though they were visible in the Exchange Admin Logs. While missing events is a common issue with the SCC, I cannot be certain of the underlying cause in this case. Hopefully, it was just a temporary fluke.
More concerning is the lack of any events related to approval or denial of access requests, either in the Exchange Admin Log or in the Unified Audit Log. The same is true for creating requests. While none of those events seem to make it to the audit logs, in general you should be able to get all the relevant information via the PAM cmdlets. Unfortunately, the Get-ElevatedAccessRequest cmdlet seems to return only a very limited number of results, and so does the Get-ElevatedAccessAuthorization cmdlet.
Another thing to remember is that Exchange only logs successful executions of the cmdlets. This, combined with the lack of auditing for the New-ElevatedAccessRequest cmdlet, makes it very hard to generate a “usage report” for PAM, like one that lists how many times has a given policy been triggered and how many approvals were given. On the positive side, the team has already promised to provide reporting feature as part of the Graph API.
Summary
In this article, we took the recently released Privileged Access Management feature for a spin. Designed to help your organization reach a state compliant with the Zero Standing Access principle, PAM is easy to configure, yet very powerful. Privileged access management is built on the same technology used for the Lockbox and Customer Lockbox features, and nicely complements the existing RBAC controls in the service, as well as features such as Privileged Identity Management.
While PAM is still in its infancy and has some rough edges, its potential is great. In all fairness, most of the issues observed during the preparation of this article are likely a side-effect of the extended rollout of the feature. With or without rough edges, being able to provide granular, time-bound and fully audited access to a given task, on demand, topped off with an approval workflow is a feature worth consideration, even when it requires E5 licenses. Yes, PAM currently only covers Exchange related tasks, but that’s hardly a surprise given the state of RBAC controls in other workflows, and broader support across the service will surely follow in the months to come.
As PAM expands to cover the Office 365 portal, Azure AD, and the Graph, it will surely help improve the security posture for your organization. So, check out the official announcement, read the documentation over at docs.microsoft.com, and watch this session from Ignite to get even more details on PAM, and start playing with it as soon as possible.


Yes I was wondering…
In case you were wondering – you cannot create a policy for the same task, role, or role group if one already exists, which means that you cannot have both manual and automatic approval for the same type of request.