Exchange Server uses certificates for:
- Authentication – to verify that a server truly is the server that it claims to be.
- Encryption – to prevent theft of or tampering with data in transit by creating a secure connection between servers.
To accomplish these goals, Exchange Server uses several different certificates. In this article, I explain the different types of certificates, their uses, and how to manage them.
SSL Versus TLS
SSL, which stands for Secure Sockets Layer, is an encryption method between a server and a client developed in the early nineties by Netscape. The never-released SSL version 1.0 was followed in 1995 by SSL version 2. This version had some weaknesses and was quickly replaced by SSL version 3.0 in 1996.
The successor of SSL is TLS, which stands for Transport Layer Security. TLS version 1 was introduced in 1999 and is not interoperable with SSL, but TLS 1.0 contains a fallback mechanism to use SSL version 3.0.
Released in 2006, TLS 1.1 was an improved version. It was quickly followed in 2008 by TLS 1.2. Although TLS 1.3 appeared in 2018, TLS 1.2 is still very much in active use. Exchange 2019 uses TLS 1.2 by default and does not yet support TLS 1.3. On the other hand, Windows 2022 supports TLS 1.3. Table 1 gives an overview of each TLS version and its publication and deprecation year.
| Protocol | Published | Status |
| SSL 1.0 | Never published | Never published |
| SSL 2.0 | 1995 | Deprecated in 2011 |
| SSL 3.0 | 1996 | Deprecated in 2015 |
| TLS 1.0 | 1999 | Deprecated in 2021 |
| TLS 1.1 | 2006 | Deprecated in 2021 |
| TLS 1.2 | 2008 | In use since 2008 |
| TLS 1.3 | 2018 | In use since 2018 |

Certificate Usage
Servers use certificates for authentication and encryption. When a client wants to set up a secure connection to a server, the server presents a certificate. Similar to the checks performed at an airport to validate a passport, the FQDN that the client uses must match the certificate, the certificate must not be expired or revoked, and the issuer of the certificate must be trusted.
If all checks pass, the client uses the information found in the certificate to create a secure connection. If not, what happens depends on the circumstances. When using a browser client like OWA, the client displays a warning message, and you can choose to continue to set up an encrypted connection or close the browser. If a problem occurs with an SMTP connection, the client can continue with a secure connection, but the server is not authenticated. Attempting to proceed with an unauthenticated server may present a problem when using domain security or forced TLS, where all checks must pass. If not, the client cannot create a connection, and messages cannot be sent.
Only the connection is encrypted. The data is still sent unencrypted over the encrypted connection. With eavesdropping, a malicious user can sniff the network traffic, but not read the actual data. When a malicious user is capable of terminating the connection, he can see the actual contents. This is known as a ‘man in the middle’ attack. To prevent this, an end-to-end encryption method can be used like S/MIME where the sending Outlook client encrypts the data, and the receiving Outlook client decrypts the data.
A certificate contains a private key and a public key. The public key is used to encrypt data, the private key is used to decrypt the data. The public key is always available, the private key is only available on the server that holds the certificate.
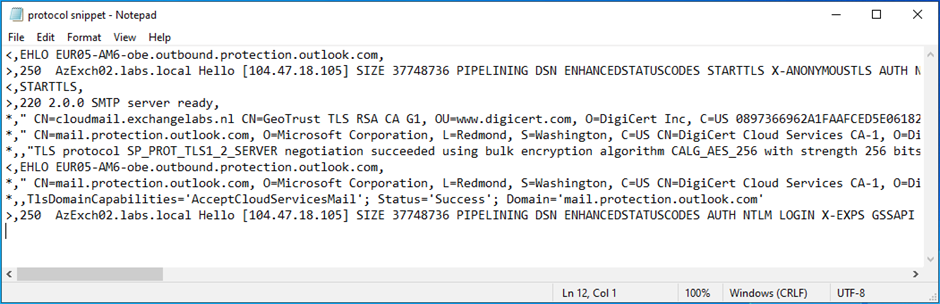
To decrypt traffic from a server, the client must obtain the certificate from the server. The certificate is exchanged using the TLS handshake. This is visible in the SMTP protocol logs as shown in Figure 1.
In an Exchange hybrid configuration, the certificate on the Exchange server must be a valid 3rd party certificate. These certificates are issued by a trusted vendor, and all clients and servers will automatically trust these vendors and the certificates they issue. If it is not a valid 3rd party certificate, mail flow will not work. To work around this, you can opt for verifying the IP address in the Exchange Admin Center instead of the certificate when configuring the Connector.
Exchange and Certificates
When an Exchange server is installed, it comes with three preconfigured certificates. You can see these certificates using the Get-ExchangeCertificate cmdlet. Here’s an example of retrieving Exchange certificate information:
Get-ExchangeCertificate -server EXCH01

Thumbprint          Services   Subject
----------          --------   -------
A9CF3E1D0DCA5DDA87  ....S..    CN=Microsoft Exchange Server Auth Certificate
2259CF7ADEB6D7CDFE  IP.WS..    CN=EXCH01
637647FAB458DB7507  .......    CN=WMSvc-SHA2-EXCH01
Note. The thumbprints have been edited for better readability.
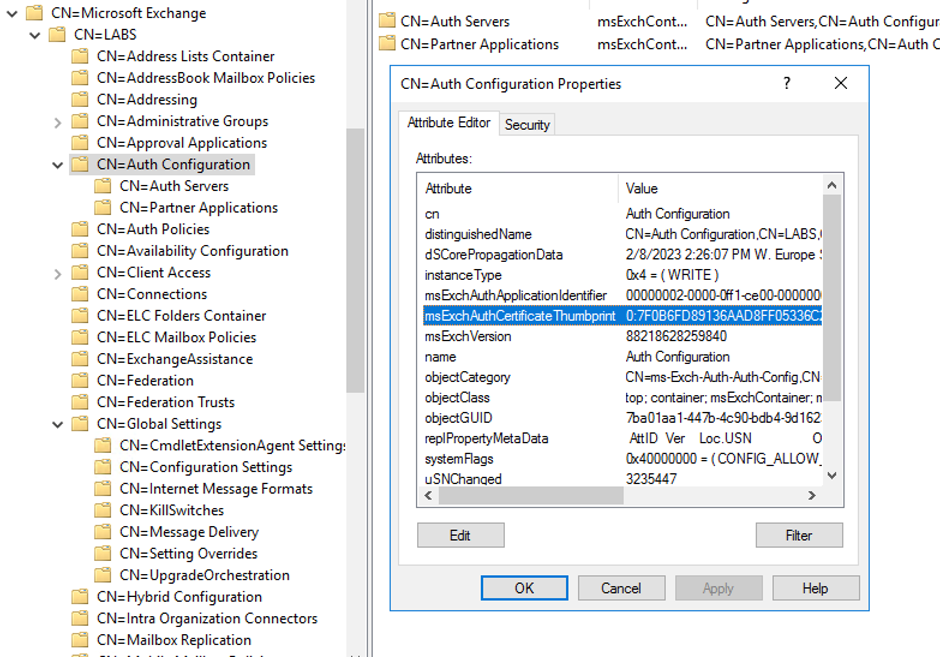
The first certificate is an authentication certificate used for OAuth authentication in a hybrid environment. This certificate is installed on all Exchange servers in the organization, as well as on Exchange 2016 or Exchange 2013 servers when present in the organization.
To make this certificate available to all Exchange servers in an organization, it is stored in the configuration partition of Active Directory (Figure 2).
The second certificate is the Exchange server self-signed server certificate. This certificate is generated during installation of the server, and it has a Common Name (CN) with the NetBIOS name of the server. In this example it is CN=EXCH01. A second Exchange server in the organization has a Common Name CN=EXCH02 etc.
The self-signed certificate is used to create encrypted TLS connections between Exchange servers in the same organization. Since the servers are members of the same Active Directory, they automatically trust each other. There’s no need for these servers to use certificates to validate connections.
The self-signed certificate can also be used to set up encrypted TLS connections with external SMTP hosts. The certificate is then used for encryption only since the external host cannot validate the self-signed certificate. Connections of this type are called ‘opportunistic TLS’.
The self-signed certificate can be used for connections with clients like Outlook on the Web or Outlook, but since this certificate does not contain the name of the server and it is not trusted by the client its use generates an error message (Figure 3).
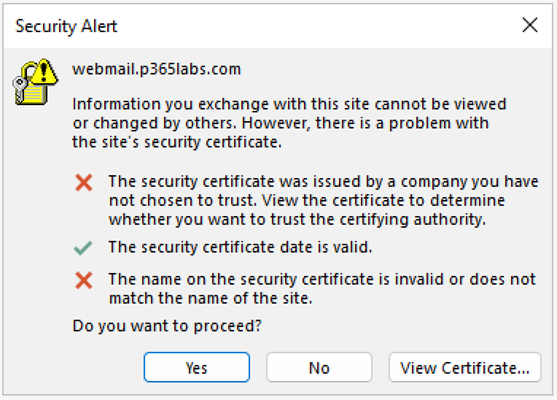
The error message shows the FQDN that the client wants to access (in this example webmail.p365labs.com) and the actual error provoked by the connection. Obviously, the certificate is not trusted and the name on the certificate does not match the name of the site. This makes sense since the name on the certificate is CN=EXCH01.
The third certificate with the Common Name CN=WMSvc-SHA2-EXCH01 is not an Exchange certificate. This is an IIS self-signed certificate created when the webserver role is installed on the server.
Getting and Using Third-Party Certificates
In a normal Exchange environment, you must install a third–party certificate. These certificates are trusted by almost all clients. Or better, the certificate authority that issues these certificates is trusted by all clients, and therefore their issued certificates are trusted.
There are several vendors selling these certificates, but I always use certificates from Digicert because I know they work. For an overview of Microsoft certificate requirements, please check the Certificate requirements for hybrid deployments article on the Microsoft website.
Creating a new third-party certificate consists of the following steps:
- Creating a certificate request.
- Requesting a certificate from a certificate authority and validating ownership of the domain.
- Downloading the answer file and completing the request.
- As a bonus, exporting the certificate for backup purposes.
In previous versions of Exchange Server, it was possible to request certificates using the Exchange Admin Center, but with Exchange 2019 it is only possible to do this using PowerShell. Here’s an example of requesting a new certificate with PowerShell:
$RequestData = New-ExchangeCertificate -GenerateRequest -Server EXCH01 -SubjectName "c=NL, S=Noord-Holland, L=Amsterdam, O=Contoso, OU=RND, CN=webmail.p365labs.com" -DomainName webmail.p365labs.com,Autodiscover.p365labs.com -PrivateKeyExportable $true

Set-Content -path C:\Install\SSL-Request.req -value $RequestData
These commands create a text file containing the certificate request. Upload the contents of the file to the portal of your vendor, validate the ownership of the domain, and when it was issued, download the answer file to your server.
Use the following PowerShell commands to import the answer file (on the same server you used to create the request file!):
$Data = [Byte[]]$(Get-Content -Path
"c:\install\webmail_p365labs_com.p7b" -Encoding byte -ReadCount 0)

Import-ExchangeCertificate -Server EXCH01 -FileData $Data
These commands import the certificate on the target Exchange server. At this point, the certificate is available on the server, but it doesn’t do anything. To enable this certificate for the IIS and SMTP service, use the following PowerShell commands. The value of the thumbprint is shown on the console when importing the certificate in the previous step.
Get-ExchangeCertificate -Server EXCH01 -Thumbprint 603130010099995AD42FBD54856820B9C9AC6BB0 | Enable-ExchangeCertificate -Server EXCH01 -Services IIS,SMTP
When executing this command, a warning message is shown asking if the default self-signed certificate should be overwritten by the new certificate.
Overwrite the existing default SMTP certificate?

Current certificate: '2259CF7ADEB6D7CDFEED739355BE7B32EBBB75FD' (expires 10/4/2028 12:15:41 PM)

Replace it with certificate: '603130010099995AD42FBD54856820B9C9AC6BB0' (expires 10/4/2024 1:59:59 AM)

[Y] Yes  [A] Yes to All  [N] No  [L] No to All  [?] Help (default is "Y"):
I always select ‘No’ since I want the Exchange servers to use this certificate for server-to-server communication. This certificate is also used for authentication with an Edge Transport server, so that’s another reason to keep the default certificate.
You can use the following PowerShell command to export the new certificate to a backup file. The commands take the certificate, ask for a password to set on the backup file and then write the certificate to the backup file.
$Cert = Export-ExchangeCertificate -Thumbprint 603130010099995AD42FBD54856820B9C9AC6BB0 -BinaryEncoded -Password (Get-Credential).password

[System.IO.File]::WriteAllBytes('C:\Install\webmail_p365labs_com.pfx', $Cert.FileData)
When multiple Exchange servers exist in an organization, you must also import the Exchange certificate in the other Exchange servers. The Import-ExchangeCertificate cmdlet changed in Exchange 2019 CU12. In earlier versions, it was possible to use the -FileName parameter which accepts UNC filenames. UNC filenames are not secure when importing data, so Microsoft removed the -FileName parameter from the cmdlet. Starting with Exchange 2019 CU12, you must use the -FileData parameter. Here’s an example of importing a .PFX file into an Exchange server.
Import-ExchangeCertificate -Server EXCH02 -FileData ([System.IO.File]::ReadAllBytes('C:\Install\webmail_p365labs_com.pfx')) -Password (Get-Credential).password

Get-ExchangeCertificate -Server EXCH02 -Thumbprint 603130010099995AD42FBD54856820B9C9AC6BB0 | Enable-ExchangeCertificate -Server EXCH02 -Services IIS,SMTP
This step is not really needed, but after installing a certificate, I always recycle the Internet Information Server components using the IISRESET command, and I restart the Microsoft Exchange Transport and Microsoft Exchange Frontend Transport services.

Edge Transport Server Certificates
The Edge Transport server role also comes with a self-signed certificate. This certificate is used for authentication purposes between the Edge Transport server and Exchange mailbox servers in the organization. It is also used for TLS connections between the Edge Transport server and other mail servers, including the internal Exchange servers.
The process of requesting certificates on the Edge Transport server is identical to the process on the internal mailbox servers.
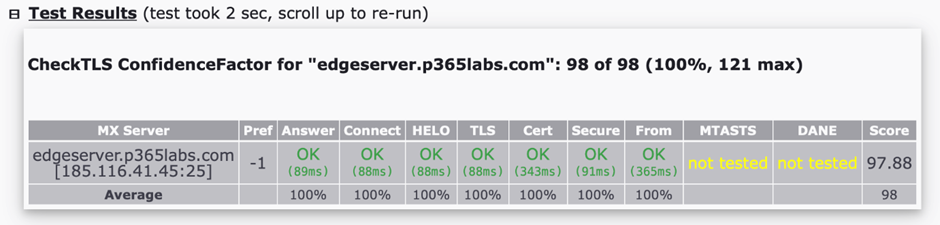
After you create and configure the certificate on the Edge Transport server, you can use the checkTLS tool (https://checktls.com) to check your Edge Transport server. After installing a third-party certificate on the Edge Transport server, you must see good results with CheckTLS. In the following example, MTA-STS and DANE are not configured for this server, but the other tests are good (Figure 4)
Renewing Certificates
Third-party certificates typically have a lifespan of one year. When this period has almost expired you must request a new certificate. Your certificate authority will automatically send you a notification, typically three months in advance. You can use the commands described above to renew a certificate. Once the new certificate is installed and configured, you can remove the previous certificate, but it does no harm to leave the expired certificate on the server.
Connecting to Exchange Online
A point often forgotten in a hybrid environment, but discovered the hard way when cross-premises mail flow halts, is that the certificates must also be configured on the Send Connector to Exchange Online and the default Receive Connector.
When the certificate is renewed, update the Send Connector from your Exchange server to Exchange Online. Here’s an example of updating a Send Connector with PowerShell:
$TLSCert = Get-ExchangeCertificate -Thumbprint 603130010099995AD42FBD54856820B9C9AC6BB0
$TLSCertName = "<I>$($TLSCert.Issuer)<S>$($TLSCert.Subject)"
Set-SendConnector "Outbound to Office 365 - <Identifier>" -TlsCertificateName $TLSCertName
Use the following example to update the default Receive Connector on the Exchange servers that accept mail from Exchange Online with the new certificate:
Set-ReceiveConnector "EXCH01\Default Frontend EXCH01" -TlsCertificateName $TLSCertName
The self-signed certificate and the Exchange Auth certificate have a lifespan of five years, so these certificates usually have a longer lifespan than an average Exchange server.
The OAuth Certificate
The OAuth configuration and its accompanying certificate are used to enable server-to-server authentication using the Open Authorization (OAuth) protocol. This protocol is not only used for Exchange servers, but also for Exchange Online, SharePoint Online, Skype for Business, and Teams integration.
When the first Exchange hybrid configuration is created, an OAuth configuration and an OAuth certificate are created. As mentioned in the previous section, the OAuth certificate has a lifespan of five years. This is longer than the normal lifespan of an Exchange server, but not of an Exchange hybrid configuration.
Suppose you created an Exchange hybrid configuration somewhere in July 2019, your OAuth certificate will expire in July 2024. At the time of writing this is only five months away. When the OAuth certificate is about to expire, you will see warning messages pop up in the Exchange Online Admin Center.
The OAuth certificate can be renewed manually as documented in this Microsoft article. Microsoft has also released a script called ‘MonitorExchangeAuthCertificate’ which you can download on GitHub. The script is much easier and admin-friendly than the manual procedure, and it can help when the OAuth certificate is already expired (which is no fun to deal with using the manual procedures). Using the script is my recommendation when renewing the OAuth certificate.
Summary
Exchange server uses certificates for server authentication and encryption purposes. This is for browsers using HTTP(S) and for servers using SMTP. Certificates must be valid, must contain the correct names, must not be expired or revoked, and preferably issued by a trusted third-party certificate authority.
In Exchange 2019, creating, installing, configuring, and renewing certificates is done using PowerShell as it is no longer possible to do this in the Exchange Admin Center. When renewing certificates, there is a gotcha in the hybrid configuration. This is often forgotten, which results in a halted mail flow between Exchange 2019 and Exchange Online.


Hello Japp,
A great article as always. You mentioned the scenarios where the certificate must be valid (hybrid, domain security or forced TLS). We use none of those but experienced an issue where due to a cert our 2016 Exchange servers stopped relaying e-mails to our 3rd party hosted service (smarthost). A week before the 3rd party cert expiration date we installed and configured the replacement cert and left the old one on the server. We thought the old cert wasn’t being used, but when it expired the servers stopped relaying e-mail. Are there other conditions you didn’t mention where the cert is required to be valid?
Thank you.
Thanks for your kind words.
Can you check with checktls.com if your server presents the right certificate?
Is your hoster expecting a certain certificate maybe?
Thanks,
Jaap
Great – many thanks