
In Part One of this Azure Automation article, I demonstrated how to create the Azure Automation service, and program the PowerShell script and modules. In Part Two, we will look more closely at how to program an Automation script for SharePoint Online, use the configured credentials, implement the MSOnline and PnP Cmdlets, and program against the CSOM.
Programming Automation scripts for SharePoint Online
Once you have at least one of the SharePoint modules installed, and a credential entry as shown in the first article, you can start creating scripts to access SharePoint.
Script using MSOnline
Create a new Runbook and, in the edit window, add the following code:
  # Credentials
 $myCred = Get-AutomationPSCredential -Name "CredentialsName"
  # Connect to Office 365
 Connect-MsolService -Credential $myCred
  # Work with SharePoint
 $myDomain = Get-MsolDomain
 Write-Output $myDomain
The first line of the script collects the user’s credentials using the name of the entry that defines the credentials. You can see that the second line uses the credentials to log into Office 365. The Get-MsolDomain Cmdlet in the MSOnline module recovers domain data, and the fourth line then displays them on the screen. Any of the Cmdlets present in MSOnline, can be implemented to work with SharePoint.
Use the Save button in the Runbook and then the button Test pane. In the Test window, use the Start button to run the script, after a few seconds the result appears:
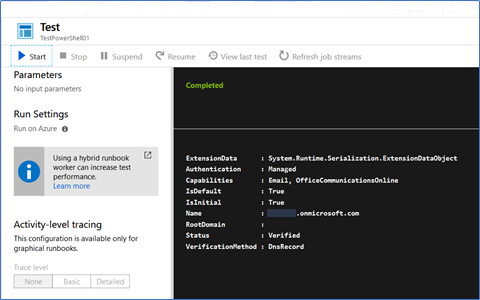
Testing a Runbook.
Script using CSOM
Create another Runbook and use the following code:
  # Credentials
 $myCred = Get-AutomationPSCredential -Name "CredentialsName"
 $myUser = $myCred.UserName
 $myPW = $myCred.Password
  # Connect to Office 365
 $cred = New-Object Microsoft.SharePoint.Client.SharePointOnlineCredentials($myUser, $myPW)
 $mySite = "https://domain.sharepoint.com/"
 $myContext = New-Object Microsoft.SharePoint.Client.ClientContext($mySite)
 $myContext.Credentials = $cred
  # Working with SharePoint
 $myWeb = $myContext.Web
 $myContext.Load($myWeb)
 $myContext.ExecuteQuery()

 Write-Output "Web Title: " $myWeb.Title
In this code, the first line uses the name of the zip file in the path to the SharePoint DLL, which was indicated in the Add the SharePoint CSOM DLLs section in the first part of this article.
Script using PnP
Create a new Runbook and use the following code:
  # Credentials
 $myCred = Get-AutomationPSCredential -Name "CredentialsName"
  # Connect to Office 365
 $mySite = "https://domain.sharepoint.com/"
 Connect-PnPOnline -Url $mySite -Credentials $myCred
  # Working with SharePoint
 $myContext = Get-PnPContext
 Write-Output $myContext
How to run an Azure Automation script
There are several possibilities to start an Azure Automation script:
1. Manually from the Azure Automation control window:
As previously mentioned, a Runbook can be run manually from the test window directly on the Azure portal. After publishing, you can use the Start button to make it run manually. The Overview window of the Runbook shows a list of the Recent Jobs that have been executed. If you click on a Job, you get a complete rundown of information on how that execution was, its errors, output, etc.
2. From another Runbook:
A Runbook can be run from another Runbook, just as a PowerShell script can be called from another PowerShell script. Use the Start-AzureRmAutomationRunbook Cmdlet in the following way to run a script from another script:
 Start-AzureRmAutomationRunbook `
     -AutomationAccountName 'CredentialsName' `
     -Name 'RunbookName' `
     -ResourceGroupName 'AzureResourceGroupNameWhereRunbookIs' `
     -DefaultProfile $AzureContext `
     -Parameters $params -wait
The used parameters indicate the name of the credentials as indicated at the end of the first article, the name of the Runbook and Azure Resource Group where it is hosted. The -DefaultProfile parameter gets the credentials, account, tenant, and subscription used for communication with Azure. The -wait parameter is used to return results after the job is completed.
3. Automatic execution via schedule:
The Azure Automation allows you to attach a schedule to a Runbook. To do this:
- Create, test and publish the Runbook
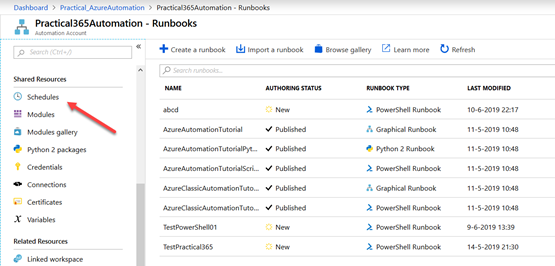
- From the Runbooks window, click on Schedules (menu on the left side) and then Add a Schedule
Creating a schedule for the Runbooks.
- Set a name, description, date and time to start the Schedule, and if the timer should run only once or recursively
- If a recurring timer is used, define each time you need to run, and if it has an end time, or should run indefinitely
- Save the changes
To attach a Runbook to a schedule, from the list of Runbooks select it and from its management window click on Link to Schedule. The Link to Schedule to your Runbook button allows you to select one of the previously created schedules or fashion a new one.
4. Through PowerShell
Automation scripts can be started from a Local Windows PowerShell console. First, you need to add the PowerShell module for Azure using the Install-module AzureRM Cmdlet locally in PowerShell. Then, use a script like the below example, which initiates logging interactively to the user, then runs a Runbook with an input parameter and finally, by means of a loop, waits for the execution to end and shows the result of the script in the screen:
 # Login in Azure
 Login-AzureRmAccount
 #Get-AzureRmSubscription / Select-AzureRmSubscription # if you want to switch Subscription
 $params = @{"ScriptData"="Practical365 was here"}   # Use ';' to separate two or more parameters
 $job = Start-AzureRmAutomationRunbook -ResourceGroupName "Practical365_AzureAutomation" `
                 -AutomationAccountName "practical365azureautomation" -Name "TestRunbook01" `
                 -Parameters $params
 $doLoop = $true
 While ($doLoop) {
   $job = Get-AzureRmAutomationJob -ResourceGroupName "Practical365_AzureAutomation" `
                 -AutomationAccountName "practical365azureautomation" -Id $job.JobId
   $status = $job.Status
   $doLoop = (($status -ne "Completed") -and ($status -ne "Failed") -and ($status -ne "Suspended") `
                     -and ($status -ne "Stopped"))
 }
 Get-AzureRmAutomationJobOutput -ResourceGroupName "Practical365_AzureAutomation" `
                 -AutomationAccountName "practical365azureautomation" -Id $job.JobId -Stream Output
5. WebHooks for Azure Automation
One more way to run an Azure Automation script is through a webhook. Automation offers the possibility to create a webhook for each Runbook, i.e. an URL on the Internet, which can be called with an HTTP POST method, passing parameters if necessary.
To create an Automation webhook for a Runbook:
- Create, save, test and publish the Runbook
- From the Runbook window (after published), click on Add Webhook
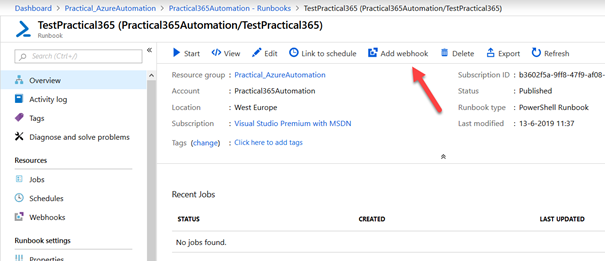
Creating a WebHook for one Runbook.
- In the new window, click on Create new Webhook and give it a name. In the Expires box determine how long the Webhook will be available. Copy in a secure place the URL because after closing this window, it will be impossible to recover the token from Azure
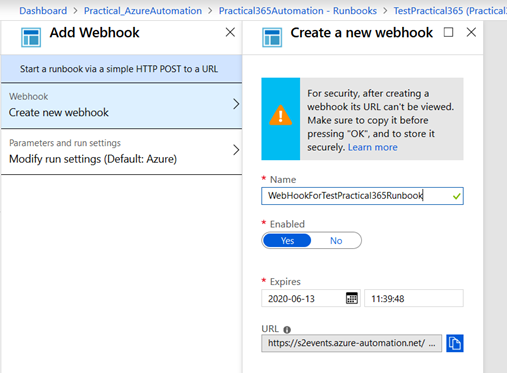
The WebHook parameters for the Runbook.
An important point in the code of the script for WebHooks is that you can only read one input parameter called (obligatorily) $WebhookData, of the Type object. The names and values of the parameters must be sent in the header and/or body of the HTTP call. To read the parameter, first test if the variable contains any data, and then use its values if it is true, as shown in the following PowerShell snippet:
  Param(
  [string]$ScriptData,  # To be used as parameter directly
  [object]$WebhookData  # To be used as parameter in a WebHook
 )

 if ($WebhookData -ne $null) {
     Write-Output ("*** Information received using a WebHook")
     Write-Output ("Name In Header - " + $WebhookData.RequestHeader.NameInHeader)
     Write-Output ("Text In Header - " + $WebhookData.RequestHeader.TextInHeader)
     Write-Output ("WebHook Name - " + $WebhookData.WebHookName)
     Write-Output ("Body - " + $WebhookData.RequestBody)
 }
 else {
     Write-Output ("*** Information received in a direct call to the script")
     Write-Output ("Script Data - " + $ScriptData)
 }
To call the Webhook you can use any type of programming language. For example, using PowerShell:
  $uri = "https://s2events.azure-automation.net/webhooks?token=dtb...MueTw%3d"
 $headers = @{"NameInHeader"="name in header";"TextInHeader"="text in header"}
 $body = "text in body"

 #$response = Invoke-RestMethod -Method Post -Uri $uri -Headers $headers -Body $body
 $response = Invoke-WebRequest -Method Post -Uri $uri -Headers $headers -Body $body

 Write-Output ("Response From Webhook - " + $response)
Note that both, the Invoke-RestMethod Cmdlet, and the Invoke-WebRequest Cmdlet can be used. It is also important to note that the Webhook does not have any type of authorization, its only security measure is the Token in the URL. If the token is known, any system can run the script smoothly (it is always possible to add custom authentication code, if necessary). Finally, because the Runbook executes totally asynchronously, it is impossible to receive information from the execution of the script directly.
Conclusions
In the SharePoint Online developer and administrator toolbox, Azure Automation is a very important asset because it enables the quick creation of PowerShell Scripts to automate tasks in the system. Although Azure Automation doesn’t have the necessary PowerShell modules to work with SharePoint installed by default (MSO, SharePoint CSOM, and SharePoint PnP). However, they can be added, which opens a multitude of possibilities to automate operations in SharePoint. In this article we’ve explained how the Azure Automation Runbooks can be configured to run in several ways: manually, from a schedule, from other Runbooks or PowerShell scripts, or using a WebHook.


What if basic auth is disabled?
Nice writing but this does not work with MFA
awesome blog bro, this give me an idea on what ive been working with since im new to az automation account and webhook .
Hello, I’m trying to connect to SharePoint, but getting error ‘New-Object : Cannot find type [Microsoft.SharePoint.Client.SharePointOnlineCredentials]: verify that the assembly ‘. I think thisis because you missed something in description. You wrote “In this code, the first line uses the name of the zip file in the path to the SharePoint DLL”. But there is no anything related to zip file in code
Input type solved my problem “Add-Type -Path “C:\Modules\User\Microsoft.SharePoint.Client\Microsoft.SharePoint.Client.dll””