
In Part One of this blog series on ‘How to create an intelligent document management process using SharePoint and Flow’, we discussed a common business scenario where the HR department needs to send out new hire document packages before the new starters the first day of employment. In order to do this, we completed the following tasks in part one:
- Created a file repository to store documents from different departments in a centralized location
- Designed a workflow to generate an external link when a new document is uploaded to the library
In Part Two, I’ll show you the step-by-step instructions on how to automate this process. We will be designing the following procedure:
- The HR team submits a request form to send out a document package
- An automated workflow will generate the document set based on the requirements in the request form and
- The document set will be automatically sent to the external user
Creating a document package request form
To design the previously discussed procedure, we’re going to create a SharePoint list with the appropriate columns or form fields. To do this, you must have appropriate rights to create SharePoint lists, if you don’t have this access, then ask your SharePoint administrator to assign you this.
To get started, I’ve created a Document Package Requests list with the columns below:
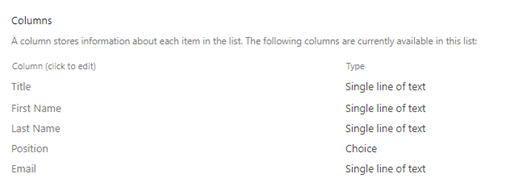
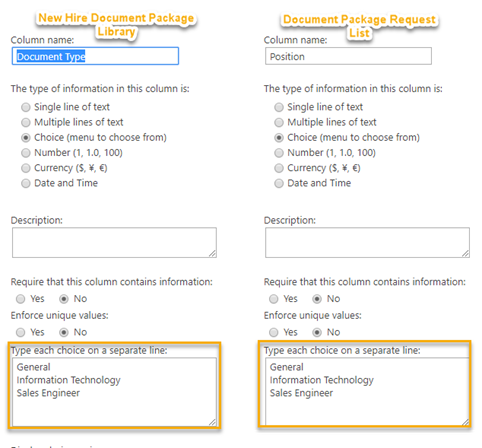
There are two important fields in this list that I want to highlight. The first is a Position field; this field is a choice field with several options. It’s important to note here that the choice options in the Position field should be identical to the available choice options in the Document Type field from the New Hire Document Package library. The main reason for this is when a user submits a document package request form specifying the Position, the workflow will create a set of documents from the New Hire Document Package library according to the request, which is position specific.
The next important field to elaborate on is Email. We will be utilizing the data in this field to send an email with the document package. Here, I recommend that you set both fields, Position, and Email, as required fields in the form.
Creating a workflow to generate document package
The SharePoint list is ready to accept requests from users, and we are ready to build a workflow which looks at the form information submitted and builds a document package from the New Hire Document Package library.
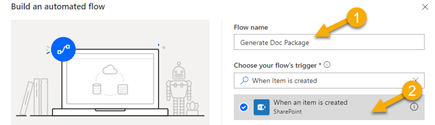
Let’s go back to Microsoft Flow designer and create a new Flow from scratch. I’m going to name my flow Generate Doc Package. If you need a reminder, in Part One of this blog series, I explained how to get to the Microsoft Flow designer and how to create new Flow from scratch. Each Flow should start from a trigger; in this case, the trigger is a new request or New Item in the Document Package Requests SharePoint List. Type the name of the Flow in the Flow name field and search for When Item is created in SharePoint in the Choose your flow’s trigger.
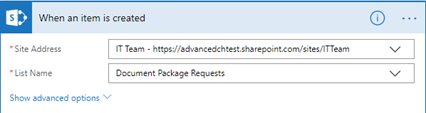
In When an item is created trigger step, specify the URL and the name of the SharePoint list.
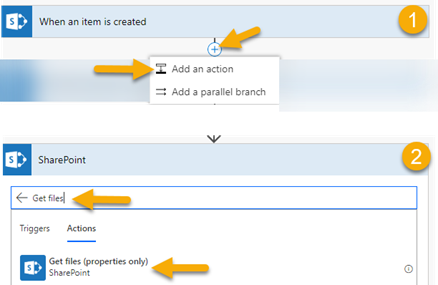
The next step is to get all the files stored in the New Hire Document Package library. We are going to be using file properties in this solution, not actual files. In Part One, of this blog post, we created a workflow to generate an external shareable link for each file when the file is uploaded or created in the Document library. From all the properties, we will only use two, the name of the file and external link. These two properties will be used to generate human-readable URLs in the email. Add action and search for Get files (properties only).
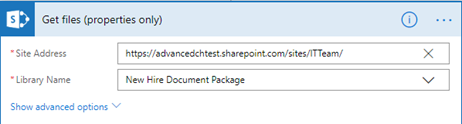
After the step is added, specify site name and document library.
The Get Files step builds an array with properties values of each file. Something like this:

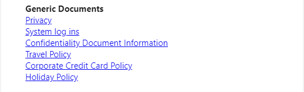
Let’s go back and review the business requirements, the document library contains generic and positions specific documents. The email that we’ll be sending should contain generic information and specific documents in relation to the new hire position. For this purpose, we need to create two separate arrays from the array we built in the Get Files action. Then, add a new step and search for Filter Array. This new step requires a parameter to be passed. What I mean here is, we need to pass an array which needs to be filtered in this step. For input, we are passing the output from Get files step which is stored in the array named value.
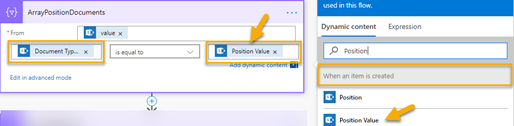
For position specific documents, we’ll be filtering the array based on the Document Type value. Basically, bringing all documents where Document Type field (document library) is equal to the Position type field (request form list) in the form submitted.
In this step, we need to add a second Filter Array, but we’ll have to filter documents differently where Document Type column is equal to General. In this step, we will hardcode the value.
Note: I call my general documents General, you can tag your documents with a different name but make sure you use exact spelling of the document tag in your filter array action since this is a static value.

Now we have two arrays built, one containing generic and the other job-specific documents based on the request form. The next step is to build user-friendly URLs. We don’t want to send an email with a bunch of long and not user-friendly URLs. If we just insert Links field data to the email, they will look like below:

What we want instead is to have the list of URLs where each URL is in a new line. Something like this:
Since we’re sending an email in HTML format, we’ll have to build document links in the format below:
<a href=”URL”> FRIENDLY TEXT </a>
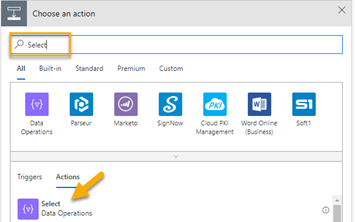
We have both the URL and FRIENDLY TEXT value (which is the name of the file in the document library) in our arrays, now we have to inject an HTML tag to each array item. To do that we are going to be using Data Operations in Microsoft Flow.
To inject the HTML tag to the array item, we need to use Select Operation. The way Select Operation works is it reviews an array and maps change to each item. Later in this article, I’m going to provide you with the correct json code to input. Add a new step here, and search for Select.
Select requires two values: FROM and MAP. FROM is the array object, we will pass the output from an array that we built when we filtered the document library to contain position specific documents only.
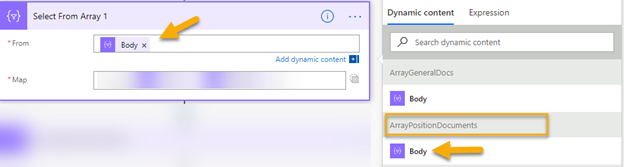
MAP is going to be a one line json code to insert HTML tag for each item in the array. Insert this code to the MAP field of the Select operation step.
| “<a href=\”@{item()?[‘Links’]}\”>@{item()?[‘{Name}’]}</a>” |
In the json code you can see [Links] and [Name], these are the names of the columns in the SharePoint library that we created in part one of this blog series. Below is graphic which breaks down what the json code is and how we’re injecting HTML to the array values:

Next, we need to join the output of Select operation with <br/> which is a new line tag in HTML. Basically, we’re making sure that each link is on a new line.
- Link 1
- Link 2
- Link 3
To join the output of Select operation with a ‘new line’, you need to add a new step, search for join and add that step. Now, select Output from the previous step and type <br/> into the Join with field.

Then, you need to add similar steps for the generic documents array. Here, you must add another Select and use the output of the filter array step where you filtered based on a General document and join the output of the Select operation step with another <br\> which is a Join step.
The last step is to build an HTML email with the generated content from the previous steps. Add a new step, search for the Send mail action and add it to your flow steps. There are three values which we’ll be passing to the Send email action.
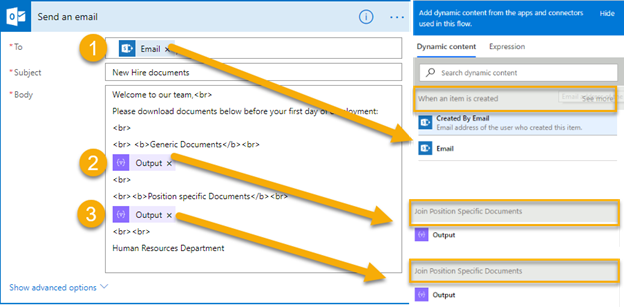
The body of the email should be HTML formatted and make sure to set the Is Html property of the action to Yes.

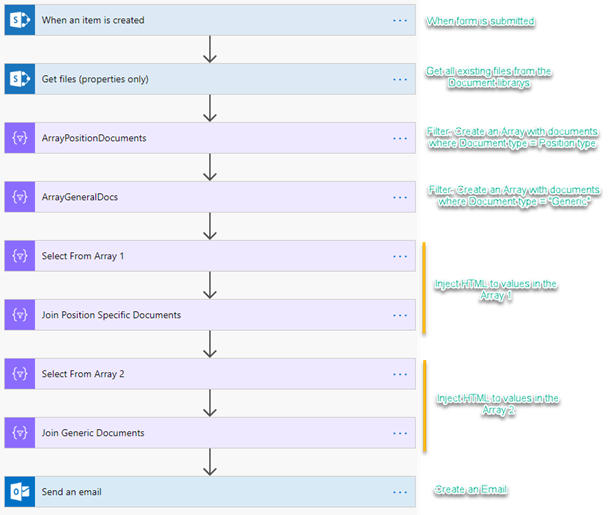
Our workflow design is now complete! Below I have listed all the steps in the workflow and summarized them. I recommend that when creating this workflow that you rename the Actions (steps) because it helps to remember the functionality of each one.
We now need to test the workflow, I’m going to submit a form to see if the required documents will be delivered.
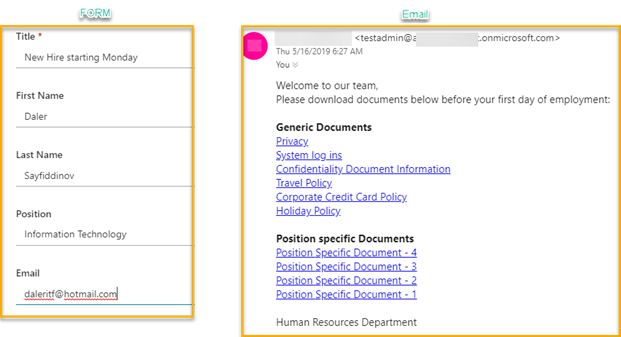
Great, you can see here that everything has worked as expected.
Conclusion
Based on this example, we can see that automating time-consuming critical business processes utilizing Office 365’s set if tools is a simple task with a lot of benefits. The possibilities with Microsoft’s Power Platform are endless, and more importantly, you don’t need to be a developer to execute this.


Hello Good Day my concern is like Leon says .Thus the template validation failed: ‘The template action ‘Select’ at line ‘1’ and column ‘2814’ is not valid: “The template language expression ‘item()?[‘Links’]}\”>@{item()?[‘{Name}’]’ is not valid: the string character ‘‘’ at position ‘8’ is not expected.”.’.
So i put the link code part of HTML to make it run,so pyyytss already done, after fill up the form running failed. What should i do?
when I use the JSON code I get this error:
The template validation failed: ‘The template action ‘Select’ at line ‘1’ and column ‘2814’ is not valid: “The template language expression ‘item()?[‘Links’]}\”>@{item()?[‘{Name}’]’ is not valid: the string character ‘‘’ at position ‘8’ is not expected.”.’.
…should I be changing any of the values in:
@{item()?[‘{Name}’]}
because when I paste this into the “Select form Array” I get:
Enter a valid json
Hi,
I followed everything up until
“Then, you need to add similar steps for the generic documents array. Here, you must add another Select and use the output of the filter array step where you filtered based on a General document and join the output of the Select operation step with another which is a Join step”
Coudl you expand on what should be in these two fields please.
Regards
hi,
found it really interesting. I’ ve had some problems with the json syntax. Flows warns me to ener a valid json.
can´t get it to work properly. I have replaced the names of the “items” to match the fields in my library.
could you please provide me some link to get more info on how to get this jason syntax working ?
I’ ve used the create HMTL table instead, but I’ like to do it with json.
kind regards
Creating HTML table does not always work, especially when you need to group query results. The best approach is JSON.
I would recommend to review your fields names. Make sure that you use internal SharePoint column name (not display name). To check SharePoint’s column internal name, navigate to SharePoint list settings, click on SP column name and at the end of the URL string, you will find internal SharePoint column name.
Regards, Daler