There are multiple ways to program bots to interact with users, but it is essential they have some kind of “intelligent” algorithm created to work effectively. The Microsoft Azure QnA Maker is a cloud-based API service which enables you to integrate a conversational, question and answer layer. This, in turn, powers an FAQ service from semi-structured content like documents, URLs, and product manuals. Utilizing the native language from the programmed location, the QnA Maker service answers questions by matching them with the best possible response. Essentially, what the QnA Maker allows us to do is create a bot using pre-existing information derived from FAQs, without needing to develop cumbersome and expensive AI algorithms. The QnA Maker can also be easily integrated with other systems such as SharePoint or Microsoft Teams.
Like most search engines, the Azure QnA Maker engine crawls for information across various sources, this information is then utilized to train the bot an algorithm to draw links between specific questions and answers. You number of sources allowed is dependent on what pricing tier you have selected, you can find out more information here. Below are some examples of the different sources the engine will collect information from:
- Public FAQ sites (URLs) which
have questions or answers on their pages, these must be publicly reachable
without any kind of authorization process - Physical documents containing
FAQs such as: product manuals, brochures, flyers, support guides, etc. The QnA Maker
engine accepts documents in the format of: Word, Excel, pdf, txt and tsv (Tab
Separated Values) - Questions or answers can be entered
manually too
How to create a QnA System
There are a few ways to create a QnA system:
- The first being utilizing the
completed user interface provided by Microsoft where you can define the sources
and other parameters, test the results and publish it to make it public - Or, utilizing the API that
allows the creation of systems in a more automated mode - There is also a REST API which
sends questions to the engine and receives the matching answers
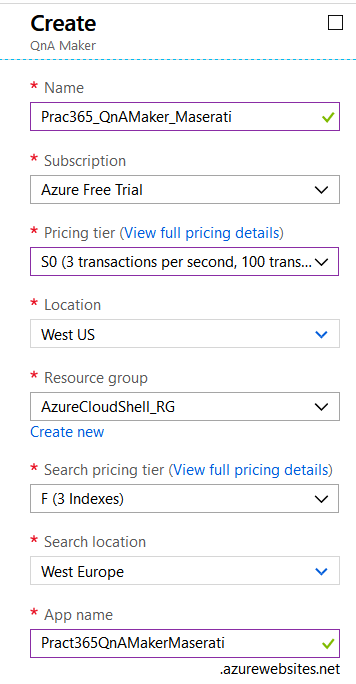
Creation of the Azure QnA Maker Service
Before you get started you need to create the QnA Maker service first:
- From the Azure panel-control page, sign in with your
administrator’s account and create a new Resource
Group or reuse an existing one - In the Group add a QnA Maker resource, giving it a name,
Azure Subscription, Location (“West US” is the only available currently),
and pricing tier
Because QnA uses a standard Azure search to crawl the answers, define as well its location and pricing tier. An Azure App Service and App Service Plan are created automatically to manage the REST calls.

Figure 1. Creation of the QnA Service in Azure
Creating the QnA
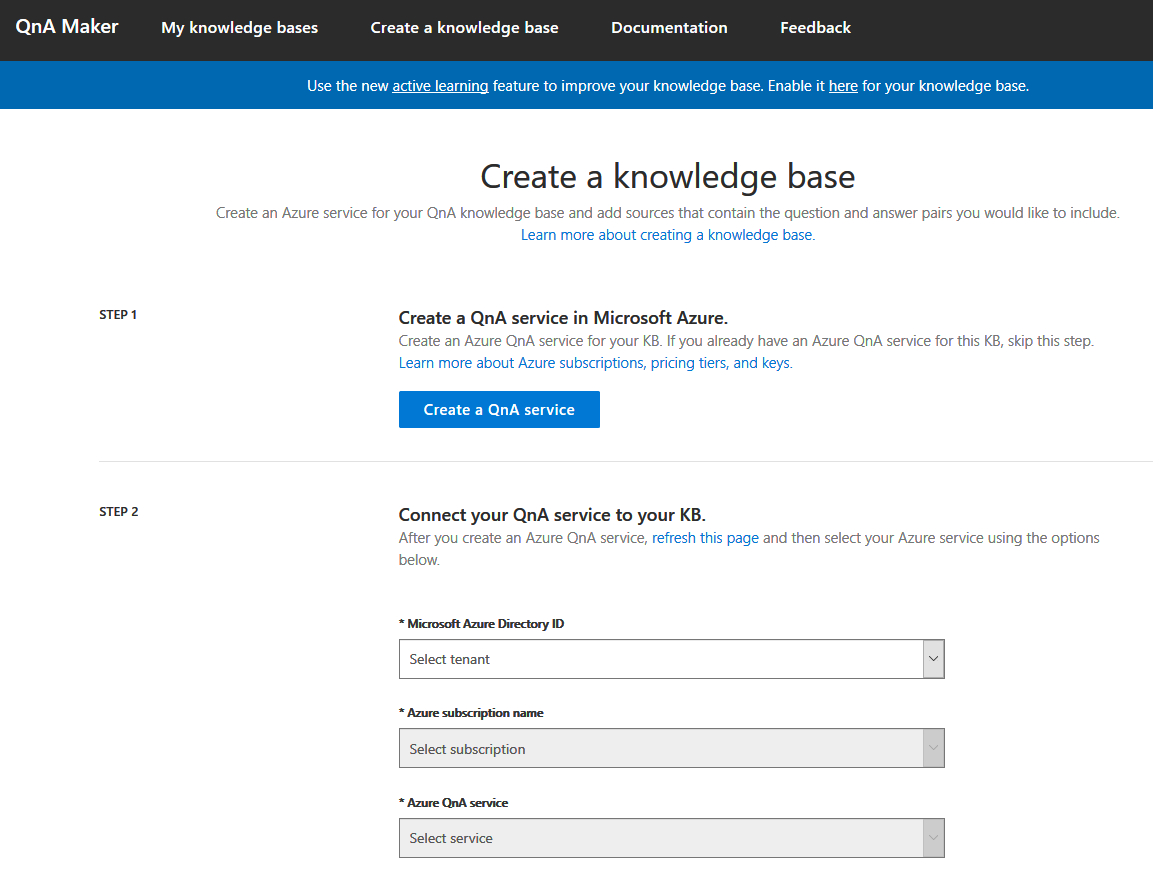
Now that you’ve created the Azure QnA Maker Service and system, you need to create the QnA using the WYSIWYG interface. Below are the steps you need to execute this correctly:
- Open the site and log in with the same credentials used
to create the Azure Service. - Then select Create a knowledge base. If you haven’t
followed the instructions to create the Service in Azure, the first step in the
page allows you to do it using the button “Create a QnA service”. - Then, follow the sequence in
“Step 2” in the page to select the Azure Tenant, Subscription and QnA
Service. - After you’ve completed that
step, select a name for the QnA and after that you get the possibility to populate
the database with the questions and answers. - As mentioned earlier in this
article, you can define one or more URLs with the questions and answers and/or
add files containing the information. Step 4 on the page allows you to use both
methods. - If you prefer to add manually
the questions and answers, you can skip this step and go ahead using the button
Create your knowledge base.

Figure 2. Creation of the QnA using the Azure Admin interface.
After you’ve completed this process you’ll find the QnA engine starts working by extracting the questions and answers from the sources and utilizing this information to train the AI algorithms. This can take several minutes, depending on how much information you’ve provided. When the process is complete, you’ll then be redirected to the Knowledge base page. If the engine finds errors in the extraction, it will either ask you to correct it or skip the data source.
The Knowledge base page shows the list with extracted QnAs, together with a Test button where you can fire queries and review the answers. If you test a question and aren’t satisfied with the answer, use the button Inspect which will open a new window where you can refine manually the answer or, eventually, create a totally new answer if necessary. Also, the Knowledge base page has an Add QnA pair button that you can use to create customized questions and answers.

Figure 3. Reviewing, testing and training the QnA
When you are pleased with the results, use the Save and train button to rerun the learning algorithms. Then, you can make the QnA public by using the Publish button.
Using the QnA from SharePoint
Sending a question and receiving the answer(s) is relatively simple using the QnA REST API. This is ideal for creating a SPFx (SharePoint Framework) WebPart and for integrating the QnA into SharePoint Online. The SharePoint Framework is the recommended way to create customized functionality in SharePoint Office 365 and they can be used in Microsoft Teams as well. It uses JavaScript as language or you can use TypeScript if you prefer to work with a friendlier language. SPFx components can be developed totally using Open Source tools as Gulp, Yeoman and Visual Studio Code; full information about how to create a development environment and the WebParts self is provided by Microsoft here.
Below is the code on how to create a new SPFx WebPart, add the following code fragment and routine (TypeScript):
  protected hostUrl:     string = "https://prac365qnamakermaserati.azurewebsites.net";
   protected indexId:     string = "1fb7e07c-2752-4ef1-b768-55fc3a0c3cad";
   protected endpointKey: string = "beb53282-ca29-49c8-8db1-e32fb934e499";

   protected QnAUrl: string = this.hostUrl + "/qnamaker/knowledgebases/" + this.indexId + "/generateAnswer";

   protected getAnswers(): void {

     const requestHeaders: Headers = new Headers();
     requestHeaders.append("Content-type", "application/json");
     requestHeaders.append("Cache-Control", "no-cache");
     requestHeaders.append("Authorization", "EndpointKey " + this.endpointKey);

     // Gather the information from the form fields
     var strQuestion: string = (<HTMLInputElement>document.getElementById("txtQuestion")).value;

     // This are the options for the HTTP call
     const callOptions: IHttpClientOptions = {
       headers: requestHeaders,
       body: `{'question': '${strQuestion}', 'top': 1}`
     };

     // Create the responce object
     let responceAnswer: HTMLElement = document.getElementById("responseAnswer");
     let responceScore:  HTMLElement = document.getElementById("responseScore");
     let responceSource: HTMLElement = document.getElementById("responseSource");

     // And make a POST request to the Function
     this.context.httpClient.post(this.QnAUrl, HttpClient.configurations.v1, callOptions).then((response: HttpClientResponse) => {
        response.json().then((responseJSON: JSON) => {
           var myResponseText = JSON.stringify(responseJSON);
           var myResponseJson = JSON.parse(myResponseText);

           responceAnswer.innerText = myResponseJson.answers[0].answer;
           responceScore.innerText  = myResponseJson.answers[0].score;
           responceSource.innerText = myResponseJson.answers[0].source;
         })
         .catch ((response: any) => {
           let errorMessage: string = `Error calling ${this.QnAUrl} = ${response.message}`;
           responceAnswer.innerText = errorMessage;
         });
     });
   }
Note: the complete SPFx source code for the WebPart can be found in the GitHub report.
As you may have recognized in the code, we need to fill three variables [SJ3] with data coming from the used Azure Service Resource Group:
- The hostUrl can be found at the “URL” in the Overview window
of the App Service - The indexId is visible in the Search Service – Indexes, under
“Name”; - You can find the endpointKey in the QnA portal (where you defined the data sources)
under “Settings” – “Authorization: Endpoint”
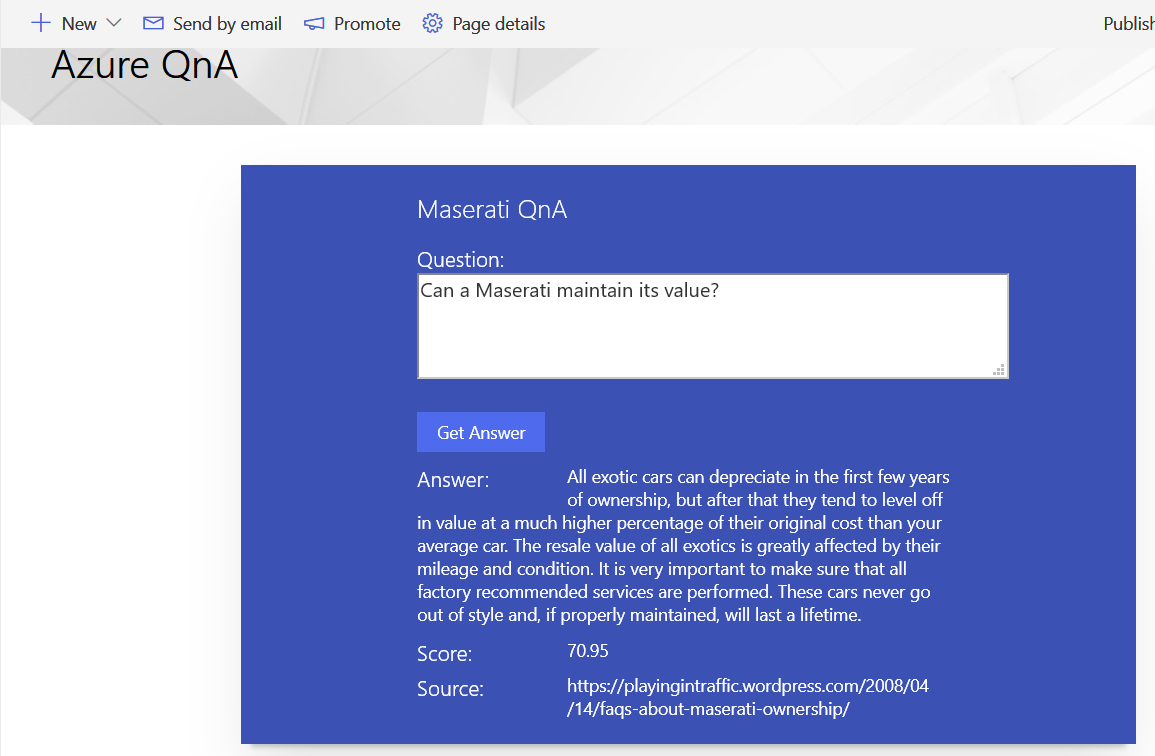
The routine getAnswers in the code creates the URL for the REST call, adds the authorization in the HTTP headers and the question in the body, analyzes the JSON response, expels the results for answer, scores how accurate the answer is and answer-source in the interface.
Now, you need to compile and deploy the WebPart to SharePoint, following the instructions given by Microsoft. The WebPart allows to send a question to the Azure QnA Service using REST and responds with the related answer. The answer and related metadata is then shown in the user interface below:

Figure 4. SPFx WebPart working inside SharePoint to send questions and receive answers
To conclude, we can say that the Azure QnA Maker Service is a really easy way to create an intelligent FAQ system that can straightforwardly be integrated with SharePoint or Microsoft Teams. The QnA system is inexpensive and doesn’t need any kind of customized Artificial Intelligence algorithms that must be created and trained separately, which is a bonus in terms of implementing this cost effectively.
Source code:
https://github.com/gavdPublic/Practical365AzureQnAAndSharePoint_SPFx.git


