
Azure Automation enables Administrators to automate recurring cloud management tasks that can be time-consuming and problematic, as a result it’s effective at reducing operating costs and improving efficiency. The service provides many opportunities for admins to program administration and maintenance tasks in Office 365. For example, in SharePoint On-premises, you may need to create timed jobs for provisioning new sites, assigning user accounts to lists, and automating the execution of processes inside SharePoint initiated by external systems.
How to create the Azure Automation service
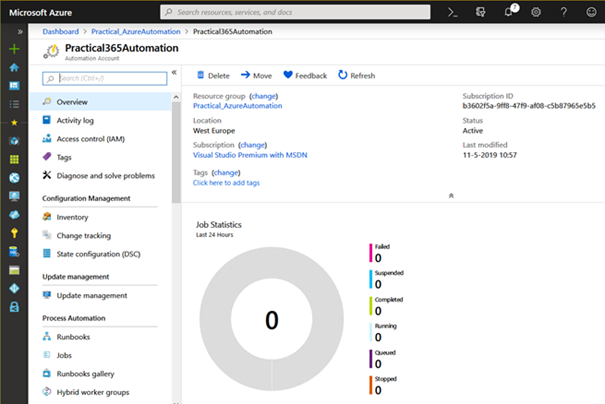
To use this service, you need to create an Automation instance in your Azure subscription. Here, you need to insert your administrator credentials on the Azure portal site, then create or reuse a resource group. Within the group, add an Automation service assigning a name, subscription, resource group and data center location. Currently, the pricing scheme includes 500 minutes of free script execution, and you only pay extra when you’ve exceeded your free limit.
From the service management window, you can monitor running and executed scripts, create new ones or manage those that already exist:
Programming an Automation Script
To create a PowerShell script for Automation, from the Service Management window click on Runbooks, which opens a new window with the list of all scripts managed by the service, each instance can contain hundreds of scripts.
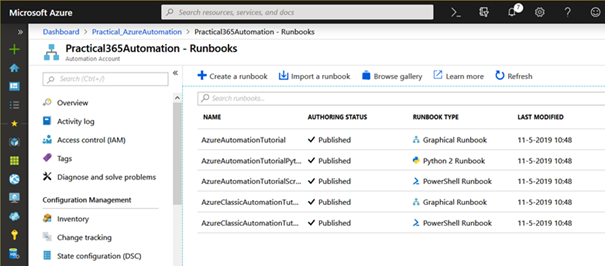
The service creates a few sample scripts that can be deleted if you don’t need them. Click on the Add a Runbook button to create a new script, or Runbook as it’s referred to, or import one from a file. The Create a new Runbook button allows you to assign a name and select its type, for example, PowerShell, Python, graphical, PowerShell Workflow or graphical PowerShell Workflow. The graphical type allows you to create WYSIWYG scripts based on pre-existing PowerShell code blocks. PowerShell type is the most commonly used type to work with SharePoint.
After creating a PowerShell Runbook, the screen where you can create and edit the PowerShell code appears:
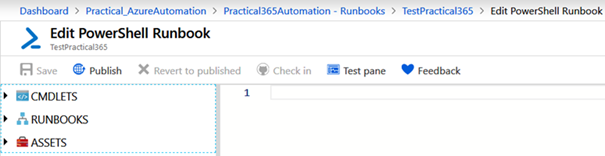
The left-hand menu allows you to quickly scan and add Cmdlets which exist by default in the service. Similarly, like most PowerShell scripts, they can be connected with other Runbooks in the service to use their functionality. In the Assets part, you can view and add Variables, connections, credentials, and certificates.
Once the script has been created and tested, you must use the Publish button to tell the system that the Runbook is ready to be used in production.
Add PowerShell modules in Azure Automation
As indicated, the service has all the default Cmdlets that can be viewed and used in a normal Windows system, meaning: all Cmdlets that exist in a standard Windows PowerShell console can also be found here. These Cmdlets don’t work with Office 365 or SharePoint Online by default, making it necessary to add the corresponding modules or DLLs before you can use Azure Automation with SharePoint.
There are three types of modules that can be used for SharePoint. You can create your own Cmdlets or DLLs, compile and add them to an Automation in a similar way as I will demonstrate later in this article. The MSOnline module Cmdlets is used to execute basic operations with users, groups, and general maintenance in the Office 365 Tenant; the SharePoint CSOM (Client Side Object Model) DLLs that give access to all the SharePoint functionality; and the PnP Cmdlets that extend the functionality of the CSOM DLLs.
Add MSOnline Cmdlets:
From the Runbooks Management window (picture 2), use the Modules button (left menu, under the Shared Resources section). The window displays the list of all PowerShell modules available at the moment. Click on Browse Gallery and in the search box type msonline. By clicking on the module MSOnline, created by AzureADPowerShell and, in the cmdlets list window, on the Import button, the module is installed automatically.
Add the SharePoint CSOM DLLs:
The SharePoint CSOM uses two DLLs: Microsoft.SharePoint.Client.dll and Microsoft.SharePoint.Client.Runtime.dll and permits you to use the classes, methods, and properties to work programmatically with SharePoint. The DLLs can be downloaded here. Download the latest x64 version of the sharepointclientcomponents from that site and install or unpack locally. Copy the two indicated DLLs to a local directory called Microsoft.SharePoint.Client, make sure you use this name and don’t change it. Make a zip file from the Microsoft.SharePoint.Client directory (do not include the directory, the files must be directly under the root of the zip file).
From the Runbooks Management window (picture 2), use the Modules button (left menu, under the Shared Resources section). The window displays the list of all PowerShell modules available. Click on Add a module and select the previously created ZIP file. The service uploads the DLLs to Azure and sets them up in the system in such a way that they can be used by PowerShell in the service.
Add the PnP Cmdlets:
Use the same procedure as described for the MSOnline module, but in this case search for SharePointPnPPowerShellOnline.
Creating credentials for Office 365
The idea of using Azure Automation with SharePoint Online is that you can create scripts that run automatically and by themselves, so you must set up the execution account credentials so that the scripts are also automatically authorized.
From the Runbooks Management window (picture 2), use the Credentials button (left menu, under the Shared Resources section) to create credentials that can be used in the scripts. You can create separate credentials for each script, or one for everyone. The Add a Credential button lets you set a name for the credential, a short description, the username (email) and their password. Keys are maintained encrypted in Azure and cannot be viewed or extracted from the service management interface.
What Part Two holds…
In the next article, we will see how to program an Automation script for SharePoint Online, using the configured credentials, implementing the MSOnline and PnP Cmdlets, and programming against the CSOM as well. Also, we will explore the debugging possibilities and how to convert a Runbook to a WebHook.


How can connections using account with enabled MFA be handled? Is it possible?
Use App Permissions for that