Use the Graph API to Report Apps and Permissions
Some time ago, I published an article explaining how to generate an “inventory” of Azure AD integrated applications within a tenant. I also created a script to create an inventory with the same level of detail as surfaced within Microsoft Cloud App Security, without having to pay the extra license fees. The script used the Azure AD PowerShell module and generated information about the application’s publisher, the permissions assigned to it, the list of users who have consented to the application and so on.
Things in the cloud change, and it’s time for an updated version of the script. But first, let’s spend a minute reminding you why reporting on Azure AD integrated applications is important. The TL; DR version is because it is ridiculously easy for applications to request permissions within a given organization’s directory. And because it’s easy, it’s also common for users to grant permissions, with or without any bad intent. Everyone using a mobile device is familiar with the consent prompts asking for access to your data, and the reality is that most users blindly accept those prompts. The same applies for Azure AD integrated applications.
Microsoft has controls in place to prevent most bad scenarios from happening, and in general end users can only consent to permissions affecting their own data. One notable exception is the User.ReadBasic.All permission, allowing you to list all users within the organization and their email addresses, which is more than sufficient for the initial reconnaissance stages of an attack. In fairness, Microsoft has introduced additional functionalities such as Permission classifications, risk-based step-up consent, admin consent requests and more, all designed to help you strike balance between usability and security. Whichever settings you configure though, periodically reviewing the set of Azure AD integrated applications and their permissions remains a best practice.
Before turning to the script, let’s also briefly explain how applications are represented within Azure AD. The tenant “authoring” an application (Microsoft, an ISV or your own) hosts an application object, whereas every other tenant “consuming” the application gets a service principal object, in other words, a representation of the application object specific to that tenant. More detailed information is in the official documentation. For our purposes, it is sufficient to know that the script enumerates service principal objects.

Using the Graph to Query Azure AD
The new version of the script now queries the Graph API and the requirements have changed. To run the script, you need an app registration with at least the Directory.Read.All permissions granted. I know that asking you to create another app to report on existing Azure AD integrated applications is ironic, but this approach has some added benefits too. For one, you can now run the script on PowerShell Core/7, whereas only Windows PowerShell supports the Azure AD PowerShell module.
The most important improvement is that the script now enumerates application permissions granted to Azure AD integrated applications, whereas the previous version only returned delegate permissions. Application permissions often give you unrestricted access to the entire tenant and moreover, they are not subject to Conditional Access policies or MFA enforcement. Until recently, apps using these permissions didn’t generate sign-in events either, making it vital to know exactly how many such applications you might have and which permissions they hold.
The script also tells you whether the application is from a verified publisher and includes the publisher’s name if this is true. Because this information is only available when querying the /beta Graph API endpoint, here’s the mandatory disclaimer that functionality might change as Microsoft moves things to the /v1.0 endpoint. The same applies for the expiryTime property for delegate permission entries, which is another example of newly added output. To finish up on new properties, the script now surfaces the createdDateTime value, in other words when the application was added to your tenant.
Before moving to the output section, here’s the link to download the script from GitHub. It goes without saying that you should closely examine the script before running it. You need to update the code to include the values for your tenant, the app holding the permission, and the app secret. If you need help with the process, consult the documentation or one of the many step-by-step articles available online. You can also replace the corresponding code (lines 74-95) with your preferred authentication routine.
Understanding the Output
The bulk of processing in the script involves handling the output object, specifically the permissions granted on the service principal. This includes rearranging them all in a single tokenized string, as well as “translating” GUID values to human-readable output, such as UserPrincipalName or Application Role entries. By default, the script generates a CSV file in the directory where the script is run. The CSV file contains a single line per service principal object, listing both the delegate and application permissions granted. The default order is by the createdDateTime property, ascending. Information about the corresponding application object will also be surfaced, such as the Name and GUID.
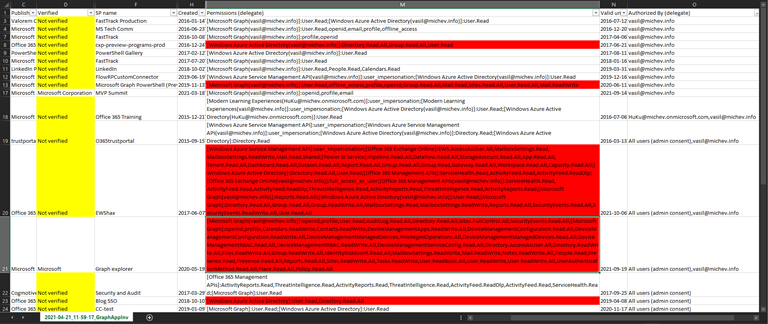
I should also mention something about the format used for the permissions string. Permissions are grouped “per resource” and optionally “per resource per user” for the case of delegate permissions, all concatenated together with the semicolon (“;”) symbol used as the separator. The name of the resource is encapsulated in square brackets, for example [Microsoft Graph]. For delegate permission entries where multiple users can have (different) permissions granted on the same resource, the user’s UPN is also added, encapsulated in round brackets: [Microsoft Graph(user@domain.com)].
For each resource or resource/user entry, the set of permissions is displayed in a comma-separated list. Of course, a picture is worth a thousand words, so let’s take a quick look on how the exported data is presented. Figure 1 focuses on Delegate permission entries, with various examples of consent. From top to bottom, we have applications with consent granted by a single user only, applications with multiple users’ consent, and various permutations of user and admin consent. Excel’s conditional formatting is used to highlight sensitive permission entries, such as Directory.Read.All. Similarly, entries that do not have a verified publisher are brought to your attention.
While in most cases we can use Excel’s robust filtering functionality to focus on a certain permission entry or user, some people might still prefer an “each permission on separate row” type of output. The best way to address this is to modify the relevant bits in the script itself, but you can also take advantage of Excel’s “text to columns” wizard. In Figure 2, we’ve applied the wizard on the Permissions (application) column and split the output to multiple columns by designating the semicolon symbol as delimiter. In effect, we now have a separate column per each “resource”:

You can use the same process to break down the individual user assignments for delegate permissions. Keep in mind that in any organization of size you can have hundreds, if not thousands of entries to deal with for each service principal, and it’s likely that we will hit some of Excel’s limitations. On the other hand, outputting each permission entry separately will result in unnecessary duplication of some details, such as the service principal name or GUID. Your mileage will vary, and as always, feel free to make changes as you see fit.
Additional Notes and Summary
By default, the script filters out first-party service principal objects, or in other words all the pre-integrated Microsoft applications. You shouldn’t care about those, as they are managed by Microsoft and messing with them might negatively impact your user’s experience with the service. You can opt in to include such entries in the generated report by removing the filter from the query on line 102. Expect at least several hundred entries to be added to the output should you choose to do that! As an example, in my tenant there are 429 such entries returned, whereas the number of “Azure AD integrated” entries is 30.
As many of the properties returned by the Graph API queries are in GUID form, the script performs some additional queries to resolve those identifiers to human-readable values. To minimize the number of calls and speed up script execution, the script uses hash tables to store data for already processed entities and a few helper functions are introduced to handle this. The net effect is probably negligible in smaller tenants but should substantially improve performance in tenants with large number of users and applications. And just to be on the safe side, a minor delay is added between queries as a simple anti-throttling mechanism.
In summary, the updated version of the Azure AD integrated applications inventory script is based on the Graph API and can run on PowerShell 7. The output includes additional details about the service principal objects and most importantly also returns application permission entries. Even the latest version of MCAS “OAuth apps” dashboard does not include this level of detail, just saying!
Update: Read this post for some ideas about how to process the set of apps identified by the inventory script. This post explains how to focus on selective high-priority permissions assigned to Azure AD apps and report those apps by posting a message to a Teams channel.


I really appreciate your creating this script. Unfortunately, as my tenant has grown, I cannot get the script to complete. It errors out about halfway through with “Invoke-WebRequest : The remote server returned an error: (401) Unauthorized.” Wondering if you (or anyone else) have any suggestions for editing the script so that it can process a tenant with a large number of users and applications?
I didn’t write the code, but looking at it I think your problem miht be that the access token granted to the app expires after an hour. Any subsequent request fails due to the expired token. Vasil has posted an updated version which uses the Microsoft Graph PowerShell SDK cmdlets here: https://www.michev.info/blog/post/5922/reporting-on-entra-id-integrated-applications-service-principals-and-their-permissions
Maybe it will work better for you.
Vasil, I was starting an effort to perform Azure AD App inventory, and was spending a lot of time connecting to the dots between the apps, service principals, permission grants, etc. When I came across your script I adapted it to my project, and it was glorious! Thank you so much for making and sharing this. I wish I could get you a beer right now.
Any idea what expiryTime / Valid until (delegte) actually means? I see apps with a Valid until is 1+ year ago but users that used that app just a few weeks ago.
Hi,
While running the script i am getting following error:
VERBOSE: POST https://login.microsoftonline.com/xxxx-xx-xxx/oauth2/v2.0/token with -1-byte payload
VERBOSE: received 1684-byte response of content type application/json; charset=utf-8
Failed to obtain token, aborting…
Try adding -UseBasicParsing
$res = Invoke-WebRequest -Method Post -Uri $url -Verbose -Body $body -UseBasicParsing
This is on Line 91. Good luck.
Hi Vasil,
Great script –
What’s your understanding of the expiryTime property returned in the script? Can we use it’s value to determine if the Azure AD app can be decommisioned? (f.e. if from inventory the Valid Until (delegate) column projects a data which has past, the App is a candidate for removal?) I’ve looked at the documentation for the experyTime property but it’s kind of vague about what it exactly holds.
Thanks in advance,
It does nothing currently afaik, it’s not implemented. Just added it for the sake of completeness.
I’m afraid I don’t understand what is the valid until (delegate) date that is listed? Where do you get it and what does it mean?