In any IT organization there are administrative tasks that need powerful admin privileges. It’s a good security practice that accounts should have the fewest permissions necessary, and only for the period of time they need them. But managing the temporary assignment of admin permissions becomes time consuming. As a result, many organizations assign them on a permanent basis, which is not ideal.
Furthermore, auditing the assignment of administrative permissions is a challenging task. Many of us have used custom scripts and third party reporting tools to keep track of permissions.
In Azure Active Directory we can use Privileged Identity Management (PIM) to solve those problems. PIM allows you to grant permissions for an administrator on a temporary basis. PIM also provides approval controls, alerting, and reporting for administrator assignments.
In this blog post I’m going to walk-though the basic PIM setup within Azure Active Directory.
Privileged Identity Management Licensing
PIM is a premium feature of Azure Active Directory, and as such does need licensing. The license required is Azure AD Premium P2, which is available as a standalone add-on license. You can also buy it as part of the Enterprise Mobility + Security (EM+S) E5 license bundle.
You will need an Azure AD Premium P2 license for each user that interacts with PIM. That includes users who are receiving administrator assignments, as well as those who are involved in approvals and reviews.
For this scenario I have a single EM+S E5 license assigned to my main admin account in Office 365. I will be using PIM to grant admin permissions to a user account, Ted Tester.

Enabling Privileged Identity Management
To enable PIM, open the Azure portal and navigate to Privileged Identity Management. Then go to Azure AD Directory Roles – Overview, and click on Wizard.
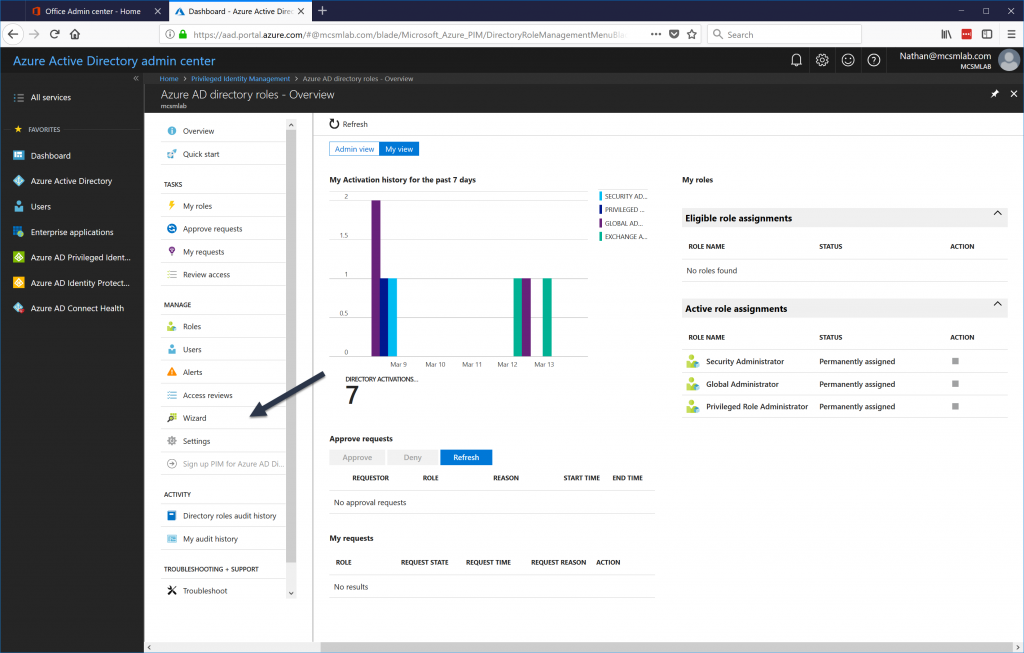
Open the wizard and let it discover the admin roles setup in your tenant. Don’t try to configure anything at this point. Let the wizard activate PIM in your tenant. The account that you are using at this stage will be the first Security Administrator in your tenant.
Once the wizard completes it may take some time before you can assign permissions to users. I needed to wait about half an hour before I could proceed.
Configuring Roles in Privileged Identity Management
Next, we need to configure the specific actions for each role assigned via PIM. Navigate to Azure AD Directory Roles – Overview again, and then choose Settings -> Roles.
Select the role you will be assigning to one of your administrators. For this example I will be assigning the role “Exchange Administrator” to Ted.
On this screen, there are a few controls I want to call out:
- Maximum Activation Duration – The maximum number of hours that a user can request activation for. You should keep this as low as possible, but not so low that your users are under pressure to perform admin tasks in a rush.
- Notifications – The admin will receive a notification when a role is activated. This lets them know they can proceed with their admin tasks, and also alerts them to any unauthorized privilege escalation that may be occurring.
- Multi-Factor Authentication – This control can’t be disabled for high privilege roles. All users who have a PIM role activated will need to use MFA to activate that role.
- Selected Approver – These users can approve access requests for the role. It is important to note that the approvers do not need to have the rights they are granting.
Assigning PIM Roles to a User
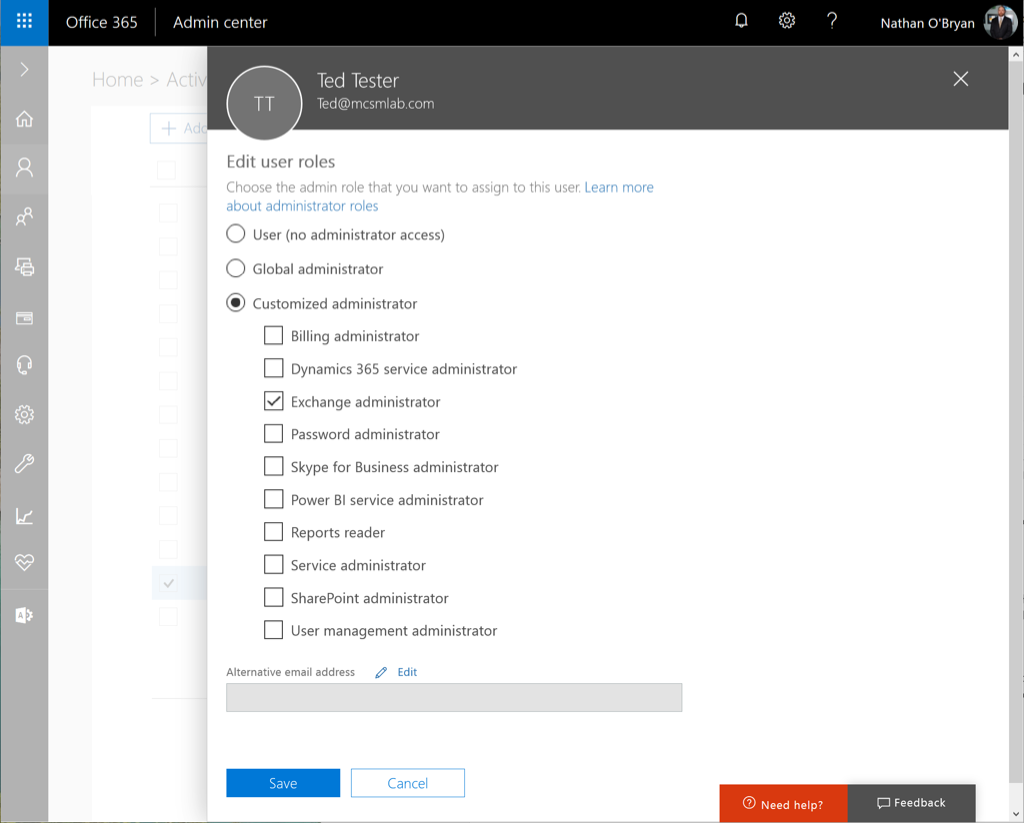
To assign a PIM role to an administrator, first you must assign that role to the user’s account in the Office 365 portal.
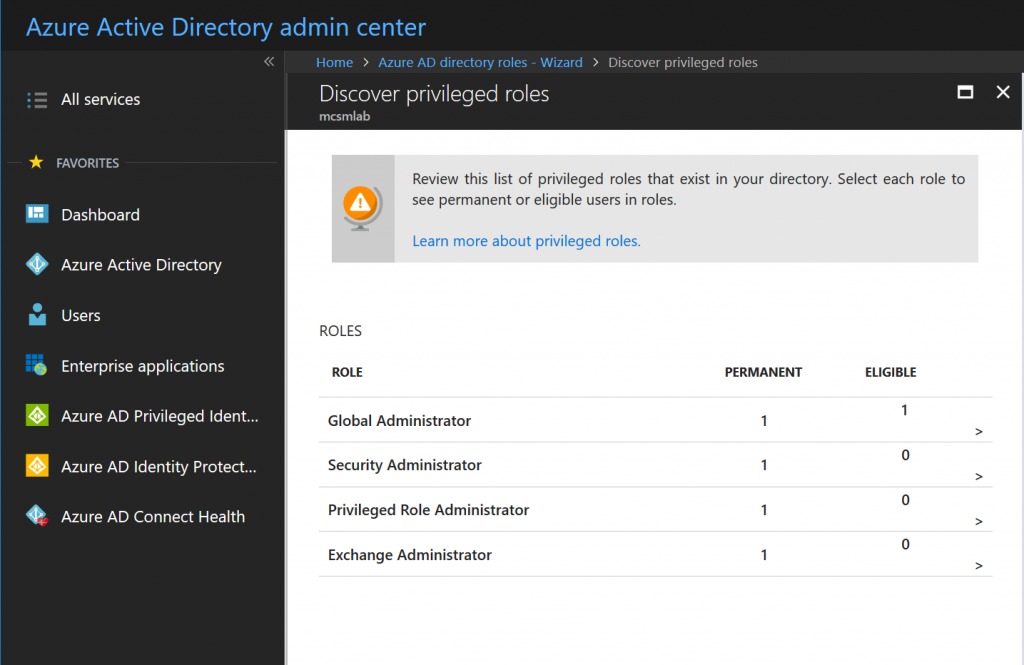
Give that assignment a few minutes to replicate, then go back to the PIM roles wizard we used to activate PIM. Within the Wizard, select the first option to discover roles, and you’ll see the following screen.

These are the roles currently assigned within the tenant. This screen is informational, so click Next to proceed. This is where we active Privileged Identity Management for Ted’s Exchange Administrator permissions. Selection that assignment from the list, then click Next.
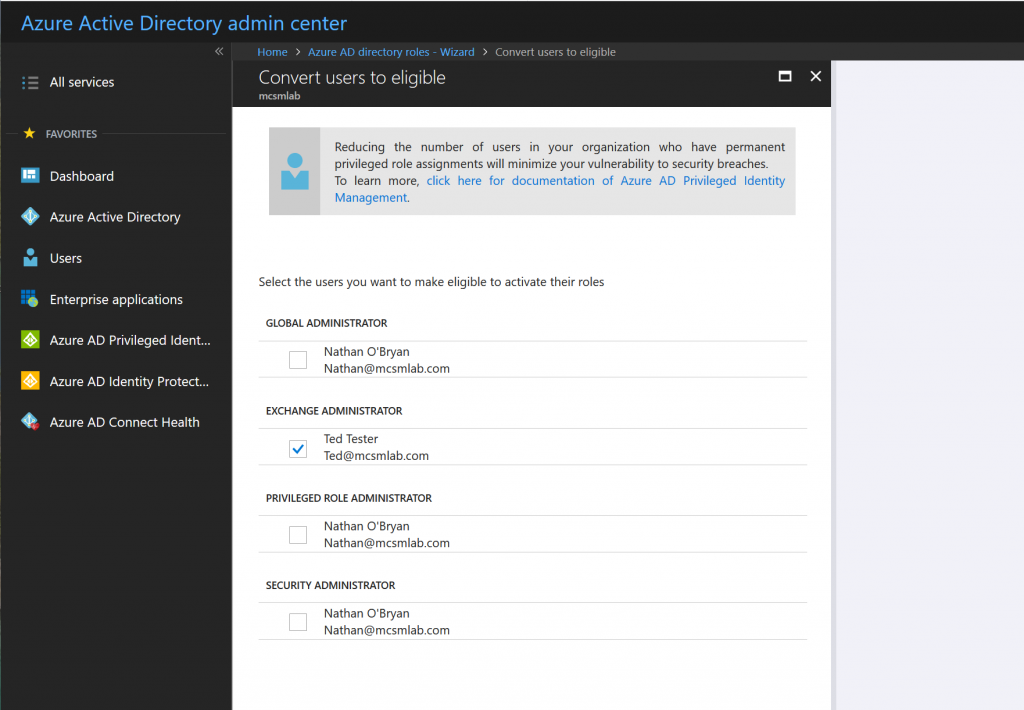
The next screen will verify your selection and configure PIM for Ted. At the end of this process, the Exchange Administrator role is removed from Ted’s account. In effect, he is a standard user again. But, he is now eligible to become an Exchange Administrator.

Requesting Activation of PIM Managed Roles
Logging into any Office 365 portal at Ted will only show user options now. If Ted needs to do some Exchange admin work, he can request to have his permissions elevated via the Azure AD portal.
When Ted logs into the PIM management tool, under My roles he’ll see roles that he is eligible to request for activation.
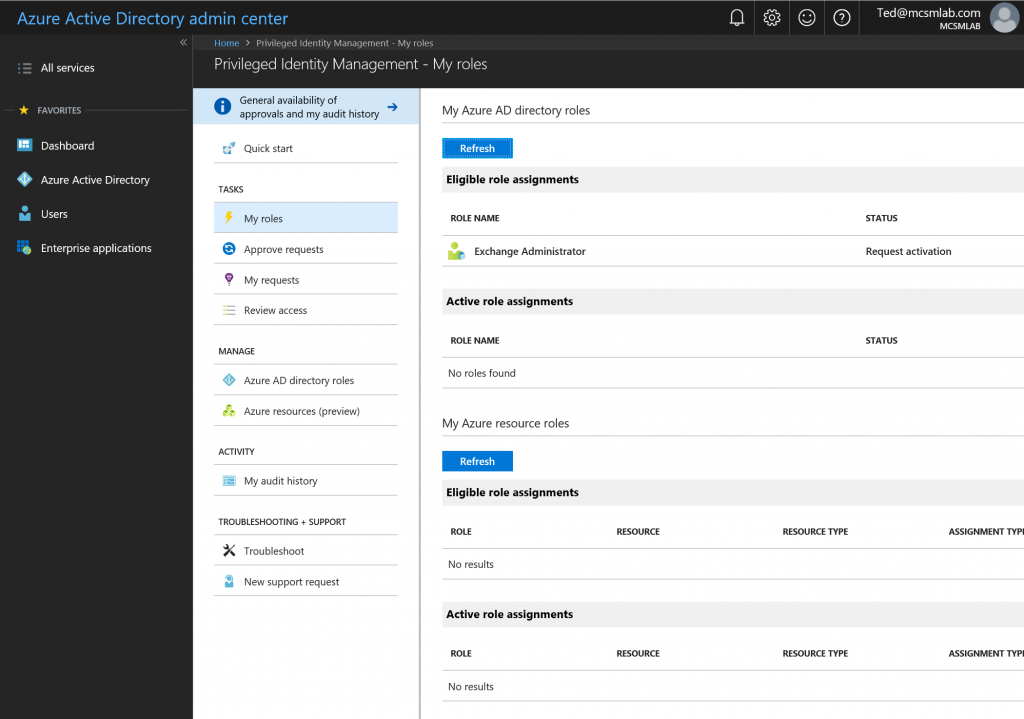
Selecting Exchange Administrator will take him to the activation screen.
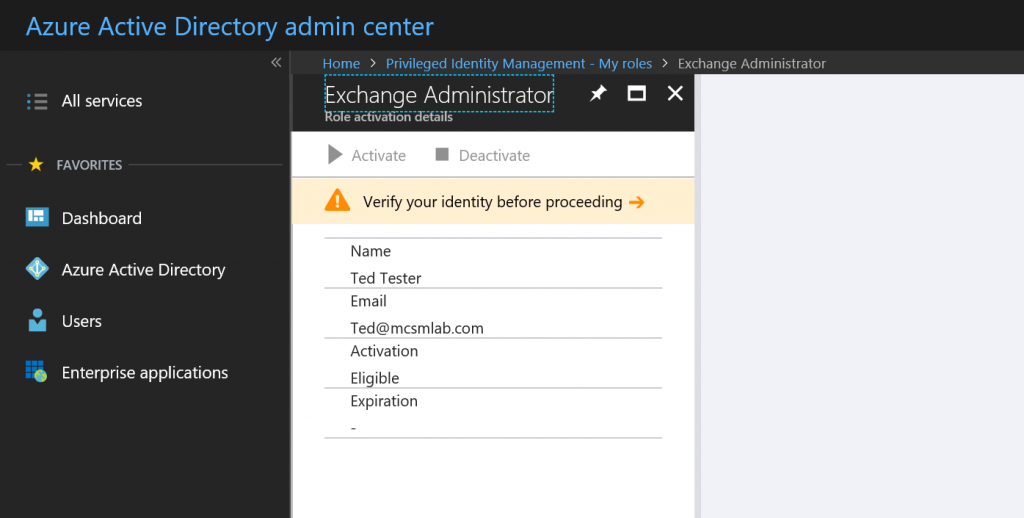
Ted will need to verify himself with multi-factor authentication before proceeding. If MFA is not already enforced for the user, they’ll be prompted to register. I recommend configuring MFA for your administrators before you start assigning PIM roles.
Once Ted passes the MFA, he can select Activate to request rights elevation.
Authorizing PIM Role Activation
For this example, I am listed as an approver. This means I can see and approve Ted’s request in the PIM portal.
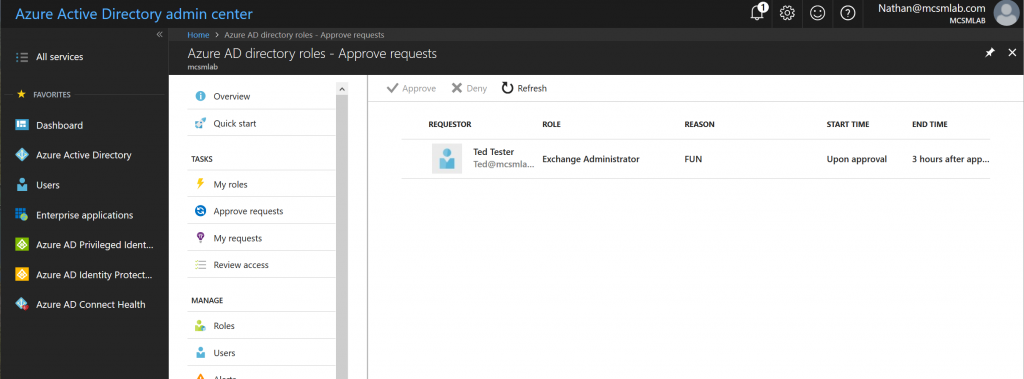
I can approve or reject Ted’s request, and also add notes justifying my action.
While testing PIM in my tenant saw a delay of 30-45 minutes for Exchange permissions to take effect. Other workloads were almost instant. Once the rights kick in for Ted, he was able to perform tasks as an Exchange Administrator. The permissions are then automatically revoked at the end of the approval period.
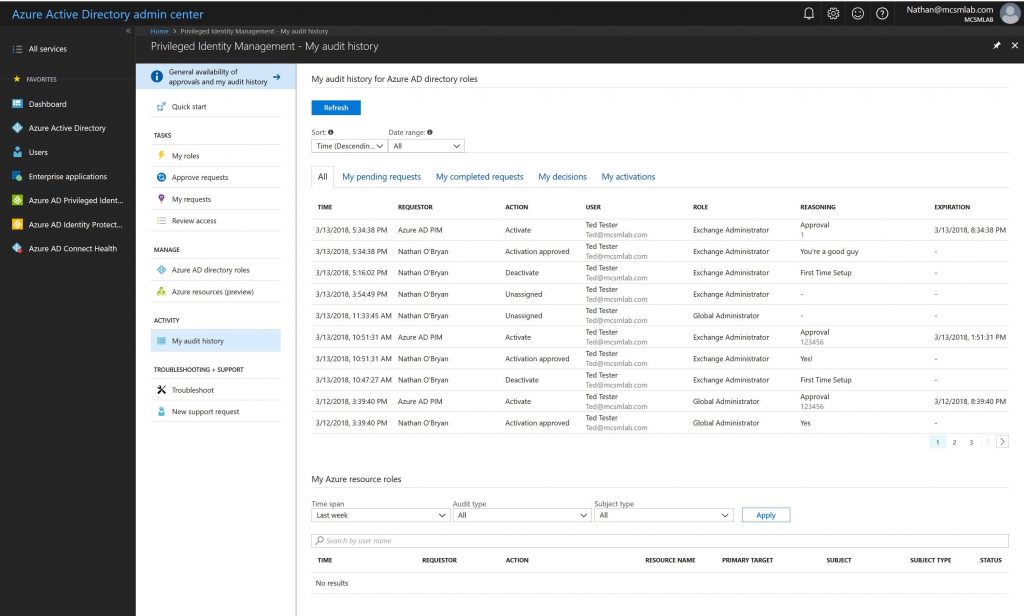
That approval, and all the information I enter with it, is recorded in the My audit history section of the PIM control panel. In the screenshot below you can see the approvals I did for my test account during the process of writing this blog post.
Summary
Privileged Identity Management in Azure Active Directory is the solution for managing least privilege, “just in time” administrative access for Office 365 and Azure AD. As a premium feature it does require additional licensing. However, many organizations will benefit from the increased control that PIM provides for high privilege credentials, making the additional cost a worthwhile investment.


How do you assign approvers? I am not seeing any approvals, all requests are being automatically approved.
Pingback: Multi-factor Authentication by Default for Administrators in Azure AD and Office 365 – SimpleITPro
Nnice article.
There is a course available in Pluralsight about [Implementing Azure Privileged Identity Manager][Azure AD PIM].
http://www.pluralsight.com/courses/microsoft-azure-privileged-identity-management-implementing?utm_source=Facebook&utm_medium=video&utm_campaign=authordemo
Course Description:
——————-
Privileged Identity Management is emerging as one of the hottest topics in cybersecurity. In this Pluralsight course, you’ll learn how to use Microsoft Azure PIM to manage, control, and monitor access within Azure AD, Azure resources, and Microsoft Online Services.
FYI that the picture before this sentence – “On this screen, there are a few controls I want to call out:” – is seemingly the wrong picture. I see the same picture that is showing again about two images down.
These are the similar features of MIM (Microsoft Identity Management) which is similarly called as PAM (Privilaged Access Management). Although the AAD P2 seems pricey, if some one know about the implementation of PAM, PAW under MIM, complexity involved in such configurations and the security benefits that an organization will benifit – will easily compensate the the price we pay for it. Its totally worth it, I hope there will be future enhancements to the PIM on the O365 Platform like what the rich reporting that we get from MIM.
Great feature but at the cost of AAD P2 a steep price.
What too many companies don’t / won’t consider is that P2 is not required for all users. It is only required for users that are actually going to use the P2 features.
In the case of PIM, a company can select to purchase P2 licensing only for employees who will need to access higher privilege roles. That prospect can provide a much better cost/risk balance for implementing PIM.