
SharePoint is a widely popular tool amongst developers for many reasons. Firstly, most of the core functionality, such as security, data management and more are already in place, meaning one less job for developers.
Secondly, SharePoint lists is a highly efficient system for managing records. In the most recent Microsoft update to the core design, lists can now handle a phenomenal 30 million records, therefore providing organizations with scalable record management systems for business applications. What makes this even more valuable, is that Microsoft increases this limit almost every year at Ignite.
So, building new applications utilizing SharePoint is evidently a great opportunity to enhance business processes, but what if we need to migrate historical data from a legacy system?
I came across a situation with a customer whilst on a project developing a custom application utilizing SharePoint Online. Once the application was ready to go live, my customer requested to move their historical data from the Microsoft Access database to the new system. After analyzing the current dataset from the CSV file provided by the customer, I discovered my customer was generating around 70,000 records a year and wanted to migrate three years’ worth of records.
Essentially, my objective here was to migrate the historical data (210,000 records) provided in a large CSV file to a new system designed in SharePoint Online.
If I were to achieve this objective by migrating the data manually it would be an extremely time-consuming, inefficient process. In order to make this process more automated and streamlined, the best tool to use is PowerShell.
In this blog, I will explain the steps I took to create a more simplified method for data migration and demonstrate how you can do this in your environment.
The Plan of Action in 4 Steps
- Review the exported CSV dataset to ensure that the SharePoint fields match the CSV data
- Download and install SharePoint Online Management Shell
- Install the PowerShell PnP library
- Write and run the script in PowerShell
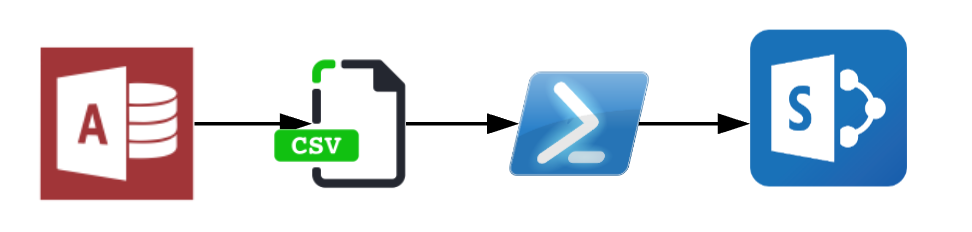
Below is a graphic on how this process looks. Let’s get started!
Step 1: Review the exported CSV dataset to ensure that the SharePoint fields match the CSV data
The first step is very important to ensure data imports to SharePoint with no errors. We need to check the CSV file columns to make sure they match the associated SharePoint fields datatypes. Let’s open a CSV file and review the data set.
In my example, I have a CustomerData.csv file with a few records.
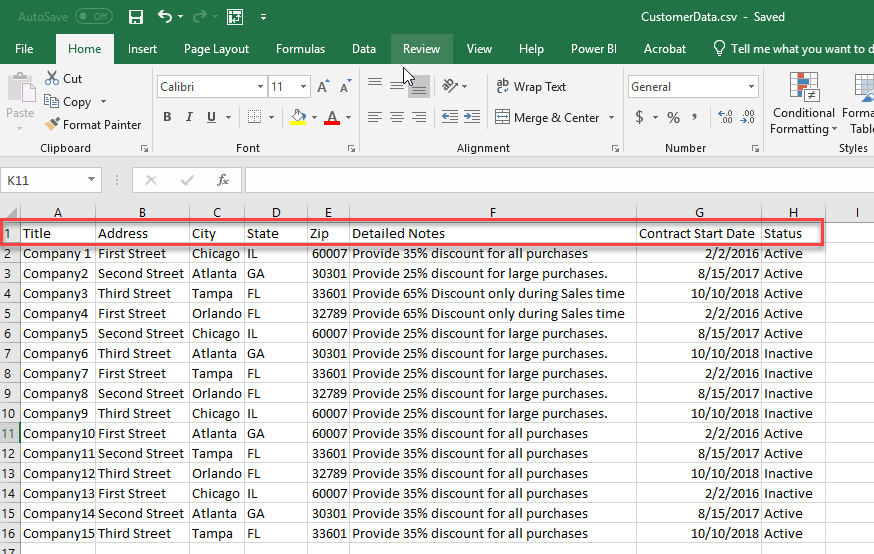
A few things to be aware of:
- The first row of the CSV file must represent the column name
- All the data in each column should have the same data type for a consistent result
- If your SharePoint list has a choice column, you need to make sure that the data in the CSV file column matches all available options in the SharePoint choice column. In my example above, SharePoint list has a column named Status which is a choice column with only two options: Active and Inactive. If my CSV dataset has a line record with the status as Open, then this would import with an error
We can see in my CSV file example that Title, Address, City, and State are one-line text fields. Since the Detailed Notes column may have more than 255 characters, we will consider this field as a multiline text field. Contract Start Date is a date field and Status is a choice column with two options (Active and Inactive).
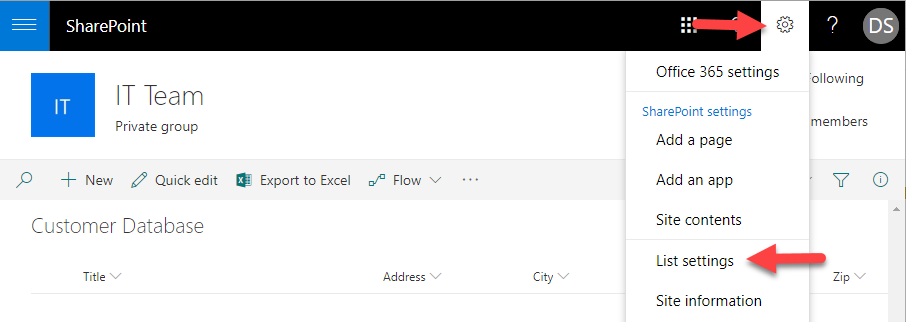
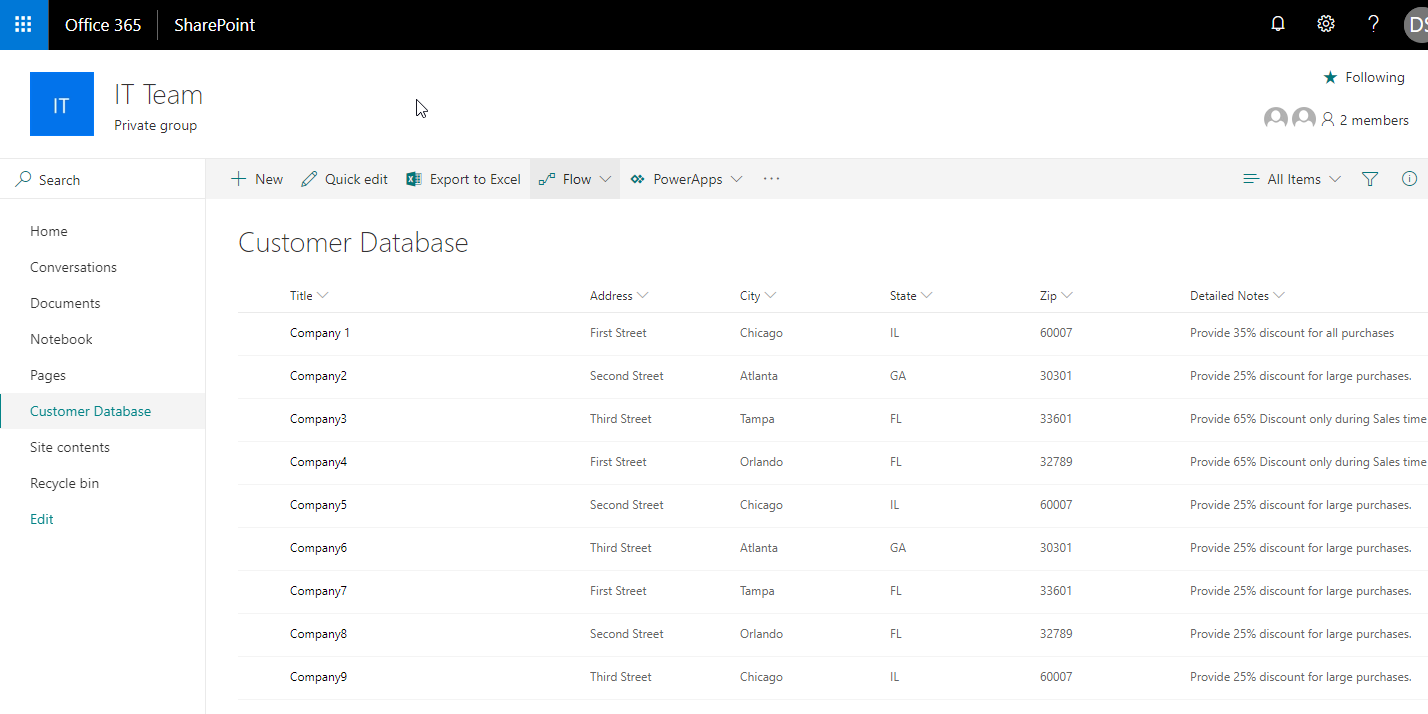
Now, let’s review SharePoint list to make sure the list can accommodate the data from CSV file. Navigate to your SharePoint site and open your list. In my example, I have a SharePoint list called Customer Database.
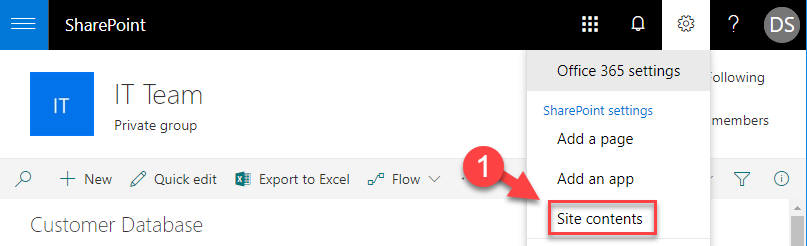
To open SharePoint list settings, click on the gear icon at the top right corner of the screen and choose List settings from the drop-down menu.
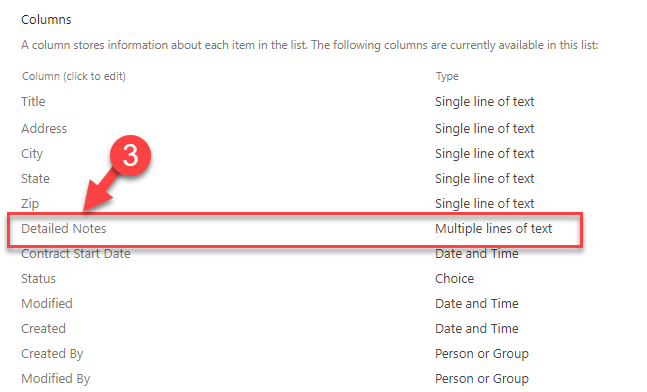
Scroll down to the Columns section and verify the data type of your SharePoint list’s columns matches all the columns in the CSV file.
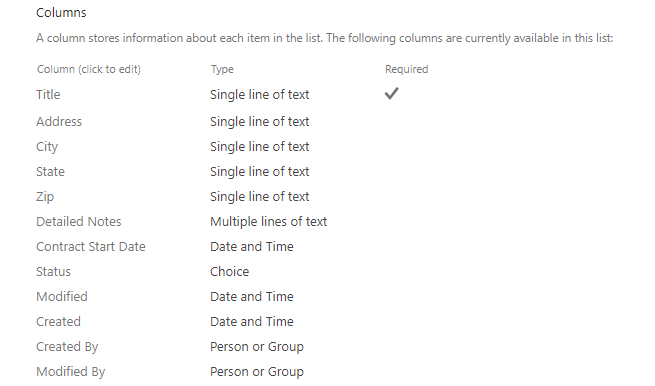
In my example, I have a perfect match between the CSV file and SharePoint list. If you find inconsistency in your dataset, you will have to decide either to fix your historical data (CSV file) or change SharePoint column types. Let’s move on to the next step of the process.
Step 2: Download and install SharePoint Online Management Shell
Like any other Microsoft products, SharePoint has its own management shell. It is a PowerShell module that can be used to manage SharePoint Online/SharePoint on-premises site collections and sites. You can download the SharePoint Online Management Shell here, and make sure you check the System Requirements and download the right version of the Management Shell.
Note: To use SharePoint Online Management Shell, you must have SharePoint Online Global Admin rights.
Step 3: Install PowerShell PnP library
Let’s talk very briefly what PnP library is, PnP PowerShell is a library that contains PowerShell cmdlets to manage SharePoint artifacts. You can provision site and site collections, manage lists, libraries, and more. For more details, visit Microsoft’s documentation – PnP PowerShell overview.
To install PnP PowerShell library, open SharePoint Online Management Shell and type the cmdlet below:
Install-Module SharePointPnPPowerShellOnline
Note: To successfully run the command, make sure you open the Management Shell as an administrator.
You can use PowerShell PnP library for SharePoint online, on-premises 2016 and on-premises 2013. You will have to install different modules for each version of the product.
SharePoint Online: Install-Module SharePointPnPPowerShellOnline
SharePoint 2016: Install-Module SharePointPnPPowerShell2016
SharePoint 2013: Install-Module SharePointPnPPowerShell2013
After the module is installed, we are ready to write our script to import thousands of records from CSV file to SharePoint Online.
Step 4: Write and run the script
Before we write the script, let’s consider its mechanics:
- Connect to SharePoint Online environment
- Load the content of the CSV file to a variable, which creates an array
- Loop through each item in the variable (array) and create associated Item in the SharePoint Online list
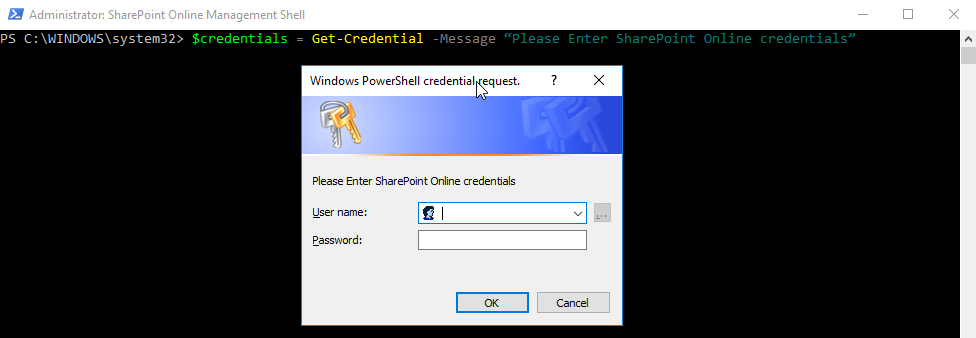
First, we need to connect to our SharePoint Online environment. Again, make sure that you have SharePoint Global Administrator rights to run cmdlets below. To connect to the environment, we will save admin credentials into the variable called $credentials.
$credentials = Get-Credential -Message “Please Enter SharePoint Online credentials”
After running this command, you will be prompted to type your username and password.
Remember that everything saved in the variables is good for running a PowerShell session. If you close and re-open management shell, you will have to re-create all the variables.
Next, we will create a variable called $Site with the URL of your SharePoint site:
$Site=”https://SITE-URL.sharepoint.com/”
Note: You don’t have to include SharePoint list/library name in the URL.
Now, using these two variables ($credentials and $Site), we will use PnP cmdlet to connect to the SharePoint Online environment:
Connect-PnPOnline -Url $Site -Credentials $credentials
To make sure that you are in the right site collection you can run Get-PnPlist cmdlet to locate SharePoint list that you are trying to work with.
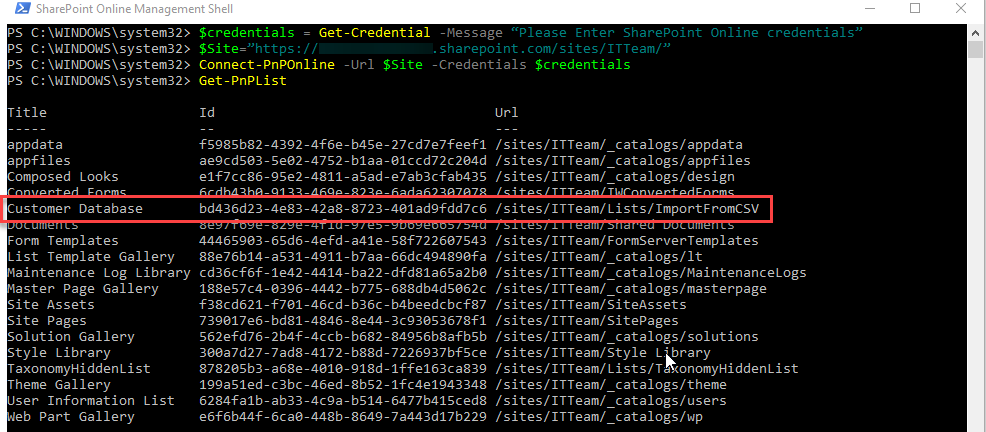
According to the result of Get-PnPlist cmdlet, we are in the right place.
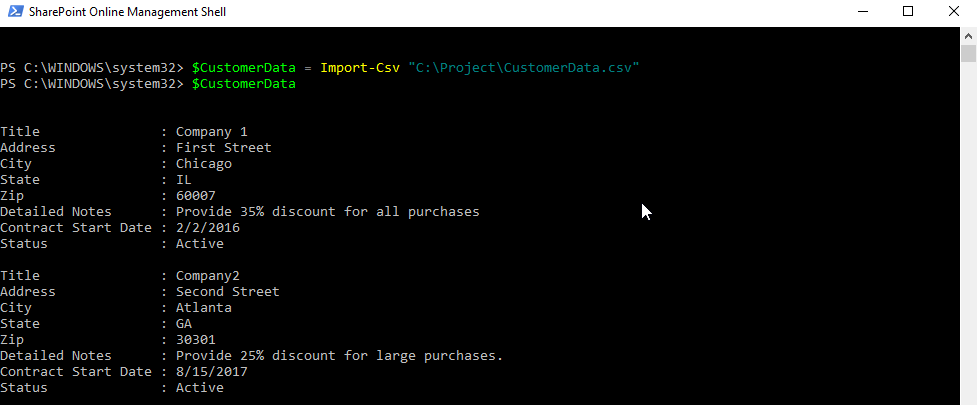
Next, we are going to load CSV file data into the variable named $CustomerData.
$CustomerData = Import-CSV “C:\Project\CustomerData.csv”
To verify that your data set loaded correctly, you can display the content of the CSV file. Type the name of the variable and hit enter.
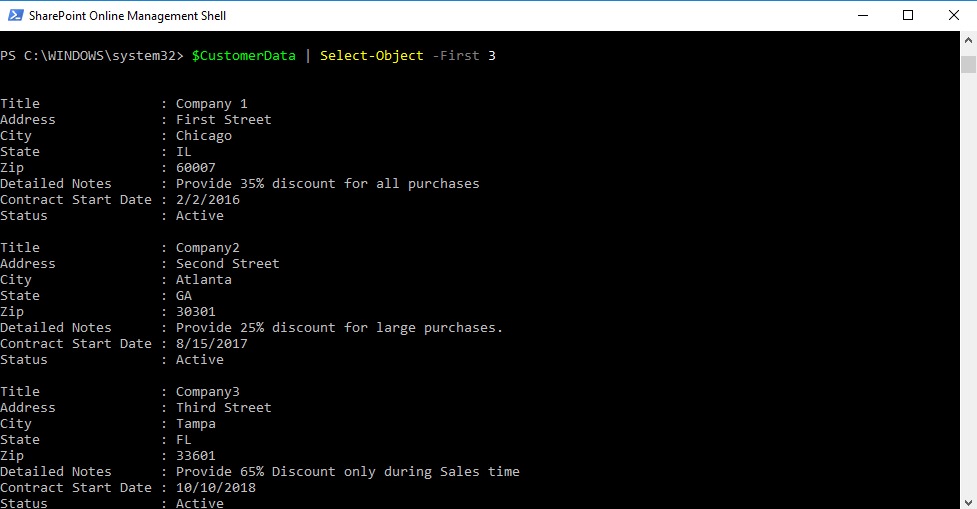
If you have a large data set, you may not want to display the entire list. Run the cmdlet below to show the first three records in the dataset.
$CustomerData | Select-Object -First 3
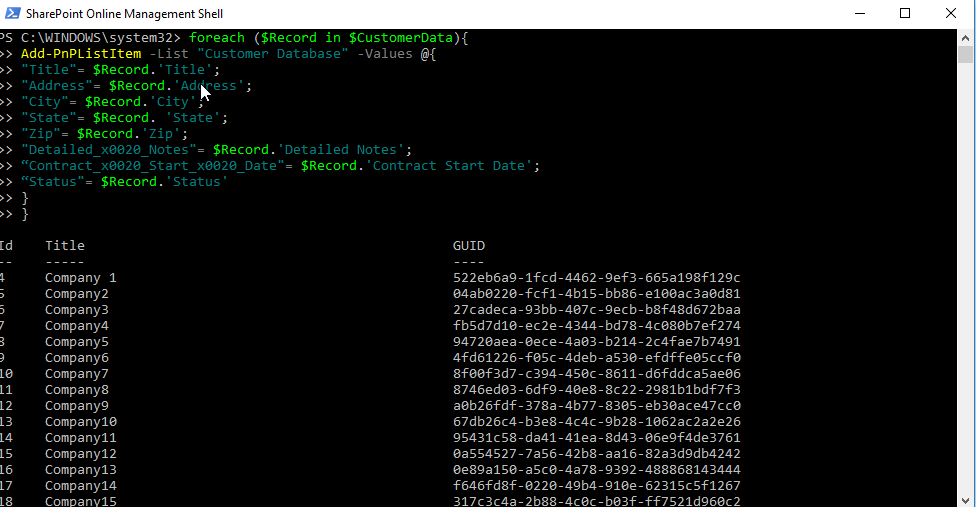
Great, we are connected to the right environment, and we have loaded the dataset for us to use. Next, we are going to loop through each item and in the $CustomerData variable and create an associated item in the SharePoint list.
Note: Pay close attention to the names of the fields.
foreach ($Record in $CustomerData){
Add-PnPListItem -List "Customer Database" -Values @{
"Title"= $Record.'Title';
"Address"= $Record.'Address';
"City"= $Record.'City';
"State"= $Record. 'State';
"Zip"= $Record.'Zip';
"Detailed_x0020_Notes"= $Record.'Detailed Notes';
“Contract_x0020_Start_x0020_Date"= $Record.'Contract Start Date';
“Status"= $Record.'Status'
}
The left side of the statement is the name of the SharePoint filed, and the right side is a CSV column name.
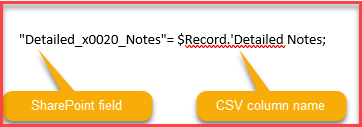
Note: For SharePoint fields make sure you use internal name NOT the display name of the field. To find the internal name of the field, navigate to your SharePoint list, click on the gear icon and select List settings.

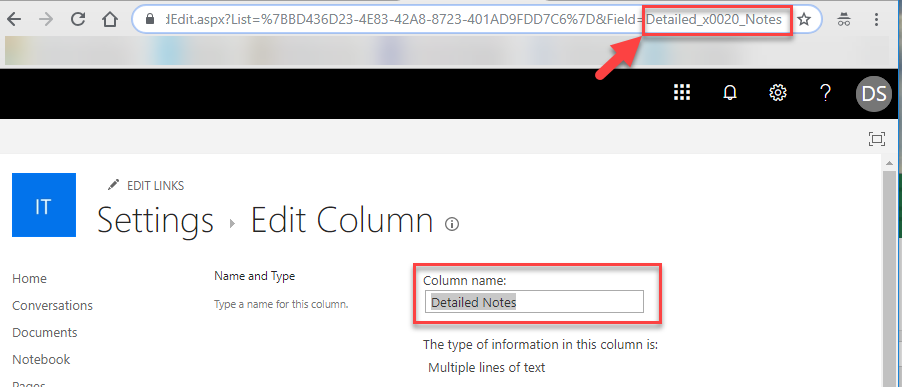
Scroll down to the Columns section and click on the column that you would like to know the internal name.
When you click on the column name, you will be navigated to the column’s settings page. If you look at the tail of the URL, you will find an internal name of the column that you need to use in the script.
Now we are all set to run the script. Let’s review the entire script to have a full picture of what we just created:
$credentials = Get-Credential -Message “Please Enter SharePoint Online credentials”
$Site=”https://SITE-URL/sites/”
Connect-PnPOnline -Url $Site -Credentials $credentials
$CustomerData = Import-CSV "C:\Project\CustomerData.csv"

foreach ($Record in $CustomerData){
Add-PnPListItem -List "Customer Database" -Values @{
"Title"= $Record.'Title';
"Address"= $Record.'Address';
"City"= $Record.'City';
"State"= $Record. 'State';
"Zip"= $Record.'Zip';
"Detailed_x0020_Notes"= $Record.'Detailed Notes';
“Contract_x0020_Start_x0020_Date"= $Record.'Contract Start Date';
“Status"= $Record.'Status'
}
After running the script, all the items have been added to SharePoint list. You can verify this by navigating to the SharePoint list.
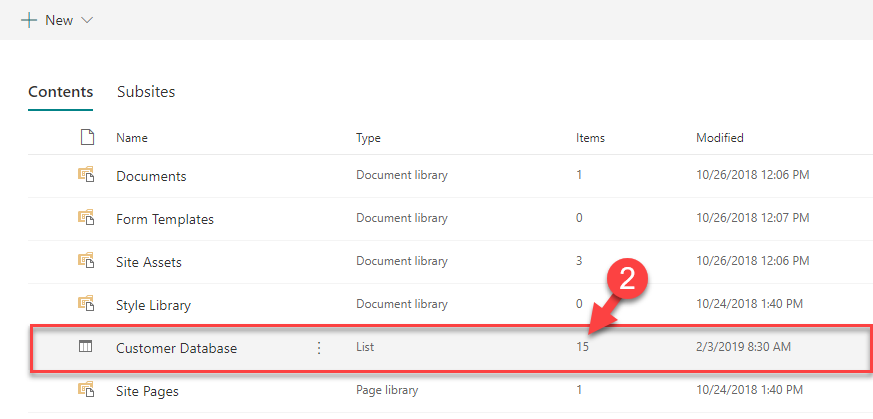
Now, we’re all done, and all the records have been imported to the SharePoint list. You can always check the total number of items in SharePoint list by navigating to Site Contents and locating your list which shows the total number of items.
In a matter of minutes, we were able to automate, what could have been a time-consuming manual process, by entering data into SharePoint Online list utilizing PnP PowerShell library cmdlets.
PnP PowerShell library is a powerful tool for SharePoint artifacts management such as site collections, sites, lists, and libraries. You can find more information here. For code examples, you can visit the PnP GitHub repository.
To conclude this how-to guide on migrating large capacities of records from a CSV file to a SharePoint application, I would like to highlight the time PowerShell can save for IT professionals by enabling them to automate time-consuming processes and therefore spend more time learning new Office 365 technologies.


Hi
Would this work for Sharepoint on premises as well
Thanks for the detailed description. I am looking for how we include lookup values. Still looking for a good example that I can follow. I have over 10000 items to go through.
Will this pnp work for more than 5000 data in a excel?
Hi,
I have many Lookup-columns that are collected from another list and it seems not to work even if the value is exactly the same. Do I need to do something more logical in the script to solve that? For example pick up the value from the lookup-list and enter it to the current list to import to?
I am also really after importing records with lookup columns, any luck with it?
Any progress on this? Going through the same issue.
Hi Daler,
thanks for this awesome script.
4 lines of codes that can spare a lot of time!
In my experience, I waste a bit of time because I was using the wrong column names.
Although you mention this, in your article. The suggetsion to lock in the list setting is not enough in all cases.
I was stuck, and if anybody is interested I found another nice script that provides the exact column names.
https://www.sharepointdiary.com/2017/02/sharepoint-online-get-all-list-fields-using-powershell.html
My columns went through different modification, and after a couple of modification one would hardly guess the exact column name.!
Thanks
Nicola
can`t update date and time field. throws below error
String was not recognized as a valid DateTime
I had this error. I formatted the .csv date columns to represent the US standard datetime as opposed to UK standard. Which worked for me.
I am also having same error for blank values in csv any idea?
Hi,
I once tried this and it worked, but now it suddenly doesn’t. Nothing happens at all. I only got once the error while trying multiple times again:
Add-PnPListItem : The remote server returned an error: (500) Internal Server Error
I would really appreciate help.
Thank you
Emi
I solved the problem myself. For anyone who might have the same issue as me, I had to include the wanted list to the url. At first it worked without it (as it was written in the explanation), but now it only works for me when I include it.
*I meant the SharePoint library name where the list is located.
Really great explanation! Helped me a lot!
Will it work for LoopUp columns ..? SPList(Lookup Field) is Configured with parent list field. can we write that loopup values from CSV file..?
Hi, I wonder the same thinkg. I have many Lookup-columns that are collected from another list and it seems not to work even if the value is exactly the same. Do I need to do something more logical in the script to solve that? For example pick up the value from the lookup-list and enter it to the current list to import to?
Nice article with a great explanation!
Helped me with what I needed 🙂
Thanks,
Dennis
Great write-up! Thanks for sharing!
I am trying to use this approach but my script imports 39 records out of 100 and then fails with the message below. Anyone have any thoughts on this? Any help will be much appreciated!
format-default : The collection has not been initialized. It has not been requested or the request has not been
executed. It may need to be explicitly requested.
+ CategoryInfo : NotSpecified: (:) [format-default], CollectionNotInitializedException
+ FullyQualifiedErrorId : Microsoft.SharePoint.Client.CollectionNotInitializedException,Microsoft.PowerShell.Comma
nds.FormatDefaultCommand
I think I found a way around the error. I assigned the Add-PnPListItem cmdlet to a variable:
$MyVar = Add-PnPListItem -List ….
Peter, I was running into this too. Thanks for sharing the fix.
Hello,
thanks for this tutorial. It works, but finally my SharePoint has Empty rows but i can deleted after input. what can be the mistake here?
The only one thing I can think of is the data in Excel spreadsheet did not match available options in SharePoint drop down values.
I know this is way late, however it may help someone else down the line. If you are importing empty rows, check your csv file and make sure there aren’t a bunch of empty rows being added by Excel. To do this, simply open your csv with a text editor like notepad. Scroll to the bottom of the document and see if there are rows of just commas with no data. If there is, just delete those rows and try again. If you want to do it programatically, pipe the following code to your import-csv line:
| Where-Object { $_.PSObject.Properties.Value -ne ” }
Hi,
I have few rows where some of the columns are blank and it should be like that.
My columns in the list are as well not of required type. But still the item does not get created due to a single blank column in my row. What can be a solution for this.
The error comes that Item cannot be created if its value is null.
Not sure if this change lately. I used this PNP approach in SharePoint ONLINE but did not work with Internal Name. Instead it worked with the Display Name. (no label Name).
You may want to update info here.
A very detailed explanation. Keep up the great work 🙂
In step 1 you already have your csv in Excel. Why do you not simply create a table, and then go to ‘Design – Export – Export Table to SharePoint List…’?
Hi Michael, Thank you for the comment.
Yes, you can use this method for a simple excel table.
Also, this method only supports limited types of columns and much more difficult to manage large datasets.
Another benefit of using PowerShell is that you can use complex logic during the import process.
Thank you
Great article. Though there are a few mistakes/ In a picture it says SP field is on the left, but in the text it says vice versa. Also screenshot just below it talks about List settings but arrow points to Site settings (duplicate of a screenshot even more below).
Btw, i have installed and used SP Online Management Shell on Windows Server 2012 R2 before as i didn’t have spare Windows 10 machine to do administration of Office 365 via PowerShell, but i was under impression that at least now everything should be possible to do via regular PowerShell by downloading relevant modules from Gallery. Or is SPO Management Shell required just for this scenario?
Hi Oleg,
Thank you for your comment. We will correct the content.
Yes, you are correct, you can import required modules to PowerShell and everything should work. The reason I am recommending to use the SP Management shell is to have everything available to you during script execution.
Thank you