This is a two-part article series on the Azure Ink Recognizer, you can find Part One here.
If you’re looking to integrate handwriting, shapes and inked documents into your Office 365 applications, and in this case, SharePoint, the new Azure Ink Recognizer is a prominent option.
The new Azure service, which is currently still in preview, can distinguish digital handwriting and the layout of inked documents. For example, the Recognizer identifies notetaking, form-filling and document annotations.
The service has an API that can be used to read and upload handwritten information to SharePoint which is used in the built-in search engine, and any other relevant text manipulations and automated processes.
In Part One of this article, I supplied some more background information on the service and its input and output formats. In part two, I’ll demonstrate how to use the Azure Ink Recognizer Service programmatically.
Creating an Ink Test Application
To get started, we need to create a small application that gets the ink shapes in a suitable form for the Azure service. Here, I’m using Microsoft Visual Studio Enterprise 2019, however, you can use any version from 2017.
- Create a new Windows Console Application (CSharp). Add references to PresentationCore, PresentationFramework, and WindowsBase. Add NuGets or NewtonSoft.Json and Microsoft.SharePointOnline.CSOM.
- Define some constants and global variables at the beginning of the code (under the Class definition)
  const string azureEndpoint = "https://api.cognitive.microsoft.com";
 const string inkRecognitionUrl = "/inkrecognizer/v1.0-preview/recognize";
 static Window myWindow;
 static InkCanvas myInkCanvas;
3. Add an OnStart handler to start an Inking canvas for writing down text, as per the code below:
  protected override void OnStartup(StartupEventArgs args)
 {
     base.OnStartup(args);

     myWindow = new Window();
     myInkCanvas = new InkCanvas();
     myWindow.Content = myInkCanvas;
     myWindow.Show();
 }
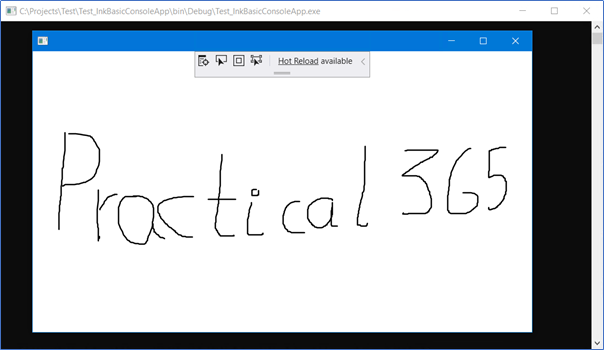
When the console application starts, it shows the inking canvas which you can write on with your mouse, or if you’re on a tablet, through touch.
4. The main routine will start when the canvas is closed:
  [STAThread]
 static void Main(string[] args)
 {
     new Program().Run();
     Tuple<string, string, string> FilePathAndName = GetInk();
 }
Please note, the [STAThread] command is required for the decoration attribute, also the GetInk command reads the data from the canvas in different ways:
  static Tuple<string, string, string> GetInk()
 {
     SaveFileDialog mySaveFileDialog = new SaveFileDialog();
     mySaveFileDialog.Filter = "isf files (*.isf)|*.isf";

     if (mySaveFileDialog.ShowDialog() == true)
     {
         CreateIsfFile(mySaveFileDialog.FileName); // Save the ink to a .isf file
         CreateBmpFile(mySaveFileDialog.FileName); // Save the ink to a .bmp picture
         CreateJsonFile(mySaveFileDialog.FileName); // Save the strokes to a json file
     }

     string dataPath = mySaveFileDialog.FileName.Replace(".isf", "_Ink.json");
     var requestData = LoadJson(dataPath);
     string requestString = requestData.ToString(Formatting.None);
     string myText = RecognizeInk(requestString, mySaveFileDialog.FileName);

     Tuple<string, string, string> tplReturn =
         new Tuple<string, string, string>(mySaveFileDialog.FileName, mySaveFileDialog.SafeFileName, myText);
     return tplReturn;
 }
The Ink information in different formats
The Ink from the canvas is saved in different ways, for example as a .isf file, .bmp format or .JSON which I’ll explain in further detail below:
.ISF File
A .isf file or Ink Serialized Format (ISF) is a Microsoft open-source format for storing written ink information.
Here, the ink object is described as a sequence of strokes, where each stroke is representative of a sequence of points, and the points are aligned with X and Y-axis coordinates.
The routine CreateIsfFile passes the strokes information on to another file:
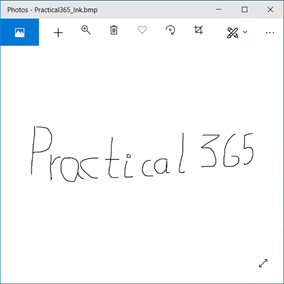
  static void CreateBmpFile(string FilePathAndName)
 {
     int width = (int)myInkCanvas.ActualWidth;
     int height = (int)myInkCanvas.ActualHeight;
     RenderTargetBitmap myRenderBmp = new RenderTargetBitmap(width, height, 96d, 96d, PixelFormats.Default);
     myRenderBmp.Render(myInkCanvas);
     BmpBitmapEncoder myEncoder = new BmpBitmapEncoder();
     myEncoder.Frames.Add(BitmapFrame.Create(myRenderBmp));
     string bmpFileName = FilePathAndName.Replace(".isf", "_Ink.bmp");
     using (FileStream bmpFileStream = new FileStream(bmpFileName, FileMode.Create))
     {
         myEncoder.Save(bmpFileStream);
     }
 }
.Json Format
Lastly, you can save it in .Json format. The information below enables you to make the call to the Ink Recognizer service to do so:
  static void CreateJsonFile(string FilePathAndName)
 {
     int intCounter = 1;
     string myStrokesJson = string.Empty;
     myStrokesJson = "{" +
                         "\"version\": 1, " +
                         "\"language\": \"en-US\", " +
                         "\"unit\": \"mm\", " +
                         "\"strokes\": [";
     foreach (Stroke oneStroke in myInkCanvas.Strokes)
     {
         string myPoints = string.Empty;
         foreach (Point onePoint in oneStroke.StylusPoints)
         {
             myPoints += onePoint.X + "," + onePoint.Y + ",";
         }
         myPoints = myPoints.Remove(myPoints.Length - 1); // Remove last ","

         myStrokesJson += "{" +
                             "\"id\": " + intCounter + "," +
                             "\"points\": \"" +
                             myPoints +
                             "\"},";
         intCounter++;
     }
     myStrokesJson = myStrokesJson.Remove(myStrokesJson.Length - 1); // Remove last ","
     myStrokesJson += "]}";

     string jsonFileName = FilePathAndName.Replace(".isf", "_Ink.json");
     using (TextWriter writer = new StreamWriter(jsonFileName, true))
     {
         writer.Write(myStrokesJson);
     }
 }
Calling the Ink Recognizer Service
Once we have the Strokes information, the GetInk command uses the .Json file to make a call to the RecognizeInk method:
  static string RecognizeInk(string requestData, string FilePathAndName)
 {
     string subscriptionKey = ConfigurationManager.AppSettings["AzureSubscriptionKey"];
     var result = SendRequest(
         azureEndpoint,
         inkRecognitionUrl,
         subscriptionKey,
         requestData).Result;

     dynamic jsonObj = JsonConvert.DeserializeObject(result);
     CreateResultJsonFile(FilePathAndName, jsonObj);

     string myRecognizion = string.Empty;
     foreach (var oneUnit in jsonObj.recognitionUnits)
     {
         if (oneUnit.category == "line")
         {
             myRecognizion += oneUnit.recognizedText + Environment.NewLine;
         }
     }

     CreateResultTextFile(FilePathAndName, myRecognizion);

     return myRecognizion;
 }
This routine makes a REST POST call to the Azure service. The SubscriptionKey, found in step four of my previous article, is in the AppConfig. File. The REST service sent back the response as JSON, set in a dynamic object. Finally, the RecognitionUnits in the object are read to form the final interpretation of the strings in the canvas.
The REST call uses the SendRequest method, as follows:
  static async Task<string> SendRequest(string apiAddress, string endpoint, string subscriptionKey, string requestData)
 {
     using (HttpClient client = new HttpClient { BaseAddress = new Uri(apiAddress) })
     {
         ServicePointManager.SecurityProtocol = SecurityProtocolType.Tls12 | SecurityProtocolType.Tls11 | SecurityProtocolType.Tls;
         client.DefaultRequestHeaders.Accept.Add(new MediaTypeWithQualityHeaderValue("application/json"));
         client.DefaultRequestHeaders.Add("Ocp-Apim-Subscription-Key", subscriptionKey);

         var content = new StringContent(requestData, Encoding.UTF8, "application/json");
         var res = await client.PutAsync(endpoint, content);
         if (res.IsSuccessStatusCode)
         {
             return await res.Content.ReadAsStringAsync();
         }
         else
         {
             return $"ErrorCode: {res.StatusCode}";
         }
     }
 }
To finish, the final interpreted text is also save to a file using the CreateResultTextFile method:
  static void CreateResultTextFile(string FilePathAndName, string StringResult)
 {
     string jsonFileName = FilePathAndName.Replace(".isf", "_Result.txt");
     using (TextWriter writer = new StreamWriter(jsonFileName, true))
     {
         writer.Write(StringResult);
     }
 }
Saving the information to SharePoint
Saving the interpreted text to SharePoint is relatively simple, all you have to do is use the SharePoint CSOM and send it to a Custom List, with two fields to save the picture and the text. The instructions on how to do this can be found on the GitHub site here.
The final step of this process is to upload both values to the List:
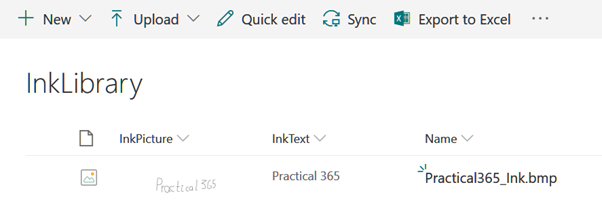
From here, SharePoint can index the text, making it available for further collaboration. For example, you could create a Flow which sends emails announcing that the note is available.
Conclusions
SharePoint is an enterprise system, with multiple capabilities, however, it does suffer from a lack of ability to interact in a human-like manner. Notetaking is one of those features it lacks and has traditionally been very difficult to implement into systems. Using the Azure Ink Recognizer service, we can now a guarantee consistent and good interpretations of handwritten text, now making it available for collaboration across Office 365 in your organization.
GitHub Source Code
You can find the GitHub Source Code I used in this article here.


