PowerShell is one of the most important skills for a Microsoft IT professional today. I won’t bang on about it too much here. I wrote my own personal story of how I started learning PowerShell here. This post is for those of you who know that PowerShell scripting can be helpful, but don’t quite know how to create scripts to solve your problems.
In particular, this post is for those of you who have ever left a comment or sent me an email asking how you can modify one of my scripts to suit your needs. In this article I’ll take you step by step through the process I follow to create a PowerShell script, using the example of a PowerShell script that imports data from a CSV file and creates mail contacts in Exchange or Exchange Online. This script would be useful in scenarios where a customer has a database or spreadsheet of contacts that they want added to Exchange, and would save you a lot of time manually entering the details of each contact. You can find the complete script here. By showing you how I write scripts, hopefully I can help you to see how you can easily write your own or modify other people’s.
Getting Started
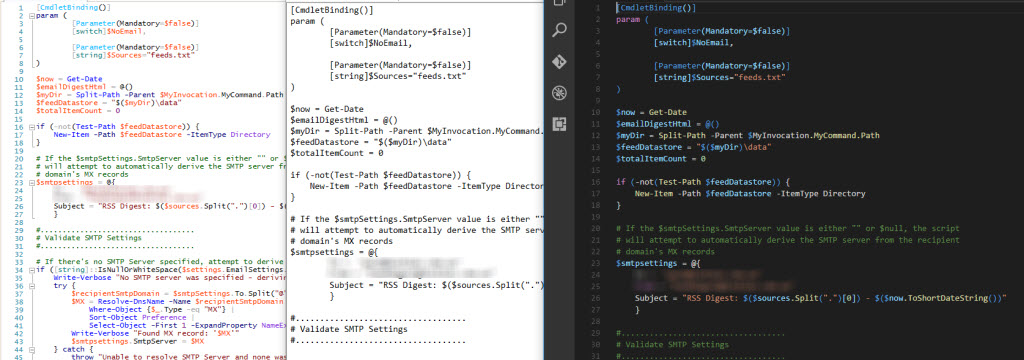
First, let’s get our tools set up. For PowerShell scripting I use the PowerShell ISE. You can use any text editor you like (even Notepad), but an IDE that recognizes PowerShell code and does useful things like syntax highlighting, suggestions, and auto-complete will make your coding much easier. Visual Studio Code is another option, and has a PowerShell extension that you can install. In the image below I’ve opened one of my scripts in the PowerShell ISE, Notepad, and VS Code. You can see how PowerShell ISE and VS Code have syntax highlighting and line numbers, but Notepad does not. The PowerShell ISE also has collapsible regions, which is useful when working on large scripts.
Don’t get too hung up on which IDE to use. If you don’t already have a preference then just use the PowerShell ISE, which comes installed with Windows 10. You can find it by searching for “ISE” in the menu. Pin it to your taskbar or start menu, since you’ll be using it a lot from now on.
If we’re going to write code, then we need somewhere to store it. You can keep your scripts in a folder on your computer, or in OneDrive or Dropbox or some other safe storage area. I prefer to use GitHub to store all my code. There’s a few useful advantages to using GitHub:
- Code is synchronized between your machine and the cloud (GitHub), so it’s reasonably safe from accidental deletion and can be worked on from multiple computers.
- Git lets you track your code changes (commits) so they can be reviewed and rolled back if needed.
- Git lets you maintain your code in multiple branches (e.g. a stable and working “master” branch, and a work in progress “development” branch).
You can read about my own Git workflow for PowerShell scripting here. Taking the time to get set up with GitHub now is worth it. GitHub is free, and you’ll be using it a lot more as you get used to writing PowerShell scripts. I’m a strong believer in sharing your work and coding in public. It contributes to the community, as well as making you better at writing code that handles a wider range of environments and scenarios.
So, having settled on PowerShell ISE and GitHub as the tools of the trade, it’s time to:
- Create a new GitHub repository (refer to my workflow post for details).
- Create a development branch for the new repository.
- Create the new script file in the repository. I’m calling the script Import-MailContactsFromCSV.ps1.

Writing Pseudocode
It’s fine to dive right in and start coding if you want to, but I like to take a moment and write a little pseudocode first. Think of pseudocode as a sketch of how you want your code to work. For PowerShell scripts, I just write mine as a series of comments (using the # symbol). For example, here I’ve written out the parameters I think the script will need, some research I need to do before I start coding, and a “to do” list of features that might not make it into the first version of the script, but that I want to make sure I keep in mind. I then go on to write the basic logic of the script itself; importing a CSV file and then looping through it to create the contacts.
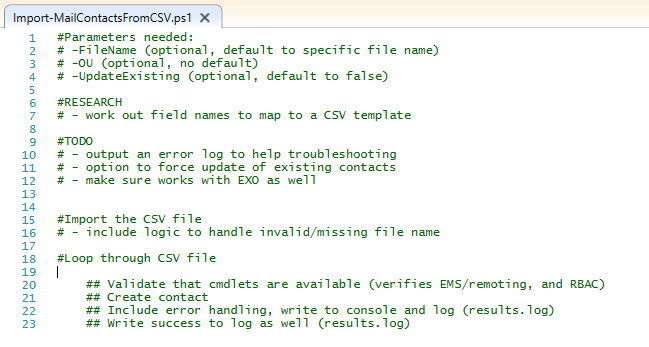
I treat pseudocode as a rough draft. I don’t spend a lot of time making it perfect, and I expect it add more, or move things around, or remove comments as I go along. It’s just a starting point.
Creating the Basic Script
The most basic parts of this script are the importing of the CSV file containing mail contact details, and the creation of the contacts based on that information. I’m going to leave out any other logic such as checking whether PowerShell is connected to Exchange or not, and add those bits later. Remember, you can write and publish a basic script, and add features over time. Your scripts do not need to be perfect, all-purpose tools right out of the gate.
Creating a Mail Contact
Now, I know that I need to import a CSV file, but what does that CSV file need to look like? I have a research note in my pseudocode to find out which attributes can be used to create a new contact, but for now let’s just look at the most basic requirements. Taking a look at the TechNet documentation for the New-MailContact cmdlet, we can see that the only two required parameters are Name, and ExternalEmailAddress. Another way to find out is to simply run the New-MailContact cmdlet, which will prompt for the required parameters and ignore the rest.
[PS] C:\scripts\ImportContacts>New-MailContact

Supply values for the following parameters:
ExternalEmailAddress: test@test.com
Name: Test Contact 1

Name                      Alias                                          RecipientType
----                      -----                                          -------------
Test Contact 1            TestContact12260876                            MailContact
Importing a CSV File
Next, we just need a CSV file containing the names and external email addresses of each contact. I’ve created one called Contacts.csv with the following information in it.
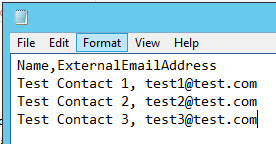
PowerShell has a cmdlet for importing CSV files. It’s called Import-CSV, and its usage is documented here. Running Import-CSV against the Contacts.csv file outputs the file contents to the console.
[PS] C:\scripts\ImportContacts\>Import-Csv .\Contacts.csv

Name                                                        ExternalEmailAddress
----                                                        --------------------
Test Contact 1                                              test1@test.com
Test Contact 2                                              test2@test.com
Test Contact 3                                              test3@test.com
That’s not quite what we want. Instead, let’s capture the results into a variable for re-use.
[PS] C:\scripts\ImportContacts>$csvfile = Import-Csv .\Contacts.csv
The $csvfile variable in this example is an array. An array is basically a collection of items. In this case, the items are the individual entries in the CSV file. Each item in the array can be referenced by an index number, starting at 0 for the first item.
[PS] C:\scripts\ImportContacts>$csvfile[0]

Name                                                        ExternalEmailAddress
----                                                        --------------------
Test Contact 1                                              test1@test.com


[PS] C:\scripts\ImportContacts>$csvfile[1]

Name                                                        ExternalEmailAddress
----                                                        --------------------
Test Contact 2                                              test2@test.com


[PS] C:\scripts\ImportContacts>$csvfile[2]

Name                                                        ExternalEmailAddress
----                                                        --------------------
Test Contact 3                                              test3@test.com
Individual properties of each item in the array can also be referenced, for example:
[PS] C:\scripts\ImportContacts>$csvfile[0].Name
Test Contact 1

[PS] C:\scripts\ImportContacts>$csvfile[0].ExternalEmailAddress
test1@test.com
PowerShell Loop Processing
Arrays are useful for scripts, because an array can be used as input for loop processing. There are often many ways to achieve the same outcome in PowerShell, and loop processing is an example of where this is true. Over time you’ll learn about different types of loop processing, but for this script I’m going to use a foreach loop. The syntax of a foreach loop is essentially “for each thing in this collection of things, do these actions”. For example:
[PS] C:\scripts\ImportContacts>foreach ($line in $csvfile) {Write-Output $line}

Name                                                        ExternalEmailAddress
----                                                        --------------------
Test Contact 1                                              test1@test.com
Test Contact 2                                              test2@test.com
Test Contact 3                                              test3@test.com
In the example above, the thing is $line, the collection of things is the array stored in the variable $csvfile, and the actions are the command within the curly braces, {}, which is known as a script block. You can call your thing whatever you like, but it makes sense to use variable names that describe what the thing is, whether it’s a “line” in a CSV file, or a “mailbox” in a collection of mailboxes. Only one action is being performed in the example above, writing the output to the console, but you can have as much code within that script block as you need.
Putting the Basic Script Together
Having learned how New-MailContact, Import-CSV, and loop processing work, let’s add some real code to our script. I’ve removed some of the pseudocode from this sample to make it easier to read.
#Import the CSV file
# - include logic to handle invalid/missing file name

$csvfile = Import-CSV .Contacts.csv

#Loop through CSV file

    ## Validate that cmdlets are available (verifies EMS/remoting, and RBAC)
    ## Create contact
    ## Include error handling, write to console and log (results.log)

foreach ($line in $csvfile) {

    New-MailContact -Name $line.Name -ExternalEmailAddress $line.ExternalEmailAddress

}
Let’s see what happens now when we run this script in the Exchange Management Shell.
[PS] C:\scripts\ImportContacts>.\Import-MailContactsFromCSV.ps1
Here’s a screenshot of the output I get. Notice the red text? That’s an error, telling me that “Test Contact 1” already exists (which it does, because I manually created it earlier while testing the behavior of New-MailContact). But the other two contacts are created successfully.

If I run the script again, I’ll get three errors, because now all three contacts exists. We need the script to handle those error conditions gracefully, so let’s take a look at that next.
Simple Error Handling
One of the traits of a good script is how well it handles the unexpected. Error handling is one example of that, and there are also others such as parameter validation that you will learn about as you write more scripts that other people try to use and make mistakes with. For our mail contacts import script, we need to handle two immediate error scenarios:
- What if the CSV file doesn’t exist?
- What if a contact already exists, or New-MailContact throws some other error?
Again, this is PowerShell, so there’s many ways to achieve the same outcome. Let’s start with checking that the CSV file exists. Logically, if the CSV file isn’t present, there’s not much point in continuing with the rest of the script, so we’ll stop the script from proceeding in those cases.
To check for the presence of a file, we can use the Test-Path cmdlet. Test-Path returns a true/false result, which we can use in our script logic.
[PS] C:\scripts\ImportContacts>$csvfile = "contacts.csv"

[PS] C:\scripts\ImportContacts>Test-Path $csvfile
True
If the file was not present, we’d get a false result. In the script logic we can use an if statement to say “If the Test-Path result is true, then do this loop processing, else the file must be missing so we should stop the script.”
In code, that would look like this:
$CSVFileName = "Contacts.csv"

If (Test-Path $CSVFileName) {


    #Import the CSV file
    # - include logic to handle invalid/missing file name

    $csvfile = Import-CSV $CSVFileName

    #Loop through CSV file

        ## Validate that cmdlets are available (verifies EMS/remoting, and RBAC)
        ## Create contact
        ## Include error handling, write to console and log (results.log)

    foreach ($line in $csvfile) {

        New-MailContact -Name $line.Name -ExternalEmailAddress $line.ExternalEmailAddress

    }

        ## Write success to log as well (results.log)

}
else {

    throw "The CSV file $CSVFileName was not found."

}
Notice a few changes to the overall script as well. The CSV file name is defined as a variable $CSVFileName so that it can be re-used throughout the rest of the script. Later we can look at changing this to allow any file name to be supplied as a parameter when running the script, but for now it just means that if the file name changes only one place in the script needs to be updated. The other significant change is that the earlier code has been wrapped in the if/then/else logic, and indented for readability.
The throw command will terminate the script and display the text string as an error message, like so.

Next, let’s deal with the error handling for the New-MailContact cmdlet. For this we’ll use what is called a try/catch block, which basically means “Try running this command, if an error occurs we’ll stop and deal with it gracefully.”
An example would look like this:
try {
   $mailbox = Get-Mailbox foo -ErrorAction STOP
   Set-Mailbox $mailbox -UseDatabaseQuotaDefaults $true
}
catch {
   Write-Warning $_.Exception.Message
}
In the example above, if the mailbox “foo” doesn’t exist, the error action of “STOP” means that the next command in the script block (the Set-Mailbox command) won’t be executed. Instead, the script moves to the catch section and runs whatever code is there, which in this case is displaying a warning message. There’s many ways to handle errors, which this article will teach you more about. But for now, that type of try/catch logic will work just fine.
So let’s add that to our mail contacts script, to make sure that if contacts already exist, or any other unexpected error occurs with the New-MailContact cmdlet, that the errors are handled gracefully.
try {
    New-MailContact -Name $line.Name -ExternalEmailAddress $line.ExternalEmailAddress -ErrorAction STOP
}
catch {
    Write-Warning "A problem occured trying to create the $($line.Name) contact"
    Write-Warning $_.Exception.Message
}
Before running the script again I added a few more lines to the CSV file so that some more contacts will be created. Now when the script is run, warning messages are displayed for the first three contacts that already exist, and the two new ones are created.

If you’re working along with this tutorial, the script progress so far has been saved in the “Tutorial Part 1” folder of the GitHub repository.
Adding Script Parameters
Some PowerShell scripts with hard-coded variables, such as the CSV file name in our script here, are fine in situations where those variables are always the same. However, as you write more scripts that are intended for yourself or others to use as tools in different situations, you’ll find it necessary to add parameters so that the person running the script can provide their own values. For our mail contacts script, a perfect example is the name of the CSV file.
When you’re adding parameters to scripts there’s a few things you need to decide:
- Will the parameter be mandatory or optional?
- Will the parameter have a default value, e.g. if no CSV file name is provided, should the script look for a default file name of “Contacts.csv”?
- What type of values will the parameter accept, e.g. a text string, a numeric value, or a true/false condition?
There are many more considerations which you can learn more about here, but for now let’s keep it simple. Our mail contacts script needs a parameter so the user can supply their own file name, but should default to “Contacts.csv”, so it should also be an optional parameter. The code to add to the beginning of the script (because parameters are always defined first) is as follows.
param (

    [Parameter( Mandatory=$false)]
    [string]$CSVFileName="Contacts.csv"

)
Because the CSV file name is now being provided as a script parameter that has a default value, we no longer need the line of the script that defines that variable, so it can be removed or commented out.
#No longer needed due to script parameter
#$CSVFileName = "Contacts.csv"
The next parameter we need is to allow the user to specify the OU where the mail contacts should be created. Until now, the mail contacts have been created in the Users container of Active Directory. For this environment I’d prefer they be stored in a specific Contacts OU that already exists.

So, to meet both requirements, a parameter can be added that has a default value of the OU where contacts should be stored, but that will also allow the user to specify their own OU.
param (

    [Parameter( Mandatory=$false)]
    [string]$CSVFileName="Contacts.csv",

    [Parameter( Mandatory=$false)]
    [string]$OU="exchangeserverpro.net/Company/Contacts"

)
Remember, we also want to be sure that unexpected errors are handled. What if the user supplies an invalid OU name, for example? So we need to make sure that some code is added to the script to deal with those situations as well. Logically, this code needs to be placed early in the script so that if the OU doesn’t exist the script will terminate without trying to create mail contacts in the non-existent OU.
#Check if OU exists
try {
    Get-OrganizationalUnit $OU -ErrorAction STOP
}
catch {
    throw "The OU $OU was not found."
}
We also need to add the OrganizationalUnit parameter to the New-MailContact command.
New-MailContact -Name $line.Name -ExternalEmailAddress $line.ExternalEmailAddress -OrganizationalUnit $OU -ErrorAction STOP
Again, if you’re following along with this tutorial, the script progress so far has been saved in the “Tutorial Part 2” folder of the GitHub repository.
Adding Logging
When you are running scripts that make changes to your environment, or that might throw errors for a few out of a hundred items being processed, it’s useful to have a log of what happened while the script was running so that you don’t need to rely on the output of your PowerShell console. If you are providing a script to other people to run it’s also useful to be able to just have them send you a log file instead of relying on them accurately describing an error message that they received.
For our mail contacts script there’s several places where logging would be of value:
- If the organizational unit doesn’t exist.
- If the CSV file name can’t be found.
- If the mail contact was created successfully.
- If an error occurred when trying to create the mail contact.
You can also consider whether you want the script to append information to an existing log file, or overwrite the log file each time the script is run. There’s no single correct answer to that, it really comes down to what you’re going to be relying on that log file to tell you. As a general rule, I tend to make one-time processes or reports just overwrite any existing log file, but long-running tasks (e.g. a script that runs each night to enable auditing for mailboxes) should preserve existing log data and only append new entries instead of overwriting.
There are some existing logging functions available online that you can incorporate into your PowerShell scripts, like this one. Writing functions or incorporating other people’s functions into scripts is something that you will learn as your PowerShell skills develop, and you go from writing scripts to writing tools. For now, let’s just use a simple bit of code to write the info that we’re interested in to a log file.
To begin with, set a variable for the log file name.
$logfile = "results.log"
Next, write the first line to the log file using Out-File. I like to write the current date and time, which can be easily performed by piping the output of Get-Date into Out-File. Writing the first line to a log file like this, without using the Append switch, will overwrite any existing log file and create a fresh one.
Get-Date | Out-File $logfile
Now we can start updating the script to write log info for the important events. In this example, I’ve set a variable called $message so that the same string can be used for the log output as well as the terminating error thrown to the console. Notice also the use of the Append switch so that the new line is added to the existing log file, instead of overwriting it.
#Check if OU exists
try {
    Get-OrganizationalUnit $OU -ErrorAction STOP
}
catch {
    $message = "The OU $OU was not found"
    $message | Out-File $logfile -Append
    throw $message
}
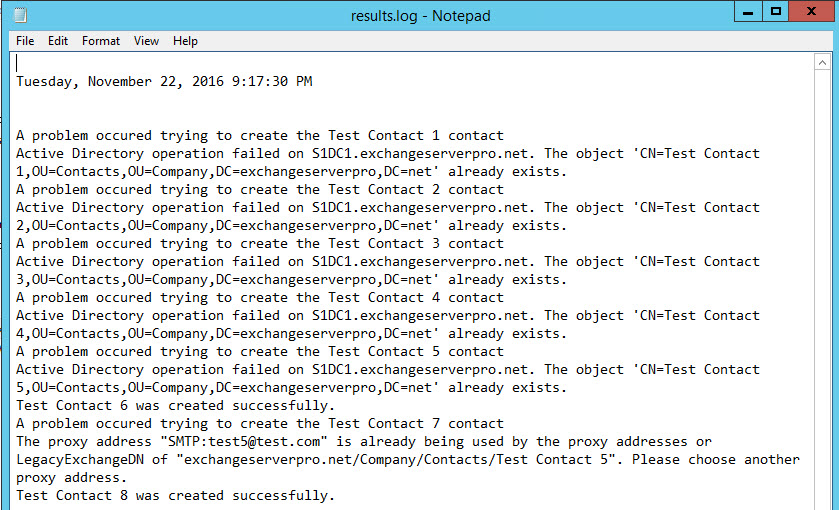
Repeat the same technique to add the other logging entries in. To see the results at this stage, take a look at the copy of the script in the “Tutorial Part 3” folder of the GitHub repository. Now when the script is run, a useful log file is generated with the results.
Adding Script Help
As the final part of this demo, let’s take a look at adding help information to the script. Comment-based help can be added as specially formatted text at the beginning of the script file, and allows users to run the Get-Help cmdlet to see instructions for how to use your script. Never underestimate the value of good, simple help information in a script.
I keep a template handy for my help, and add it to all of my new scripts as soon as possible, ideally before they are first released publicly. So all I need to do is copy it into my new script and do a little editing. You can see the help info in the final script here.
With the comment-based help added we can now see the results by running Get-Help.
[PS] C:\scripts\ImportContacts>Get-Help .\Import-MailContactsFromCSV.ps1

NAME
    C:\scripts\ImportContacts\Import-MailContactsFromCSV.ps1

SYNOPSIS
    Import-MailContactsFromCSV.ps1 - Create new mail contacts in Exchange from a CSV file


SYNTAX
    C:\scripts\ImportContacts\Import-MailContactsFromCSV.ps1 [[-CSVFileName] ] [[-OU] ]
    []


DESCRIPTION
    This PowerShell script will take contact data from a CSV file and create mail contacts
    in Exchange.


RELATED LINKS

REMARKS
    To see the examples, type: "get-help C:\scripts\ImportContacts\Import-MailContactsFromCSV.ps1 -examples".
    For more information, type: "get-help C:\scripts\ImportContacts\Import-MailContactsFromCSV.ps1 -detailed".
    For technical information, type: "get-help C:\scripts\ImportContacts\Import-MailContactsFromCSV.ps1 -full".
Where to From Here?
We’ve now got a basic, functional script to use when creating bulk mail contacts from a CSV file. However, there’s still a lot of improvements that can be made. So that I don’t lose track of them, I removed all the “to do” items from the script itself and added them as issues in my GitHub repository.
If you’ve been following along and you found this tutorial helpful so far, you might like to take a copy of the script (or fork it) into your own GitHub repository and have a try at some of those further enhancements, or come up with your own ideas to improve the script for use in your own environment.
Otherwise, I hope you found this article useful. It’s a long one, so there might be some typos or areas where it could be made clearer, so please feel free to point out anything that you think isn’t quite right. And of course, if you have any questions I’m happy to try and answer them in the comments below.


Thank you, Paul, for your great article. Everything here is applicable to what I am currently trying to accomplish. I haven’y quite worked out the migration component to this script, but everything else is in place. I also would like to define my Pseudo-code so it’s as precise as possible, so if someone else, other than me, is able to see this, then they should hopefully understand what I am trying to accomplish. Thanks again!!
-Andy
Pingback: Show Calendar Permission as a Report - MSB365
This script is kinda what I’m looking for, except if new-mailcontact failed due to the contact existing, it runs set-mailcontact instead and updates it.
Is that possible?
Sure, you just need to catch that particular error and add the command to run Set-MailContact instead.
Again, excellent write up Paul. As the Office 365 ‘Go-to guy’ I’m constantly using various PowerShell Scripts (or modifying existing ones) to perform certain tasks related to licensing and such. This was very helpful!
Hello Paul, you are doing a great job for the community! Thanks for that.
Just my 2 cents: I usually do not start from scratch as I have an script “skeleton” with basic contents that are common for almost all scripts. So script help, parameters and other variable declaration, Excxhange and AD PS module import and some common controls are already there, is just a case of changing or removing accordingly.
I also have a “code vault”, a text file with commands I used before. This is useful for future reference. Every time I find a command syntax or usage I copy to this repository. So I don’t have to know by heart how to use this or that command. Just copy, paste and adapt.
But, as a long time programmer, I believe the most important tip is to plan a good pseudo code first, so you can see clearly the required steps and writing code will be just a matter of using the correct language syntax.
Again, thanks for your great help for the community!
Yes, those are the type of things you build up over time. For a beginner, the “from scratch” approach is what they’ll be using, at least for a while.
Fantastic article! I preach to everyone I work with the importance of Powershell and why they need to know it. Thanks for posting this
Thanks a lot for this write up.
Now the param and loggind/error handling are so much clearer for me now.
Really good explanation.