Microsoft Teams has built-in features for creating webinars and live events that are good and constantly improving. However, your marketing team will often wish to produce more polished live streams, and publish them to platforms like YouTube, LinkedIn Live, Twitter, Facebook or run virtual conferences using commercial event platforms. These typically need streaming software that can send RTMP (Real Time Messaging Protocol) streams, and therefore basic options like Restream.io or StreamYard can become attractive.
Whilst tools like StreamYard undoubtable work and help get live streams up and running to the right platforms, they are less attractive to presenters who won’t be able to use Teams features like Background Effects, Blur, noise cancellation in meetings or when presenting together won’t be able to hand over control of a screen or slides.
The good news is – if you already use Microsoft Teams you can achieve both presenter zen and attendee bliss with it’s NDI functionality to attach it to the de-facto (and free) live streaming software OBS.
This gives you the capabilities of Teams, and the ability to customise your live stream layout without limitation.
In this guide, I’ll show you how to do this in several simple steps. You can also watch the video version of it below on our YouTube channel:
Enable NDI functionality in the Team Admin Center
As a Teams Administrator, access the Teams Admin Center and navigate to Meeting Policies (1). We’ll need to add a new (2) or update (3) an existing meeting policy to switch on NDI capabilities.
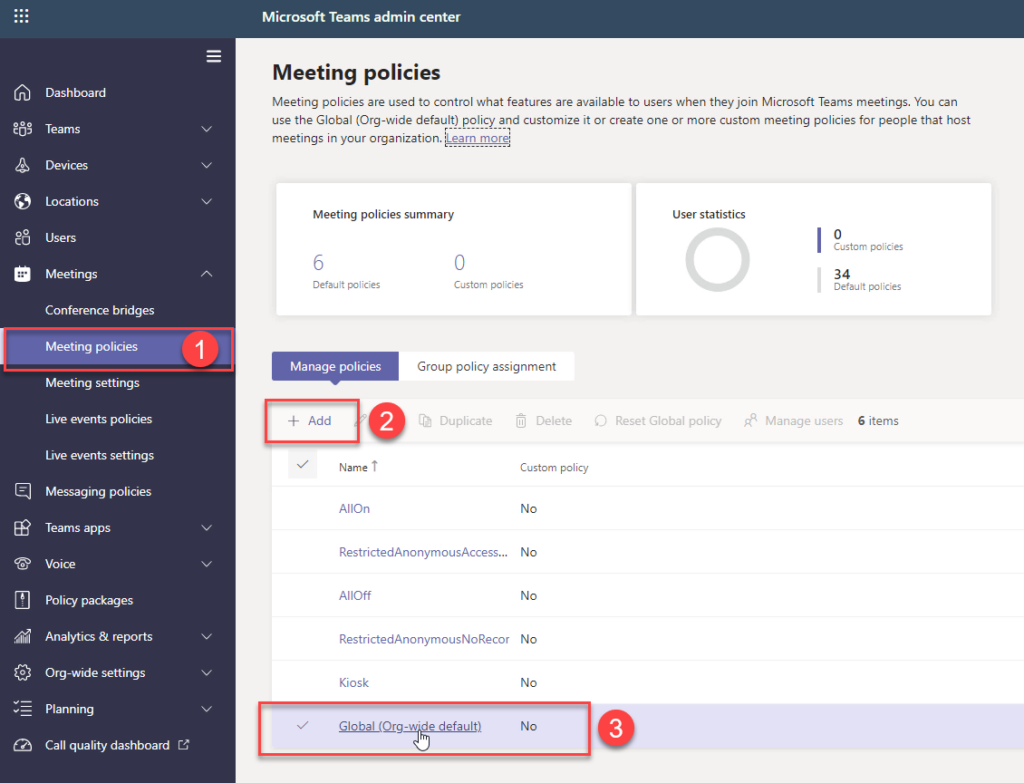
You’ll need to enable NDI functionality for folks who will assume the role of producer. Similar to a Teams Live Event, or when using software like StreamYard, one person will co-ordinate the live stream and control the layouts, who is live on-screen to viewers, and run the OBS software package. These are the only people who will need NDI enabled.
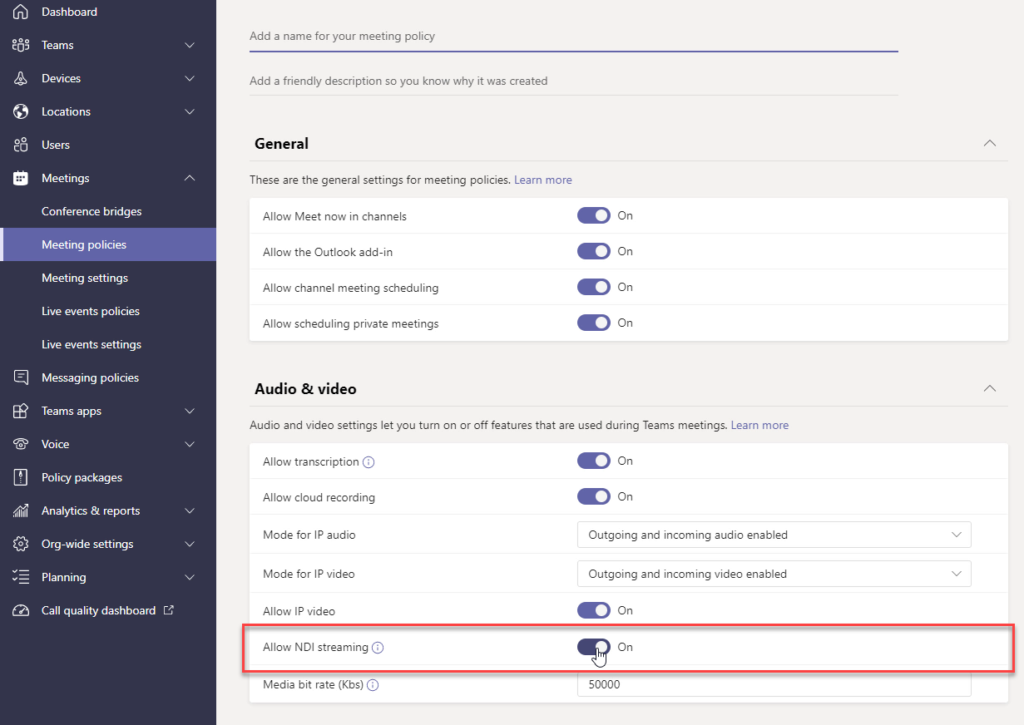
In either a new policy or an existing policy, scroll to the Audio & video section, and toggle Enable NDI streaming to on. Save the policy, and if the folks who will assume the producer role are not assigned the policy, ensure it is assigned to them.
Install OBS and the OBS-NDI plugin on a producer’s machine
A Teams event that is live streamed works like a normal meeting, with people presenting joining as usual. These people will share content, their camera and microphone as usual and will not control the output to the live stream.
One person will act as a “producer”. This role is similar to a Teams Live Event, and this person will switch on NDI capabilities for the meeting, and then use OBS as the “mixing desk” and bridge to the live stream.
OBS is a free download from the OBSProject.com website. If you are assuming the producer role, you’ll need to ensure it is installed, along with the OBS-NDI plug-in. The OBS-NDI plugin is found within the OBS website. Follow the Go to download link on the page, then scroll down to releases, and download and install the Windows Installer package.
With NDI enabled in the Teams Admin Center, and OBS installed, you’ll now have everything you need to broadcast a Teams event (or any Teams meeting) to a live streaming platform.
When you launch OBS you’ll be presented with the main window which looks similar to the example below.
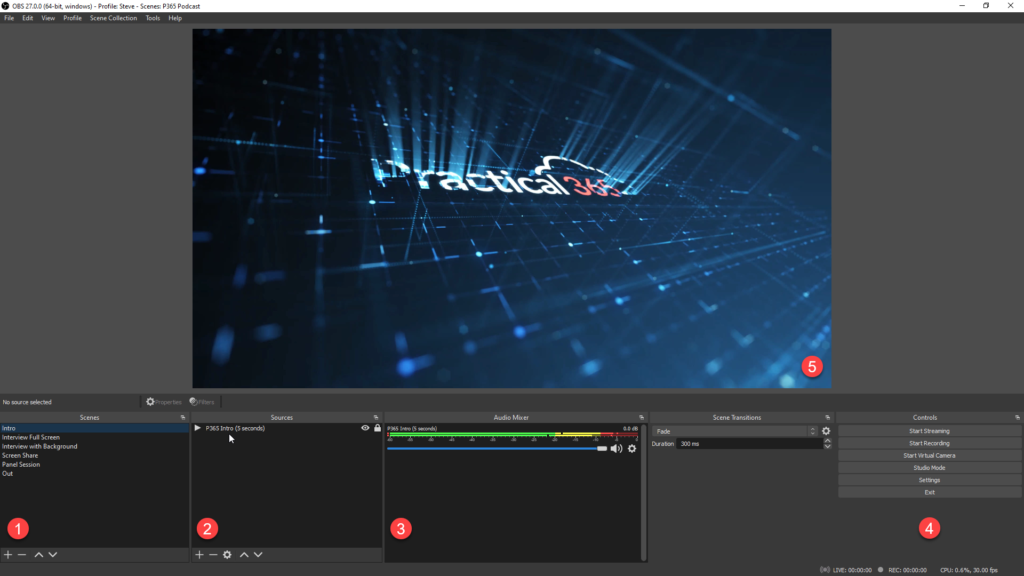
OBS has core features you need to use, including:
- Scenes – these are the “layouts” that are broadcast live to viewers, and contain the graphics and video streams composed by adding content and dragging and dropping it to the right place. Add a scene for your introduction, countdown video, adverts, or video files that should play directly to the viewer and not via the meeting itself.
- Sources – this is where our content is listed. We add audio and video content here, including elements such as images and logos, backgrounds, shapes, text, audio that will play either on a loop or when the scene is activated, native camera and screen input – and our NDI feeds providing individual meeting presenter video feeds from Microsoft Teams.
- Audio Mixer – this is used to select which audio feeds are available and enabled in the particular scene that is active. We will have an audio source for each NDI feed from Teams, but we’ll only need one enabled, as each audio feed contains the full meeting audio; presenters remain in control of their mute/unmute capabilities in the Teams meeting.
- Controls for OBS allow us to start and stop streaming or recording video, starting and stopping the virtual webcam feature, switching to studio mode and opening the settings page. We’ll mention the streaming, settings and virtual webcam features later in the guide, so ensure you remember where these are.
In our example above, we’ve created scenes for the different layouts that we want to show, including:
- A full screen 50% cropped side-by-side feed of two people in the Teams event, with names and job titles
- A layout containing two half-size 16:9 ratio video feeds and space for titling and audience comments to be displayed
- A layout containing a screen share session
- A layout for together mode, allowing us to run a panel session.
- Introduction and ending videos
Set up your live streaming platform and collect connection details
In our example, we’ll live stream to YouTube. We’ve created a new live stream, and need to collect details to input into OBS. As YouTube is one of the many services with built-in settings, we only need the Stream Key (shown below) to paste into the OBS settings:
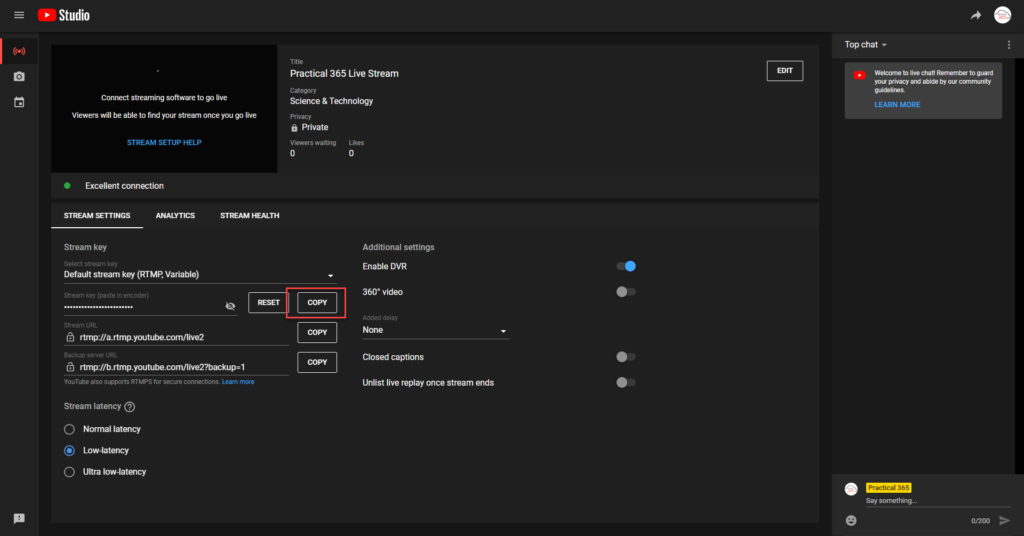
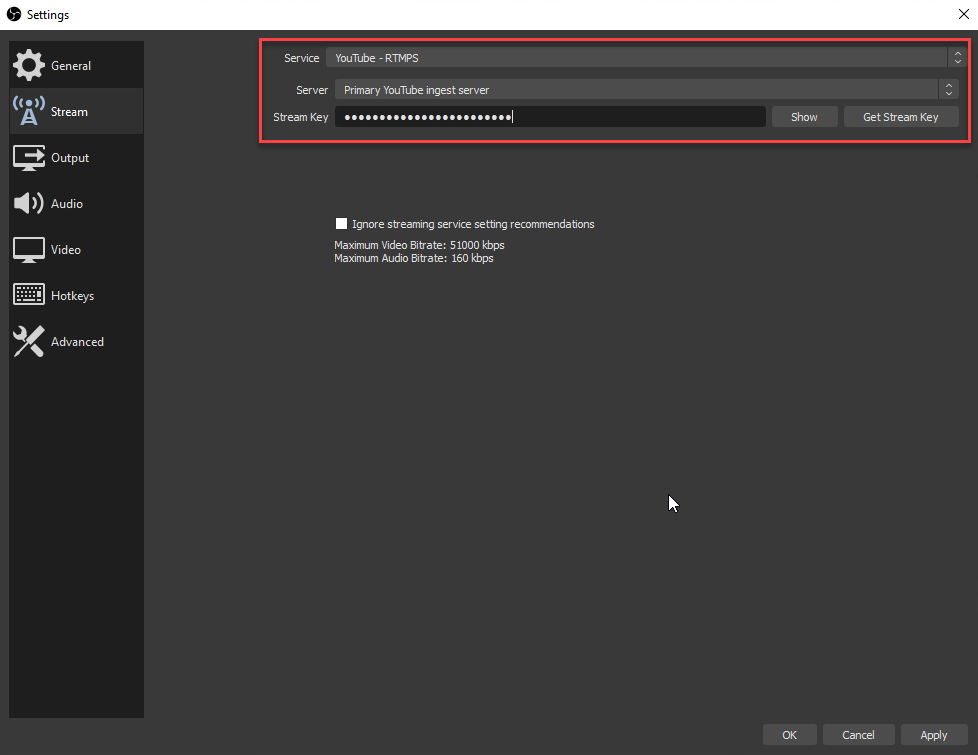
In OBS, open the settings page, and select the Stream tab. Select the streaming service (or custom if it’s not listed – services including Microsoft Stream work with OBS, but you’ll need to paste in the server details) and then paste in the stream key, then choose OK:
Get Microsoft Teams ready to broadcast
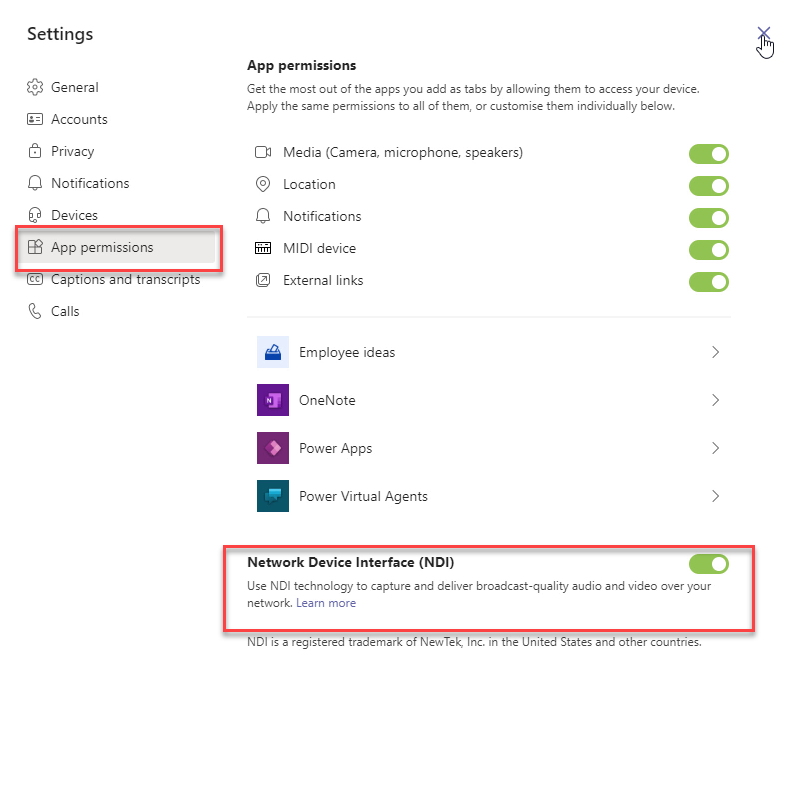
Getting Microsoft Teams ready is straightforward. As a one-time task, open the Microsoft Teams main settings, and select the App permissions tab, then toggle Network Device Interface (NDI) to On:
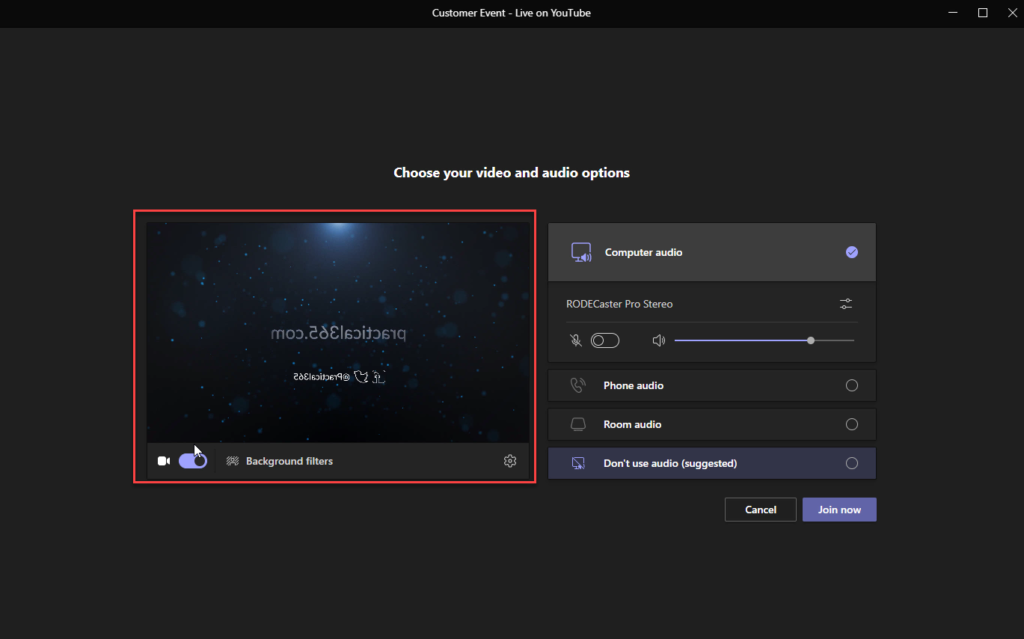
We’re now ready to join the Microsoft Teams meeting that will be broadcast as a live event. If we want to, we can enable the Virtual Webcam in OBS so that our meeting presenters can see what is being broadcast. This will be shown flipped horizontally to the producer – don’t worry, this is simply the “mirror” used as it expects a normal webcam input.
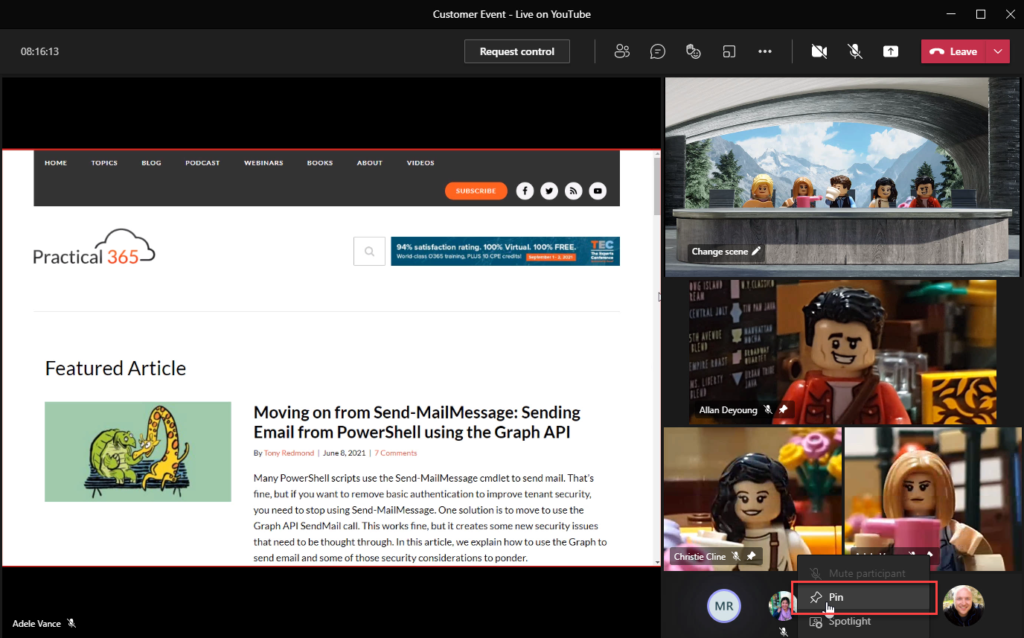
When we are in the meeting as a producer, it is time to make sure we perform several steps to ensure NDI will pick up individual feeds correctly. If you want to see and use Together Mode or Large Gallery view, switch it on.
If you enable either of those views, then you will need to Pin each participant to ensure that your Teams client is receiving individual people’s video feeds, and is worth doing in any event your broadcast. You can do this by moving the mouse to each presenter, then from the menu, choose Pin as shown below, one by one:
We’re now ready to enable NDI broadcast. This is done on a meeting-by-meeting basis, as NDI is a network based protocol and should only be enabled when needed. Select the ellipses to bring up the menu, and then choose Broadcast over NDI.
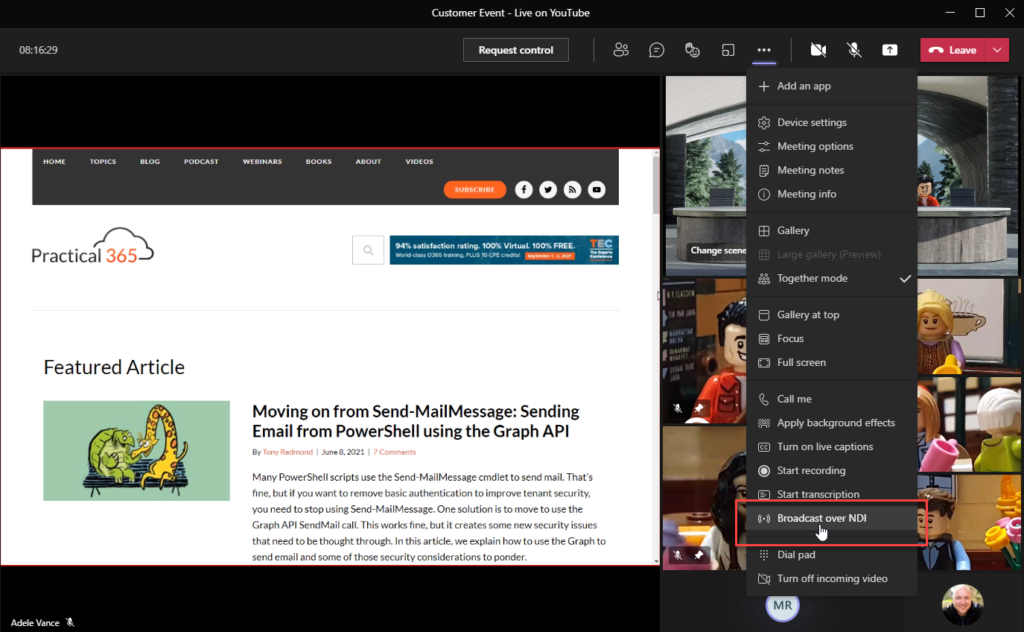
Join Teams to OBS
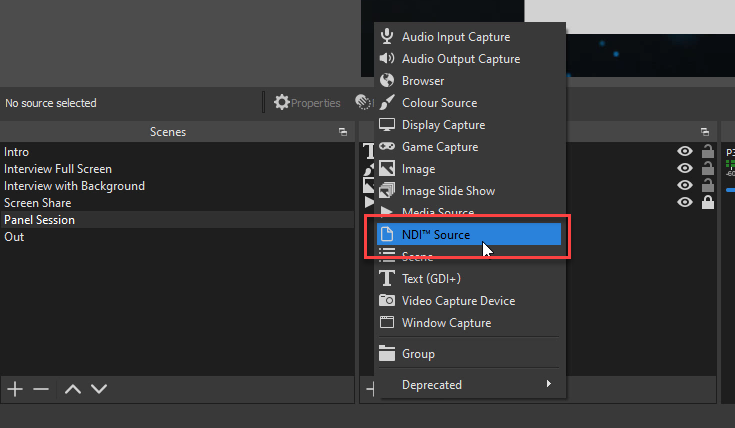
To add each video feed, shared screen or views like Together Mode into OBS, we’ll need to add a new NDI Source. To do this, select the scene you want to add Teams content to, then add a new source. From the menu, select NDI Source, as shown below:
A new window will open showing the properties for the new source. Open the Source name menu. This will show the feeds from the Teams meeting that you’ve enabled NDI broadcast for. For meeting presenters (and other participants), it will have the display name shown. This will ensure from event to event, that people are in the same locations.
You’ll also see a local feed, and the different views. In this list Together mode is listed as Audience, presumably because it is commonly used by TV broadcasters who are using Together Mode when presenting a virtual studio or stadium audience to viewers.
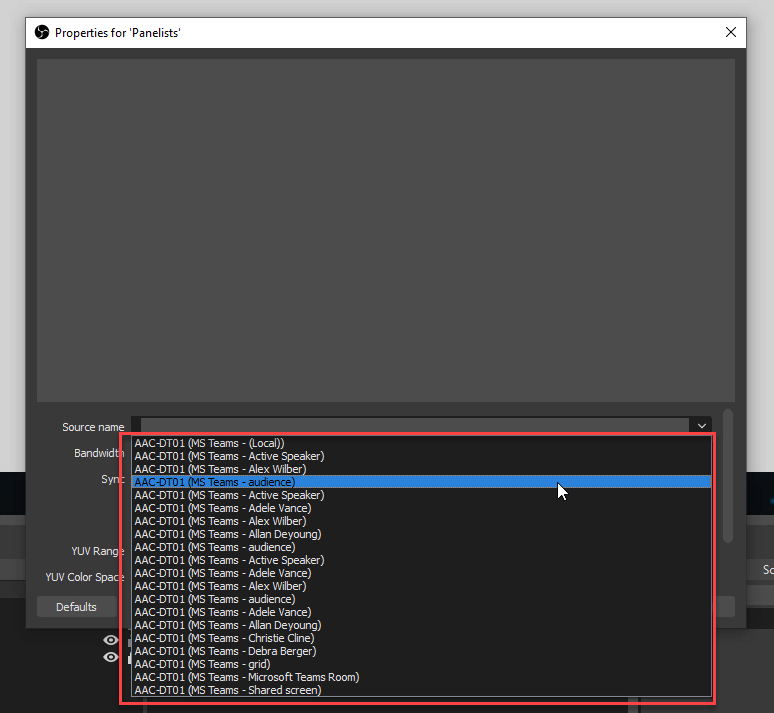
If you are preparing your layouts in advance of the live event (which you most probably will) then you can start a test meeting and then add the same source (such as a person who has joined your test meeting, or even yourself) multiple times as you add additional NDI sources. Just remember that when you ask your presenters to join the real event, get them to join a few minutes early so you can then adjust each source to show the actual person you want to display.
In our example though, we’ve chosen the Together Mode view, which by default has been added in the top left hand corner:
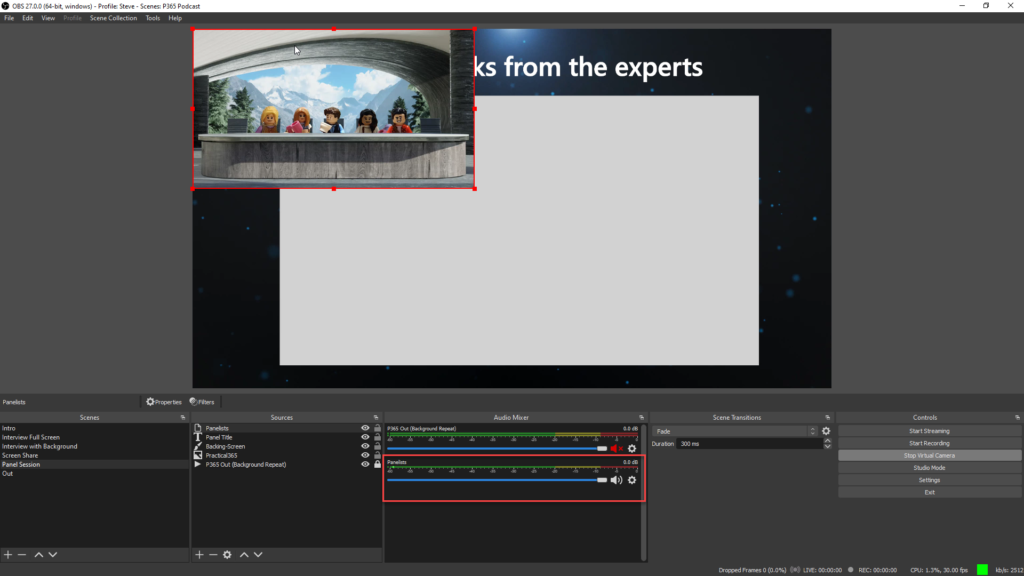
To position it, or any other NDI source, we can move it by dragging and dropping it in the right location. We can simply resize it, however I’d advise right-clicking on the NDI source (either as shown below, or in the Sources panel) and selecting Transform>Edit Transform to set the dimensions:
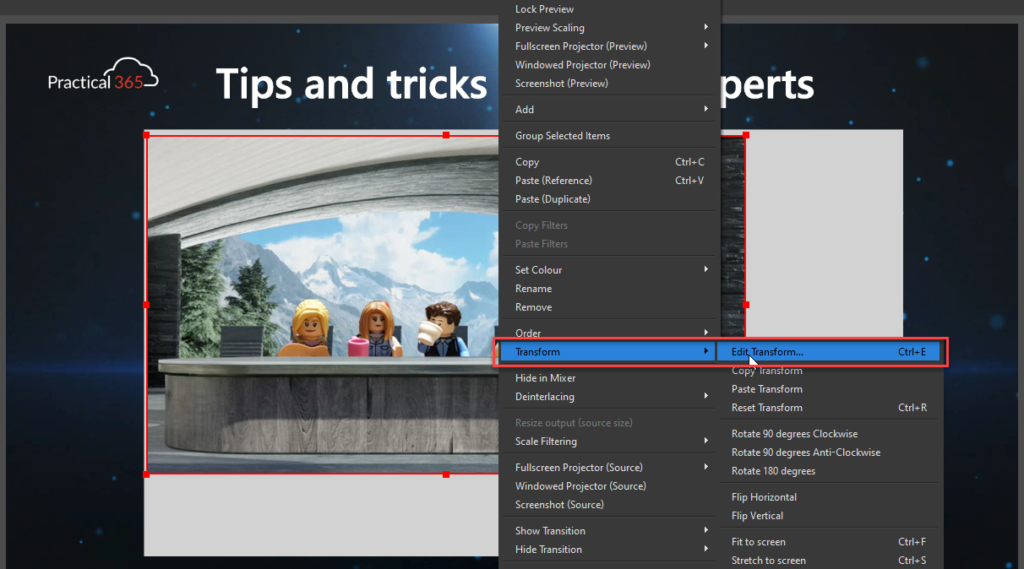
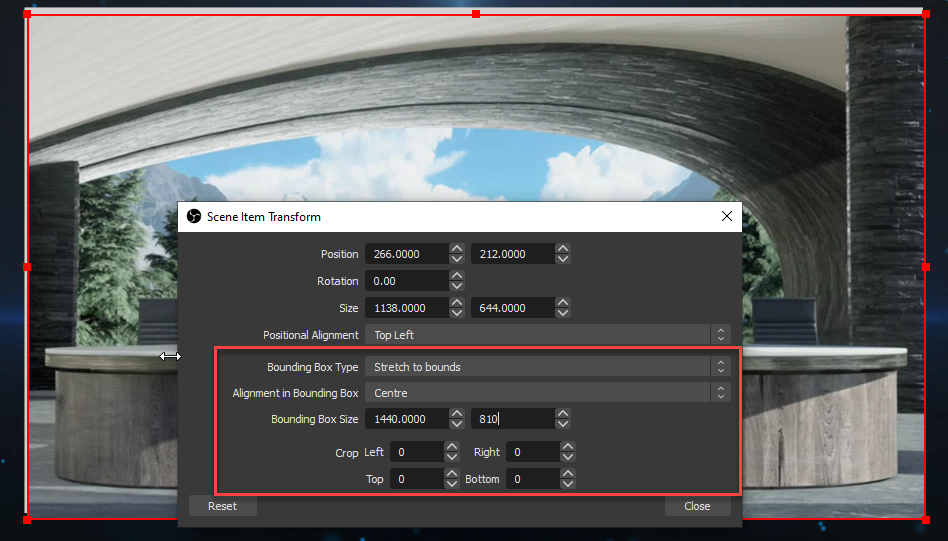
In our example, I will want the Together Mode view to fill a 16:9 size smaller than the 1920×1080 Full HD broadcast. I’ve chosen 1440×810, therefore I’ll choose to set a Bounding box type that will stretch or shrink the content to the correct size, and then a Bounding box size of the aforementioned dimensions:
When you choose close, you’ll see your finished layout. As you’ll see below, I’ve added a background video/image, a corporate logo and a title for our Panel Session for viewers to see:
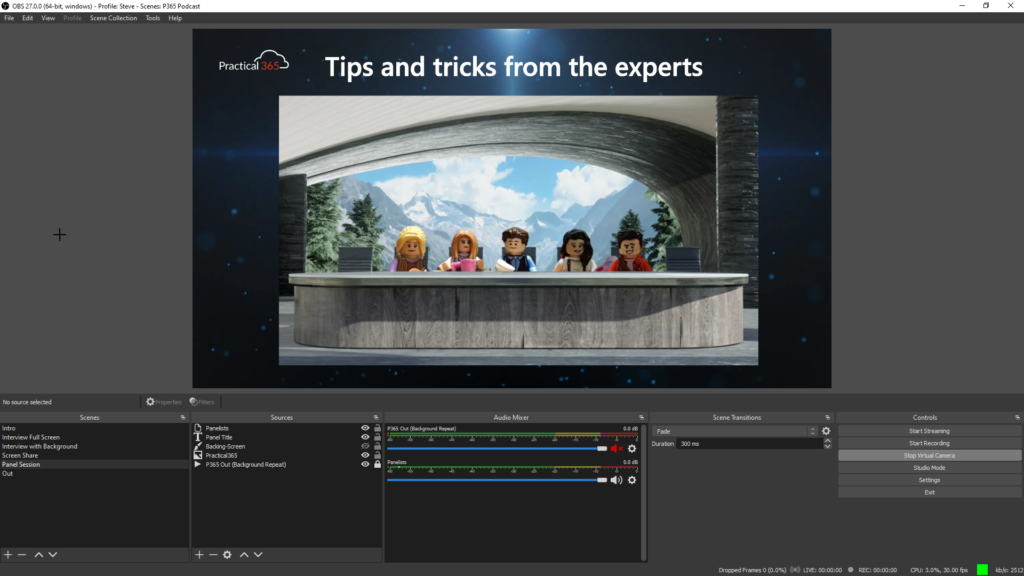
You’ll see these layouts in action in the YouTube video at the beginning of the article, including those listed above and shown here.
I’ll describe a couple of common layouts though that you’ll most likely want to create.
Most live streams now use a full-screen side-by-side view for “talking heads” and interviews. You can achieve this by using the transform dialogue shown above, and setting the Bounding box size to 1920×1080 (assuming that’s your output size – check the OBS settings) and then using the Crop Left and Crop Right settings directly below the bounding box size to trim the size, taking 25% (or 480 pixels) from the left and the right hand side. This provides a layout like this one shown below, where we’ve then added a couple of titles in the lower thirds section, and a superimposed logo:
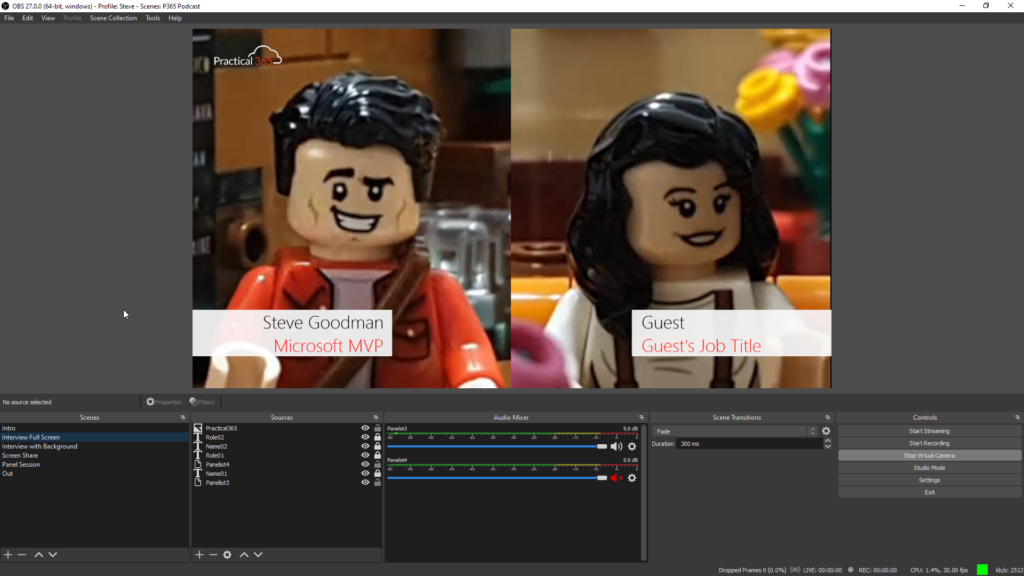
As mentioned earlier in the article – each audio feed contains the full audio from the meeting, therefore if you look closely, you’ll see I have only enabled the audio feed for Panellist1. Both people will be heard, along with anyone with their mic unmuted and not on-screen.
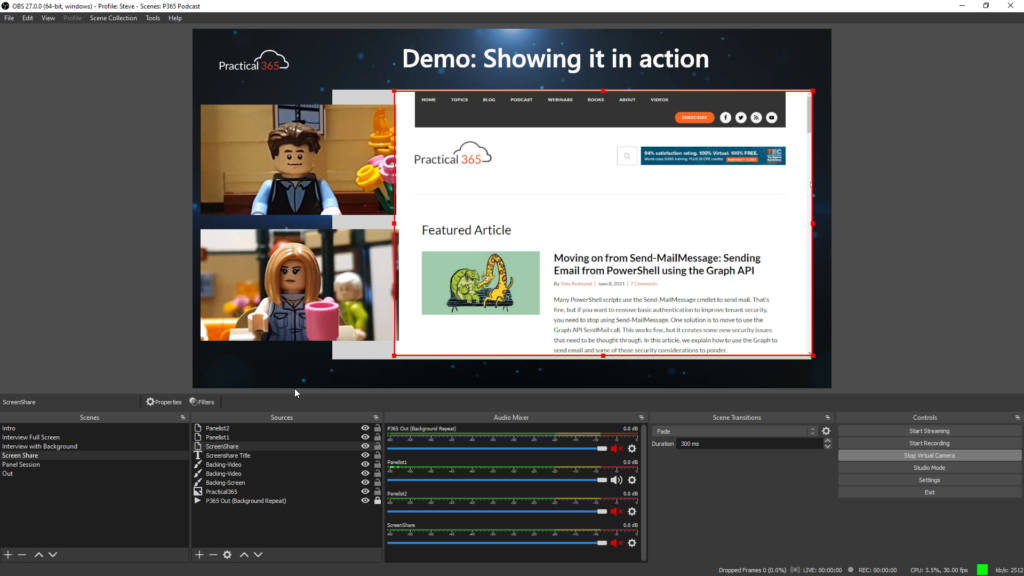
The screen share OBS source will provide the single screen share feed from whoever is sharing their screen at the current time. This means if people are handing over to one another to present, then you don’t need separate scenes configured; and because it is Teams they can of course use native abilities to request and give control over their screen.
In the example here, I’ve placed the presenters to the left of the screen share content, and slightly overlapped the feeds over the screen share with the opinion it looks slightly better. If there are two scenes for these two presenters, then you could choose to duplicate the first scene with the presenters simply side-by-side, or copy and paste the NDI sources from scene to scene.
Starting your live stream and staying in control
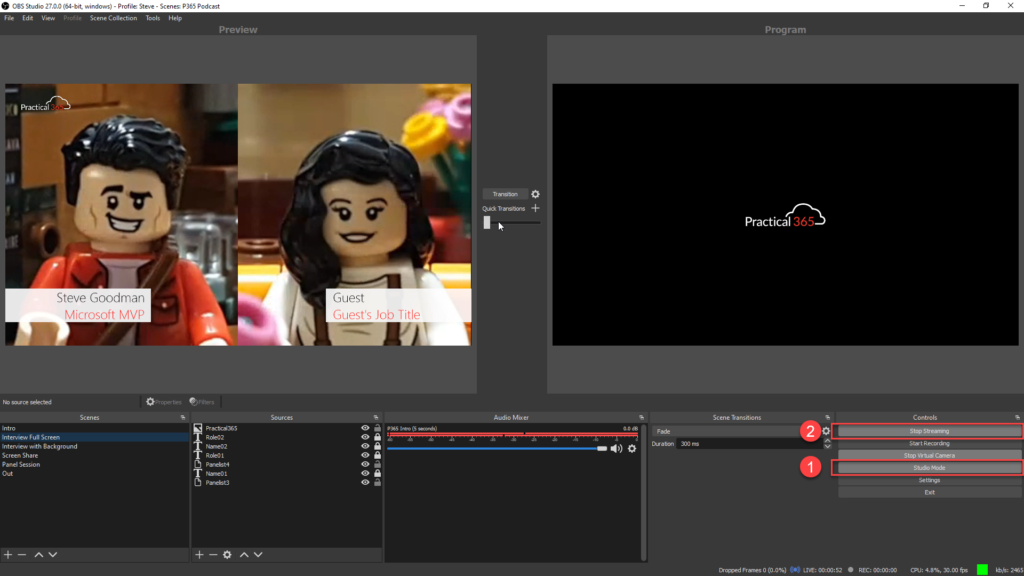
We’ll (optionally) switch to Studio Mode (1) before we begin our live stream. This will give us the ability to select and “cue up” our next scene on the left hand side, known as the preview and then press transition to change it to the broadcast program. If you’ve used a Teams Live Event this will be a familiar concept.
We can then choose to Start Streaming (2) which will connect OBS to our live event platform:
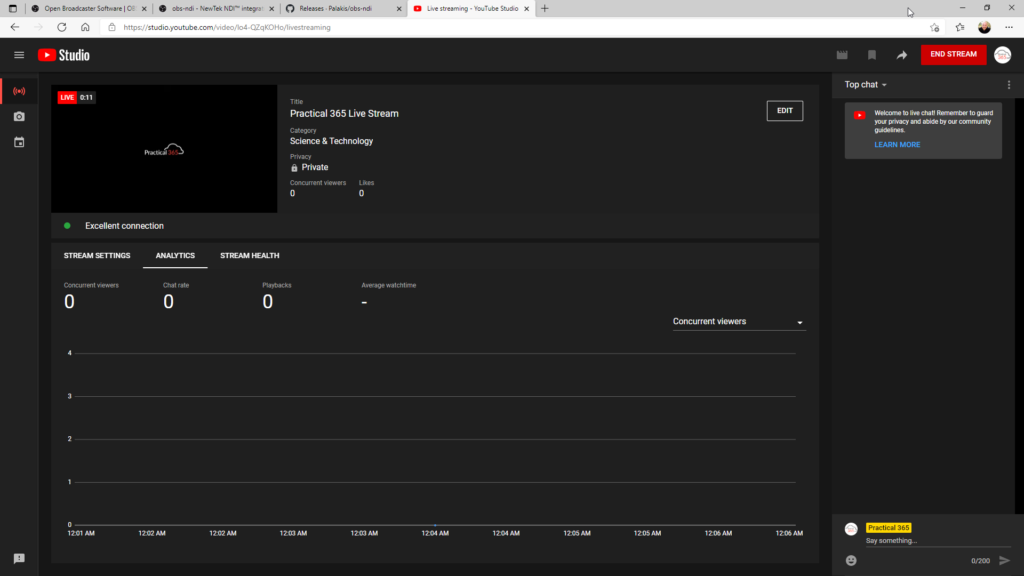
In your live streaming platform, this will either go live immediately, should you have chosen to allow it to, or allow you to preview what will be broadcast before hitting the button to go live to your audience. You’ll typically see an indicator as to whether the stream is live, and in the example below, we see a preview of the live content:
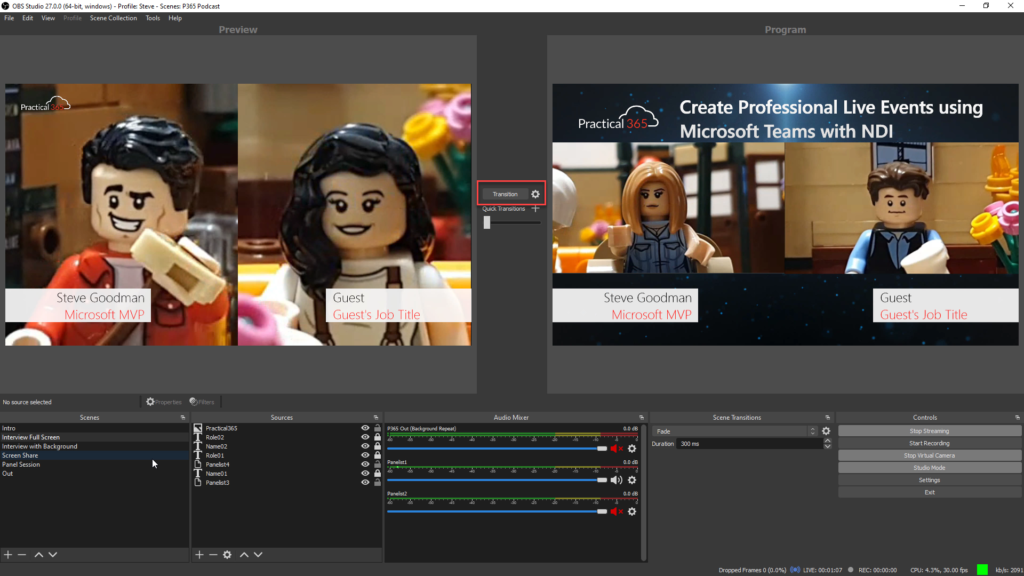
As the live stream continues, we’ll use the Studio Mode feature to select a scene from the list in the bottom right, which will place it in the preview window and transition these across when needed. In my example below, I’ve two main presenters for the live stream (on the left) and two experts talking in depth about a topic; and I’ll transition back to my main presenters as needed so they can introduce the next segment in our live stream:
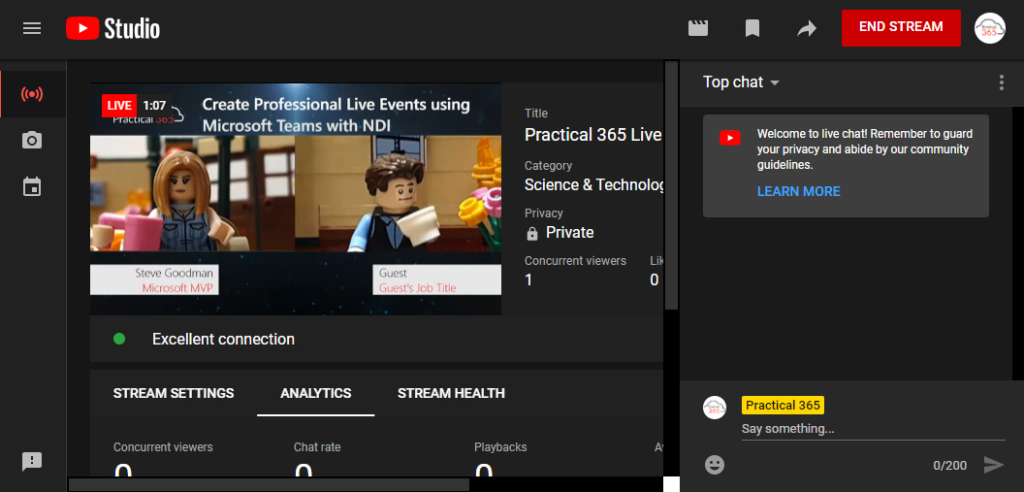
Although not necessary, you can monitor the live stream in your software. In YouTube, for example, we’ve the ability to talk to the audience via the chat function here, although these can be brought into OBS too – though we might save that for another article.
We’re now both at the end of our live stream – and the guide. As you’ve read, it is reasonably straightforward to use Microsoft Teams as the engine for powering professional live events, and by using OBS we gain capabilities on par with professional streamers; and best of all, it is free.


Wow, just wonderful!
Thanks Steve
Man I wish I had this guide when I was setting it up for my previous company 1.5 years ago. It took me weeks to figure out all the invidivual components.
You’re a hero Steve now I can easily share what, how and why with my new colleagues : )
Hey,
Good video and tutorial.
How can we add lego miniatures gifs/short videos as video in call on ms teams as u do? I want to test capabilities of MS Teams with OBS 😀
Hi ML,
I’ll make a guide on how to add them as videos to calls, I’ll share the videos I’ve made and how to make your own quickly and easily. That should be published next week.
Steve
Great writeup Steve, well done
Thanks Nicolas! 😃