Preventing Sprawl
Preventing sprawl in SharePoint and Teams across your Microsoft 365 tenant is crucial for several reasons:
- Reduces your digital footprint and associated risks: Protect essential data against inadvertent or malicious disclosure.
- Ensures necessity: Confirm that each SharePoint site or Team is genuinely needed.
- Standardizes information architecture: Make it easier to apply compliance controls (both manual and automatic).
Default settings in Teams and Entra ID allow anyone to create a new team (and therefore site). Allowing people to create teams without approval often leads to team sprawl. Implementing a provisioning solution is a sound practice to manage this sprawl. A provisioning solution allows you to collect important information about the site or team from the person requesting the new site or team, inject an approval process prior to creation, and automatically apply some compliance controls based on the information provided.
There are third-party products in the market to provision Sites and Teams today, but you can also build your own using the Microsoft Graph API, Microsoft Graph PowerShell SDK, or even PnP PowerShell in your own Azure function. This post showcases some compliance controls that you should consider including in any provisioning solution. This is not an exhaustive list, but rather some key controls to consider.

Control Container Sensitivity
Sensitivity labels are available for tenants with Office 365 E3 and above. Container-based sensitivity labels allow you to apply consistent controls across Sites/Teams such as whether to allow external sharing of SharePoint content, allowing guest access, privacy, and, with an E5 license, the authentication context can be used to apply conditional access policies.
Automatically applying a container-based sensitivity label based on the sensitivity of the content that will be stored in the container is an excellent way of standardizing controls across Sites/Teams and ensuring the right settings are in place from the start.
Reference links:
- Set the sensitivity label on a SharePoint site (not Group-backed) with SharePoint Online PowerShell
- Set the sensitivity label on a Microsoft 365 Group with Exchange PowerShell
- Set the sensitivity label on a Microsoft 365 Group with Microsoft Graph PowerShell SDK
Over time, you may want to monitor the container sensitivity label applied to Sites/Teams to ensure the correct one is still applied (since owners can update the label). Refer to this post for a script to do this: How to Monitor Changes to Sensitivity Labels Used for Container Management
Apply Retention Policies and Retention Label Policies
Making sure that sites and teams come within the scope of a retention policy or retention label policy from the moment of creation is often preferred because it reduces the risk of content being deleted too early or retained for too long. If the retention policy targets all sites or all teams, then the new site or team will automatically be included and there is nothing more to do. However, retention policies often target a smaller subset of locations, which means that someone must keep the locations up to date.
With an E3 license, the onus is on you to include the new site/team in the list of locations for a retention policy. This is a straightforward process; however, there are limits on the number of locations that can be included/excluded per policy that must be adhered to.
This Practical 365 article describes how to maintain the set of locations for retention policies using PowerShell and some Azure Automation.
Adaptive Scopes is an E5 feature to automatically manage the set of locations covered by a retention policy and has the added benefit of having no limits on the number of locations. You need an E5 license for every user that has access to the locations targeted with the adaptive scope. The benefit of an adaptive scope is that it allows you to scope retention labels and retention policies to targeted sites and groups in an automated way based on the conditions you provide. This ensures new sites/groups matching those conditions have the appropriate retention controls applied from the start and removes the administrative burden of keeping the list of locations up to date either manually or via script.
SharePoint Adaptive Scopes (E5 Feature)
You can set SharePoint site properties during the provisioning process. These properties can be used as a condition for a SharePoint Adaptive Scope. By default, a SharePoint adaptive scope will include all types of SharePoint sites matching your condition except for a shared channel SharePoint site. This includes Microsoft 365 Group sites, Modern Communication sites, Teams Private Channel sites, Team sites without a group, and Classic Team sites.
There are two built-in site properties you can use when building a SharePoint adaptive scope: Site URL and Site name. If you control the Site URL during provisioning such as prefixing the URL of all Team sites with their division’s abbreviation (LGL-, HR-, FIN-, etc.) or prefixing all project sites with PRJ-, then using the built-in Site URL property may be a good choice because you can use the “Site URL starts with” condition. It is risky to use the Site name since it can easily be changed.
The real power comes in using custom site properties. If you use the simple query builder GUI interface for the adaptive scope, you can use custom site properties RefinableString 00-99. You can also enter KQL directly into the advanced query builder providing for these additional site properties and more complex queries: RefinableString100-199, RefinableDate00-19, RefinableInt00-49, Created date, and even the Site template. This article explains how to use adaptive scopes with SharePoint Online.
Like setting SharePoint site properties, you can also set Group attributes during the provisioning process for Microsoft 365 Groups: Name, Display Name, Description, Email Addresses, Alias, Custom Exchange attributes (CustomAttribute1 – CustomAttribute15).
These attributes can be used as a condition in a Microsoft 365 Group Adaptive scope to target the following locations: Group mailboxes, Group sites, Teams channel messages, and Viva Engage community messages. This article explains more about how to define the criteria for adaptive scopes used to find user and group mailboxes.
Once an adaptive scope is built, all locations matching the condition are automatically kept up to date and can be used to apply retention policies and retention label policies.
Applying a retention policy or a retention label policy to content can be done either through the Purview Compliance portal or via script using these Exchange PowerShell retention cmdlets:
This example script creates a new retention label policy that auto-applies the Legal retention label to all content with a document content type for all sites included in the Legal Matter scope adaptive scope. This script requires an E5 for all users with access to locations covered by the retention label policy since it is using an adaptive scope and an auto-apply condition, both E5 features.
# Connect to the Security & Compliance Center
Connect-IPPSSession

# Define the retention label, policy name, and adaptive scope
$labelName = "Legal"
$policyName = "Legal Document auto-apply"
$scopeName = "Legal Matter scope"

# Create the auto-apply retention label policy with the adaptive scope
New-RetentionCompliancePolicy -Name $policyName -AdaptiveScopeLocation $scopeName -Applications "Group:Exchange,SharePoint"

# Auto-apply the retention label with the KQL query contenttype:document
New-RetentionComplianceRule -Policy $policyName -ApplyComplianceTag $labelName -ContentMatchQuery "contenttype:document"

# Disconnect the session
Disconnect-ExchangeOnline
Because the adaptive scope is being used for the location, the only thing you need to ensure is that the group attributes for each new Legal Matter group are set correctly when it is provisioned so it is automatically included in the adaptive scope.
Set a Default Retention Label
Based on your organization’s retention requirements, you may want to apply a standardized and custom information architecture (libraries, content types, site columns) during the provisioning process to meet your retention needs.
For example, if you are provisioning a new Project site, you may want to apply custom Project content types to the Shared Documents library such as: Project status report, Project charter, and Solution design. This provides a consistent information architecture across all project sites and provides metadata to be able to auto-apply retention labels with a retention label policy (prior section).
Instead of auto-applying a retention label with a retention label auto-apply policy, you may want to simply set a default retention label on the document library as soon as a new site/team is provisioned. Setting a default label ensures all content within the library will inherit the retention label, including non-Office files.
Setting a default retention label on a library can be done in several ways: SharePoint REST API, SharePoint Client Side Object Model (CSOM), CLI for Microsoft 365, and PnP PowerShell.
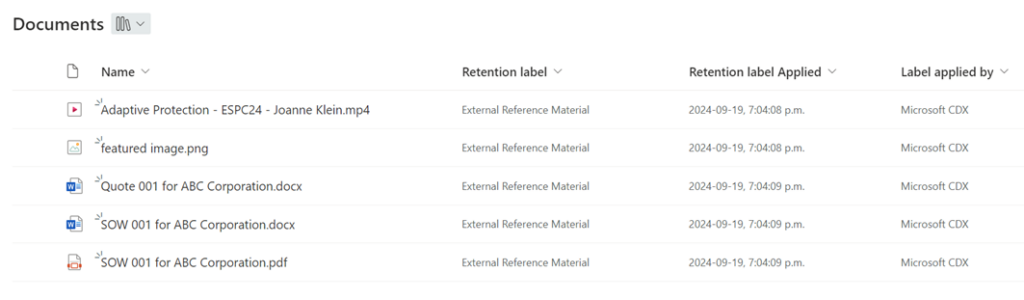
Below is a PnP PowerShell script to apply a default retention label, External Reference Material, on the Document library called Documents:
Import-Module PnP.PowerShell

# Connect to SharePoint site
$siteUrl = "https://yourtenant.sharepoint.com/sites/yoursitename"
Connect-PnPOnline -Url $siteUrl -Interactive -ClientId ApplicationIdGoesHere

# Set the default retention label on the document library
Set-PnPRetentionLabel -List "DEMO Library" -Label "External Reference Material"

Disconnect-PnPOnline
This script assumes:
- An application has been registered in Entra ID for an interactive login and has generated an Application Id
- The retention label has already been created in Purview
- The retention label has been published to the SharePoint site
Once the script runs, all content added to the library inherits the External Reference Material label:
Although the Microsoft Graph is unable to set a default retention label on a library, it can set a default on a folder and has the added benefit of not requiring the retention label to be published to the site in advance as it is required for the PnP PowerShell script above. The PowerShell script below sets a default retention label named Project on the folder named Major in the Projects document library:
# Connect to Microsoft Graph
Connect-MgGraph -Scopes "Sites.ReadWrite.All"

# Get the Site, Drive, and Folder IDs
$site = Get-MgSite -SiteId "yourtenant.sharepoint.com:/sites/yoursitename"

# Get the drive (document library) named "Projects"
$drive = Get-MgSiteDrive -SiteId $site.Id | Where-Object { $_.Name -eq "Projects" }

# Get the folder named "Major" within the "Projects" library
$folder = Get-MgDriveItem -DriveId $drive.Id -DriveItemId "root:/Major"

# Apply the Retention Label named "Project"
$retentionLabel = @{
    name = "Project"
}

Update-MgDriveItemRetentionLabel -DriveId $drive.Id -DriveItemId $folder.Id -BodyParameter $retentionLabel

Write-Output "Retention label applied successfully to the 'Major' folder in the 'Projects' library."

# Disconnect from Microsoft Graph
Disconnect-MgGraph

Where is a Good Place to Start with These Controls?
Understanding your organization’s long-term compliance requirements is crucial for determining which controls should be integrated into a provisioning solution over time. It is often most efficient to begin with controls that are already in place within your organization. For instance, if your organization currently utilizes container-based sensitivity labels, it would be logical to incorporate these into the provisioning solution initially, with the addition of retention policies and retention labels at a later stage.
Even if you don’t currently have E5 licenses, it may still be beneficial to apply custom site properties and group attributes during the provisioning process. These enhancements improve search results and enable custom scripting and reporting. If you purchase E5 licenses in the future, you’ll already be prepared to leverage them for adaptive scopes.
The decision-making process regarding the inclusion of compliance controls in any provisioning solution should involve a comprehensive discussion with compliance teams, such as those responsible for security, risk, and records management.


Any way to retrive all files and their sensitive or retention policys on spo and onedrive
Use the Policy lookup feature in the compliance portal to check what policies apply to sites.
There are articles published in this site about using PowerShell to report the content of SharePoint sites and OneDrive accounts. The OneDrive script https://practical365.com/onedrive-for-business-account-files/ demonstrates how to report the sensitivity labels and retention labels assigned to individual files.