
Entitlement management – Connected organizations
Welcome back! So far in this series, we covered the concepts behind entitlement management and created a sample access package in the first article. In the second part, we expanded on some additional settings, looked at how things work from the end user’s perspective, and covered topics such as auditing in reporting. Now, we will explore one of the main reasons why you might want to use entitlement management – the ability to grant access to users from “connected” organizations and manage their lifecycle within your own directory.
Connected organization
We’ll start by introducing the concept of Connected organization. Any organization you have a relationship with can become a Connected organization, regardless of whether they are already using Azure AD or not. In our scenario, we can imagine that part of the work that needs to be completed for the successful delivery of Project Tango will be executed by an external company. To make things simpler, we will cover the scenario where the external company already uses Azure AD, but will provide notes for other scenarios throughout the text.
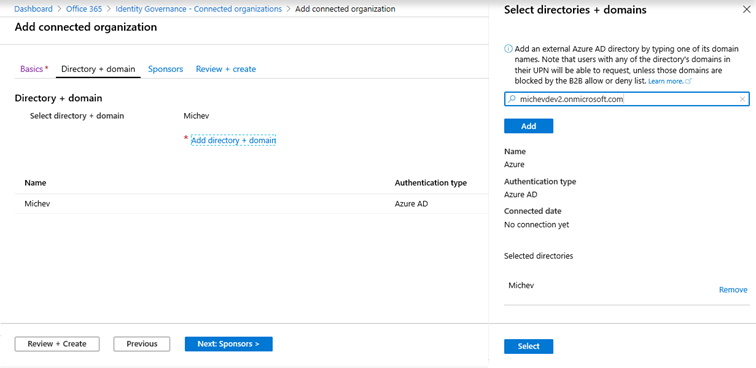
To add a new Connected organization, navigate to the Azure AD blade -> Identity governance -> Connected organizations and press the Add connected organization button. The familiar wizard interface will guide us over the creation process. On the first page, Basics, you can enter the Name and Description, then continue to the Directory + Domain page. Here you will press the Add directory + domain link and provide a domain name to search for.
You can use any of the domains verified in the (external) organization, or their default, tenant.onmicrosoft.com domain. If the organization is found, the corresponding Name will appear for you to verify, and if they are using Azure AD, the corresponding Authentication type will be configured. If they are not using Azure AD, the Authentication type will change to One-time pass code, the new B2B feature allowing users to redeem their invitation by providing a code sent to their email address. Another possible scenario here is direct federation. Only a single directory/domain can be added at a time, so you might need to repeat the process in case you have multiple organizations to add.
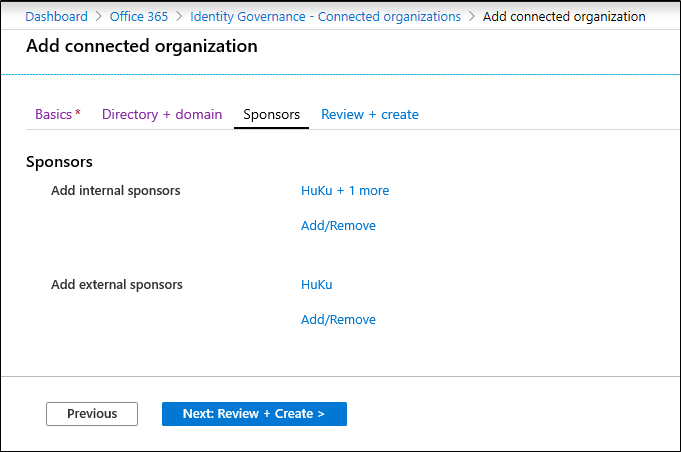
The next step is to configure Sponsors. Those are basically users that are responsible for managing some of the tasks related to collaboration between users of the two organizations, such as issuing approvals for assigning a package. Two types of sponsors exist, internal or external, which you configure via the corresponding Add internal sponsors/Add external sponsors links. While both types are optional, it’s recommended that you do configure at least one sponsor. If you choose to configure an external sponsor, it is important to understand that they must already exist in your directory as a Guest user, that is you cannot select a user directly from the external organization. The UI actually allows you to select regular (internal) users as the external sponsor, a small improvement here would be to filter the view and only present Guest users.
Lastly, on the Review + Create page, you can go over the configuration one last time and if everything checks out press the Create button to provision the new connected organization. You can change the settings later by selecting the corresponding entry from the list of connected organizations. One small annoyance found here is that you can only see the “Name” of the connected organization when it is of type Azure AD, not the actual (default) domain you pointed to when configuring it. This can cause confusion later on, as the “Name” is a free-form field, unrelated to the default domain and can have any value. Similarly, multiple organizations can have the same “Name”.
Assigning packages to users from connected organization
Now that we have at least one connected organization configured, we can proceed to provision some access packages that assign resources to users from said organization. Please note, that the catalog with the corresponding resources must be Enabled for external users, by toggling the corresponding setting on the catalog overview page.
To make things a bit easier and avoid repeating steps from our previous articles, we will select the already existing Project Tango package and create a new policy, this time using the For users not in your directory option. Doing so presents the choice between Specific connected organizations, where you select one or more pre-configured organizations; All connected organizations, which as the name suggests applies to all organizations; and All users, which includes any additional connected organizations you configure in the future.
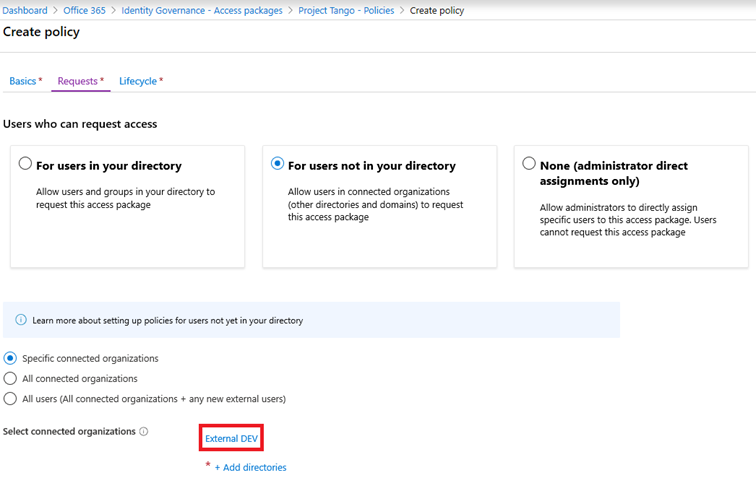
Another important part to note is that any packages that have a policy associated with a given connected organizations will be accessible by any user within said organization. This will also include users from any additional (sub)domains within the corresponding Azure AD directory. If you select one of the other available choices here, the package will be eligible for even broader scope of external users. One way to restrict access is to use the Azure AD B2B policy controls to specify a list of allowed/blocked domains. Alternatively, you can control this via approvals and access reviews.
Read more: How to Manage Guest User Access in Azure Active Directory
After making the selection, proceed with configuring the rest of the policy settings. Since you are effectively provisioning access for external users, it’s a good idea to diligently configure the Approval settings, where you can request that both the External sponsor and Internal sponsor you configured when adding the connected organization have their say in the process (two-stage approval). Justification, alternate approvers and fallback settings can also be configured as needed. Same applies to the Lifecycle policy settings, which you should also configure with care. Since no additional controls are presented here, refer to our previous articles or the official documentation for more information on these.

External user experience
We now have a connected organization configured and a policy that makes one of our access packages eligible for users within said organization. In order for users from connected organizations to request access to a package, they will need to be given a link to it, as access packages from connected organizations do not show under the My Access portal. Alternatively, access for external users can also be granted directly by a user with sufficient permissions via the corresponding page in the Azure portal, as with the other scenarios we examined.
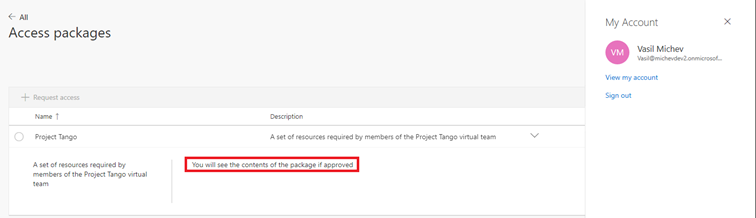
Once the person opens the link sent to them, the process is pretty much the same as that for internal users, with the slight difference that you cannot view the set of resources included in the package until you get the actual approval. When submitting the request, you will also see a privacy notice, which you must accept.
Once the request is approved and the corresponding access package has finished provisioning, the list of resources will be populated, and the external user can access them. As part of the process, a Guest user object is provisioned/invited to the directory. This representation of the user object within your own directory is what allows you to assign access and otherwise govern the lifecycle for such external users. Unlike the “regular” Guest user invitations process though, no email invitation will be sent, however the user will receive a notification that he has been granted access as part of the access package.
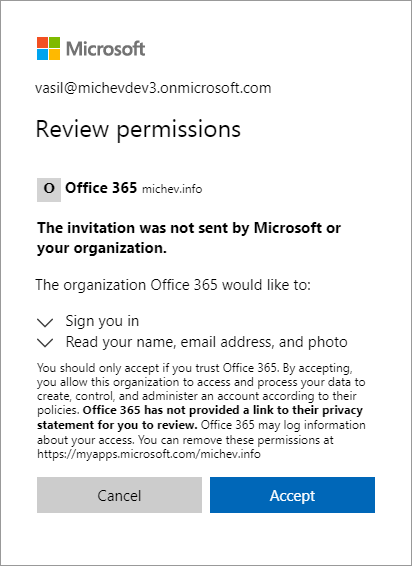
At this time, the user can click on any of the links in the (now updated) list of resources or access the corresponding resource directly. The first time they do this, they will have to complete the invitation process by consenting to the below prompt:
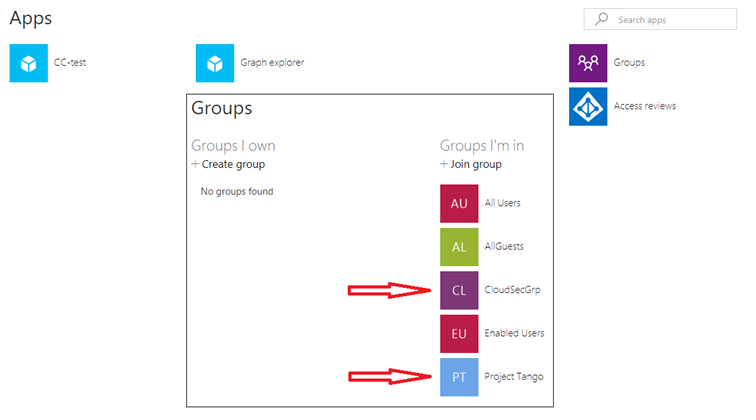
Another way for the user to access the corresponding resources is via the My apps portal. In our scenario, they should expect to see the two Azure AD integrated applications we’ve added as part of the package, and under the Groups page, he should also be added as members of the specified groups. Since the tenant has some groups with dynamic membership rules configured as well, the external user will become a part of their membership where applicable.
Final remarks and series summary
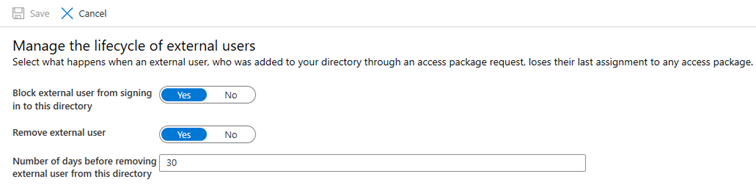
Before we close off the series, we should also mention some important settings related to Managing the lifecycle of external users. Those settings control what happens when access lapses for all of the access packages previously assigned for the user and allow you to block the user or remove him from the directory altogether. Additionally, you can specify the number of days before the user is removed. You can find the corresponding settings under the Azure AD blade -> Identity Governance -> Settings as pictured below:
So, there you have it, our not so short review of the entitlement management feature in Azure AD. Over the course of three articles we introduced the concepts behind the feature, and examined a sample scenario where an access package that grants access resources needed for a given project was created and later assigned to users. Apart from managing the set of resources and user assignments, the feature comes with built-in approval workflow, lifecycle controls (including managing the lifecycle of external users), robust auditing and reporting capabilities as well as PowerShell and Graph API support (albeit in preview). In a world where “minimum viable products” are becoming the norm, it’s refreshing to see Microsoft releasing a fully functional and highly customizable solution.
That’s not to say that entitlement management is perfect or without limitations. We mentioned already that only cloud-authored Azure AD groups are supported, meaning you cannot use Access packages to grant access to on-premises or Exchange Online groups. This argument can be extended to cover other resource types, but I suppose those will be covered when we get Graph API support for the corresponding workloads. Another restriction that you should be aware of is that multi-geo SharePoint Online locations are not supported, you can only grant access to sites within the default geo-location. Some of the choices presented when selecting different resources in the UI can also be handled better. Lastly, the Azure AD Premium P2 license requirement for every user that requests a package might also be a problem for some organizations.


Excellent series and really useful tool from Microsoft. However there is a gap, with a B2B object is created for the access package duration, internal users with SPO owner permission can add access to guest users to any site outside of what is allowed in entitlement management. Ex – In EM we add 2 sites as resource and an external user gone through the approval to gain access to the package and also a B2B object in the directory. Now there is a third site which is not part of EM, an owner of a site can add access manually.
In order for users from connected organizations to request access to a package, they will need to be given a link to it, as access packages from connected organizations do not show under the My Access portal.
Is it correct? I recall the packages can be listed
Yes, you’ll need to share the link with them for easier access.