Use the Microsoft Graph PowerShell SDK to Assign Retention Labels to Unlabeled Files
In a previous article, I explain how to use a content search to find files in SharePoint Online and OneDrive for Business that don’t have a Microsoft 365 retention label. The article also describes how to refine the search results to exclude files held in the preservation hold libraries for sites under the control of retention policies. The output of this work is a CSV file containing the URLs for the sites and accounts where unlabeled files exist.
If your tenant has Office 365 E5 or advanced compliance licenses, it’s easy to apply retention labels to the unlabeled files by creating an auto-label policy that targets the locations found by the search. A week or so after publishing the auto-label policy, a search for unlabeled files should reveal a big drop in the number of unlabeled files. The big advantage of an auto-label policy is that it continues working to label new files added to the target locations. To make it even more certain that new files receive the appropriate retention labels, you can configure a default retention label for document libraries and/or folders. This feature is also controlled by E5 or advanced compliance licenses.
The Backstop of Retention Policies
However, not everyone has the necessary licenses to use auto-label policies or define default labels for document libraries. In this scenario, you could apply a default retention policy to cover all SharePoint Online sites and OneDrive accounts. A retention policy is a catch-all backstop to ensure that nothing is removed from a location before the retention period specified in the policy expires.
Retention policies work well and have a lot going for them, but sometimes you might like to have the extra degree of control that a retention label brings. For instance, a retention label can invoke a disposition review or a custom Power Automate flow at the end of its retention period.
Microsoft Doesn’t Want DIY Auto-Label Policies
Creating a do-it-yourself auto-label policy seems feasible. After all, the Microsoft Graph supports APIs to list, get, and update retention labels and a RecordsManagement.ReadWrite.All permission is available to control access the APIs. Then you notice that an application form of the permission is unavailable. The delegated form of the permission allows the signed-in user to interact with retention labels, but only in sites and accounts they have access to. The lack of an application form of the permission, which would allow a script to process retention labels for any site or account in the tenant, is a strong hint that Microsoft doesn’t want people to build their own auto-label policy.
You could get around the block by adding the account that will run the script as an administrator of every site (site member is sufficient for sites linked to Microsoft 365 groups). This approach is feasible for small to medium deployments, but it will probably run out of steam as the number of sites grows.
With all these caveats in mind, I decided to write a proof of concept script to demonstrate how to take the locations information generated from the content search results and use it to find and label items. The script is available from GitHub. Its structure is simple and follows these steps:
- Read the locations data from the CSV file generated by the previous script into an array.
- Filter the array of locations to exclude OneDrive for Business accounts. It is possible to assign retention labels to files in a OneDrive account, but only if the signed-in account is an alternative administrator for the account. OneDrive is supposed to hold personal information instead of the shared content that should be in SharePoint Online, so the script concentrates on SharePoint and leaves it to the account owners to label their files.
- Declare a retention label to apply to unlabeled files. The script applies one label to all files, but, if necessary, you could include code to apply different labels based on whatever criteria seem appropriate. For instance, the script could evaluate the age of unlabeled items and apply a retention label with a longer retention period if the assignment of the preferred default label would result in the immediate removal of files by the Purview background jobs that process retention policies and labels.
- The script has a preview mode, meaning that it will report but not label files. This option is controlled by a switch parameter.
- Attempt to access each location (site) in the array by using the Get-MgSite cmdlet to search for its URL. A site might be inaccessible for various reasons, including:
- The signed-in account might not have access to the site (this includes when the signed-in account is not a member of a site owned by a private or shared Teams channel).The site might be archived in Microsoft 365 Archive.The site might be deleted but is held in a retained state and is inaccessible to users.
- Bugs (see below).
- If the site is accessible, use the Get-MgSiteDrive cmdlet to find its drives (document libraries). If present, exclude the preservation hold library and Teams Wiki Data libraries. Items in the preservation hold library cannot be labeled and the Teams Wiki Data library is an artifact of a deprecated feature. The Get-MgSiteDefaultDrive cmdlet is also available to find the default document library for a site. However, unlabeled files could be in other document libraries, so the script fetches all drives and filters out the drives that shouldn’t be processed.
- Find the files in each drive and check Office documents and PDFs to find unlabeled files. Labels can be assigned to other file types (for instance, some organizations like to use retention labels to preserve the MP4 files for Teams meeting recordings instead of the default Teams meeting expiration policy), but I decided to simplify the script.
- Before applying a retention label to an unlabeled file, check its last modified date to make sure that applying the label won’t force the immediate deletion of the file (see above). Files ignored because of their age are noted in the output report.
- Run the Update-MgDriveItemRetentionLabel cmdlet to apply the default retention label specified in the script to the remaining unlabeled files.
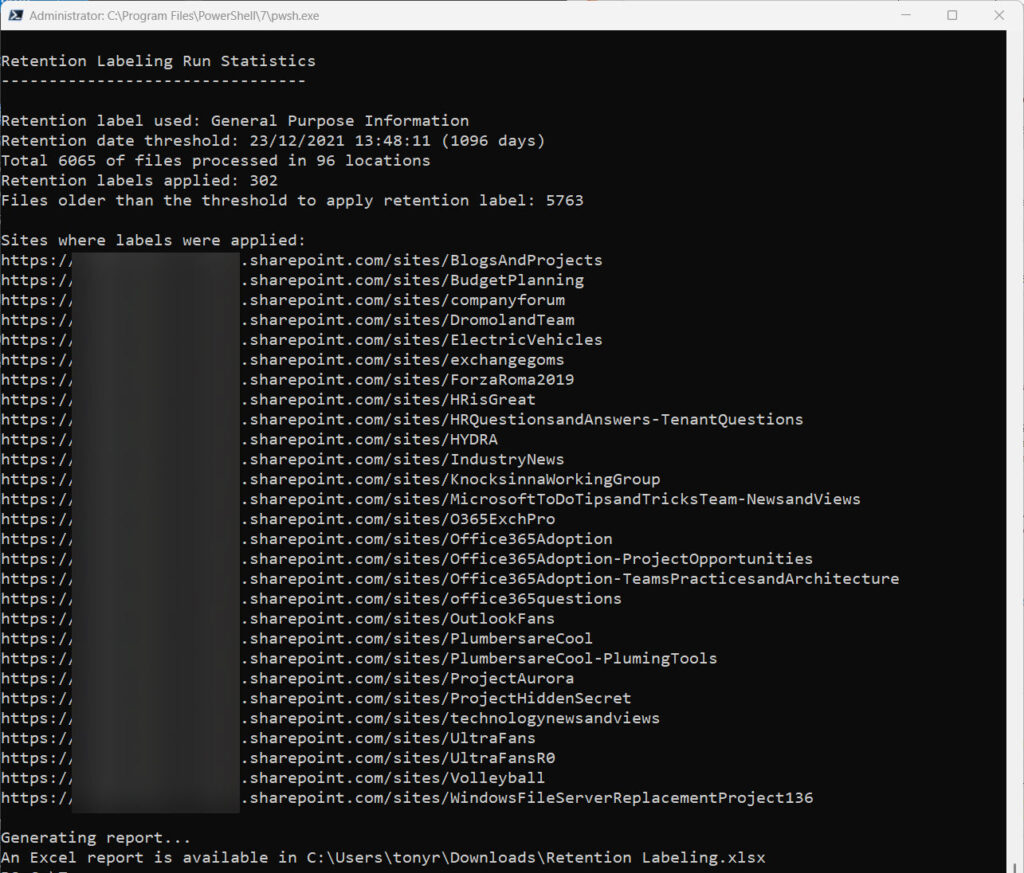
- Report the actions taken by the script (Figure 1).

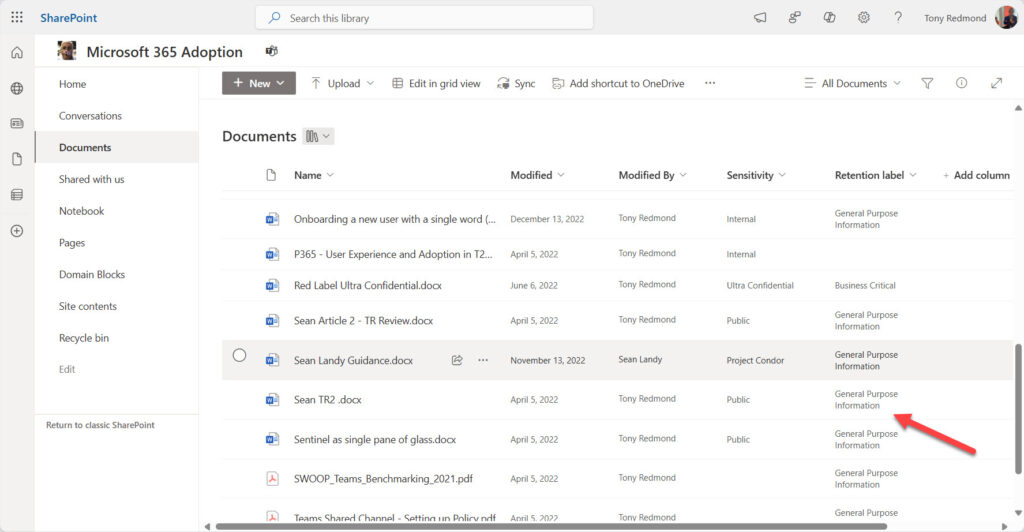
The detailed report is generated in an Excel worksheet (if the ImportExcel module is installed on the workstation) or CSV file. The report lists the files that the script applied labels to and which files were ignored because of their age. To test the veracity of the report, access one of the SharePoint Online sites and examine which files have the retention label assigned by the script. In Figure 2, the retention label to look for is called General Purpose Information.

Another way to check which files received retention labels is to run an audit log search to look for TagApplied events. The audit events should be available in the audit log an hour or so after the script finishes. This script uses the Search-UnifiedAuditLog cmdlet to look for TagApplied audit events generated by the Microsoft Graph PowerShell SDK app and reports which files received retention labels.
Graph API Issues Discovered During Development
During the development of the script, I discovered two bugs with Graph Site and Drives APIs (and the relevant Microsoft Graph PowerShell SDK cmdlets). Both issues appear to relate to site access constraints imposed by SharePoint either directly or via a container management sensitivity policy. The first is that the Get-MgSite cmdlet returns nothing when it searches for a site with a block download policy. The block download policy has other side effects, such as blocking the ability of Microsoft 365 Copilot to use files from the site in its responses to user prompts.
The second problem is that the Get-MgSiteDrive and Get-MgSiteDefaultDrive cmdlets fail with an access denied error when reading drive information for a site protected by a sensitivity label that requires MFA with an authentication context.
I’ve reported both issues to Microsoft. It’s unsurprising that security restrictions can interfere with API responses, or at least require additional handling by the APIs, and no doubt Microsoft will address the problems in a future release of the Graph APIs and SDK. In the meantime, the script will note failures to find sites or access drives if it encounters the problems when it runs.
It’s All About Knowledge and Learning
Although this script isn’t intended for production use, I learned a lot by writing the code, including discovering the two bugs described above. The experience proves once again the value of interacting with Microsoft 365 data through the Graph APIs in terms of knowledge acquisition. You might never use a script like this to apply retention labels, but learning how to navigate SharePoint Online sites, drives, and files is invaluable expertise that will deepen your understanding of how Microsoft 365 works, and that’s always a good reason to write some PowerShell.


