
In the final part of this three-part guide, we’re completing the configuration of our Microsoft Flow and then testing out our completed process.
A quick recap
We’re taking a fairly common scenario that occurs in most businesses that work with customers – creating a sales or project proposal. We want to automate this process.
Our solution will be to provide a form to users to provide information, allow a manager to review the information entered and then automatically create a Microsoft Word document based on a company template.
We’ll use Microsoft Teams, Microsoft Word, SharePoint Online List, and Document Libraries, Microsoft Flow and a Microsoft PowerApp to make this happen.
In part one, we created an underlying Team Contoso Proposals to provision a SharePoint site and to use as the place to access the form and for approval management.
Next, we created our Word template and added the relevant fields to it, then finally we created a new SharePoint List to store the information that will need approval and populate the Word Document.
In part two of the series, we created our PowerApp form that presents a friendly, easy to use interface to our users, then integrated it with Microsoft Teams. We then created the Microsoft Flow that glues the process together and set up the approvals process within the Flow.
We now need to edit what happens in our Flow when the approval is granted – the core of our Flow that actually makes the process useful to the business. We’ll then give it a whirl once it’s completed.
Creating our approved actions in Microsoft Flow
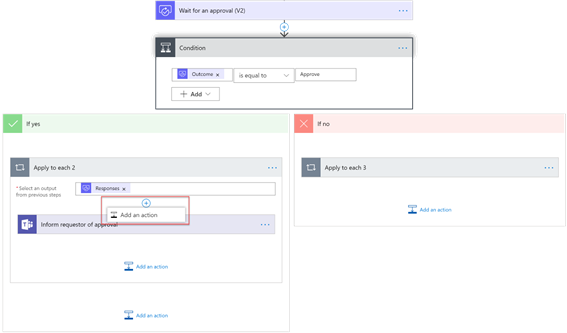
We enter our flow at the Wait for approval step and then expand the Condition action.
We’re interested in what happens when the manager approves the request, so select If yes, then expand Apply to each 2.
Our template-created Flow has one action – Inform requestor of approval.
Before that happens, we’ll add the logic that creates and populates the Microsoft Word document. This will include the following actions:
- Get the SharePoint List item – in case the manager has made changes to it during the approval
- Populate the Microsoft Word template and store it temporarily within the Flow
- Create a new file in our SharePoint document library associated with the Team and save the contents of the Microsoft Word document into it
- Create a Sharing Link that can be used to access the document
- Update the approval notification with the link the requestor can use to access the document
To do this, we’ll hover over the + icon within Apply to each 2 above Inform Requestor of approval and choose to Add an action.
The Choose an action dialogue will show, allowing us to select connectors and add appropriate actions:
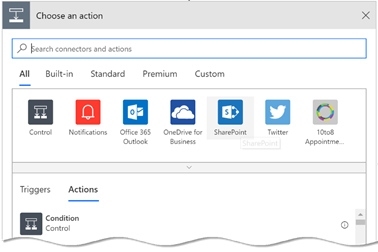
Add four actions corresponding to those described above, including:
- SharePoint Online – Get Item
- Microsoft Word Online – Populate a Microsoft Word template (Preview)
- SharePoint Online – Create file
- SharePoint Online – Create sharing link for a file or folder
Once these are created they should show in the order below:
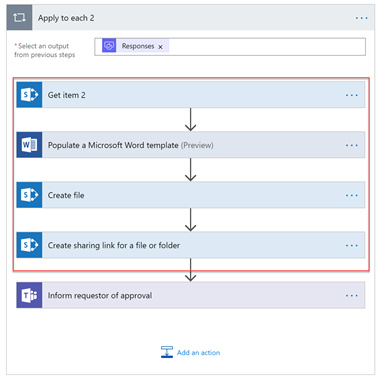
We’ll now update each action to implement the logic required.
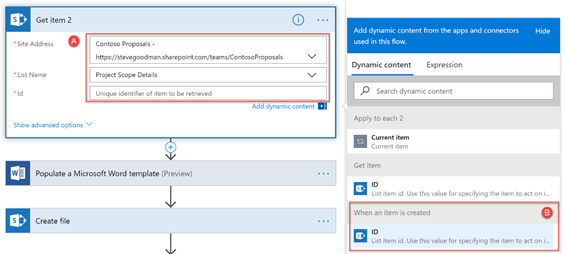
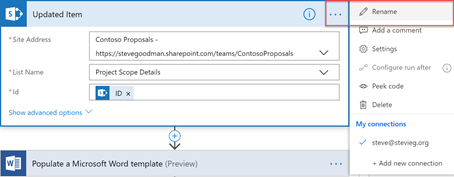
First, select Get item 2. We’ll populate the Site address with the Contoso Proposals site and select the Project Scope Details list (A). These should match those used in the Get Item action earlier in the Flow.
In the Id field, choose Add dynamic content and choose ID from When an item is created (B):
Next, we’ll rename Get item 2 to Updated Item so it is more descriptive:
We’ll now select Populate a Microsoft Word template from the actions. First, we’ll need to choose the Microsoft Word document we uploaded to SharePoint Online in part one of this guide:
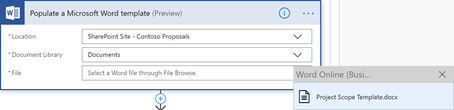
After we have selected our Microsoft Word document that will be used as a template, the document fields we added in part one will automatically be detected – how cool is that?
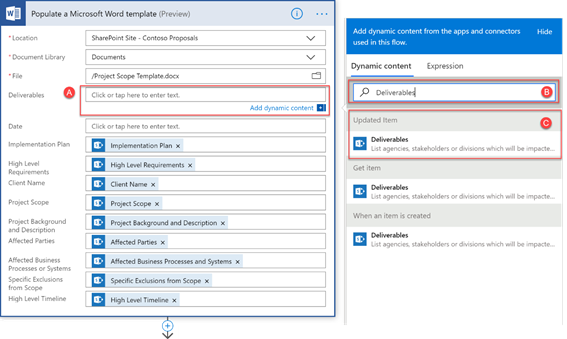
We now need to map each field detected in the document to the corresponding SharePoint Online List column retrieved by our Updated Item action configured above.
To do this, select each field and choose Add dynamic content (A). Then search for the column name (B) and select it from Updated item (C):
In our example document, we want to populate a Date field. We’ll use this as an example of how to add in dynamic content from an expression. This will allow us to add a formatted date time (formatDateTime) value based on the current time (utcNow) that the flow is running.
We’ll select our Date field (A) and then select Expression (B). We’ll then add the following expression into (C):
formatDateTime(utcNow(),’dd/MM/yyyy’)
This will add the date only in UK format. You’ll see this shown below:

When the ‘Populate a Microsoft Word template’ action runs, the document won’t actually be created anywhere – it will be stored within the Flow as it runs.
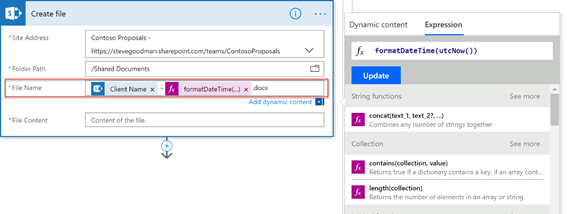
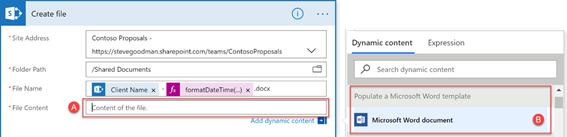
Therefore, we’ll need to create a file in SharePoint Online to store the document in. That’s what our Create file action is for. Add the Site Address corresponding to the Team and select the Folder Path to save the file.
We’ll next construct the File Name dynamically. This will use the Client Name as used above, and for uniqueness, we’ll use the formatDateTime combined with utcNow to append the full date and time, with a file extension of .docx:
The file itself will need the correct data in it – so select File content (A) then choose Microsoft Word Document from Populate a Microsoft Word template (B) to retrieve the document we created in the previous step and save it to the file:
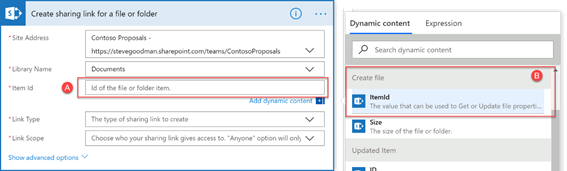
Our next step is to Create a sharing link for a file or folder. This ensures that should we allow people outside the team to make requests for proposals we can create a valid sharing link they can use.
It also makes it easier within the Flow to get a URL link that is easy to use within other steps.
First, we’ll select the same SharePoint site we created the file in, then select the Item id (A) and choose Add dynamic content. Then select ItemId from Create file (B):
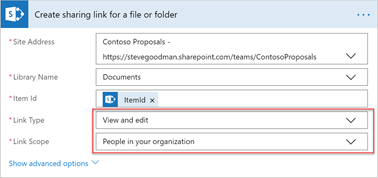
Next, choose the appropriate Link Type and Link Scope settings:
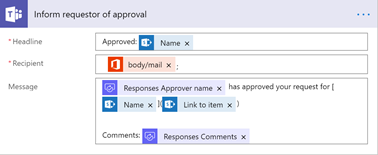
Our final step is to update the existing Inform requestor of approval action. We’ll add a short message and a link that the requestor can select to view the document.
Select Inform requestor of approval:
We’ll then add our short text and link.
Within the message, we’ll be able to add a hyperlink with a text description by entering it in a specific format. Flow will convert a link formatted like this:
[Practical365](https://www.practical365.com)
Into a format like this
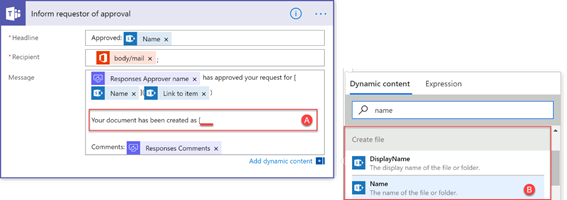
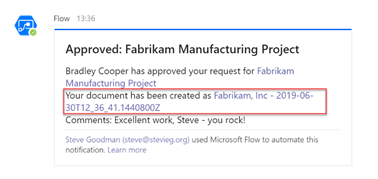
Therefore, we’ll add a quick introduction “Your document has been created as” followed by the File Name with the Sharing Link as the URL.
First, add the text and open the square bracket that will contain the file name. With the cursor after the square bracket, select Add dynamic content (A) and then select Create File > Name (B):
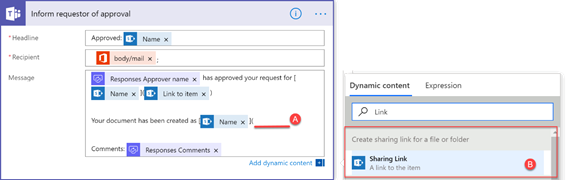
After adding the file name, close the square brackets and open the round bracket. Choose Add dynamic content and then select the Sharing Link:
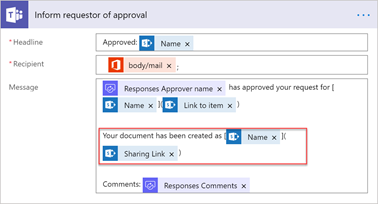
After adding the dynamic content and closing the brackets your new text should be displayed as shown below:
With our Microsoft Flow complete, ensure it is saved.
Testing out our process
We’re now able to test our end-to-end process.
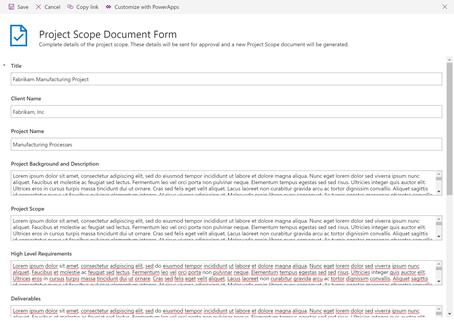
First, we’ll create a new Project Scope Document using the SharePoint List form we created in part two of the series:
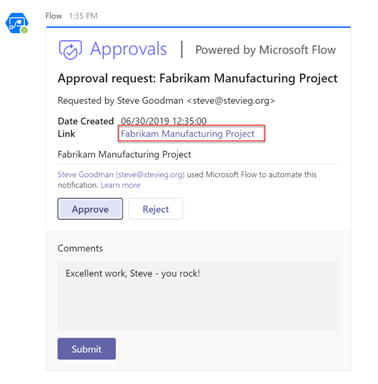
After submitting the form, one of the managers specified in the approvals part of the flow we set up in part two of the series will receive chat message from the Flow bot. They will see a link to the item for review, and have the option to Approve or Reject the new proposal content:
After approval, the flow will continue to run. The actions we’ve added in this part of the series will execute and create, then save the new Word document. As a final step, a message is sent to the requestor informing them of this, along with the message we added above. You’ll see below that this includes a link to access the document:
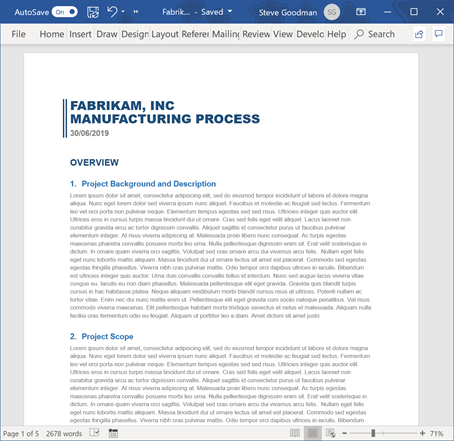
Open opening the document we’ll see it includes the content from the form:
Summary
In this three-part guide we’ve looked at an existing business process that can be improved using Office 365 and Teams – and then used SharePoint, PowerApps and Flow to automate it – with Teams being the place users go for it to happen.
From a user perspective, we’ve made the process simpler – and they don’t have to adopt additional applications, as it can all happen in Microsoft Teams.


Steve
Thank you for a fantanstic job of writing this blog. Its a life saver. My questions is that
1) can you put more than one approver
2) can you choose approver based on the amount of project
Thanks
Hello. Thanks for sharing this! It was really helpful. I got stopped because the “Populate with Word Online” seems to be now a premium feature. Is there an alternate way to keep following these steps without Word?
Hi Steve,
Excellent series of using flow for approval! Many thanks for putting this together!
Similar to Moe, i’d like to put the approved date and name etc in the document – done with a fields.
However, is there a way to restrict this to work with the flow – i.e. the document field is not editable from within the doc, only when it has run through etc. where i can up revision the version to a major etc.
In effect i’m looking to ensure the field cannot be changed to falsely look like its been approved.
Many thanks in advance,
Simon
Hi Steve,
First of all thanks for this tutorial. This has really cleared up some questions of how flow can be used with powerApps and I cant wait to use it at my workplace!
I get an error message though. I followed it upto the point where you mention “After we have selected our Microsoft Word document…” but I get the message “Failed to load dynamic schema” and the list does not get populated in to the flow.
Could you help me with that?
Thanks!
Hiya,
When I’ve seen similar, it has been when using a document (or document from a template) that has some history and been upgraded from previous versions of Office. I’ve not looked into the root cause, but found that moving the content to a fresh document helps in this scenario.
Steve
Thanks for the quick reply Steve,
We did just upgrade from Office 2016 to Office 365. So I’ll give it a try. Hopefully this sorts things out. Thanks a lot.
Cheers!
Is there a way to add the name of the approvers and the date when they approved at the bottom of the document? Instead of being separated in a different page.
Hiya,
Yes, you could create an MS word field and populate this where ever you choose on the document – it doesn’t need to be a separate page.
Steve
Is there a way to populate the Project Scope form with data for two or more Projects.
Hiya,
You could add whatever fields you like within the template, but each Form is linked to one SharePoint List item, so I think that would difficult without creating a custom PowerApps Canvas App
Steve