Exchange Online and Azure Automation
Updated 15 February 2024
In a previous article, I explore how to use the Microsoft Teams and Microsoft Graph PowerShell SDK modules with Azure Automation managed identities. At the time, I noted that Exchange Online didn’t support managed identities. The problem disappeared when Microsoft released V3.0 of the Exchange Online Management module, complete with support for Managed Identities. Connecting to Exchange Online with a managed identity requires specifying the organization to connect to, and that’s about it.
Connect-ExchangeOnline -ManagedIdentity -Organization office365itpros.onmicrosoft.com
The service principal belonging to the managed identity needs the permission to perform Exchange Online management actions. I did note that it isn’t possible to create a new Microsoft 365 group with the New-UnifiedGroup cmdlet. This might be a temporarily glitch, or perhaps this cmdlet is not yet capable of working with a managed identity.
Update: Always use the latest version of the Exchange Online management module (V3.0 or above) to connect to Exchange Online with Azure Automation. The methods describe below are now of historical interest only. See the Microsoft documentation for more information. Microsoft has not yet upgraded some Microsoft 365 group management cmdlets to work with Azure Automation after authenticating with a managed identity. The functionality of these cmdlets can be replaced with cmdlets from the Microsoft Graph PowerShell SDK or Graph API requests.
Using Managed Identities with Exchange PowerShell V1
While we wait for Microsoft to deliver a production module, it’s possible to use the older V1 Exchange module with a managed identity. MVP Vasil Michev lays out how in his blog. Before going further, it’s important to say that Microsoft doesn’t support this method either. It works, but if you use it in production, don’t expect to be able to call Microsoft support if things go wrong.
The important step in the process is to assign the Manage Exchange As Application role to the service principal of the managed identity you choose to use. This is done by:
- Getting the details of the Microsoft enterprise app registered for Exchange management.
- Fetching the permission identifier for the Manage Exchange as Application role from the set of roles defined for the Exchange management app.
- Using the information to assign the Manage Exchange as Application role to the service principal for the managed identity.
Once again, PowerShell is the only way to make the assignment. Here’s the code I used:
$ExoApp = Get-MgServicePrincipal -Filter "AppId eq '00000002-0000-0ff1-ce00-000000000000'"
$AppPermission = $ExoApp.AppRoles | Where-Object {$_.DisplayName -eq "Manage Exchange As Application"}

$AppRoleAssignment = @{
    "PrincipalId" = $ManagedIdentityApp.Id
    "ResourceId" = $ExoApp.Id
    "AppRoleId" = $AppPermission.Id
  }
New-MgServicePrincipalAppRoleAssignment -ServicePrincipalId $ManagedIdentityApp.Id -BodyParameter $AppRoleAssignment
Once the service principal holds the role allowing it to act as an Exchange administrator, we can put it to work. This code is an example of using the managed identity to sign into Exchange Online using an access token generated for the identity (using a special account called OAuthUser@ plus the tenant identifier (OAuthUser@a662313f-14fc-43a2-9a7a-d2e27f4f3478 in this instance). After connecting, we run some standard Exchange PowerShell code to find all user mailboxes and return some mailbox statistics.
# Get token with Service Principal for managed identity
$ResourceURI = "https://outlook.office365.com/"
$TokenAuthURI = $env:IDENTITY_ENDPOINT + "?resource=$resourceURI&api-version=2019-08-01"
$TokenResponse = Invoke-RestMethod -Method Get -Headers @{"X-IDENTITY-HEADER"="$env:IDENTITY_HEADER"} -Uri $tokenAuthURI
$AccessToken = $TokenResponse.access_token
$Authorization = "Bearer {0}" -f $accessToken
$Password = ConvertTo-SecureString -AsPlainText $Authorization -Force

$Ctoken = New-Object System.Management.Automation.PSCredential -ArgumentList "OAuthUser@a662313f-14fc-43a2-9a7a-d2e27f4f3478",$Password

$Session = New-PSSession -ConfigurationName Microsoft.Exchange -ConnectionUri https://outlook.office365.com/PowerShell-LiveId?BasicAuthToOAuthConversion=true -Credential $Ctoken -Authentication Basic -AllowRedirection -Verbose
Import-PSSession $Session | Format-List

$Mbx = Get-Mailbox -RecipientTypeDetails UserMailbox -ResultSize Unlimited
$MbxList = [System.Collections.Generic.List[Object]]::new()
ForEach ($M in $Mbx) {
   $Stats = Get-MailboxStatistics -Identity $M.DistinguishedName
   $MLine = [PSCustomObject][Ordered]@{  # Write out details of the private channel and its members
          Mailbox             = $M.DisplayName
          UPN                 = $M.UserPrincipalName
          Items               = $Stats.ItemCount
          Size                = $Stats.TotalItemSize
          LastInteraction     = $Stats.LastInteraction
          ProhbitSendQuota    = $M.ProhibitSendReceiveQuota }
       $MbxList.Add($MLine) }
$MbxList | Sort-Object Items -Descending | Format-Table Mailbox, Items, Size
Remove-PSSession $Session
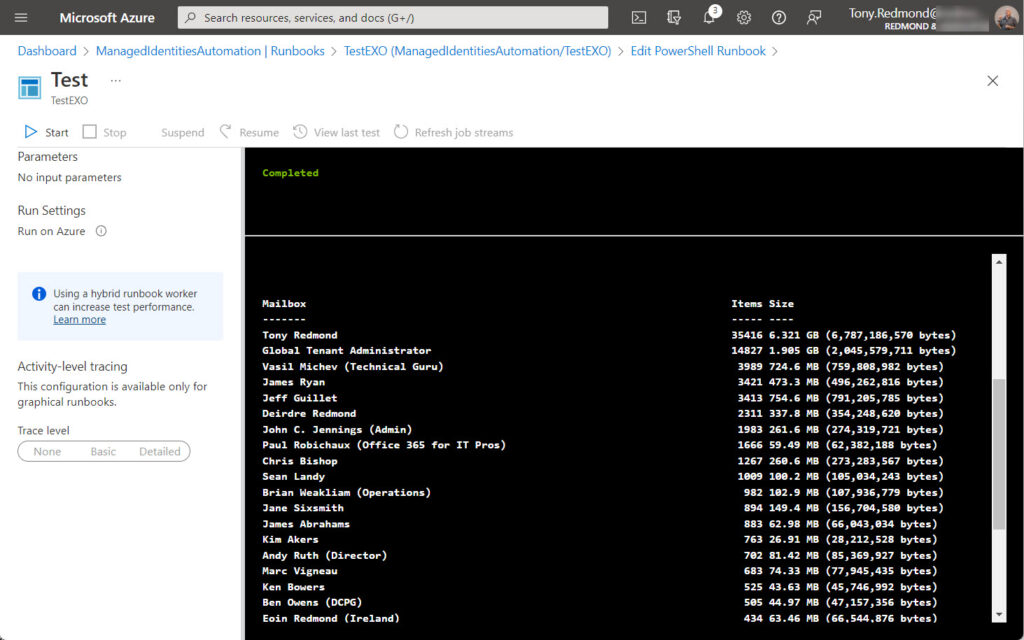
The code works (Figure 1) with the big caveat that only the old cmdlets (the set that originated on-premises) are available. None of the newer REST-based cmdlets found in the Exchange Online management module (like Get-EXOMailbox) can be used.

Using the Exchange Online V2 Module
If you want to use the cmdlets in the Exchange Online V2 module to take advantage of their speed and reliability when fetching large amounts of objects, you can, but not with a managed identity (for now). Instead, you could use some of the techniques explored in previous articles, notably by storing username and password credentials in Azure Key Vault. The account must hold the Exchange administrator role to be able to perform Exchange administrative tasks. This might be an interim stage to allow the automation of some repetitive periodic processing while waiting for Microsoft to perfect managed identity support for Exchange Online.
Take the script I wrote to check shared mailboxes for appropriate licenses. Normally, shared mailboxes don’t need licenses, but once a shared mailbox stores more than 50 GB of content, has an archive, or is on litigation hold, the rules change and the mailbox needs an Exchange Online Plan 2 license. You can ignore the requirement, but eventually Exchange will stop the mailbox from receiving and sending emails, and that’s a bad place to be.
The script uses the Get-ExoMailbox and Get-ExoMailboxStatistics cmdlets to interact with mailboxes and the Get-MgUserLicenseDetail cmdlet (from the Microsoft Graph PowerShell SDK) to check the licensing status of the Azure AD accounts that own the shared mailboxes.
To get the script running in Azure Automation, I included the code to sign into the Microsoft Graph PowerShell SDK with a managed account and fetched the account credentials from Azure Key Vault. Here’s the code to retrieve the credentials and connect to Exchange:
# Connect to AzAccount to access Key Vault to fetch variables used by the script
$AzConnection = Connect-AzAccount -Identity | Out-Null
# Get username and password from Key Vault
$UserName = Get-AzKeyVaultSecret -VaultName "Office365ITPros" -Name "ExoAccountName" -AsPlainText
$UserPassword = Get-AzKeyVaultSecret -VaultName "Office365ITPros" -name "ExoAccountPassword" -AsPlainText
# Create credentials object from the username and password
[securestring]$SecurePassword = ConvertTo-SecureString $UserPassword -AsPlainText -Force
[pscredential]$UserCredentials = New-Object System.Management.Automation.PSCredential ($UserName, $SecurePassword)
Connect-ExchangeOnline -Credential $UserCredentials
After that, it was just a matter of updating the script code slightly to change some details (like removing some instances of Write-Host and updating others to use Write-Output instead – there’s no point in including lots of informative output when a script executes in Azure Automation). I also included a Disconnect-ExchangeOnline command in the script to remove the connection to Exchange Online when the script finishes. This avoids encountering problems when running the script multiple times in quick succession during testing as Azure Automation doesn’t allow more than three concurrent connections.

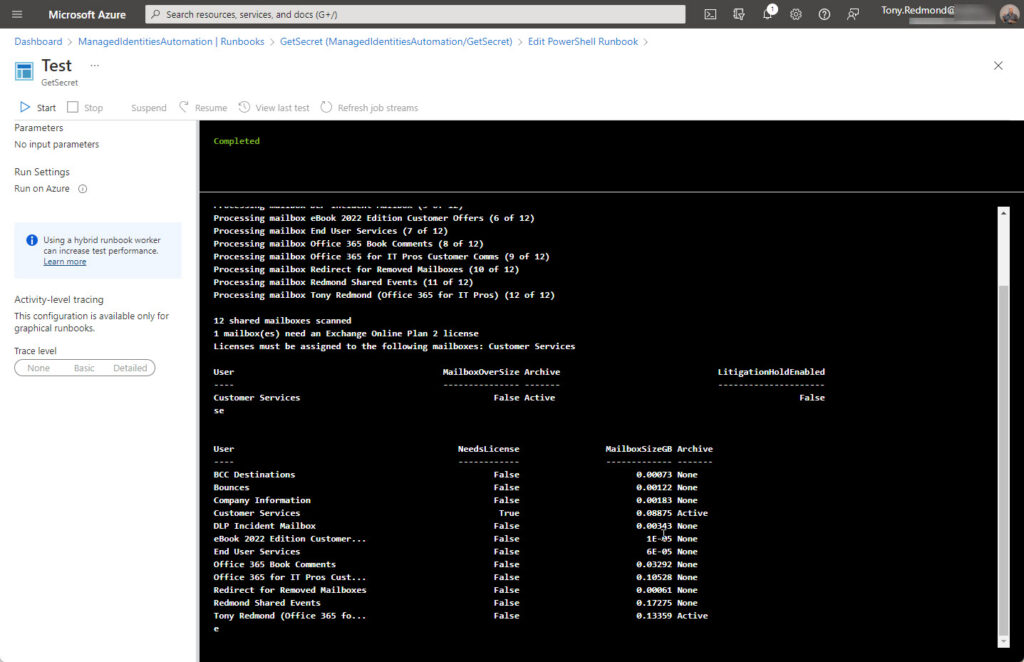
As I expected, everything worked without a hitch (Figure 2). I didn’t go through the process of creating suitable output for consumption by administrators. This could be done by using any of these well-known methods:
- Posting a message to a Teams channel.
- Creating a document in a SharePoint Online site.
- Sending email.
Next Step – Production
Of the two methods, I favor using the second as I’d always prefer to use the Exchange Online V2 cmdlets. It’s interesting to connect to the V1 modules using a managed identity, but it’s more practical to go with the V2 cmdlets, especially as they’ll be the basis for the production solution. In the interim, fetching credentials from Azure Key Vault isn’t perfect, but it works, and that’s usually the most important thing.


This is now out of date with V3 being the only supported module.
We are moving from run as accounts to managed identities and having connection/permission errors with Teams and EXO
Using the example above, I get the error “The requested identity has not been assigned to this resource.”
Using a secret, I get the following error “UnAuthorized”
Using your method above for V2, I get the following error: “The user is not recognized as a managed user, or a federated user.Azure AD was not able to identify the IdP that needs to process the user U/P: Wrong username”
Clearly, I’m missing something. The permissions haven’t changed, and automation is still managing mailboxes using run as connections without issue.
First, let me say that articles on a blog age quite rapidly because of the pace of change in the service. If you want something that’s kept updated on an ongoing basis, buy a book like Office 365 for IT Pros. https://gum.co/O365IT/
As it happens, we have a later article about connecting to Teams https://practical365.com/managed-identity-powershell/ which shows how to use a managed identity to connect in Azure Automation. To connect to Exchange Online V3.0 only, run:
Connect-ExchangeOnline -ManagedIdentity -Organization $TenantName
Is there any article on authenticating via managed identity for “Connect-IPPSSession” command in ExchangeOnlineManagement? I’ve tried -ManagedIdentity and -Identity but it doesn’t recognize either.
The compliance cmdlets don’t support authentication using a managed identity. You’ll have to use a certificate instead: https://learn.microsoft.com/en-us/powershell/exchange/app-only-auth-powershell-v2?view=exchange-ps
I’m currently going through Ingo Gegenwarth’s “Using Azure Functions for Exchange Online” however I’m stuck on the step “Grant Admin Consent to the Service Principal”. Where exactly am I supposed to run “Connect-ExchangeOnline -ManagedIdentity -Organization $TenantName” I’ve done everything else in the guide but I’m stuck on this part.
Hello,
I’m trying to grant Manage Exchange As Application permission for the Manage Identity of my Azure Automation
I get an error:
New-MgServicePrincipalAppRoleAssignment: Cannot bind argument to parameter ‘ServicePrincipalId’ because it is an empty string.
what am I doing wrong?
“AppId eq” I’m inserting the Manage Identity Object (principal) ID of my Azure Autoamation
What value are you feeding to the ServicePrincipalId value? PowerShell is complaining that it’s empty. Check the variable that you’re passing and how it is populated.
PS. I go into the mechanics of this a little deeper at https://office365itpros.com/2022/10/13/exchange-online-powershell-app/
Hey Tony, I’m trying to add the new-mgserviceprincipalapproleassignment but $ManagedIdentityApp.ID variable is never populated. What does it need to have in it?
Did you use Get-MgServicePrincipal to populate the variable with the properties of the service principal you want to assign the permission to?
Hello Toni; maybe a stupid question but what is in $env:IDENTITY_ENDPOINT?
I don’t have that environment varable.
You do when you run with managed identities… See https://learn.microsoft.com/en-us/azure/app-service/overview-managed-identity?tabs=portal%2Chttp