Taking Advantage of SharePoint Storage
In this mini-series of articles, I’ve explored how to use Azure Automation with PowerShell to process Exchange Online information, including using the Microsoft Graph PowerShell SDK to send email. Sharing the output of jobs through email is certainly a valid distribution mechanism, but other methods are available. In this article, I want to cover how to store files created by Azure Automation in SharePoint Online and discuss why it’s not possible to post messages to Teams.
As a brief recap, Azure Automation runbooks allow organizations to run PowerShell scripts on sandbox servers using a variety of authentication methods. The PowerShell scripts can use cmdlets from workloads like Exchange Online, SharePoint Online, and Teams in addition to Microsoft Graph queries. No user interaction is possible, but scripts executed by runbooks offer a good platform for running jobs which process a lot of information.

Tracking Expiring Microsoft 365 Groups
The Microsoft 365 Group expiration policy is an Azure AD feature (requiring Azure AD premium licenses). The policy defines a period (for instance, 365 days) during which groups must show signs of activity. If they do, Azure AD renews the groups automatically. If not, Azure AD puts the groups through a gradual deletion process starting by warning group owners by email about imminent deletion and finishing with permanent removal.
The automatic renewal process is based on signals gathered in the Microsoft Graph. However, it’s possible that Azure AD deems some important groups inactive, and the owners don’t read the warning email. In these instances, the groups might end up being removed. For this reason, it’s a good idea to keep an eye on groups approaching their renewal dates.
I have a script to fetch details of groups coming within the scope of the expiration policy and report their renewal status. To ensure reasonable performance in even large tenants, the script uses a Graph query to find the groups.
Converting the script code to execute in a runbook is straightforward. To authenticate and connect to the Graph, we use the certificate thumbprint for the RunAs account’s service principal to obtain an access token. A Graph query fetches the set of groups. Here’s the code to authenticate and query the Graph.
$Connection = Get-AutomationConnection -Name AzureRunAsConnection
$Certificate = Get-AutomationCertificate -Name AzureRunAsCertificate
$GraphConnection = Get-MsalToken -ClientCertificate $Certificate -ClientId $Connection.ApplicationID -TenantId  $Connection.TenantID
$Token = $GraphConnection.AccessToken
$Headers = @{
            'Content-Type'  = "application\json"
            'Authorization' = "Bearer $Token"
            'ConsistencyLevel' = "eventual" }
# Get set of groups with an expiration date set. Can't check for null as the ExpirationDateTime property doesn't support this
$uri = "https://graph.microsoft.com/beta/groups?`$filter=ExpirationDateTime ge 2014-01-01T00:00:00Z AND groupTypes/any(a:a eq 'unified')&`$count=true"
[array]$Groups = Get-GraphData -AccessToken $Token -Uri $uri
Once we have the set of groups, it’s simple to create a PowerShell list containing the renewal details and export the data to a CSV file. As a bonus, we use the same data to create a HTML version of the report. As a bonus, the script connects to the Graph to use the Get-MgOrganization cmdlet to fetch the display name for the tenant.
Posting to SharePoint Online from Azure Automation
To connect to SharePoint Online and post the CSV and HTML files, I chose the SharePoint PnP module. To post to a document library in a site, we must use the credentials of a site member (I couldn’t find another method to add files). To do this, we create a credential object as a resource in the Azure Automation account. The object stores the username and password for the account to use when authenticating. Obviously, this account can’t use multi-factor authentication as there’s no way to respond to an MFA challenge. We also need to know the target site and where in the document library to create the files.
This code fetches the credentials from the automation account and uses them to connect to the target site. After defining a title for the new file, the Add-PnpFile cmdlet adds the file to the target folder.
# Insert the URI for the target site here.
$SiteURL = "https://office365itpros.sharepoint.com/sites/Office365Adoption"
# Insert the credential you want to use here... it should be the username and password for a site member
$SiteMemberCredential = Get-AutomationPSCredential -Name "Credential1"
# Connect to the SharePoint Online site with PnP
$PnpConnection = Connect-PnPOnline $SiteURL -Credentials $SiteMemberCredential -ReturnConnection
# Add a document title
$Values = @{"Title" = 'Microsoft 365 Groups Expiration Report (CSV)'}
# Add the file to the General folder
$FileAddStatus = (Add-PnPFile -Folder "Shared Documents/General" -Path $SourceDocument -Connection $PnpConnection -Values $Values | Out-Null)
Many reports exist of people having problems using the Add-PnPFile cmdlet with Azure Automation (here’s an example) where running the runbook in the test pane resulted in errors like “the runbook job was attempted 3 times, but it failed each time.” Debugging PowerShell code for runbooks can be challenging at times. It helps to have a regular PowerShell session open to test basic commands, and the patience to search through numerous internet pages to track down possible solutions.
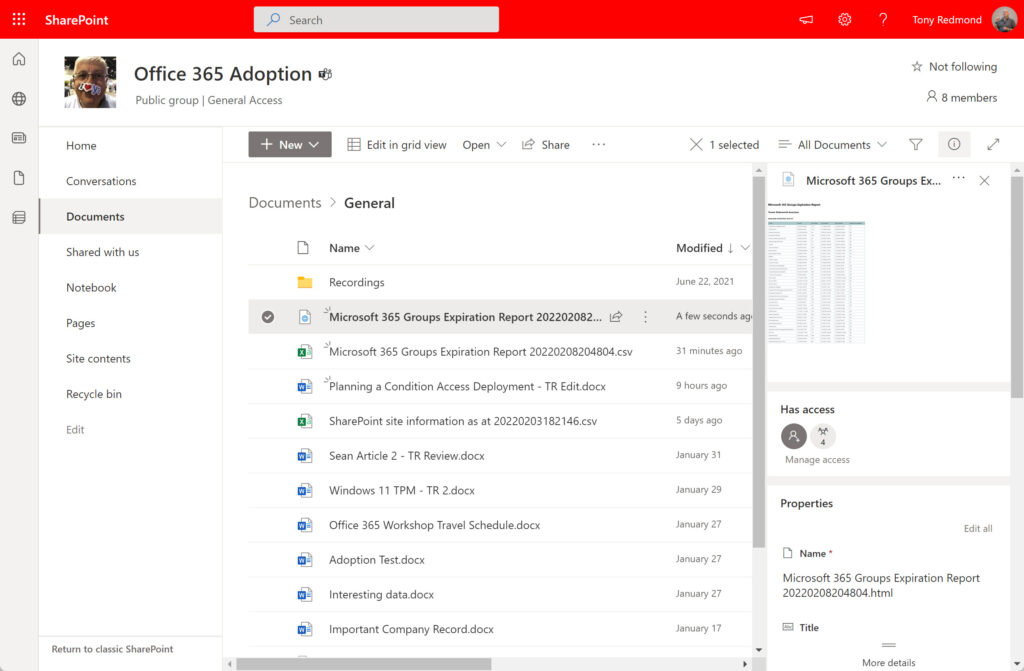
In this case, using a variable to receive the result of the cmdlet and adding a pipe to Out-Null seem to resolve the issue and the code works reliably (at least, in my tests). You can see the files created in the document library in Figure 1.
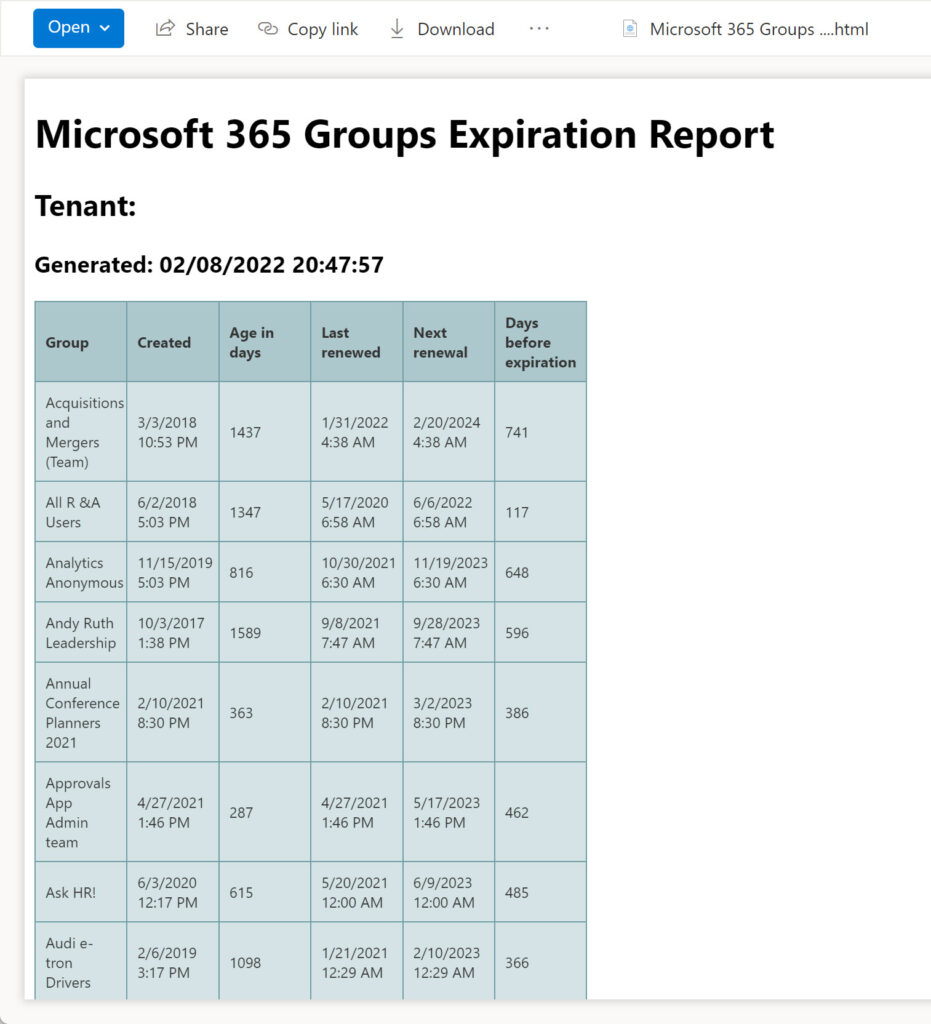
Once the files created by Azure Automation are in SharePoint Online, they can be distributed or shared elsewhere as needed, just like any other SharePoint file (Figure 2).
Publishing and Scheduling
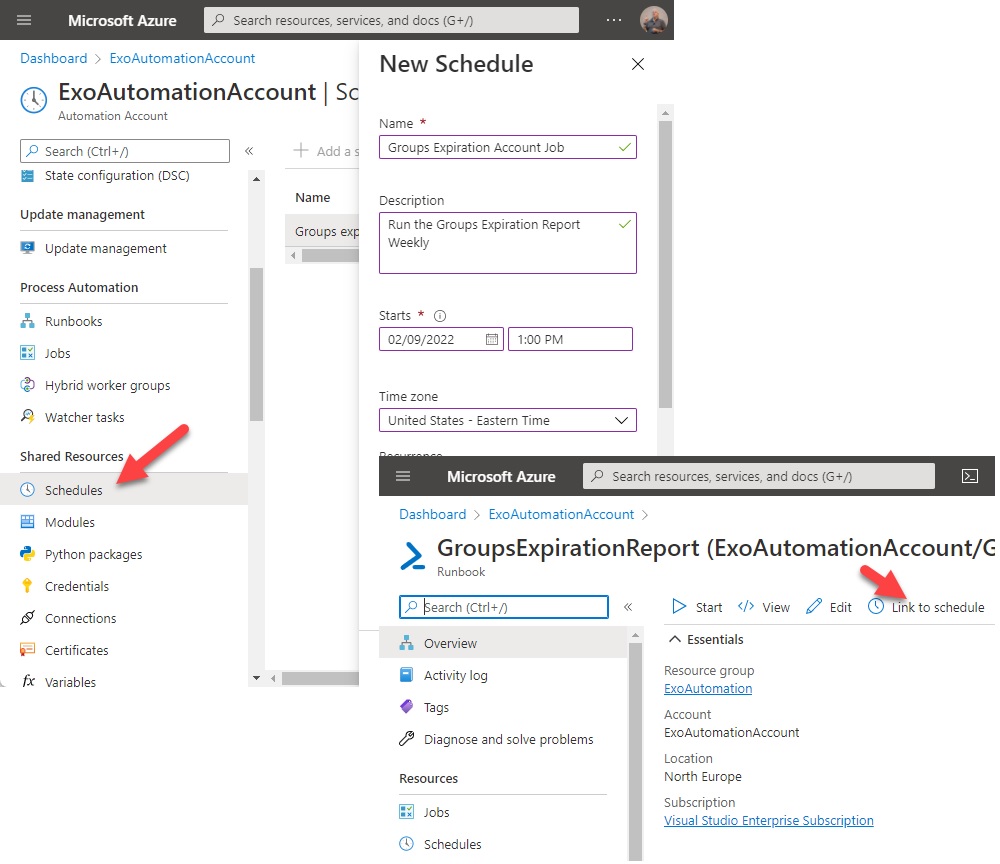
To keep an eye on expiring groups, we should run the report periodically. Azure Automation makes this easy by supporting job scheduling on a one-off or recurring basis. You’ll need to publish the runbook to make it available for scheduling. Once this is done, create a new schedule as a resource in the automation account. Now select the runbook and use the Link to schedule tab to link the runbook to the schedule (Figure 3).
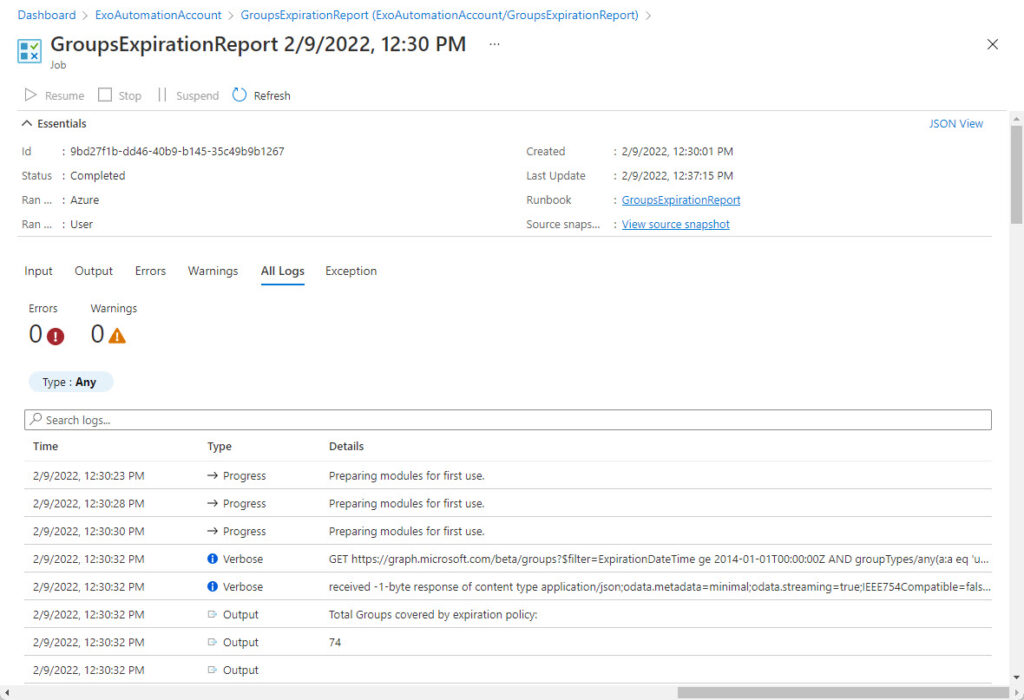
After the job finishes, you can check its outcome and outputs in the Jobs section for the runbook. I usually set the logging and tracing for a runbook to capture verbose records and to log progress records, which is what you see in Figure 4. Of course, the true result of the job is measured by its success in generating the files in SharePoint Online, and that’s easily checked by going to the destination folder to see if the expected files are present.

No Posting to Teams Channels
Disappointingly, you can’t post a message to a Teams channel containing the report. Although the Microsoft Graph PowerShell SDK includes a New-MgTeamChannelMessage cmdlet capable of posting messages to channels, it only works with delegated permissions, as does the underlying Graph API. In other words, a signed-in user must be present to perform the action. That user must also be a member of the team hosting the target channel. In an interactive session connected to the Microsoft Graph PowerShell, a command like this works splendidly and posts the HTML report to a channel.
$Message = (New-MgTeamChannelMessage -TeamId $TeamId -ChannelId $ChannelId -Body @{Content = $HTMLContent; ContentType = "html"} -Subject "Microsoft 365 Groups Expiration Report" -Importance "High")
However, for an Azure automation account to be able to post a message to a team channel, the Graph ChannelMessage.Send permission would need to support both delegated and application use. A viable alternative is to use the Submit-PnpTeamsChannelMessage cmdlet from the PnP module after connecting to PnP with account credentials. This article explains the details.
Searching for Better Authentication
Humans often react better when prompted, which is why sending email reminders is so common. It would be easy to amend the script to distribute the groups expiration report by email. However, being able to post files to SharePoint Online is a convenient way to store the output from automation jobs and is preferable in some respects to distributing files via email (for instance, the output is in a shared repository rather than a personal mailbox). It’s also easier to store files in SharePoint than I suspect some developers might imagine.
I don’t claim that my code is perfect. It’s more of an exploration of a principal than anything else. I’d like to have found an easy way to use certificate-based authentication to load files into a SharePoint Online document library. It seems like it’s possible to use an automation account to perform administrative operations, but not to create new files in a document library. Perhaps one of the SharePoint gurus out there can set me right on this point! But that’s another day’s work.
Update: See this article for examples of how to post to Teams channels using the incoming webhook connector and the PnP module.


Hi Tony. Another great article!
When it comes to authentication to SharePoint Online or Microsoft Graph it is now recommended to use Managed Identity. I have tested it and works great.
Here is the link to the article:
https://pnp.github.io/powershell/articles/azureautomationrunbook.html#by-using-a-managed-identity
Regards!
The article was written in 2022. Now in 2024 I would absolutely use a managed identity.
Hey Tony,
I like the post. Can we upload the CSV files from Azure File Shares to SharePoint online using Azure RunBook powershell?
I’m sure that you can…
But is there a better way to get files from file shares to SharePoint Online? Like Mover https://learn.microsoft.com/en-us/sharepointmigration/mover-plan-migration?WT.mc_id=M365-MVP-9501
Hi Tony,
I like this post and the idea.
However, is there a way I can iterate through and post them into a dataverse.
I’m running it on Azure Automation runbooks.
Thanks.
I haven’t tried posting information extracted from Office 365 to a dataverse, but if an API is available to Azure Automation to do the job, then go for it!
Hi Tony,
I like this post and the idea of posting a file directly from Azure Runbooks to SharePoint Online. I have an application I am working on where this would be helpful. One thing I did not get from the above was how/where the file is initially created … how/where do you set the $SourcePath parameter?
$FileAddStatus = (Add-PnPFile -Folder “Shared Documents/General” -Path $SourceDocument -Connection $PnpConnection -Values $Values | Out-Null)
Any chance you could share a code snippet that shows how to do this from within an Azure runbook? Or point me to an example?
Thanks
The file was originally created as a PowerShell List object and then exported in CSV and HTML formats. Here’s how the CSV file was created:
$Report | Sort “Days before expiration” | Format-Table Group, “Last renewed”, “Next renewal”, “Days before expiration” -AutoSize
# Create data to store in SharePoint Online
# First, the CSV file
$SDate = Get-Date -format yyyyMMddHHmmss
[string]$SourceDocument = “Microsoft 365 Groups Expiration Report ” + $SDate + “.csv”
[string]$HTMLDocument = “Microsoft 365 Groups Expiration Report ” + $SDate + “.html”
$Report | Sort “Days before expiration” | Export-CSV -NoTypeInformation $SourceDocument
# Connect to PnP using the credentials fetched from Azure Key Vault
$PnpConnection = Connect-PnPOnline $SiteURL -Credentials $UserCredentials -ReturnConnection
# Add a document title
$Values = @{“Title” = ‘Microsoft 365 Groups Expiration Report (CSV)’}
# Add the file to the General folder
$FileAddStatus = (Add-PnPFile -Folder “Shared Documents/General” -Path $SourceDocument -Connection $PnpConnection -Values $Values | Out-Null)
$NewFileUri = $SiteUrl + “/Shared Documents/General/” + $HTMLDocument
You can use Submit-PnPTeamsChannelMessage to submit a Teams message with PnP PowerShell. Connect-PnPOnline will let you authenticate with a thumbprint. That should get you access to Teams and SharePoint.
Ping me if you want any help.
Tk
I will…
Hey Tony,
Nice idea regarding the SharePoint storage location. Will look into that
Regarding Teams what’s about using a webhook? This should do the job or is there any problem which I‘m not aware of?
Cheers
Christoph
Good idea to use a webhook. I shall investigate.
I have had a look and think that it is certainly possible to post to a channel via a webhook. However, you run into problems with the amount of data supported by the cards. It is impossible to fit the amount of information included in a report like the groups expiration report and I hit some problems with HTML formatted data too. I’m sure the technique could come in handy in some instances, but not in this situation.