Runbook Useful in Some Circumstances
Update: This raticle is now a little outdated. Azure Automation doesn’t support RunAs accounts any longer and the Exchange Online management PowerShell module now supports managed identities.
Practical365.com articles often include PowerShell code to illustrate the principles of working with Microsoft 365 data to automate common administrative operations. Sometimes, readers ask if it’s possible to use the code with Azure Automation runbooks. Given a classic consultant’s answer, my response is “it depends.” Among the dependencies are what the code does, the PowerShell modules involved, and if a script is interactive or not. Sean McAvinue covers the basics in his article about implementing a timed disclaimer in Exchange Online transport rules, but I wanted to work through the process and document how to create an Azure automation account and some runbooks. Here’s what I discovered.
Update: See this article for more information about using Exchange Online with Azure Automation and Managed Identities.

The Role of Azure Automation Accounts
Azure Automation is the capability to run work using virtual machines. To use Azure Automation, you must have an Azure Automation account associated with an Azure subscription (to pay for the resources you consume). In turn, the automation account supports an Azure RunAs account, used for authentication to gain access to the resources needed to do work, such as running a PowerShell script in a runbook. To get things going, I:
- Signed into the Azure portal with an account holding the Azure Owner role for the subscription to use for the automation account.
- Created a new automation account. You need to specify the Azure subscription at this point.
- Created a RunAs account. This results in the creation of an application and service principal in Azure AD, which serves as the basis for authentication and permissions. Azure creates a X.509 certificate (a certification asset in the account) that the service principal can use for authentication for one year (the certificate is easily renewable). At present, Exchange Online doesn’t support Azure managed identities, so using a RunAs account is approach to take. Finally, a connection asset called AzureRunAsConnection becomes available. We’ll see how this asset is used later.
After creating the RunAs account, record the information reported by Azure for the application identifier and service principal object identifier. We’ll need these details later to assign permissions via PowerShell.
Read about how to use a runbook with the Microsoft Graph SDK for PowerShell.
Using Exchange Online PowerShell in Azure Automation
Exchange Online has the most complete support for PowerShell of any Microsoft 365 workload. Apart from mailboxes and other aspects of email management, the module spans Microsoft 365 groups and, if you connect another session to the compliance endpoint, includes cmdlets to manage information governance and other compliance solutions. It therefore makes sense to start any exploration of Azure Automation for Microsoft with Exchange Online.
If you’ve used PowerShell to run Microsoft Graph queries, you know that you need to register an app to hold the permissions required to access user and other data. In most situations, apps need to use application permissions to perform tasks like reading user profiles, group information, and so on. Administrators must grant consent for apps to use application permissions.
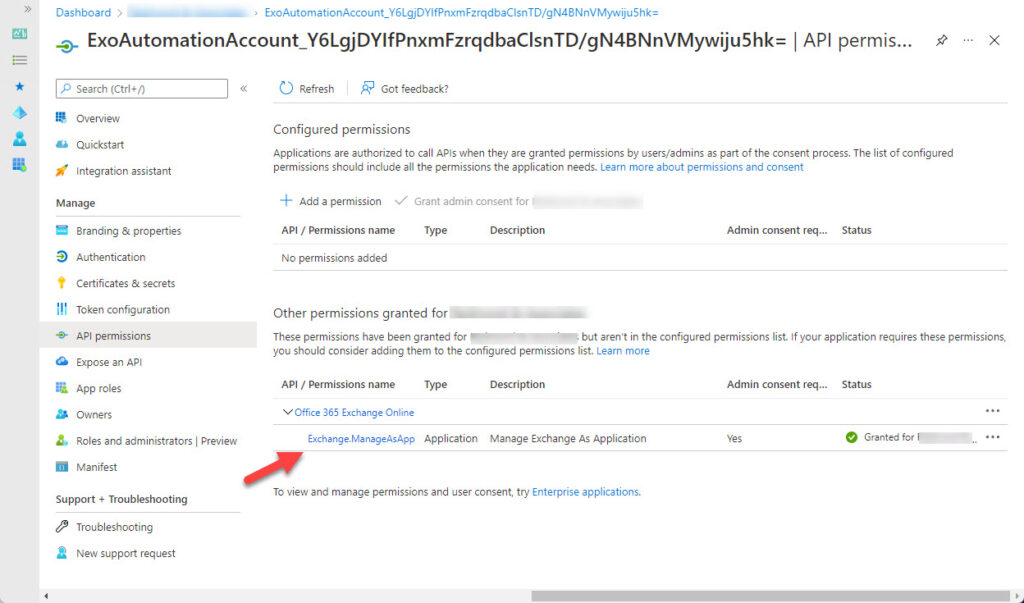
In the same way, before a RunAs account can use cmdlets in the Exchange Online management module, an administrator must grant consent for management access to Exchange Online. You can do this through the Registered Apps section of the Azure AD admin center in three steps:
- Select the app created for the RunAs account (its name will be the automation account plus a random string like ExoAutomationAccount_Y6LgjDYIfPnxmFzrqdbaClsnTD/gN4BNnVMywiju5hk=)
- Assign the ExchangeManageAsApp permission from the Office 365 Exchange Online API.
- Grant consent for the organization.
Figure 1 shows that the ExchangeManageAsApp permission is granted with consent.
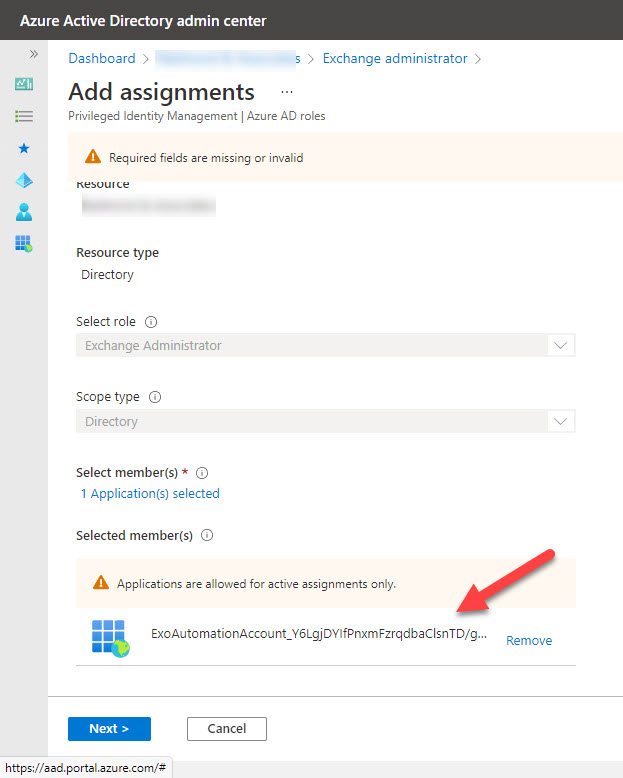
You must also add the service principal for the RunAs account to the Exchange Administrator role. You can do this in the Roles and administrators section of the Azure AD admin center (Figure 2).
Import the Exchange Online Management Module
The service principal for the RunAs account now has the appropriate permissions to act as an Exchange Online administrator. The next step is to allow the automation account to use the Exchange cmdlets. Remember that Azure Automation isn’t tied to specific machines, so you must import the Exchange Online management module to make it available as a shared resource for the automation account. When Azure Automation executes a runbook which calls Exchange cmdlets, it loads the module automatically.
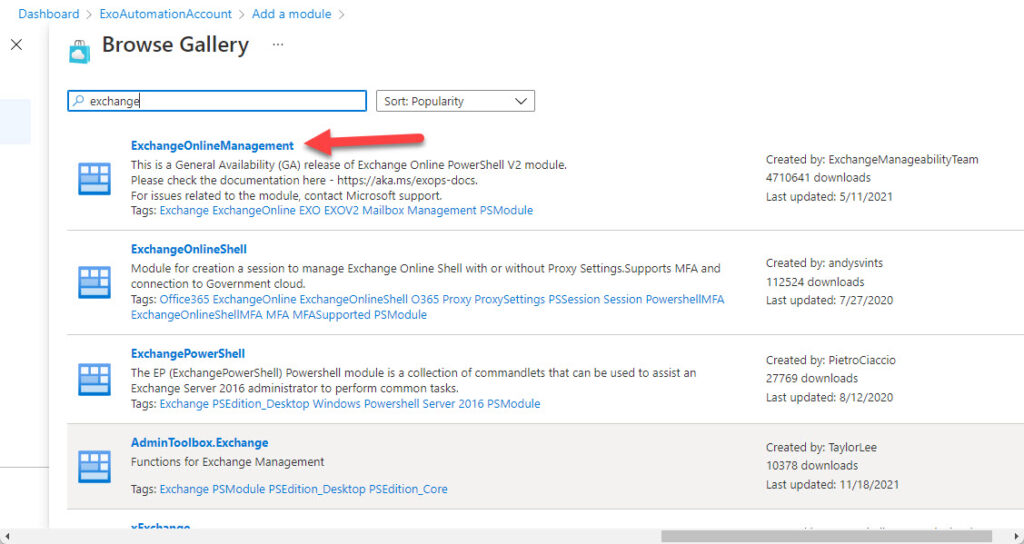
First, find Modules in the shared resources section (many modules are already preloaded, but Exchange is not one). Then browse the module gallery to find the Exchange Online management module (Figure 3). Select the module, choose version 5.1 for the PowerShell runtime version, and then import the module. This will take a few minutes to complete. You can refresh the modules view to know when the import finishes.
Other Microsoft 365 modules are also available in the gallery, including Azure AD, Teams, and SharePoint Online. Many tasks require cmdlets from multiple modules, so depending on what you want to do, you might need to import other modules.

Creating and Testing a Runbook
Runbooks are what Azure Automation uses to get work done. In this instance, you could think of a runbook as a complete PowerShell script ready to run in a sandbox. You create new runbooks under the Process Automation section for the automation account. Azure loads several tutorial runbooks into the account to help people get started with the technique.
To test things out, I took a script which scans the audit log to report group deletion events and copied the code into a new PowerShell runbook. Before the copied code, I inserted some lines to create a session to the automation connection (AzureRunAsConnection) and connect to Exchange Online and authenticate using the certificate thumbprint created for the account using the session with the automation connection.
$Session = Get-AutomationConnection –Name AzureRunAsConnection
$Tenant = 'office365itpros.onmicrosoft.com'
Connect-ExchangeOnline –CertificateThumbprint $Session.CertificateThumbprint –AppId $Session.ApplicationID –ShowBanner:$false –Organization $Tenant
Remember, our automation account has the permission to manage Exchange as an app and the service principal is a member of the Exchange administrator role group, so once the runbook authenticates, it can run any Exchange management cmdlet.
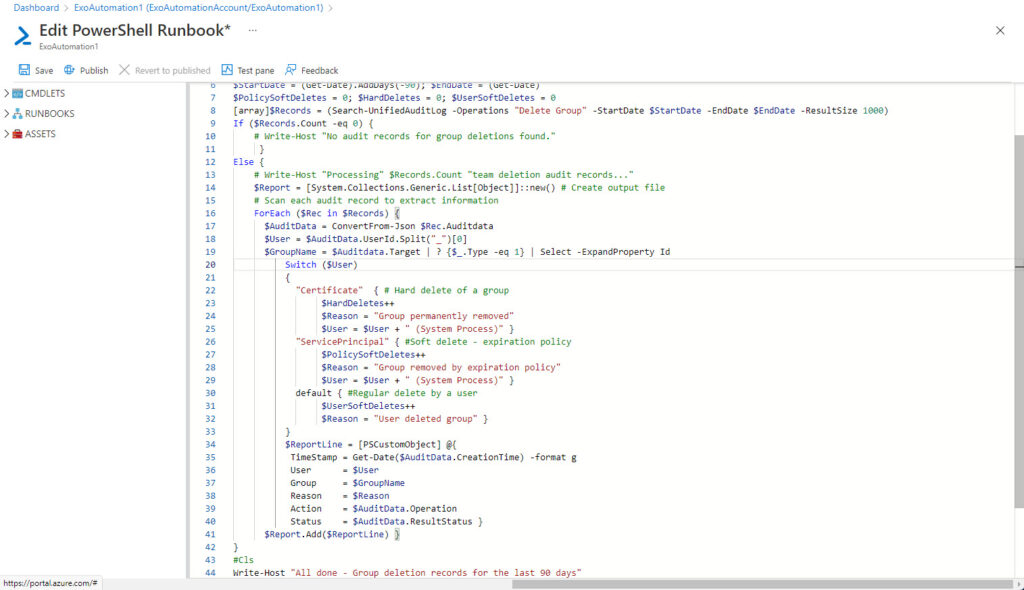
If you’ve ever used a PowerShell ISE or the Cloud Shell editor to work with PowerShell code, the runbook editor will be familiar (Figure 4). Transferring code from interactive use to automation requires the removal of any user interaction cmdlets (like Read-Host), while Write-Output replaces Write-Host. Remember, the code runs in a headless sandbox, so there’s no point in including user interactions. When you’re ready, save the code and click the Test pane icon.
The Test pane allows you to execute the runbook and check that your code works. Click start to begin. Azure Automation queues the runbook and when a resource (a sandbox machine) is available, the code runs. You won’t see anything until an error happens or the script finishes, at which point the Test pane displays any output (Figure 5).
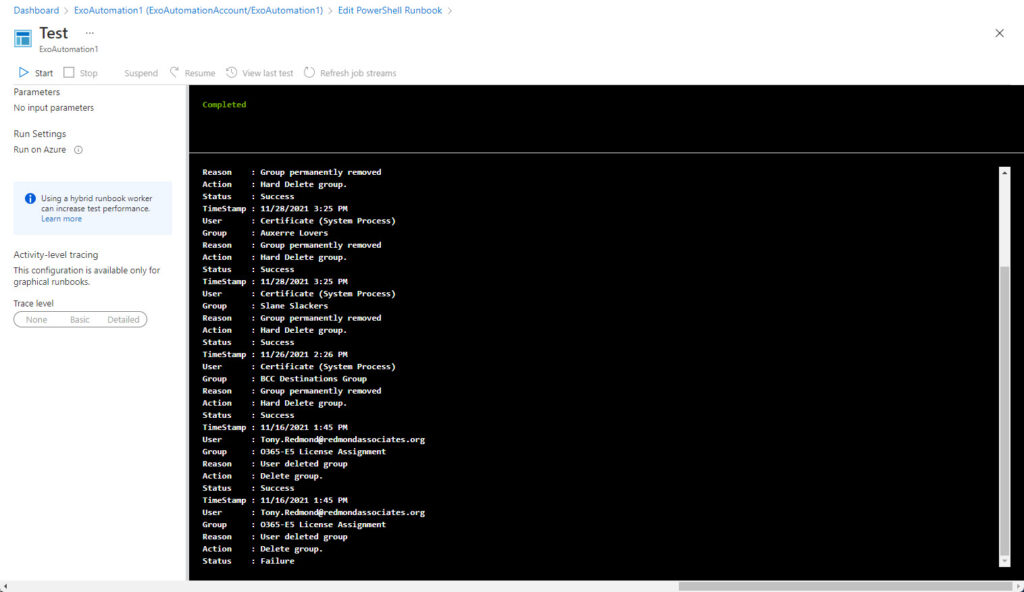
If you run a script multiple times over a short period, Exchange Online might throttle your connection. When this happens, it’s time for a cup of coffee. The throttling mechanism will lapse after a few minutes, and you’ll be able to try again. Alternatively, include the Disconnect-ExchangeOnline cmdlet in your script to close off the session.
Once you’re sure the code works, you can publish the runbook (click the Publish icon when editing the code as shown in Figure 4). You’ll then have a draft version of the runbook for further development and a published version that can be run in different ways. For instance, you can schedule Azure Automation to execute the run once at a certain date and time or run at intervals.
Certificate-based Authentication for Security and Compliance
The description so far covers cmdlets in the main Exchange Online management module. The module also includes the security and compliance cmdlets, which become usable after running the Connect-IPPSSession cmdlet. These cmdlets don’t currently support certificate-based authentication, but they soon will. According to Microsoft 365 message center notification MC316448 (Jan 21, 2022), the capability should be available everywhere by early March.
For now, if you want to use the security and compliance cmdlets, you can add a username and password credential to the automation account. The account can’t use multi-factor authentication (MFA) and must be an Exchange administrator. The lack of MFA makes this a less than desirable method, but serves to demonstrate that Azure Automation supports different types of credentials. I’ve used this method with other modules that don’t support certificate-based authentication, like the SharePoint Online management module.
This code accesses a stored username and password stored as a credential in the Automation account and named O365Password and uses the credential to connect to the security and compliance endpoint:
$O365Cred = Get-AutomationPSCredential -Name "O365Password"
Connect-IPPSSession -Credential $O365Cred
Automating with Graph APIs
Of course, Exchange Online cmdlets don’t cover all the data you might like to access, but a good chance exists that a Microsoft Graph API does. As an example, I took a script used to report sign-in information for service principals and imported it into a runbook. Normally, when you write a script to interact with Graph API queries, a preamble is present to identify a registered app, tenant, and app secret (or certificate) used to authenticate and return an access token. When you use a runbook, we use the automation account instead of a registered app and the certificate thumbprint instead of an app secret. Therefore, we replace the normal preamble with code to connect like this:
# Set up a connection
$Connection = Get-AutomationConnection -Name AzureRunAsConnection
# Get certificate from the automation account
$Certificate = Get-AutomationCertificate -Name AzureRunAsCertificate
# Get an access token using the Get-MsalToken cmdlet from the MSAL.PS Module
$GraphConnection = Get-MsalToken -ClientCertificate $Certificate -ClientId $Connection.ApplicationID -TenantId  $Connection.TenantID
# Populate the headers for our Graph queries
$Header =  @{Authorization = "Bearer $($GraphConnection.AccessToken)"}
This code uses a module called MSAL.PS (Microsoft Authentication Library) to get an access token. You can read more about the module here.
Remember that the service principal for the RunAs account needs permissions to access data. In this instance, an administrator must grant it consent for the Directory.Read.All and AuditLog.Read.All application permissions. The access token confirms that the permissions are available, so we can then run:
$Uri = "https://graph.microsoft.com/beta/auditLogs/signIns?&`$filter=createdDateTime ge " + $StartDate + " and createdDateTime le " + $EndDate + " and signInEventTypes/any(z:z eq 'servicePrincipal')"
[array]$SpSignInData = Invoke-RestMethod -Method GET -Uri $Uri -ContentType "application/json" -Headers $Header
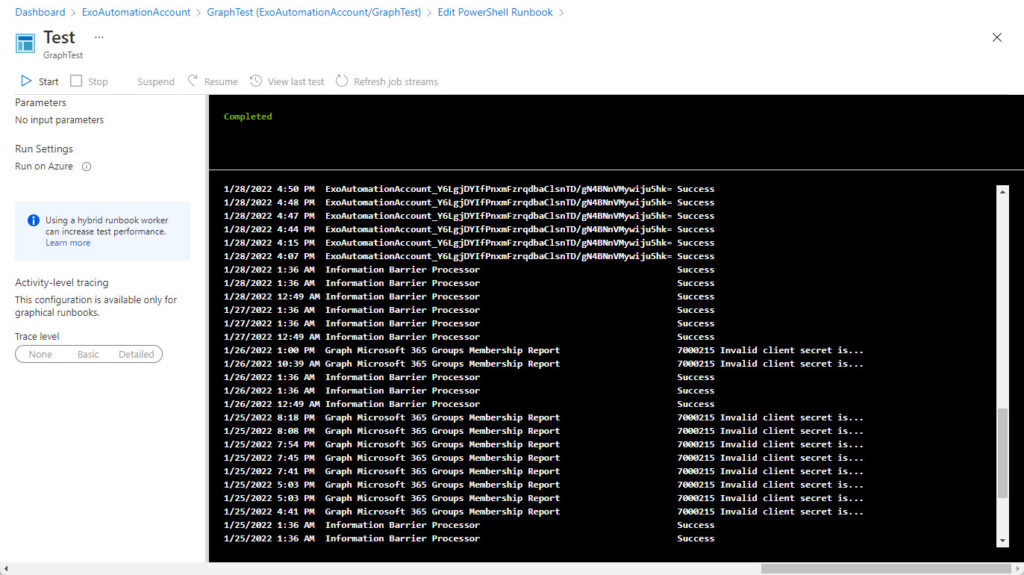
After that, it’s a matter of processing whatever the Graph query returns and reporting it. Figure 6 shows how the data appears in the Test pane.
Automation for the Enterprise
My perspective is that the best use of Azure Automation runbooks is to process large amounts of data in jobs likely to take extended periods, like taking daily extracts of data from the Office 365 audit log and writing it into an external repository for long-term retention. In essence, this is an enterprise play.
Other ad-hoc administrative procedures, like checking what Microsoft 365 groups have no owners, or what teams are missing sensitivity labels, are better run interactively, unless an organization performs these checks periodically. In that case, a runbook is a good choice.
The things to remember are:
- You need an Azure subscription. You won’t spend much unless your data quantities are large, but you still must have a subscription. I managed to spend five cents with runbooks developed during the writing of this article.
- No user interaction occurs in scripts. For instance, you can’t prompt a user to confirm that an operation should proceed.
- Runbooks execute on sandbox machines. If you want to save the results of processing as a file, you must do so in a network location. Otherwise, you could send email or post a message to a Teams channel.
Just as with any other technology, genius lies in leveraging the strengths of Azure Automation while minimizing its downsides. Like any tool, once you know how to use them to get real work done, you’ll probably find a use for a runbook or two. Exchange Online and other Microsoft 365 PowerShell modules are accessible and usable in runbooks, as are Microsoft Graph API queries, so lots of potential exists. Some practice and trial and error will soon reveal if Azure Automation runbooks are powerful enough to become a critical tool in your tenant administration toolset.


Guys make sure you use the Object (principal) ID and not the Client ID of the managed identity , using the client ID will result in UNAUTHORIZED.
Connect-ExchangeOnline -ManagedIdentity `
-ManagedIdentityAccountId “OBJECT PRINCIPALID” `
-Organization $organization `
-ShowBanner:$false
When I use an automation account to access Exchange Online, I don’t specify the managed identity account identifier.
Connect-ExchangeOnline -ManagedIdentity -Organization $Organization
is sufficient because invoking the managed identity switch will cause Exchange to use the automation account that the runbook belongs to.
I did a recent primer on this topic at https://office365itpros.com/2025/02/10/azure-automation-exchange-primer/
Hi Tony,
It appears that microsoft has updated the exchange module to allow for Managed identities to be used to connect to exchange online:
https://learn.microsoft.com/en-us/powershell/exchange/connect-exo-powershell-managed-identity?view=exchange-ps
Yes. Covered in https://practical365.com/azure-automation-managed-identity-exo/.
This is the problem with covering a cloud service like Microsoft 365 which changes all the time. I’ll update that post, but when you have thousands of posts to manage, keeping them all updated is a horrendous task. Which is why we have the Office 365 for IT Pros eBook. https://gum.co/O365IT/
Hi Tony, thanks for the article, I am getting this error after foloowing your instructions “Failed
The term ‘Update-ModuleManifest’ is not recognized as the name of a cmdlet, function, script file, or operable program. Check the spelling of the name, or if a path was included, verify that the path is correct and try again.” Do you have any idea what the cause might be?
According to the Get-Command cmdlet, Update-ModuleManifest is part of the PowerShellGet module. You need that module to update from the PowerShell gallery: https://learn.microsoft.com/en-us/powershell/scripting/gallery/installing-psget?view=powershell-7.3
Hi Tony great article. can we supply variables to our powershell scripts using service now or you can point me in the right direction. Thanks.
The Set-AzAutomationVariable https://learn.microsoft.com/en-us/powershell/module/az.automation/set-azautomationvariable?view=azps-9.1.0 cmdlet is available to set variables for an automation account. You’d need to do this before running a script. the Get-AzAutomationVariable cmdlet https://learn.microsoft.com/en-us/powershell/module/az.automation/get-azautomationvariable?view=azps-9.1.0 retrieves the variable value when the script runs.
Hi Tony, works great.
Well for the first 1000 users anyway.
Do you know if there is a way around the 1000 limit I get using get-user -resultsize unlimited.
Get a error “Invalid pagination request.” If I use -resultsize 1000 it works OK. -resultsize 1001 then Error.
Do you mean Get-MgUser? If so, Get-MgUser -All returns all available user accounts.
If you mean the Get-User cmdlet, an error after a certain number of results sounds like a bug and I would report it as such to Microsoft (or use Get-MgUser!)
Its the Get-User cmdlet. I may have to look at using Get-MgUser from the graph api.
Interesting. Get-User works OK interactively but you’ve found that it doesn’t when executed by an Azure Automation runbook? If so, that’s definitely a bug. But Get-User is a very old cmdlet and Get-MgUser is probably a better bet going forward…
I did everything according to your instructions and during the test he says: Failed
UnAuthorized (UnAuthorized)
any suggestions?
Ah, the joys of online debugging when no access is available to your tenant. I don’t know what’s happening, but the error indicates that the app (or Azure Automation account) doesn’t have the permission to run an operation. What command are you trying to execute when this error happens?
$Session = Get-AutomationConnection –Name AzureRunAsConnection
$Tenant = ‘mytenant.onmicrosoft.com’
Connect-ExchangeOnline –CertificateThumbprint $Session.CertificateThumbprint –AppId $Session.ApplicationID –ShowBanner:$false –Organization $Tenant
Get-Mailbox -ResultSize unlimited
$Session = Get-AutomationConnection –Name AzureRunAsConnection
works, I got SubscriptionId, ApplicationId, TenantId , CertificateThumbprint
Connect-ExchangeOnline faild
I have added the Exchange Online management module
It’s a permissions problem. Did you add the Exchange Online permission to the run as account?
Yes, I add the Exchange Online permission to the run as account
I don’t know what’s going on. It has to be a permission issue. Exchange is declining to let you run cmdlets because it doesn’t believe that the app you are using has the right to do so. Assigning the admin role to the run as account is the way to gain permission. Are you certain that the appid returned by the connection is the right app (the one assigned the permission)?
Hi Tony, this article says ‘Exchange Online doesn’t support Azure managed identities,’ and your other article here https://practical365.com/azure-automation-managed-identity-exo/ says that it doesn’t work yet.
But it does now work, just upload the module to the runbook and use:
connect-exchangeonline -managedidentity -Organization
So working fine for me with the latest EXO V2 module.
Microsoft will support managed identities in Exchange Online PowerShell V2.0.6. That version is still not generally available (I just checked the PowerShell gallery). The preview releases of 2.0.6 do support managed identities. I expect that V2.0.6 will GA very soon and then we will have formal support for managed identities with Exchange Online PowerShell.
For the record, Microsoft has just released V3.0 of the PowerShell module for Exchange Online management. https://techcommunity.microsoft.com/t5/exchange-team-blog/exchange-online-powershell-v3-module-general-availability/ba-p/3632543
FYI EXO V2 Module 2.0.6 preview 7 now has support for managed identities
I cover this in https://practical365.com/azure-automation-managed-identity-exo/. I’ll add a note to this article.
You’re going to hate me saying this, but I ran Set-Mailbox -Type Shared using the technique explained in https://practical365.com/azure-automation-managed-identity-exo/ and the runbook converted a mailbox from regular to shared…
This is the function I am using:
function setShared($email){
Set-Mailbox $email -Type Shared
output “Setting mailbox to shared”
}
and this is the error I receive when running the test pane:
A parameter cannot be found that matches parameter name ‘Type’.
I wish I knew how yours allowed it through!
I did nothing more than add the command to the runbook I already had to report shared mailbox licensing. The command worked, and the runbook proceeded to check the licensing status of the new shared mailbox!
Maybe don’t use a function… you probably don’t need it for a single line of code. Just insert Set-Mailbox -Identity $Email -Type Shared into the main flow of code and see if that helps. This is a wild guess on my part, but without seeing your code, it’s hard for me to do more than make guesses.
I figured it out, it was not set up with the administrative role that it needed, had to add it to recipient management so that it could have access to -Type
Fantastic article, I have a question on this. I have automation set up for our leaving employees and part of it sets their box type to shared, it does not seem to work in the runbook as it does through local powershell. What property can be called through set to convert a user box type?
I know that some issues existed (like https://docs.microsoft.com/en-us/answers/questions/48327/the-usage-of-set-mailbox-cmdlet-for-exchange-onlin.html). What command are you trying to use and I will try and reproduce the issue.
Hi Tony,
thank you for sharing this approach. That approach is an easy way to transform well-known methods to cloud based processing.
I understand
“Created a (classic) RunAs account”….
means that you need to create a classic RunAs account. But don’t you need to create a “modern” one to make use of the app registration?
Hi Jakob, you’re right. It is a modern RunAs account which is used. It looks like two important edits were not transcribed (by me) into the published text. This correction was one (along with extra text to outline the connection and certification assets created in the automation account); the other was some extra detail about making connection to Exchange Online and the role of the AzureRunAsConnection asset there.
Thanks for this nice article.
For organization using only M365 would not it be better to leverage Power Automate ? in order not get to the point to manage security of Azure etc..
Thanks
Not really. Power Automate depends on the availability of connectors and the functionality exposed through connectors. Although Power Automate can do a lot with these connectors, it cannot perform the kind of management processing (for example, update settings across thousands of mailboxes) that PowerShell is capable of doing interactively or when run through Azure Automation. It’s a case of picking the right tool for the job…
Great article!
I’m gonna try to apply on my environment.