Time to Take Time Off
Over the past year, the pandemic has disrupted traditional work patterns. With many working from home, many organizations now focus on how to help employees manage their work/life balance. Microsoft Viva Insights helps, but there are many steps admins can take using existing technology to support a wellbeing mindset in our organization. For example, an easy and effective change is to implement a transport rule to remind people that they have the “Right to Disconnect” when they receive an email outside work hours. This is a really simple process using a standard transport rule. However, while we can set a once-off activation and deactivation time for a given rule, this can’t be done natively on a recurring schedule.

Enter Azure Automation
To fill the gap, a straightforward PowerShell script can enable and disable the rule at certain times. There are various ways to schedule this. One of the easiest and most secure ways is to use an Azure Automation Account with a Run-as Account. If you have an Azure Subscription, you can create an Automation Account and utilize up to 500 minutes of run time per month for free; more details on pricing can be found here.
Alternatively, we can schedule the scripts as an on-premises task, but we lose out on the added security of using a Run-as Account to perform the tasks.
In this article, I’ll explain how to create the transport rule and schedule it with Azure Automation using the following steps:
- Create the Transport Rule
- Create an Automation Account and Run-as Account
- Assign Permissions to the Run-as Account
- Create the Automation Runbooks
- Create and Link a Schedule
Create the Transport Rule
Before we set up the Automation Account, let’s get our Transport Rule in place. Go to the transport section of the Exchange Online Admin Center (EAC) and create a rule like that shown in Figure 1:
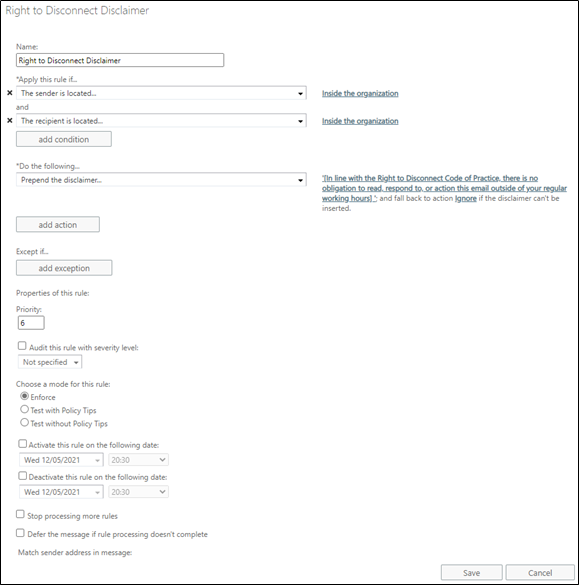
Make sure to set the rule as disabled so you don’t impact users before you’re ready!
Create an Automation Account and Run-as Account
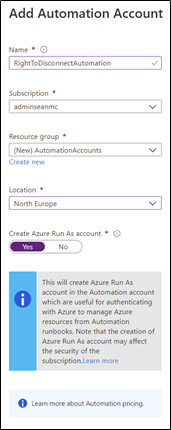
If you don’t already have an Automation Account, create one from the Azure Portal and assign it to a Subscription and Resource Group. Make sure the option to “Create Azure Run As account” is enabled:
After creating the Automation Account, open it up and navigate to the “Run as Accounts” blade to verify that the account is ready. Note the expiry date as you will need to remember to renew the account certificate on or before that date.
Assign Permissions to the Run-as Account
Next, we need to grant the appropriate permissions to our Run-as Account. To do this, open the Azure AD admin center and select the “App Registrations” blade. Under “All Applications,” search for the Automation Account and open it:
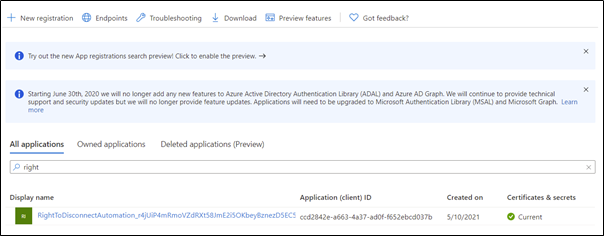
Copy the Application (client) ID value into the $AppId variable shown in the code below. Assigning the Exchange Online service principal to the app allows the service principal for the Run-as Account to manage Exchange Online:
$AppId = "xxxx-xxxx-xxxx-xxxx"  # Value copied from Azure AD
$AppServicePrincipal = Get-AzureADServicePrincipal -Filter "AppId eq $AppID"
$ExchangeOnlineServicePrincipal = Get-AzureADServicePrincipal -Filter " AppId eq '00000002-0000-0ff1-ce00-000000000000'"
New-AzureAdServiceAppRoleAssignment -ObjectId $AppServicePrincipal.ObjectId -PrincipalId $AppServicePrincipal.ObjectID -ResourceId $ExchangeOnlineServicePrincipal.ObjectID -Id "dc50a0fb-09a3-484d-be87-e023b12c6440"
After updating the code with the correct App ID, run the code in Azure AD PowerShell. The output should confirm the new role assignment has been created:

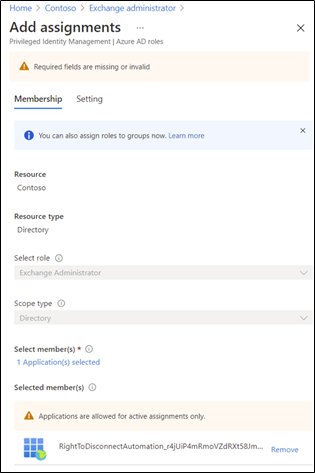
Next, open the Azure Active Directory Portal, navigate to “Roles and Administrators” and open the “Exchange Administrator” role. Select “Add assignments” and add the Run-as Account to the role. This role is needed to enable and disable the transport rule:
Create the Automation Runbooks
With an automation account prepared and assigned the required permissions, we can ready our Automation Account and Runbooks. Select the Automation Account and open the “Modules Gallery” blade so that we can add the ExchangeOnlineManagement module to allow our Runbook to connect to Exchange Online:

Select the module and click “Import” to import it into our Automation Account for use in our Runbooks.
Wait for the Module import process to finish. We can now create two Runbooks. One enables the transport rule, the other disables it.
To get started, from the “Runbooks” blade, select the option to “Create a Runbook” from the top of the page. As you can see in Figure 6, there are some tutorial Runbooks already present, but they can be ignored:
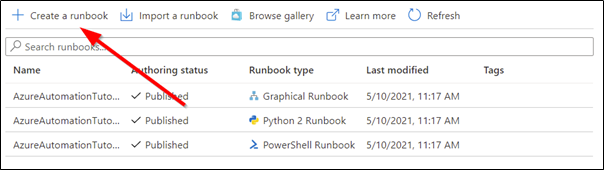
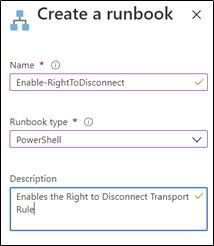
Give the Runbook a name and select PowerShell as the Runbook type, we’ll create the Runbook to enable the rule first:
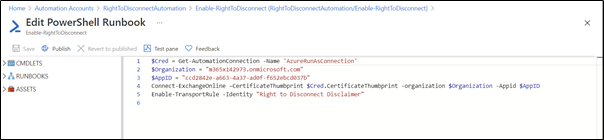
When the Runbook is created, open it up and select “Edit” from the top of the page. Add the following code to the Runbook to enable the rule. This code uses the Run-as Account certificate to authenticate to the Exchange Online Management endpoint and activate the transport rule.
Note:
Replace <TenantName> with your tenant domain (domain.onmicrosoft.com) and replace <AppID> with the Application ID we copied earlier.
Also, replace “Right to Disconnect Disclaimer” with the name of your transport rule.
$Cred = Get-AutomationConnection -Name 'AzureRunAsConnection'
$Organization = "TenantName"
$AppID = "AppID"
Connect-ExchangeOnline –CertificateThumbprint $Cred.CertificateThumbprint -organization $Organization -Appid $AppID
Enable-TransportRule -Identity "Right to Disconnect Disclaimer"
With this is place, your Automation Runbook should look like Figure 8:
We can test the code by running it in the “Test Pane” to verify the Runbook works as expected. When you’re happy the code works, click “Publish” to save the runbook.
Next, create a second runbook for disabling the rule, with the following slightly different contents:
$Cred = Get-AutomationConnection -Name 'AzureRunAsConnection'
$Organization = "TenantName"
$AppID = "AppID"
Connect-ExchangeOnline –CertificateThumbprint $Cred.CertificateThumbprint -organization $Organization -Appid $AppID
Disable-TransportRule -Identity "Right to Disconnect Disclaimer"
With both Runbooks in place, we can move on to creating a schedule for their execution.
Create and Link a Schedule
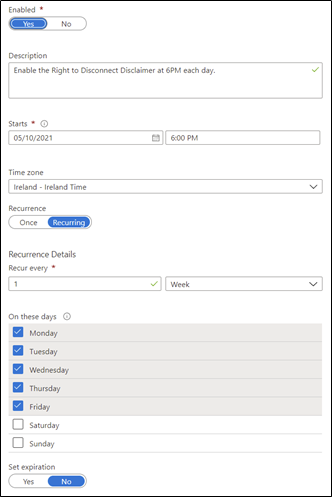
From the Automation Account page, open the “Schedules” page and click “Add a schedule”. Add a schedule for enabling the rule, in Figure 9, we set the rule to enable at 6 PM every weekday.
From the Automation Account page, open the “Schedules” page and click “Add a schedule”. Add a schedule for enabling the rule, in Figure 9 we set the rule to enable at 6 PM every weekday:
Then we create a second schedule to disable the rule every weekday at 8 AM:

With the Schedules in place, open each Runbook, and in the “Schedules” section, check the Schedule we just created.
Summary
In this article, I showed how to automate the activation and deactivation of a transport rule in Exchange Online using Azure Automation. Adding the “Right to Disconnect” disclaimer to internal emails that arrive outside of business hours is a great way of helping employees to disconnect at the end of the day to promote work/life balance. We have also laid a good foundation for using Azure Automation to perform other tasks in our Exchange Online environment without storing credentials or relying on on-premises scheduled tasks.


“If you have an Azure Subscription, you can create an Automation Account and utilize up to 500 minutes of run time per month for free; more details on pricing can be found here.”
does this mean, i can do this only in the scope of the Azure subscription of up to 500 minutes, away from this, there is extra costs?
Yes. You’ll need to tie the Azure account to a subscription with a valid credit card.
Hi Sean,
Have you noticed any oddities while using this.
On reviewing mailflow logs, Ive noticed that some PROD.OUTLOOK.COM servers can take up to 1 hour for the rule to take affect.
So if the rule is enabled at 6 PM, its often quite hit & miss for the first hour.
Example:
MS_SERVER01.PROD.OUTLOOK.COM applies the mail transport rule immediately, while MS_SERVER02.PROD.OUTLOOK.COM fails to do so for 50 minutes..
HI Jim,
Yes there is usually a delay when a rule is enabled so if it’s disabled at 6AM I would expect it to be fully complete by 7AM
Very Cool!
And thank you!