Add, Update, Cancel, and Remove Calendar Events
Everyone has a calendar. Most Microsoft 365 users pay attention to the items in those calendars to keep themselves on track for appointments and meetings, both business and personal. Most of the time, calendar access and updates are via clients like Outlook, but it is possible for apps to schedule calendar events, even if sometimes a little help from artificial intelligence is needed. In this article, I cover the basics of creating and managing calendar events with Microsoft Graph APIs, including how to create online meetings and how to report what’s in calendars.
If you browse the Graph API documentation, you’ll find references to events in the calendar resource type and event resource type. Calendars can include any of the signed-in user’s calendars, plus any calendar in any other mailbox. Events seem to be more focused on managing individual events. It’s somewhat confusing, especially when you discover that actions documented for the two resources act against the same endpoint. For example, creating an event is a post request against /users/{id | userPrincipalName}/calendar/events
With that confusing observation in mind, let’s create some events.

Permissions for Calendar Access
Calendars support the Calendars.ReadWrite permission (available in both delegated and application forms) for user calendars. In other words, in app-only mode, an app can use the application permission to read and write information in every calendar in a tenant, subject to any restrictions imposed by RBAC for applications. Access to group calendars is granted through the Group.ReadWrite.All delegated permission. No application permission is available for access to a group calendar, meaning that only members of a group can update the group calendar.
Creating an Appointment
An appointment is a calendar event with no invited participants. Conversely, meetings are events with invited participants. The identifier for the target user account must be included in the post request, so the first thing we do is identify that account. Because these commands are for illustrative purposes, I use the account that signed into an interactive Graph SDK session:
$UserId = (Get-MgUser -UserId (Get-MgContext).Account).Id
To create an appointment, you must populate the properties for the event (see the documentation) in the payload and post the request to the Graph Events endpoint. The properties for an appointment include the subject, start and end date and times (including the time zone for the event), some text for the event description (body), and the categories (string values to mark an event). As you can see, hash tables are commonly used to hold property values. Our event is for the TEC 2025 conference and includes a link to the event in the body of the appointment. If you want to add some complex content to the event body, it’s easier to compose the information in a file and read in the text using the Get-Content cmdlet than to attempt to hand-code HTML like shown below:
# Create simple calendar appointment
$EventBody = @{}
$EventBody.Add("contentType", "HTML")
$EventBody.Add("content", "The TEC 2025 comference event starts with registration and breakfast at 8:30AM. The first session will commence at 9:30AM. See
<a href='https://events.bizzabo.com/TheExpertsConference2025/home' target='_blank' rel='noopener noreferrer'>the TEC Web Site</a> for more details.")

$EventStart = @{}
$EventStart.Add("dateTime", "2025-09-30T09:00:00")
$EventStart.Add("timeZone", "Central Standard Time")

$EventEnd = @{}
$EventEnd.Add("dateTime", "2025-10-01T17:00:00")
$EventEnd.Add("timeZone", "Central Standard Time")

$EventLocation = @{}
$EventLocation.Add("displayName", "Marriott City Center Hotel, Minneapolis")

# Bring all the event details together in a hash table for the payload
$EventDetails = @{}
$EventDetails.Add("subject", "The Experts Conference (TEC) 2025 – Best Conference Ever")
$EventDetails.Add("body", $EventBody)
$EventDetails.Add("start", $EventStart)
$EventDetails.Add("end", $EventEnd)
$EventDetails.Add("location", $EventLocation)
$EventDetails.Add("allowNewTimeProposals", $true)
$EventDetails.Add("categories", @("Conference", "Travel"))
$EventDetails.Add("transactionId", (New-Guid))
The TransactionId property is set to be a Guid. It’s not mandatory to include a transaction identifier, but its presence will stop an app from creating the same event multiple times.
After preparing the payload, we post the request to create the event:
$Uri =("https://graph.microsoft.com/v1.0/users/{0}/calendar/events" -f $UserId)
$NewEvent = Invoke-MgGraphRequest -Method POST -Uri $Uri -Body $EventDetails
A successful request returns details of the new event into the $NewEvent variable. The identifier for the event ($NewEvent.Id) is essential to update, cancel, or remove the event afterwards. The event is added to the default calendar. If you want to add the event to a different calendar, include the identifier for the calendar as noted in the documentation.
Adding Event Participants
If the event is a meeting, add an array of hash tables containing the details of meeting participants, including whether they are optional or required. The array is added to the payload used to create the event. This code creates an array to hold the name, email address, and status for each participant. It then loops through the array to build the two hash tables for each participant, and updates the array used in the payload.
# Create hash table for the payload
$EventDetails = @{}
# array with details of event participants
$ParticipantsArray = @(
 @{ name = "Kim Akers"; emailaddress = "kim.akers@office365itpros.com"; state = "required" },
 @{ name = "Lotte Vetler"; emailaddress = "lotte.vetler@office365itpros.com"; state = "optional" },
@{ name = "Otto Flick"; emailaddress = "otto.flick@office365itpros.com"; state = "required" }
)

# Create hash tables for each participant
$EventAttendees = @()
foreach ($Participant in $ParticipantsArray) {
    $ParticipantHash = @{
        address = $Participant.emailaddress
        name    = $Participant.name
    }

    $EventAttendee = @{
        emailaddress = $ParticipantHash
        type         = $Participant.state
    }

    $EventAttendees += $EventAttendee
}
# Add the attendees to the event
$EventDetails.Add("attendees", $EventAttendees)
After adding the attendees and the other details to the payload, post the request to create the event. Or if you’re updating an existing event, use a patch request (see example below).

Make the Meeting an Online Event
To make a meeting an online event, set the isOnlineMeeting property to true and update the onlineMeetingProvider property with the name of the online service. In most cases, the meeting provider is “teamsForBusiness.” Then add whatever other properties are needed for the meeting, like turning a reminder on (here we set the reminder for 90 minutes before the meeting).
If you need to update the participant list, construct an array of the complete set of participants as before and pass it in the attendees property. Finally, patch the meeting with the updated properties:
$EventDetails = @{}
$EventDetails.Add("isOnlineMeeting", $true)
$EventDetails.Add("onlineMeetingProvider", "teamsForBusiness")
$EventDetails.Add("isReminderOn", $true)
$EventDetails.Add("reminderMinutesBeforeStart", 90)

$Uri = ("https://graph.microsoft.com/v1.0/users/{0}/events/{1}" -f $UserId, $NewEvent.Id)
$UpdatedEvent = Invoke-MgGraphRequest -Uri $Uri -Method PATCH -Body $EventDetails
Recurring Events
Many events occur using a regular cadence, such as every Monday at 9:30 AM for 45 minutes to review the status of a project. In scheduling terms, the recurrence for an event is defined as a pattern and range. The recurrence pattern defines the frequency (weekly, monthly, etc.), the days of the week an event can occur on, and the interval between events. The recurrence range defines the date range for a recurring event. The pattern and range are defined in hash tables that are then combined into a recurrence hash table that’s added to the event properties.
For example, this code defines a recurrence pattern for a weekly meeting that takes place every Monday. The start and end time for the meeting is defined in the start and end properties for the event and isn’t repeated here. The recurrence range defines the first meeting in the series to happen on the first Monday after April 21, 2025, and the last in the series will happen before or on May 21, 2025.
$Recurrence = @{}

$Pattern = @{}
$Pattern.Add("type", "weekly")
$Pattern.Add("interval", 1)
$Pattern.Add("month", 0)
$Pattern.Add("dayOfMonth", 0)
$Pattern.Add("daysOfWeek", @("monday"))
$Pattern.Add("firstDayOfWeek", "monday")
$Pattern.Add("index", "first")

$Range = @{}
$Range.Add("type", "endDate")
$Range.Add("startDate", "2025-04-21")
$Range.Add("endDate", "2025-05-21")
$Range.Add("recurrenceTimeZone", "Central Standard Time")
$Range.Add("numberOfOccurrences", 0)

$Recurrence.Add("pattern", $Pattern)
$Recurrence.Add("range", $Range)

$EventDetails.Add("recurrence", $Recurrence)
Figure 1 shows the first instance in the recurring series, scheduled for 21 April 2025. As discussed earlier in this article, event properties like the location, categories, body, and attendees are set in code.
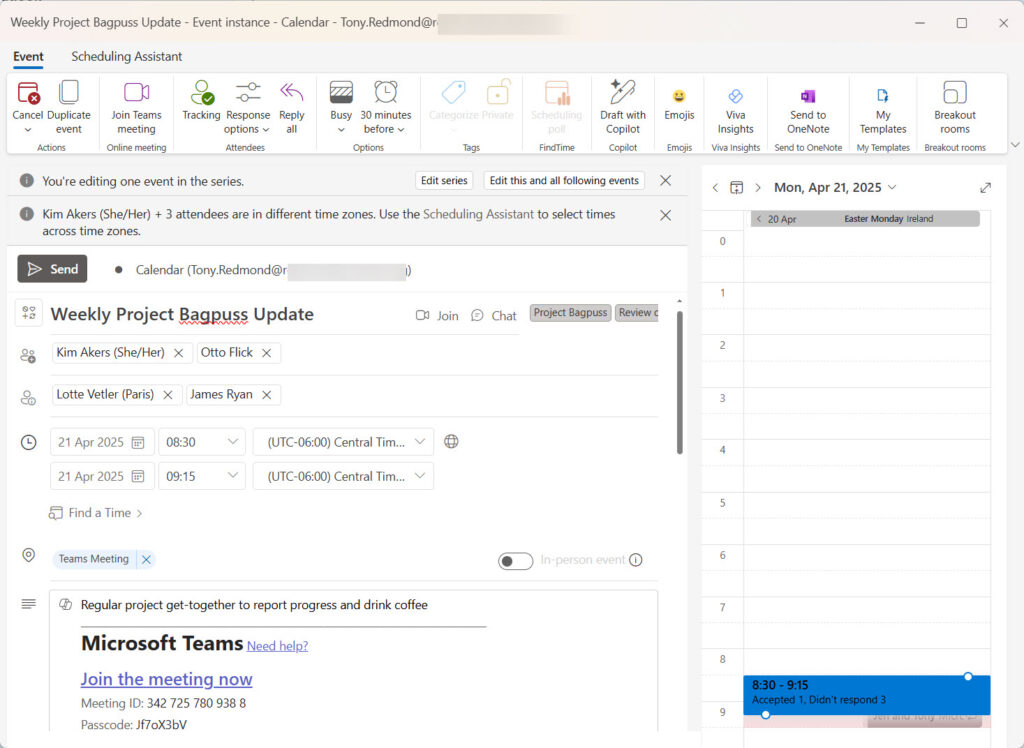
The full hash table containing the properties of the event looks like this:
$EventDetails

Name                           Value
----                           -----
location                       {[displayName, Teams Meeting]}
isReminderOn                   True
categories                     {Project Bagpuss, Review call}
recurrence                     {[pattern, System.Collections.Hashtable], [range, System.Collections.Hashtable]}
body                           {[contentType, HTML], [content, Regular project get-together to report progress and drink coffee]}
start                          {[dateTime, 2025-04-21T08:30:00], [timeZone, Central Standard Time]}
onlineMeetingProvider          teamsForBusiness
isOnlineMeeting                True
reminderMinutesBeforeStart     30
transactionId                  b8bb1941-73f6-4326-9855-ef3b18926ea1
end                            {[dateTime, 2025-04-21T09:15:00], [timeZone, Central Standard Time]}
attendees                      {System.Collections.Hashtable, System.Collections.Hashtable, System.Collections.Hashtable, System.Collections.Hashtable}
subject                        Weekly Project Bagpuss Update
allowNewTimeProposals          True
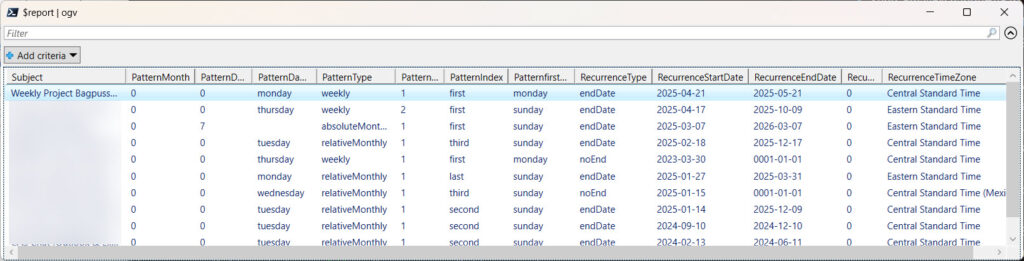
There’s no doubt that calendar event properties can be complex. Figuring out recurrence patterns and ranges are the most complicated part of scheduling events. It is helpful to examine the properties of recurring events from your calendar. By comparing the pattern shown to the user through Outlook’s calendar UI with the properties stored in the calendar, you can see what patterns and ranges are needed to create most forms of recurring events.
This code extracts the first 10 recurring events found in the signed-in user’s calendar and reports the patterns and ranges. Figure 2 shows what I discovered from my calendar. See if you can figure out how often the events are held.
$Uri = "https://graph.microsoft.com/v1.0/me/events?`$filter=type eq 'seriesMaster'&`$select=id,subject,recurrence"
$Data = Invoke-MgGraphRequest -Uri $Uri -Method Get | Select-Object -ExpandProperty Value
$Report = [System.Collections.Generic.List[Object]]::new()
ForEach ($Item in $Data) {
    $ReportLine = [PSCustomObject][Ordered]@{
        Subject    = $Item.Subject
        PatternMonth    = $Item.Recurrence.Pattern.month
        PatternDayOfMonth = $Item.Recurrence.Pattern.dayOfMonth
        PatternDaysOfWeek = $Item.Recurrence.Pattern.daysOfWeek -join ", "
        PatternType = $Item.Recurrence.Pattern.type
        PatternInterval = $Item.Recurrence.Pattern.interval
        PatternIndex = $Item.Recurrence.Pattern.index
        PatternfirstDayOfWeek = $Item.Recurrence.Pattern.firstDayOfWeek
        RecurrenceType = $Item.Recurrence.Range.type
        RecurrenceStartDate = $Item.Recurrence.Range.startDate
        RecurrenceEndDate = $Item.Recurrence.Range.endDate
        RecurrenceNumberOfOccurrences = $Item.Recurrence.Range.numberOfOccurrences
        RecurrenceTimeZone = $Item.Recurrence.Range.recurrenceTimeZone
    }
    $Report.Add($ReportLine)
}
$Report | Out-GridView
Cancelling an Event
Canceling an event causes Exchange Online to send cancellation notices to participants. The event remains in the organizer’s calendar:
$CancelMessage = @{}
$CancelMessage.Add("comment", "Cancelling because I can't go to TEC 2025! (sad)")
$Uri = ("https://graph.microsoft.com/v1.0/users/{0}/events/{1}/cancel" -f $UserId, $NewEvent.Id)
Invoke-MgGraphRequest -Uri $Uri -Method POST Body $CancelMessage
When you cancel a recurring event, Exchange Online cancels all outstanding instances of the event.
Deleting Calendar Events
You can delete an event in two ways. The first moves the event into the user’s Deleted Items folder. The second (permanent deletion) moves the event into the Purges folder in Recoverable Items in the user’s mailbox. Deleting an event from the organizer’s calendar cancels the event in participant calendars. This command deletes an event:
$Uri = ("https://graph.microsoft.com/v1.0/users/{0}/events/{1}" -f $UserId, $NewEvent.Id)
Invoke-MgGraphRequest -Uri $Uri -Method DELETE
While this command permanently deletes an event:
$Uri = ("https://graph.microsoft.com/v1.0/users/{0}/events/{1}/permanentDelete" -f $UserId, $NewEvent.Id)
Invoke-MgGraphRequest -Uri $Uri -Method POST
The Joy of a Well-Managed Calendar
After this explanation, you might conclude that working with calendar events through PowerShell is just too much bother. It’s easier to update calendars through any type of Outlook client. Outlook is the easiest way to manage a calendar, but it’s possible that you might run into a situation where an app needs to create an event, even a recurring event. Now you know how. Isn’t that nice?


