Microsoft Defender for Office 365 (Previously Office 365 Advanced Threat Protection) is a suite of tools/policies that provides powerful protection for your Office 365 environment.
Using tools such as Safe-Links or Safe-Attachments, you can protect your Exchange Online, Teams, SharePoint Online, and OneDrive against malicious content in documents or hyperlinks. You can also use Advanced Anti-Phishing Policies to detect and prevent phishing in Exchange Online. This is all available under the Defender for Office 365 Plan 1 license.
With the enhanced Plan 2 licensing, you can unlock an in-depth solution by leveraging tools like Threat Tracker and Explorer to hunt and report on the potential issues in the environment. You can also leverage Attack Simulations to perform Malware / Phishing Campaigns to help users to stay vigilant.
Note: For a full breakdown of features available under different licensing SKUs, check out the table in this article.
Getting Started
Defender for Office 365 provides a lot of configuration options and thresholds that can be customized to suit your organizational policies and requirements. When getting started, it’s easy to get lost in the sea of checkboxes and buttons.
Luckily, Microsoft has provided some great guidance on this through the Recommendations for EOP and Defender for Office 365. You’ll want to use this page as a guide for your initial setup to make sure you can align with Microsoft recommended practices.
That being said, there is a lot of manual work involved in going through the documentation and updating your configuration in line with the guidance provided. A nice way to get a quick report on the configuration status of Defender for Office 365 is to run the Office 365 Advanced Threat Protection Recommended Configuration Analyzer (ORCA).

ORCA
Tony Akers has published a great article on using the ORCA tool here which I highly recommend reviewing sooner than later.
The ORCA tool aims to help administrators compare their configuration against the recommendations and perform a gap analysis against their live settings. Microsoft has now made this even easier by directly integrating the ORCA functionality into the Microsoft 365 Security Portal.
This integration comes in two forms, Preset Security Policies, and Configuration Analyzer. Later in this article, I’ll review how to use each of these tools to make configuring Defender for Office 365 an easier process.
Preset Security Policies
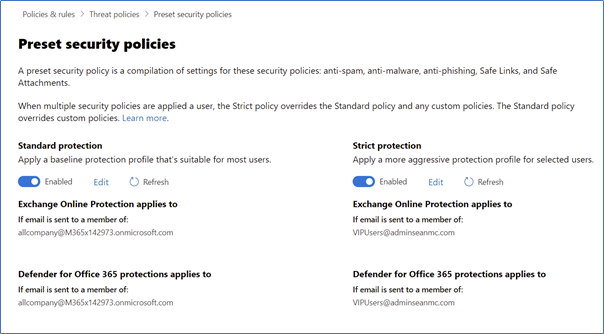
Preset Security Policies are useful for organizations that don’t want to spend a whole lot of time and effort tweaking settings and are happy enough to comply with the recommendations provided. The policies can be found in the “Threat Policies” section of the Microsoft 365 Security Portal and offer two “flavors” of protection: Standard and Strict.
The policies align with the Standard and Strict levels defined in the Microsoft recommendation documentation and once configured, there is no customization involved.
The policies can be assigned to users, groups, or mail domains, similar to any Defender for Office 365 Policies. Simply select the baseline you want to apply as shown in Figure 1, select the assignment for EOP and Defender for Office 365 settings, and you’re done!
*It’s important to note that the Strict Policies will always take precedence over the Standard ones, and custom Defender policies will take precedence over the pre-set ones.
Configuration Analyzer
Configuration Analyzer integrates the functionality of the ORCA tool directly into the Microsoft 365 Security Portal. Found in the same location as the Present Security Policies, the Configuration Analyzer takes the concept of the PowerShell-based ORCA and expands on it. The Analyzer page is split into two sections:
- Setting and recommendations
- Configuration drift analysis and history
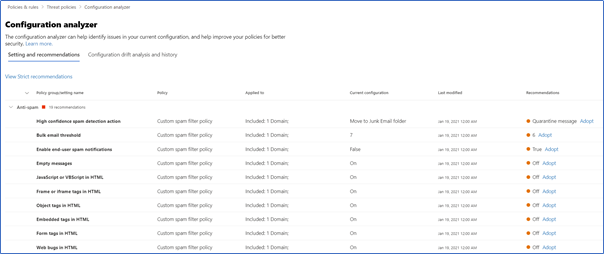
The “Settings and Recommendations” page gives a view of any policy item that doesn’t align with a particular baseline. Here you’ll see the policy item, policy type, current setting, and recommended setting, as shown in Figure 2:
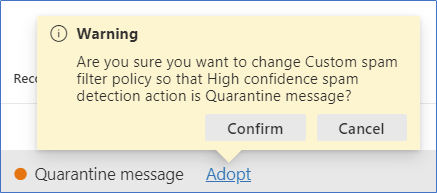
For any items that skew from the baseline, there is also a handy “Adopt” option that can be used to remediate any setting listed to bring it in line with recommendations. Clicking this will prompt you to confirm the policy change and once confirmed, the setting will be automatically changed as shown in Figure 3:
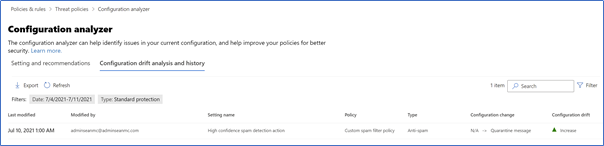
Along with the Configuration Analyzer allowing remediation and comparison, the “Configuration drift analysis and history” section allows you to view changes that have been made to the configuration over time. This analysis shows what settings have been changed, by who, and when.
We can also see how the changes affected the comparison to baselines. In Figure 4, the change I made in the above section can be seen logged and the “Configuration Drift” column is showing an increase, which means it moved the configuration closer to the baselines. This data can also be exported as a CSV file for long-term storage or documentation:

Summary
Defender for Office 365 allows a lot of room for customization based on customer requirements; however, not every organization will need to stray too far from the Microsoft recommendations.
That’s where Preset Policies and Configuration Analyzer steps in and can help you to very quickly align with the guidance provided, allowing you to focus on the settings that matter the most in your environment.


Great Article, Thanks