How You Can Turn MCAS Into a Manageable and Indispensable Tool For Your Organization
Many of the default Microsoft Cloud App Security (MCAS) templates produce what I consider to be ‘informational’ alerts, even if Microsoft has classified them as ‘severe.’ For example, most organizations want to know when there’s been an impossible travel event, which is triggered by a person logging on from two different locations that would be impossible to travel between in the time each login occurred.
However, this is only of importance if the logins were successful. The MCAS template for this labels all these alerts as severe, but if there are 50 alerts for impossible travel today, every day, or just this week – if a successful login should ever happen, we’d probably miss it. Therefore, it’s crucial that admins can quickly sort out what’s deemed informational, and what constitutes a true, severe alert.
Back when I initially set up MCAS, I configured 14 different policies which eventually grew to 23, then to 46, and now it’s at 93. The number of policies continues to grow as I discover new things I’d like to be alerted about, and Microsoft has also added policies for me as I’ve added licenses to my suite such as Defender for Endpoint. Back when I hit 23 policies, I started to realize I had a problem. I was getting buried in alerts, which in and of itself is not a good thing, but it was also violating one of my philosophies which is, “Do I really need to know that?”
The rationale behind releasing this barrage of alerts on admins is not clear, since the majority of organizations do not employ staff to just sit around and monitor alerts, nor do most organizations have a fancy SEIM (Security Information and Event Management) system that an employee sits and manages.
Those of us who work at MSPs, SMBs and Enterprise-level organizations are all finding ourselves short-staffed, even with multi-function employees who carry many different responsibilities. Therefore, it’s crucial we can quickly identify the most important issues requiring immediate action, otherwise, we’ll suffer from alert fatigue and all of these great policies will go unused, languishing as they provide information that was never acted upon.
So, what is our solution here? It is not to reduce the number of policies – we just need to tame them. We can achieve this by taking different actions on information alerts vs. the more severe ones; automating responses; splitting policies; right-sizing the alert threshold; and sending the most important alerts to a place where we’re most likely to see them. We can do all this with the native tools at our disposal, and I will detail what these are and how to use them in the remainder of this article.
Change the Threshold
Every policy in MCAS is made up of a rule, an alert threshold, and optionally a filter and governance action. Let’s look at some common policies that trigger a flood of alerts, and then take action to reduce the noise.
Impossible Travel
The Impossible Travel policy can be a very noisy one. Our goal is to elevate the serious alerts and reduce the informational ones. For this exercise, I’m going to consider a failed login an ‘informational’ alert, because what I really need to know is if there’s been a successful login that requires immediate action. To configure this alert according to our specifications, we must first:
- Add our trusted IP’s
- Set alert to ‘Successful sign ins’ only
- After review, consider the ‘Suspend user’ governance action
- Consider blocking specific user agents in another rule
The first step to reducing the number of false positives is to add your trusted IPs (these are the IP addresses defined by IT and known to your organization to be safe) into Cloud App Security (CAS). How you enrich CAS with this data is not intuitive, as ‘Data Enrichment’ is actually located under the gear icon next to your name when you’re logged into CAS. Click the ‘IP address ranges’ option and then add your trusted IP addresses. This will make the Impossible Travel policy (and MCAS in general) ignore any access activity from those locations.
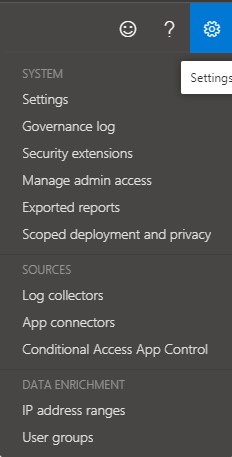
Figure 1: Locating Data Enrichment in CAS dashboard
Next, we want to make sure that the policy is set to trigger on successful sign-ins. This will now be the default setting, but if your policy has been in effect for a long time, it might still be set to ‘All sign-ins:’
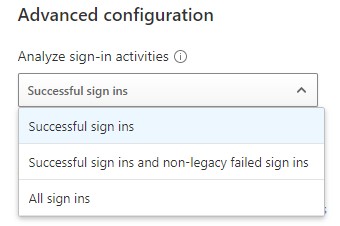
Figure 2: Setting the policy to trigger on ‘Successful sign ins’
Just changing those two settings alone should reduce the number of alerts significantly. Now, we can move our severity settings up to high, indicating to ourselves that an alert from this rule represents a network intrusion:

Figure 3: Changing security settings
In my organization, we send alerts generated by MCAS into specific Teams channels. Those Team members are all technical staff, each channel represents an individual client, and each tech is assigned a subset of clients they manage alerts for. Luckily, Teams allows the tech to hide channels that don’t require much monitoring, reducing visual clutter. Only alerts with high severity are sent into a channel, reducing the clutter further which helps the tech focus on what’s important. Policies labeled ‘low severity’ are considered informational, and we let those stay within MCAS where they can be viewed as low priority work.
Now, I’m not trying to say informational alerts aren’t entirely useful. They can, and do, provide very useful information regarding cyber attackers and should be part of your regular monitoring process. For example, if you need to figure out what types of devices are attacking your environment, look in the activity log for any alert and view the ‘Device type’ field for locations outside your country. For my organization, we found that most attempts on our cloud came from Windows 7, Firefox, or Unknown(BAV2ROPC), which is apparently an Outlook mobile client.
Next, click the device type field to get the exact user agent string you’ll need to create your filter. Since none of these devices should be trying to login to your environment, you’ll want to create a policy that reviews the activity logs and then suspends the user should any matching activity be found:
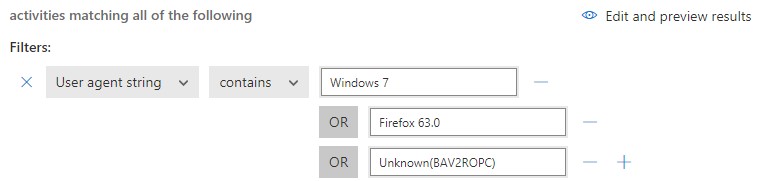
Figure 4: Creating a policy that can suspend user accounts suspected of attacking your environment
I should mention that soon after adding Unknown(BAV2ROPC), my account was suspended (disabled) due to attackers within my own country. This actually made me very happy! My conditional access rules had prevented login from countries other than my own, but it had left me vulnerable to attackers from the USA. The reason this occurred is because I neglected to set this policy to trigger only on failed logon attempts.
Next, I added an additional filter for ‘activity type’ ‘does not equal’ ‘failed log on’ so that my account is only suspended in the event of a successful login:

Figure 5: Adding additional filters
Split an Alert
Previously, I had mentioned that we want to have severe alerts filtered into our Teams channel where they can be reviewed quickly, while low severity alerts stay within MCAS as informational. But what if we want both low and high severity alerts? MCAS doesn’t differentiate between the two, so we must split the policy into two policies to set different thresholds, which will send or not send the alerts generated if we want to be alerted for both.
For example, let’s say you have some users using VPN connections that are triggering the ‘Activity from anonymous IP addresses’ policy. We don’t want to be alerted of their login via anonymous IPs; we only want alerts from unexpected anonymous IPs, or perhaps we want our expected anonymous IP alerts to be informational rather than severe.
In the instance where we want an alert for ‘anonymous IP usage’ (the default template), we need to add an exclusion filter so that users we are expecting to use anonymous VPNs don’t generate alerts:
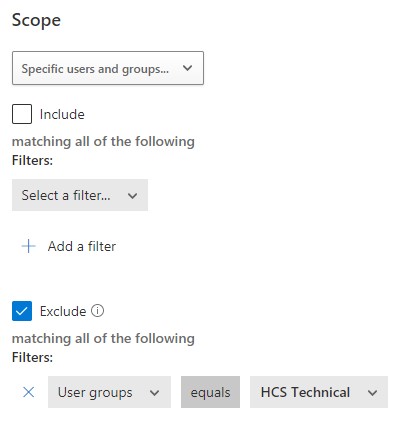
Figure 6: Adding an exclusion filter
Now, when we get an alert to this policy, we’ll know that it’s real. We can then choose to have an automatic action taken, like signing the user out or suspending the account.
However, let’s say you do have some qualms about giving known anonymous IP users carte blanche because while it could legitimately be that person, it could also be an intruder attacking their account. For this, I would create an identical rule and only include my VPN user group (HCS Technical in the figure above) and make it informational rather than generating a higher alert into our Teams channel.
New Risky App
On the one hand, I love that Microsoft is proactive and automatically creates new policies in MCAS without being prompted. On the other hand, sometimes Microsoft does automatically create a policy that generates a lot of noise, and the ‘New Risky App’ policy is one of them.
Now, this policy does have some usefulness, in the sense that it lets me know what apps are being used and by whom in my organization. Almost always these apps are websites, and the user has no idea what I’m referring to. For example, if I ask “So what is PlanetHoster being used for?” – the user doesn’t recognize the name at all, every time. I can say this with certainty because in this case the user was me, and I never visited anything called PlanetHoster.

Figure 7: New Risky App policy showing what apps are being used
In figure 6, You can see that PlanetHoster scores a 4 overall, which is the weighted average of scores in 4 categories that PlanetHoster scored out of 10: 7 General, 9 Security, 0 Compliance, and 0 Legal.
What I don’t like about this alert is that it isn’t very actionable. Sure, Microsoft gives me the option of ‘Sanctioning’ the app, which will stop alerts, or I have the option of ‘Blocking’ the app. This would be useful for a highly regulated organization that restricts users to specific websites, but really, there are easier ways to manage these apps than an alert like this.
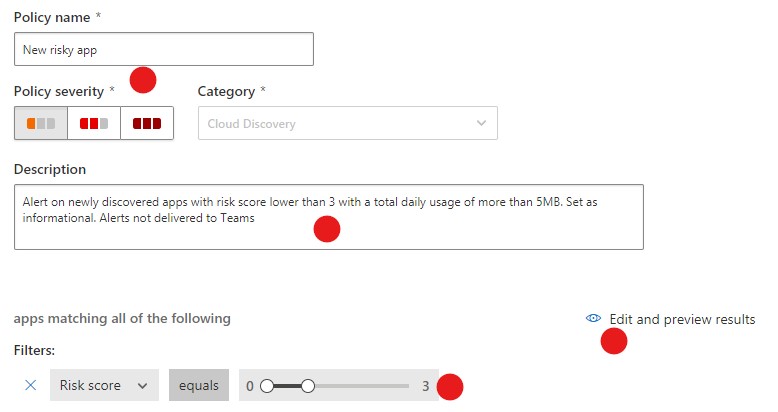
Figure 8: Creating an alert for the ‘New risky app’ policy
Instead, I’ve reduced the severity and risk level that triggers alerts, and I simply updated the description thereby alleviating the flood of alerts.
When you are trying to decide where to set the ‘Risk score’ level, use the ‘Edit and preview results’ link to view which identified apps would’ve triggered an alert. What’s nice about this is now, only newly discovered apps will trigger an alert, so they only have to be managed once.
Please note that I’ve edited the default policy here rather than create my own new policy. Up until this point I’ve never had Microsoft push out a policy update and overwrite my change, but theoretically, it is possible. If you’re worried about this happening, simply make your own copy and disable the default policy.
Make them come to you
Previously, I mentioned that my organization has severe alerts sent to specific Microsoft Teams channels. This is done so that the tech, in their everyday work pattern, can see in Teams if a new severe alert has been generated and then review that alert right in Teams, reducing the amount of disruption that comes from frequently toggling between apps.
To have severe alerts sent to a specific Teams channel, we must first identify the email address of the Teams channel we want the alerts sent to. To find a channel email address, first create the channel, then click the ellipses (…) next to the channel name and select ‘Get email address’ from the menu:
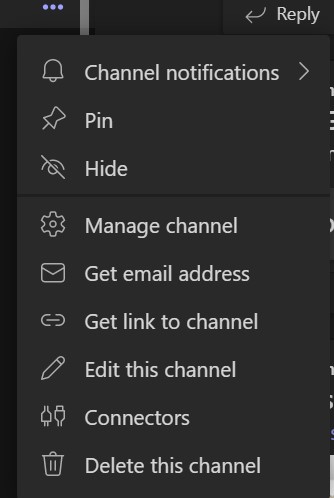
Figure 9: Identifying the email address associated with a specific Teams channel
Once we’ve located the channel email address, we create a distribution group in Exchange where the single member of that group is the channel email address. We do this so that the email address we’re sending alerts to is easy to remember. We use <clientname>@ourdomain.com for this group. Now, when we’re working in MCAS and need to set an alert, there’s no need to look up what their channel name is because the distribution group name is easy to remember.
Automate
There’s another tool available for taming alerts in MCAS, and that is Power Automate. Power Automate is a powerful feature that expands what MCAS governance actions, and with it, the only limitations are your own creativity and skill when it comes to creating flows. You can find Power Automate in your policies as the option ‘Send alerts to Power Automate,’ and the link ‘Create a playbook in Power Automate.’ A playbook is simply a flow you create in Power Automate that uses an API to retain its authentication to perform the task. Note that until you have created some playbooks, the option to select this is greyed out:
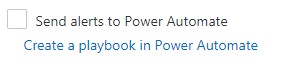
Figure 10: Power Automate option in policies.
Here’s an acronym for you – MFA (Multi-Factor Authentication) – and this is a problem for Power Automate flows. Periodically, your authentication is going to expire unless you use an account that doesn’t have MFA. This means creating another account similar to your break-glass account, and one that can remain safe without MFA. If you’re creating a new logon account, the first thing you’ll want do to is navigate over to Azure AD to create that account for flows, and then decide how you’re going to manage it.
Now, I want to mention this limitation in case you’re using Power Automate outside of the MCAS context. In MCAS, Power Automate playbooks do not have this problem because they instead use an API that is created to maintain their authority to run. Best practice would be to use the API rather than a logon account.
If creating your API for Cloud App security, click on the gear icon next to your account name and choose ‘Security extensions’ from the menu. Then click the ‘+ Add token’ link. You’ll want to give your token a name that reflects how you’re going to use it for Power Automate flows, and then press ‘Generate.’ You must notate your API token in a very secure place, as you’ll need it every time you create a new flow.
Next, you’ll click on ‘Create a playbook in Power Automate’ to get started, which will take you to Power Automate. Next, click ‘New flow’ and choose ‘Automated cloud flow’ from the menu. This will enable you to build your own custom flow using the trigger ‘When an alert is generated:”
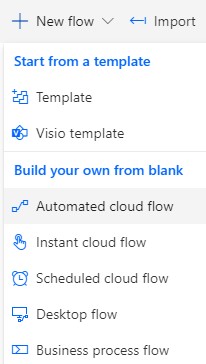
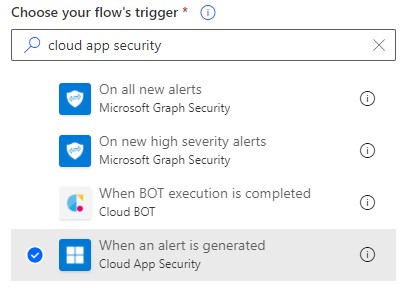
Figure 11 & 12: Building custom flows for your API
Select this trigger, give your flow a name, and then click the ‘Create’ button to begin coding your own flow or create your flow from a published template. There are currently only four published templates as shown below:
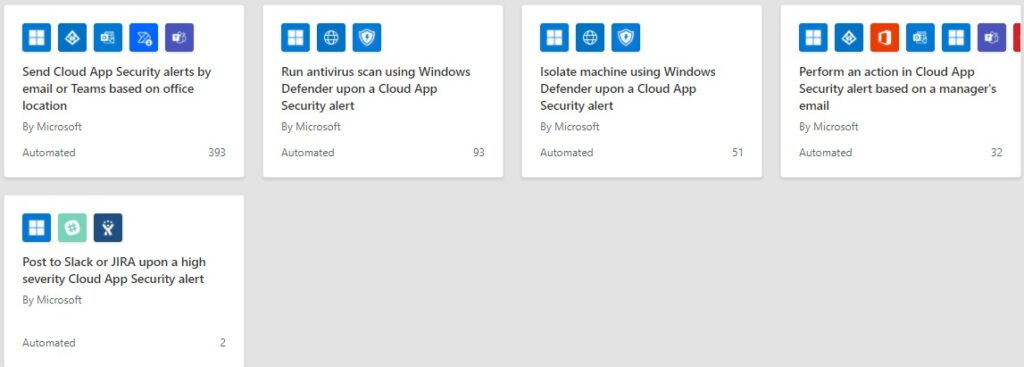
Figure 13: The four published flow templates currently available.
Once your flow is configured, let’s try the ‘Run antivirus scan using Windows Defender upon a Cloud App Security alert’ template. To complete the template, provide the required connection permissions and fill out the HTTP request URL’s and this will create the flow. Moving forward, we’ll use this template to start a scan whenever an alert is triggered that may indicate the device has malware:
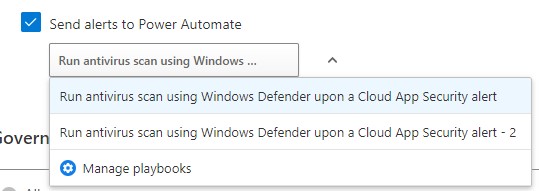
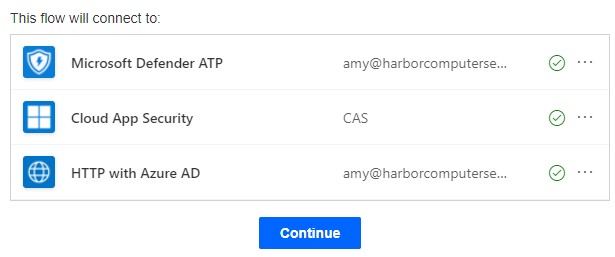
Figure 14 & 15: The ‘Run antivirus scan using Windows Defender upon a Cloud App Security alert’ template.
Once you’ve created your flow you’re able to select it under ‘Alerts’ in an MCAS policy. This Power Automate playbook can now be used to take action upon policies like ‘Excessive email updates,’ which could indicate several things – ransomware could be encrypting the mailbox; malware is scanning to gain knowledge for a potential exploit; or Potential Ransomware Activity, where you’ll want to use your bot army to start checking that device for malware.
It should be noted that if you don’t have experience using Power Automate templates, you’ll want to hone your coding skills first. These templates are relatively complex due to a large amount of code inside, and you’ll most likely want to edit the code as well. So if you’re new to Power Automate and creating flows, I recommend starting with OneDrive templates first to build up your expertise before tackling Cloud App Security. OneDrive templates are a nice place to start because they allow you to move data from one place to another, send alerts and send email.
Summary
The whole point of having a security system that is constantly watching and generating alerts is so we have warning when there is suspicious activity happening in our networks. But all too often, these alert systems generate tons of ‘not-so-severe’ alerts which bury important notifications, create more work and take valuable time out of an admins day sorting through piles of visual clutter, clutter that violates a cardinal rule of mine -“Do I really need to know that?”
However, you can make this tool work for you and your organization by simply highlighting the most important, truly severe alerts; sending automated, actionable alerts directly to tech staff; and mastering Power Automate playbooks, putting bot armies to work. Once the flood of alerts are reduced and important alerts are efficiently turned into actionable tasks, MCAS becomes a truly indispensable tool for admins in any organization.


thanks alot of information