It’s time for some real talk: not enough of us are using multi-factor authentication. For example, Twitter estimates that only about 2% of their users have MFA enabled for their Twitter accounts—which is terrible, but at least they release their usage data.
I’d expect similarly low uptake for other consumer services—after all, most consumers aren’t security experts—but we really should expect and demand better for enterprise accounts. And yet a rather shocking number of cyberattacks are publicly attributed to account compromises linked to a lack of MFA: in 2020, Microsoft’s Alex Weinert said that 99.9% of successfully attacked Microsoft 365 accounts had MFA disabled.
Security vendor Yubico released a report that makes for some interesting reading about what enterprises say they’re going to do (hint: they’re going to spend more money, especially on tokens from Yubico), but a mediocre plan executed now is better than a great plan executed later—so let’s get started and get MFA turned on in your tenant.
Two ways to get started
Microsoft, much to their credit, has done a ton of work to improve the capability and resiliency of multi-factor authentication in Azure AD. There are four ways you can take advantage of MFA in your Microsoft 365 estate.
First, you could just enable it manually and selectively for individual accounts. Don’t do this. It’s conceptually simple, but it’s also far too easy to leave out accounts, and it will require too much ongoing maintenance in the future as users come and go. Because this is a bad suggestion, I won’t officially count it as a way to get started.
Second: if you’re using Microsoft 365 Business, E3, or E5, MFA will either be on for everyone or off for everyone. So I suppose that’s a second way to get started, but perhaps not what you had in mind.
The first real way to get started is to use the “security defaults” feature that Microsoft introduced in 2019. If your tenant was created after then, good news: this is already enabled for you, and you probably don’t need to do anything. If not, as the linked article explains, it’s simple and easy to set up. Microsoft even says “If you are an organization that wants to increase your security posture but you don’t know how or where to start, security defaults are for you.” It’s easy enough to do this that I won’t cover it further here.
The other real way to get started is to use Azure AD Conditional Access (CA). This can be much more complex than security defaults, and it requires Azure AD Premium P1 or P2 licenses, but it gives you a great deal more flexibility and control.
Read more: Achieving Passwordless Authentication in Azure AD

Conditional access basics
The idea behind CA policies is straightforward: every time a user or device requests access to a resource in Microsoft 365, the endpoint they’re talking to expects to see an authentication token. If there’s no token, or the token is expired or invalid, the endpoint will force the client to authenticate.
In the simplest possible scenario, that means that the user sees a logon dialog and enters her credentials, which Azure AD then checks, issuing a token if they’re valid. CA extends this process by letting you add conditions and exceptions—you can think of these as if-then rules. For example, you could create a rule that says “if a user is signing in to the Azure management portal from a location I don’t trust, require MFA” or “don’t require MFA for users who sign in to Teams from inside our corporate network.”
Conditional Access is incredibly capable and flexible; for example, you can easily create policies that block older versions of Android and iOS (possibly a good idea given the rate at which zero-day vulnerabilities have been coming to light) without affecting access from other clients.
To manage CA policies, you’ll need to log in either to the Azure portal (then go to Azure Active Directory > Security > Conditional access) or the Microsoft Endpoint Manager portal (Endpoint security > Conditional access). Although there are a ton of things you can do with policies, we’re going to focus on a simple policy to require MFA for your users.
Creating an MFA policy
The basics of creating a policy are pretty easy; where you can get into trouble is in choosing the right mix of options from the many choices that Azure AD CA policies support. I always like to suggest starting with a written-language description of what the policy is supposed to do, using a simple template:
This policy will [allow or deny] access for [which users] when using [which applications?] but only when [conditions]
In this case, “This policy will allow access for all ‘real’ users in all applications but only when they authenticate with MFA.” You can see that the template approach makes it easy to see what the desired end result is—that sample is going to obviously require different policy settings than a template that says “This policy will block access for global admins but only when they are connecting from Pyongyang.”
Start with the basics:
- Log in to https://portal.azure.com using an account that has Global admin, then navigate to Azure Active Directory > Security > Conditional access.
- Click + New policy.
- Give your policy a name, ideally one that will make sense to you when you look at it a year from now and wonder “what did I create that for?”
Who gets the policy?
Next you need to decide which users will be affected by this policy. The users and groups control in the left nav bar allows you to both include and exclude users. You can choose to apply this inclusion or exclusion to several categories: no one, all users, or selected users, where the selection is based on their guest status, the directory role they hold, or the group membership you specify. Examples of problems you can solve using these controls include:
- Including all guest users
- Including all users except for users in the “Sales” security group
- Excluding all users except for users who hold the “Azure DevOps administrator” role
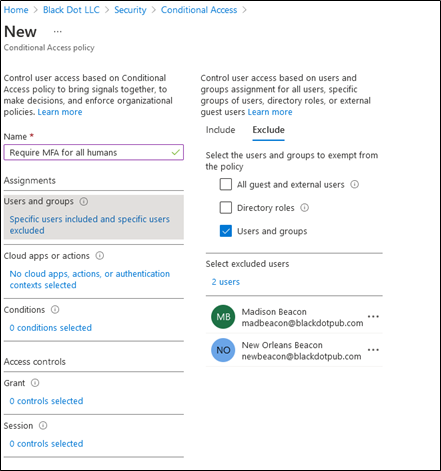
Most admins will be tempted to use these controls in combination to make fine-grained policies. While you certainly can do this, it’s always a better idea to start simply. In our case, we want to require MFA for ‘real’ users—which just means “users who are actually humans and not service accounts, etc”.
This is a little harder than it sounds, because Azure AD doesn’t have a way to separate real-human accounts from service accounts; you’ll need to put them in their own groups. In my small tenant, I only have two service accounts, so I just picked them separately on the “exclude” tab. The “include” tab, not shown, has the “all company” group I created. The result is something like this:

What apps does it apply to?
You may decide that certain apps are more sensitive or important than others; conversely, you may find that users complain more about being required to occasionally authenticate with MFA in some workloads.
The Cloud apps or actions lets you fill in the “when using” clause of your template. As with user selection, you can include and exclude all apps or choose them individually. If you choose to include or exclude specific apps, you’ll find that the app list includes every app that’s registered in your Azure AD tenant, so you can apply CA policies to third-party apps and your own line-of-business apps, not just Microsoft 365 apps. For our sample policy, we’ll choose to include “All cloud apps.”
Setting conditions: “only when…”
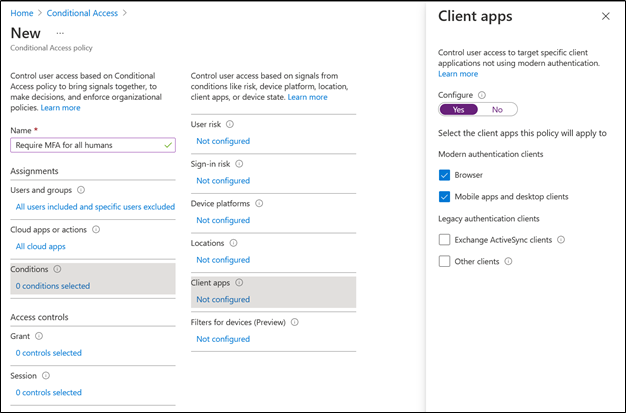
Now we get to the fun part. Right now, there are six categories of conditions you can use, some of which require additional Azure AD licenses: user risk, sign-in risk, device platform (Android, iOS, Windows Phone, Windows, and macOS), locations, client apps, or device filters. If we want to apply the broadest possible requirement for MFA, the simple way to do this is to set a Client apps condition by selecting the Configure control and then enabling Browser and Mobile apps and desktop clients.
You could also enable the condition for legacy Exchange ActiveSync clients and other historical oddities, but those clients typically won’t have a facility for using MFA so you shouldn’t expect them to work properly. Choosing these options will give you something like the following example:
The most important part!
Lurking at the bottom of the new-policy page is a small control that looks like this. It’s easy to miss, especially on screens that don’t have a lot of vertical resolution, but you’ll sort of be forced to see it because it’s right next to the Create button.
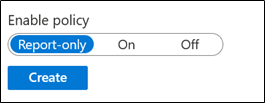
Microsoft defaults the Enable policy setting to Report-only. This is an excellent choice, and you should keep it that way until you’re confident that the policy does only what you want. If you’ve ever accidentally deployed an Active Directory group policy or Exchange retention policy that did something undesirable, you know the sinking feeling that comes when you realize that your incorrect instructions are being cheerfully, and destructively, carried out by the policy engine. Intune will happily give you that same feeling if you let it.
Next steps
Once you’ve tested that the policy applies only to the users and applications you meant for it to, you can flip the enable toggle to On and start enjoying some extra security. That’s really just the first tiptoe step into the world of what Intune can do, though; you can create policies to manage many other aspects of how your users, applications, and devices are allowed to interact with, and through, Azure AD and the other Microsoft 365 workloads.
Have fun exploring… but be careful.
Cybersecurity Risk Management for Active Directory
Discover how to prevent and recover from AD attacks through these Cybersecurity Risk Management Solutions.


Hi. I was just looking at your article and some on the subject from MS. I’m wondering why you didn’t mention this:
Access controls > Grant, select Grant access, Require multi-factor authentication
I don’t know if it’s required or not, since I haven’t actually tried any of this yet, but if not why not?