
Azure can be used to extend the capabilities and improve the operation of Office 365, it works particularly well with SharePoint both on-premises and in the cloud. One of the services offered by Azure is Azure Batch, which is a Platform as a Service (PaaS) that provides all the physical infrastructure plus the core software to run programs in groups, removing excessive server loads from production. Azure Batch is responsible for creating Virtual Machines that run processes, spread the loads, manage results, and make them available to the system that initiates the query.
SharePoint often requests you perform tasks that require a lot of farm resources. For example, this would be the case if you were creating a PDF file from a Word file for archiving or presentation reasons. SharePoint Server OnPrem has an internal mechanism for performing this task Document Conversion Service, however, this isn’t available in SharePoint Online, and all the load falls on the servers in the farm itself. As a typical example, Azure Batch can be used to remove that load from the Office 365 tenant or SharePoint Server farm, and alleviate (and improve) its capabilities.
How Azure Batch works
Azure Batch collaborates closely with Azure Storage. A Batch process requires a few files which contain the data you want to process, and also an executable file with the desired resources to process the data; in addition, results must be files that can be stored.
First, you need to upload both the data and executable-files to an Azure Storage blob. Azure Batch then receives the commands needed to process the files and uploads the results to another Azure Storage blob, from there the application that initiated the process can use them.
Azure Batch is responsible for creating Virtual Machines where the application will run to process the data. Up to 1000 cores can be used for Batch processing, which means that up to 1000 Virtual Machines can be created, each of a single core, or 100 machines of 10 cores each, or any, it’s down to whichever combination works best for you. It’s also possible to use more than 1000 cores (without limits), but if you find yourself in this scenario, you should contact Microsoft for system creation.
The process for running an Azure Batch operation is as follows and refers to Figure 1.:
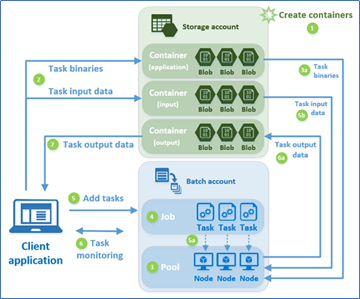
- Azure Storage Blob containers are first created, either manually using the Azure Administration user interface, via PowerShell, or programmatically. It is necessary to create three containers: one for the data to be processed, one for the processed data, and one for the executables
- The client application that handles the Batch, uploads the data and executable files to the containers
- The Azure Batch Pool is created manually, by programming, or PowerShell. A Pool contains and manages all virtual machines or Nodes that Azure Batch will create to process the data. Each Node receives a copy of the executables and one or more Tasks to run
- An Azure Batch Job is created either manually, using PowerShell or programmatically. The Job contains the Tasks to be executed
- The client application sends the Tasks to the Job. A task is a command that starts the executable that processes the data. The executable is usually a Windows Command Line application
- The app can monitor the Tasks, to check if there have been any problems, or if they are taking longer than they are designed to run
- When the Tasks finish running, they upload the results to the Azure Storage Output blob, from where the client application can download them
Figure 1. Azure Batch process (taken from the Azure Site)
Tools
You can use the Azure Batch Explorer to debug and monitor Azure Batch applications, the tool is free to download from this link.
How to use Azure Batch with SharePoint
At the beginning of this article, we discussed that Azure Batch as a common implementation in SharePoint can be used to remove the load of creating PDFs from the Office 365 tenant or SharePoint Server farm.
The following example performs a task like the one described above: Using a SharePoint List, the application first creates an XML file for each item where the value of its fields is serialized. All these XML files are then sent to Azure Batch to be converted into PDF documents, and finally, the PDF files are stored as an attachment in the original List items.
How to Create the Azure Base Infrastructure
In the example, all the necessary Azure Storage infrastructure and Azure Batch is created and removed programmatically to indicate how work can be done completely from code, although it is entirely possible to create the Azure items manually using its user interface.
Although the Azure Storage and Azure Batch components will be created dynamically, you need to create the Storage and Batch accounts manually using the Azure Dashboard. Here’s how you can do so:
From the Azure Dashboard, log in with your credentials. Go to the Resource Groups section and create a new group.
1. From the new Resource Group, click on +Add, then Storage, then Storage Account to create a standard Azure Storage account
2. Then you need to name the account, the subscription to use, and your resource group
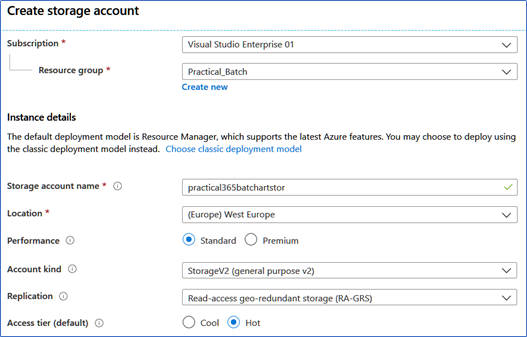
Figure 2 – The Azure Storage account creation screen
3. From the Azure Dashboard again, use the +Add, then Compute, and click the Batch Service button. Similarly, name your account, the subscription you want to use, and your resource group. In the Advance tab, select Batch Service.
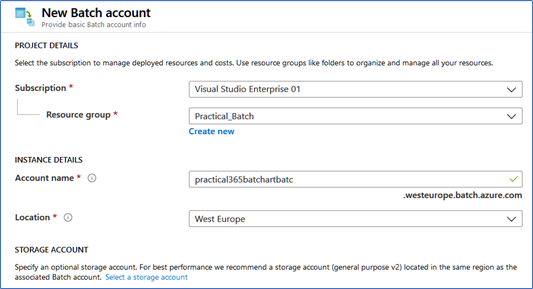
Figure 3 – The Batch service account creation screen
How to Program your Azure Batch Service
The complete source code for the application can be found in the GitHub repository here. As the code is too long to be shown in this article, we’ll only touch on the most important points. Please refer to the complete source to see the fully working details.
- The example is a Windows Command Line application using the Dot.Net Framework. Start Visual Studio and create a new Solution, in the example I’ve referred to it as the Practical365AzureBatch
- Add the NuGet packages of Microsoft.Azure.Batch and WindowsAzure.Storage to work with Azure, Microsoft.SharePointOnline.CSOM for SharePoint Online and itext7 for the creation of PDFs
- Add directives to Microsoft.WindowsAzure.Storage, Microsoft.WindowsAzure.Storage.Blob, Microsoft.Azure.Batch, Microsoft.Azure.Batch.Auth, and Microsoft.Azure.Batch.Common
- A series of constants are declared at the beginning of the program to maintain the values of the systems. There are three configurations to be done: connection with the Azure Storage service (connection string and names for the containers), connection with the Azure Batch service (account name, URL and key, and the names for the pool and job), and connection with SharePoint Online (site collection name and URL, and credentials to log in). It’s important to note that this example is a proof-of-concept and not ready for production, the values are in clear text and not secured properly.
- The main method of the console application contains two calls: the first creates the XML files for each item in the SharePoint List containing its fields and values, and the second makes a call to the MainAsync method that performs the rest of the work:
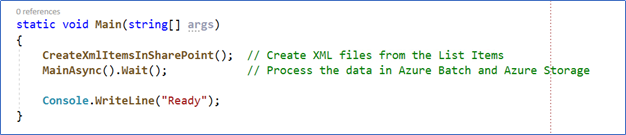
Figure 4. – The main components of the program
6. the CreateXmlItemsInSharePoint command reads all the values from the SharePoint List and creates one XML file for each item containing the names of the visible fields in the List and their value. This routine uses the SharePoint Client Side Object Model and the SharePoint context is returned by the LoginCsom routine.
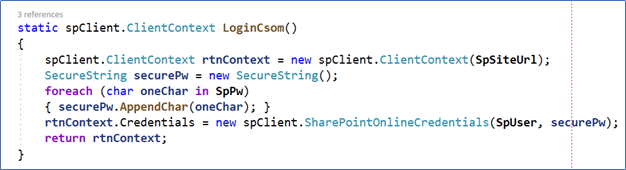
Figure 5. Finding the SharePoint context through the account data
The CreateXmlItemsInSharePoint method uses a loop that reads each of the items in the List, including each of the fields within the items and then generates a stream with the name and value of each field. The values are then saved in XML format and serialized as an attachment to the element itself. Note that try/catch routines are very basic, and the example is not ready for a production system.
In the second part of the article, we will review and analyze the code to create the infrastructure in Azure, start the batch process, create the PDFs and upload it to SharePoint.


