
In part one, we covered a malicious business scenario where a user will attempt to download company confidential files and how we can prevent this from happening by using Microsoft Cloud App Security (MCAS) and PowerAutomate. In part two, we’ll develop our Flow further to create seamless app which alerts your IT team and the relevant manager of the user.
As we mentioned in the overview of the flow creation, we’ll need to identify a user who generated an alert and their manager. For this purpose, we’re going to use Office 365 actions in PowerAutomate.
Add the Get User Profile action to the Flow by clicking on the New Step and search for Get User Profile.
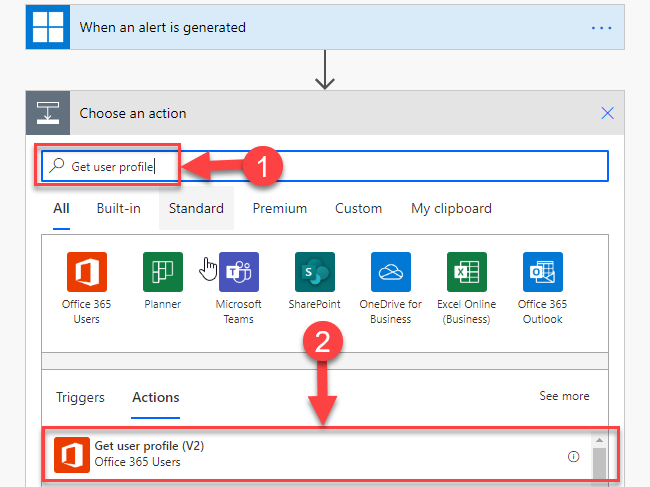
The Get User Profile Action requires to pass UPN of the user. Click on the User UPN field, and in the Dynamic Content context menu, search for CompromisedEntity. You should be able to find this value from the When Alert is generated step.
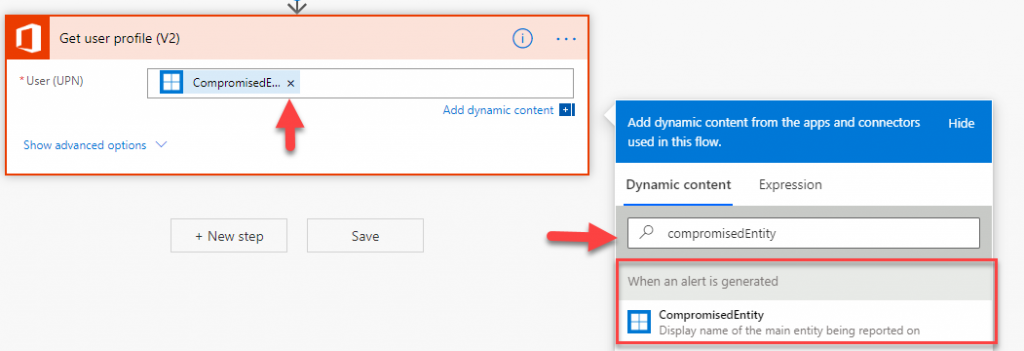
A user’s UPN (Compromised Entity) is passed from the MCAS Alert to PowerAutomate. Add another action and search for Get Manager. The Get Manager action requires to pass your users UPN as well. We’re going to repeat the steps above and add CompromisedEntity from the When an alert is generated step.

We’ve now identified the user and their manager, you now need to notify the manager and request actions to take against the user in question. For that, we will use Send Email with an options action.
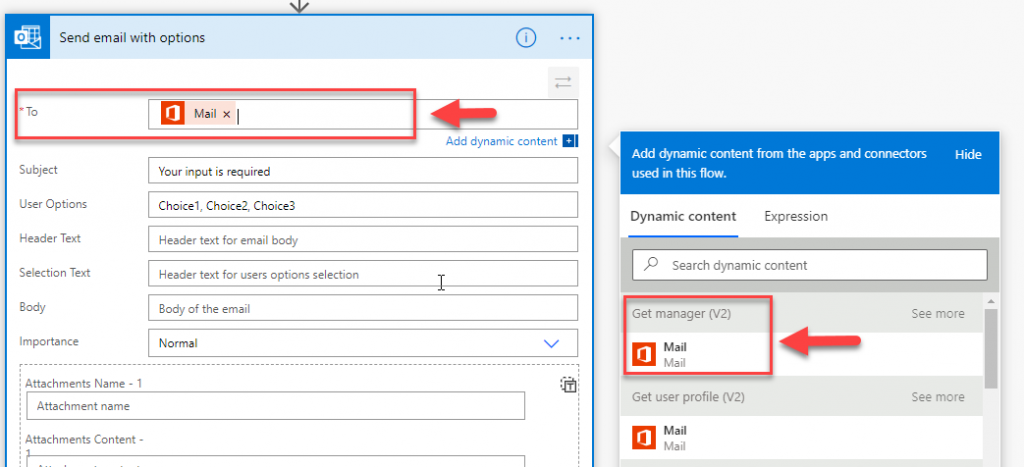
Add a new step and search for Send Email with an action. I am going to use data generated from previous steps to compose the Email.
To: [Mail] from the Get Manager step.
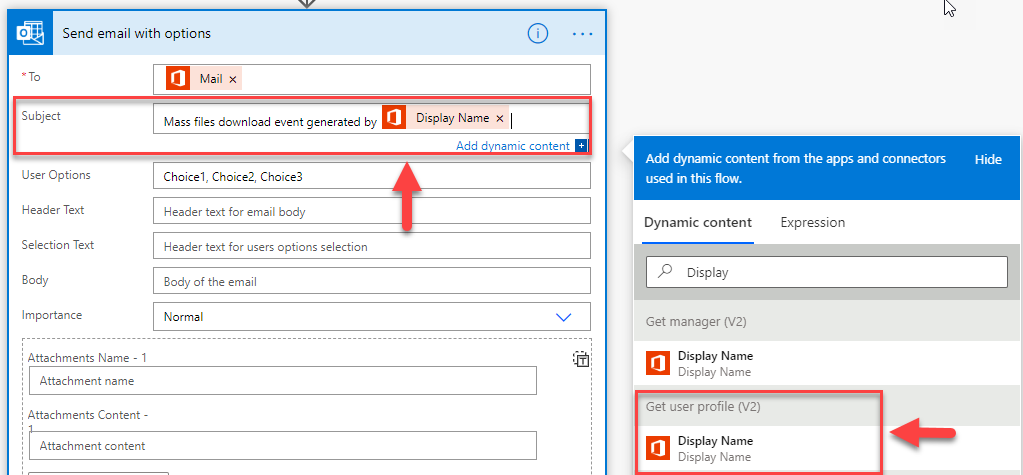
Subject: “Mass Files Download event generated by [Display Name]” from the Get User Profile step.
Your user options here are: Disable an account, Investigate and False positive.
Type your option separated by a comma. For example, I’m going to have three actions:
- Disable an account – Disable Azure AD account. This is a great and easy solution when you have cloud-only accounts. If you have a Hybrid setup and you disabled the account from the cloud, then in the next synchronization cycle, the account will be re-enabled.
For the Hybrid scenario, I will be writing another blog post on how to run the PowerShell script in the cloud, and make changes in the on-premises environment, stay tuned.
- Investigate – for simplicity, we’ll be sending an email to the IT helpdesk to request an investigation. You have many other options to create an investigation request. PowerAutomate has connections to Zendesk, ServiceNow, Plumsail Helpdesk, FreshDesk, and more. Another option is to send a message to IT Microsoft Teams team support channel.
- False-positive – acknowledging that this is intended mass download and resolving MCAS Alert.
For you Body: type whatever text is appropriate for your business case.
This is what you should have configured. There are some other configurations you can make in the Send Email with option step, but for simplicity, we will leave it as is.
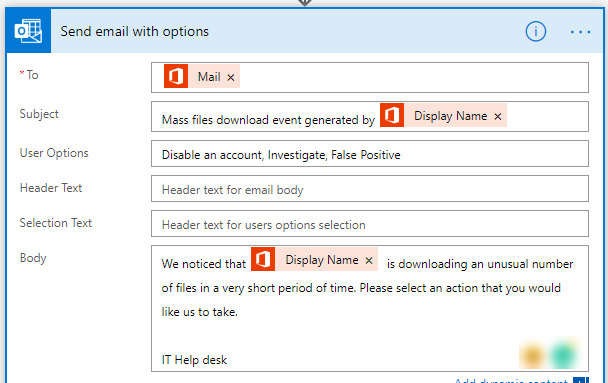
In the last steps of the workflow, we will take actions according to the managers response. Since you may have more than two actions, we will use the Switch step instead of regular true/false conditions. Click New Step, search for Switch, and add it. Based on the scenario, I’ve created three cases:
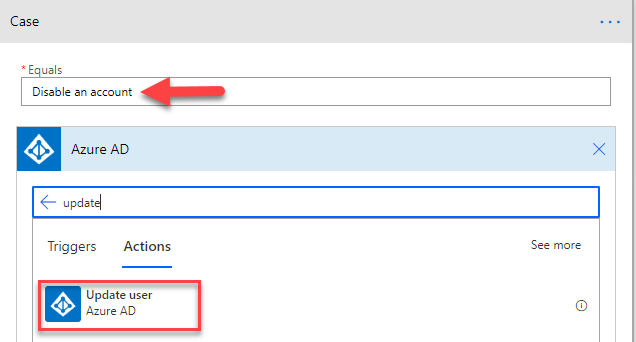
- Disable an account
- Investigate
- False Positive
For *On parameter in the Switch action, you should insert SelectOption from the dynamic content menu.
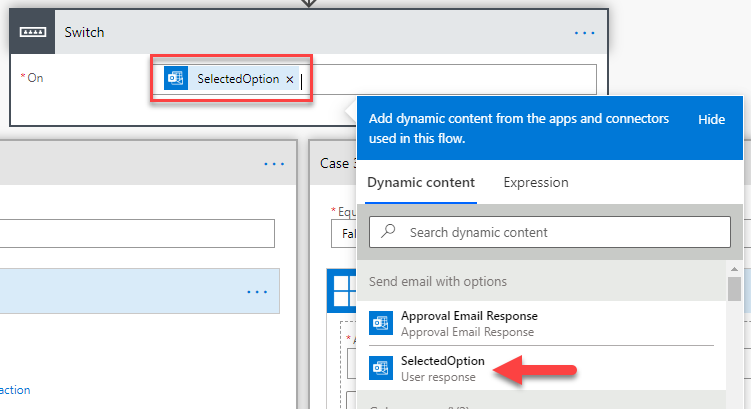

As you add all the cases, make sure that the spelling of the managers response is exactly the same as the one typed in the Send Email with an action step. In the next step we’ll add an actual action for each case.
Disable an Account
Add action and search for the Update user action which is part of Azure AD group of actions in PowerAutomate.
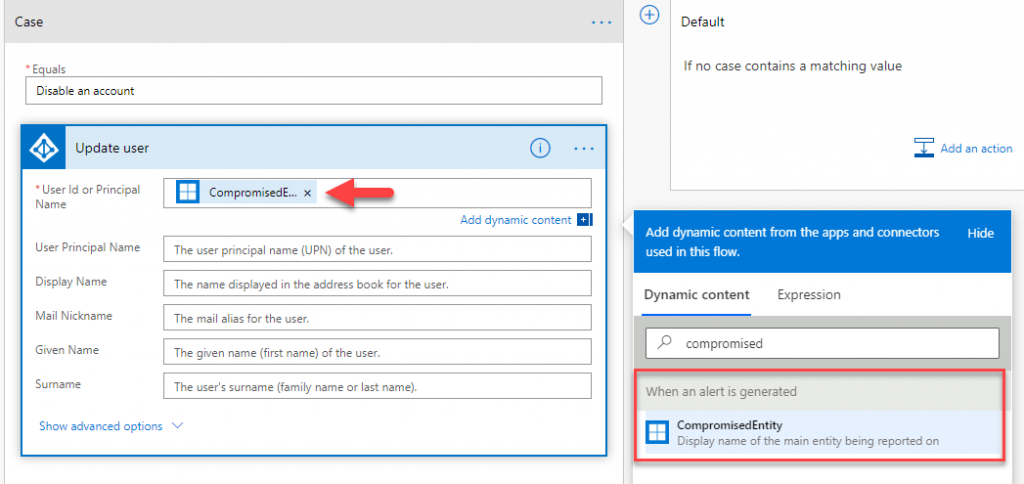
Expand the full set of configuration options by clicking in Show advanced options. For User Id or Principal name set CompromizedEntity from the When an alert is generated step.
Next, click on Account Enabled field and set it to No which will disable the account.
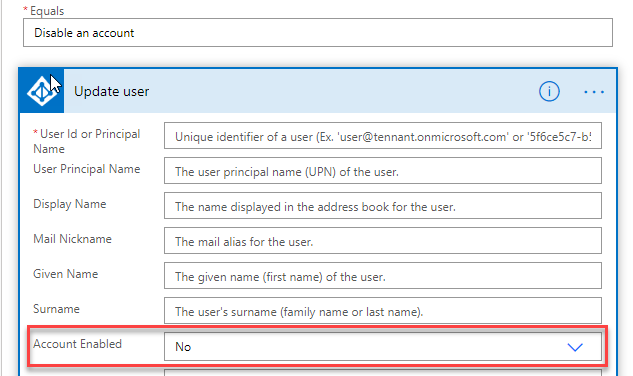
Next, we will set up an action to send an email to helpdesk when the Manager’s response is to Investigate. As I mentioned earlier, you can create a ticket in your ticketing system, just look for a connector in PowerAutomate.
Send Email from MCAS
Click Add action under the Investigate case and search for Send an Email. Type the email address of your IT support helpdesk, subject and body text.
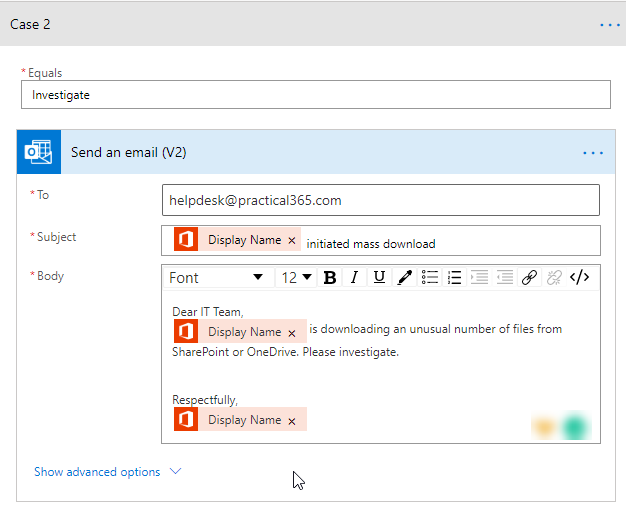
I used dynamic content to customize the message. In the subject line and beginning of the message, I used the Display name from the Get user action, but in the signature, I used the display name of the Get Manager Step.
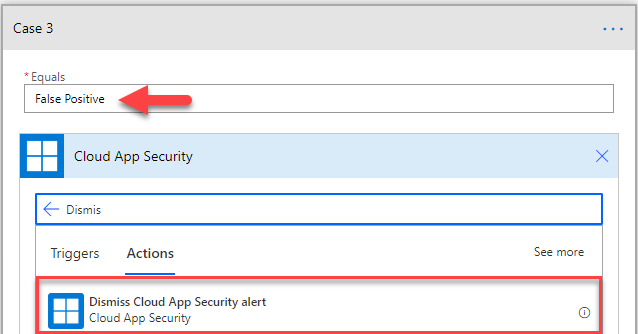
The last case is False Positive, which is when the Manager acknowledges that this is expected behavior. We’re going to respond to MCAS and close the alert that is generated by the policy, so that your security operations team doesn’t have to do anything with this alert.
False Positive
Add action, and search for Cloud App Security and select Dismiss Cloud App Security Alert.
Dismiss Cloud App Security Alert requires the ID of the incident, which you can find in the Dynamic Content menu under When Alert is generated step. The ID name is ProviderAlertID.
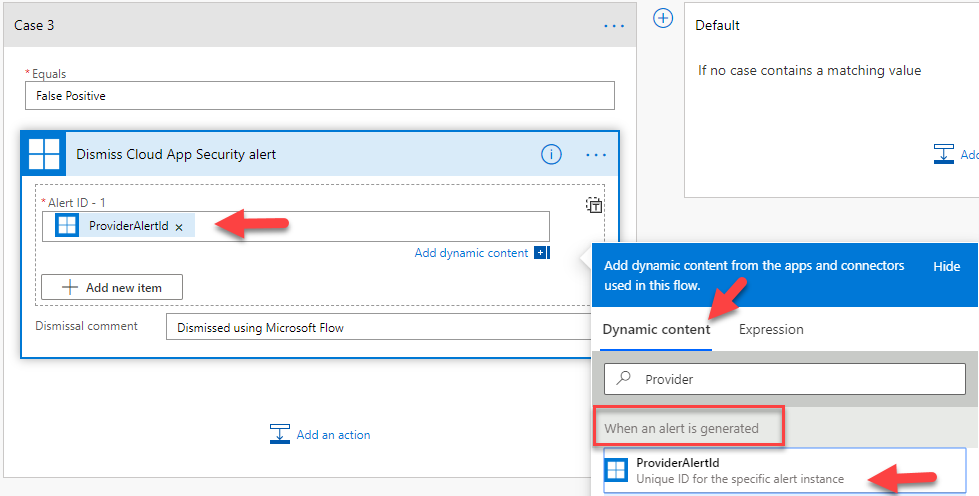
I would also suggest typing an appropriate comment in the Dismissal comment text box, which will be visible in MCAS.
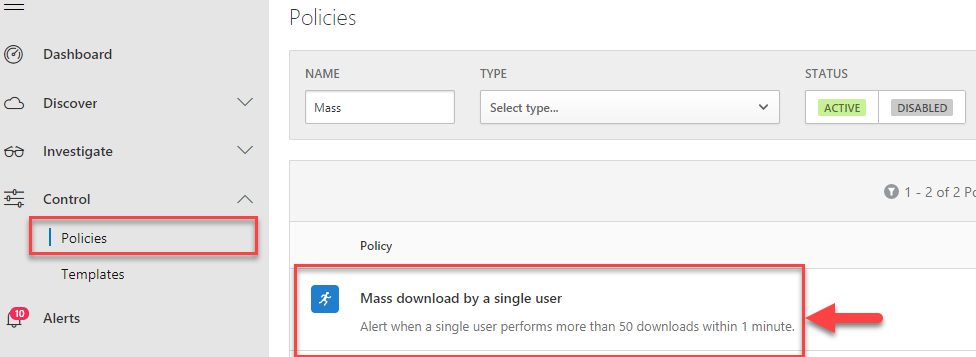
The last step is to associate this Flow with the Cloud App Security policy. Navigate to https://portal.cloudappsecurity.com/, then Controls, then Policies. Mass download by a single user is one of the default policies in the MCAS portal; you may want to customize it based on your business needs, but this is a topic outside the scope of this article.
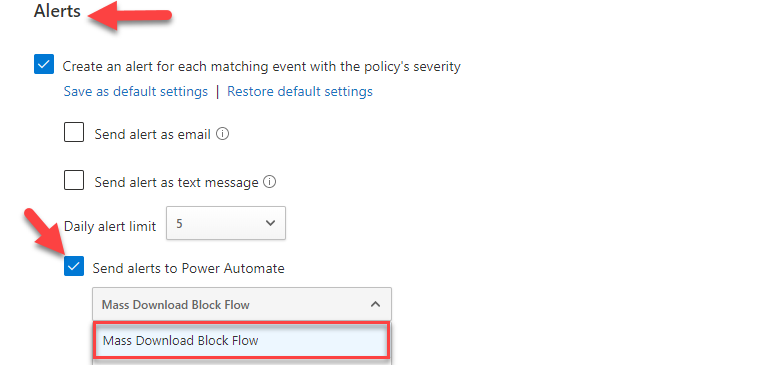
Open the configuration of the policy, scroll down to the Alert section, and checkbox Send Alert to Power Automate. From the drop-down, select your Flow. In my case, the name of the Flow is Mass Download Block Flow.
Click Update, and you’ve completed configuring your workflow and policy alert. Now you can test it by logging in as one of your users and try to download a few files.
Note: Always check your policy configuration that generates an Alert to make sure that event is triggered.
As the mass download is performed, MCAS triggered an alert.

And the Manager received an email.
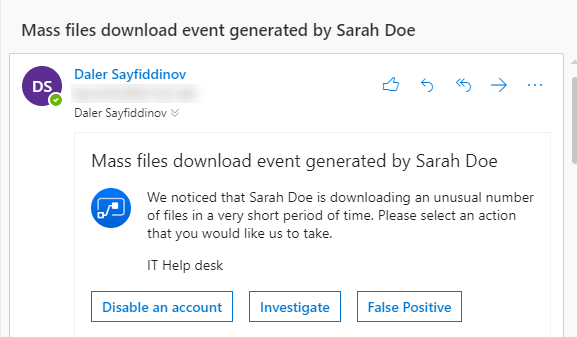
I clicked Disable an account, now we need to check the account status of the user in the Office 365 Admin portal.

As you can see that user accounts is blocked to sign in, and the solution has worked as expected.
You can use the tools explained in this blog article to help you create solutions for more complex scenarios and actions, the possibilities here are endless. Stay tuned for my upcoming articles, where I’ll be covering other use cases with more sophisticated environments and actions.


I love this. Thank you Daler!