
SharePoint Online is a complex IT system and therefore requires continuous maintenance, such as cleanup, enforcement of policies and monitoring. To ensure the correct functionality of these maintenance tasks, it’s best practice to automate these processes. In the past, SharePoint Jobs was used to carry out this function on SharePoint on-premises, however, this isn’t available on SharePoint Online. So, we now need to implement this ourselves which we can do using the many services offered by Microsoft Azure.
Azure offers three possible alternatives to SharePoint Jobs: Web Jobs, Functions, and Automation. The first two are closely related and, although Azure Functions is substituting Azure Web Jobs as the main point for SharePoint Online to conduct internal automation tasks, the Web Jobs infrastructure is still the base-technology for Functions, which has advantages in other applications.
Azure Automation is also an attractive option using PowerShell and is implemented quickly and easily. Stay tuned, as I’ll be looking at Azure Automation and SharePoint in my upcoming articles.
About Azure Web Jobs
When discussing Web Jobs, it’s important to note App Services is defined as an Azure service hosted on Managed VMs (Virtual Machines), that consists of:
- Web Apps (to host any kind of web application)
- API Apps (to host REST applications)
- Mobile Apps.
Web Apps is divided into two separate entities: Web Apps, to host front-end applications, and Web Jobs, to host background-running processes.
To make background processing simpler in Azure, Microsoft created Azure Functions, built on top of Azure Web Jobs as the underlying platform. Although Web Jobs and Functions results are very similar, the main difference between them is that for the latter, instead of building an entire application like for Web Jobs, you only need to author and deploy individual code-methods (or functions) in a totally managed PaaS platform. Additionally, Functions don’t run on servers, so it doesn’t matter about the type of hardware running them, and they scale automatically with the load.
A key concept to mention is the Service Plan used to run Functions. There are two types of Service Plan: Consumption Plan, where you only pay when you use the functions; and App Service Plan, where you pay for the reserved resources of the primary VM (also used by Web Jobs). The Consumption Plan has a timeout threshold set to 5 minutes: if the Function takes longer to complete execution, the process will be terminated.
Both, Web Jobs and Functions, are suitable to work as SharePoint Jobs, so you must take into consideration the following points when selecting your plan:
- The Service Plan is the principal factor to analyze: if the task to perform can run in less than 5 minutes and it triggers sporadically, use Functions. But, if the process must run every couple of minutes and it takes also some minutes to run, you are better using Web Jobs.
- If you are moving from a traditional coding structure, Web Jobs will adapt better without modifying the source code. Functions use a different paradigm, that requires breaking up the code into smaller chunks, implemented using one or more message queues to communicate.
- Maintaining state is easier to develop using Web Jobs. Functions are, by definition, stateless.
Step 1: Configuring the Azure infrastructure
To create an Azure Web Job that works like a SharePoint Job, we need to create the service in Azure.
- Open the Azure management site as an administrator and generate a new Azure Resource Group or reuse an existing one
- In the Resource Group create a new App Service Plan giving it a name
- Select the Resource Group, and use Windows as Operating System
- You have several options for the Pricing tiers (for development/test, production or isolated), select the most appropriate for your requirements and budget
- Then, add a Web App service to the Resource Group, assigning it a name, the Resource Group, and the created Service Plan
- Finally, you will have an Azure Resource Group that has, at least, the services shown in Figure 1
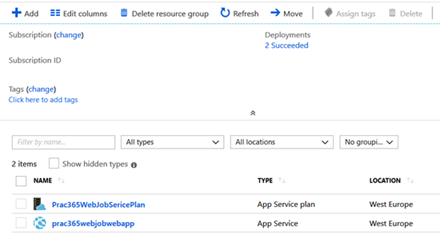
Figure 1. The services in the Azure Resource Group
Step 2 – Create and publish the Web Job
- You can use Visual Studio 2015, 2017 or 2019 to develop the Web Job code, but ensure that VS has the Azure SDK installed
- Open Visual Studio and create a new Visual C# – Cloud – Azure WebJob solution that generates a console application ready to be used in Azure
- Add the NuGet package AppForSharePointOnlineWebToolkit to connect with SharePoint (this package adds the files SharePointContext.cs and TokenHelper.cs to the project
- Add using directives to using Microsoft.SharePoint.Client; and using System.Security;
- Remove the default Main method and copy the next fragment in its place, replace the values of the first four variables with yours
 static void Main()
 {
     string mySharePointSiteUrl = "https://domain.sharepoint.com/sites/Test_WebJob";
     string mySharePointLibrary = "ListWebJob";
     string myAccount = "account@domain.onmicrosoft.com";
     string myPW = "mysecretpw";

     using (ClientContext myContext = new ClientContext(mySharePointSiteUrl))
     {
         SecureString mySecurePW = new SecureString();
         foreach (char unChar in myPW)
         {
             mySecurePW.AppendChar(unChar);
         }

         myContext.AuthenticationMode = ClientAuthenticationMode.Default;
         myContext.Credentials = new SharePointOnlineCredentials(myAccount, mySecurePW);

         try
         {
             List myList = myContext.Web.Lists.GetByTitle(mySharePointLibrary);
             myContext.Load(myList);
             myContext.ExecuteQuery();

             if (myList != null && myList.ItemCount > 0)
             {
                 Console.WriteLine(myList.Title.ToString() + " has " + myList.ItemCount + " elements");
             }
             else
             {
                 Console.WriteLine("No elements found");
             }
         }
         catch (Exception ex)
         {
             Console.WriteLine("Error: " + ex.ToString());
         }
     }
 }
As this is just a proof of concept, we are setting the SharePoint access-data (site URL, list name, account and password) as clear text. However, you need to secure the information in production code, for example, the App.Settings and Azure Key Vault. The code only demonstrates how to make a connection with SharePoint and extract some data, in this case, the number of elements in one List, but you can develop almost any type of business requirement.
- To publish the code to Azure, select the Visual Studio Project from the Solution Explorer and use Publish as Azure WebJob.
- A new window opens to assign a name, select On Demand to test it
- Then you will be asked to connect to your Azure tenant, select the Subscription, Resource Group, and Web App.
- Finally, you will get a publishing profile as shown in Figure 2:
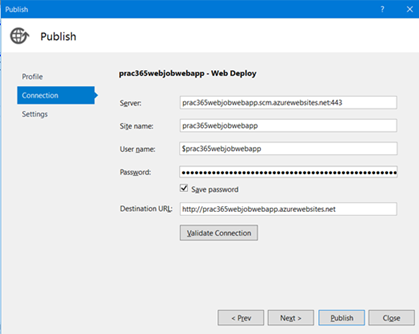
Figure 2. Publishing the Web Job code to the Azure Web App
Step 3: Run the Web Job manually
- To test the code, return to the Resource Group in the Azure management console, click on the Web App link and use the WebJobs button under the Settings section
- The list containing the Web Jobs defined for the Web App will show
- Click on the just-published Job and then on the Run button to execute the code, as shown in Figure 3:
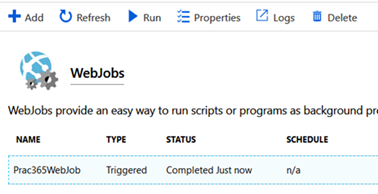
Figure 3. Web Jobs list containing the Status and the “Run” button.
To see the results, use the Logs button; a new window will open showing the below details, including all runs and the Status of each one:
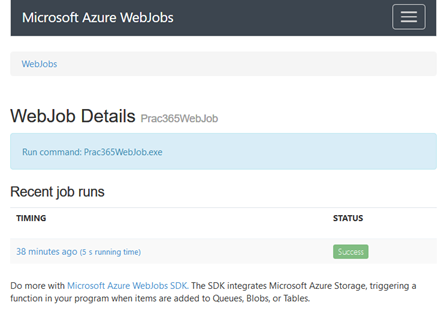
Figure 4. Run details of one Web Job
After you’ve clicked on one of the runs, you will receive the information in the below example:
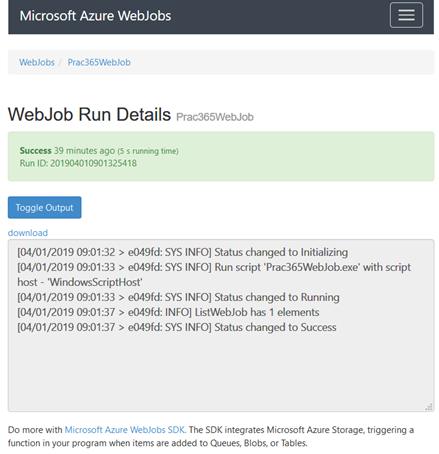
Figure 5. The output from one run
As shown in Figure 5, the output indicates that the List has one element, as it was programmed in the source code.
Step 3: Schedule the Job
Initially, we configured On Demand to run the Job, but the idea is that it runs based on a schedule. When the Job was published, Visual Studio created the file webjob-publish-settings.json in the Properties directory. To force a new deployment, delete the file and run the publisher again; choose Continuous this time instead of On Demand. Open the file and change the JSON code to:
  {
   "$schema": "http://schemastore.org/schemas/json/webjob-publish-settings.json",
   "webJobName": "Prac365WebJob",
   "startTime": "2019-04-01T00:00:00Z",
   "endTime": "2019-04-01T20:20:20Z",
   "jobRecurrenceFrequency": "Minute",
   "interval": 10,
   "runMode": "Continuous"
 }
Here, you can set the start and end time, interval and frequency for the scheduler. Publish the Job again and it will now run as you’ve scheduled it to. Please note, that there is no scheduler available if you choose the F1 App Service Plan.
Conclusion
To conclude, here’s a quick summary of what we’ve achieved in this article.
We’ve learned if we need to create an automated way to conduct maintenance work in SharePoint Online, Azure Web Jobs is a prominent option. We’ve also discussed how to configure the Job so it’s fully functioning and ready to go. Lastly, from an architectural standpoint, it only needs to be considered if Azure Functions is more suitable, but technically speaking, Azure Web Jobs allows you to automate any job you require in SharePoint.


Hi,
Interesting post! What are some practical examples of this approach though?