One of the most common asks when migrating mailboxes to Exchange Online is “how do I speed up my migration?”. There’s a number of ways to accomplish this, and in this article, we’re going to provide a quick primer on how to improve throughput by using multiple migration endpoints.
Before you begin
Before you start read about how to configure multiple migration endpoints, it’s important to be familiar with how to configure Exchange Hybrid. You’ll find guidance on how to create a Hybrid Configuration in here on Practical 365. Although one or two things have changed very recently – which we’ll cover in upcoming articles, if you are implementing this today you’ll still follow the same core tasks.
Migration Endpoints
When you configure Exchange Hybrid, you will publish at least one Migration Endpoint to use to migrate mailboxes to Office 365.
When the Hybrid Configuration Wizard executes, it will enable the MRS (Mailbox Replication Service) Proxy component on Exchange 2016 Mailbox Servers and Exchange 2010/2016 Client Access Servers. The name used for Exchange Web Services External URL is typically also used as the FQDN for the Migration Endpoint.
Consider the example organization below, where we have published our Exchange environment via a Load Balancer to the internet, and use the name mail.practical365.com as the single external name used when performing mailbox moves.
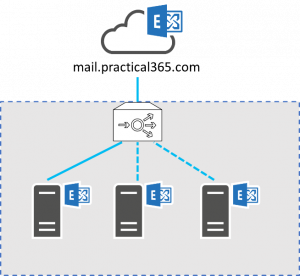
Figure 1: A single migration endpoint
In the example above, we have the external name fronted by a load balancer (most likely behind a firewall too). This single Migration Endpoint will be used for all migration batches, and spread traffic across servers behind the load balancer.
For smaller organizations, with only a smaller or medium amount of data to migrate to Office 365, or for a pilot, a single Migration Endpoint may be sufficient. After all, the simplest configuration is often the best one to use.
Introducing Multiple Migration Endpoints
However, if you need to improve the throughput – or the amount of data you can migrate within a set amount of time – then you might find that a single Migration Endpoint doesn’t meet your needs.
Typically you’ll consider this if you are in a larger organization with more than just two or three servers, or if you have Exchange servers in multiple datacentres or regions. In such cases, you’ll see benefits of being able to commence multiple Migration Batches, each configured to use a separate named Migration Endpoint.
This works by configuring separate names for the Migration Endpoints to the Exchange Web Services external URL name. We’ll still use the Exchange Web Services external URL – it is essential to functionality like Free/Busy, and this will remain published in a similar way to that it is in the example above. For our Migration Endpoints though, we’ll instead have a one to one mapping between the Migration Endpoint names and the individual Exchange Servers with the MRS Proxy capability enabled.
Each of these separate names will need to be separately published and registered in external DNS. We will also need to either have the name contained within the SAN (Subject Alternative Name) SSL certificate, or use a wildcard certificate so that the multiple names are supported.
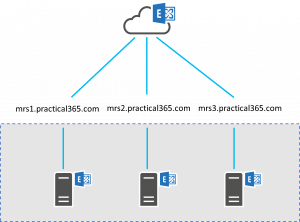
Figure 2: High Level View of Multiple Migration Endpoints
In the example above, you’ll see we’ve configured three separate names; mrs1.practical365.com, mrs2.practical365.com and mrs3.practical365.com.
SSL Certificate and Virtual Directories
In our example for practical365.com this means that the SSL certificate used is likely to have the following names configured:
- practical365.com – used for normal client access, and in respect of Hybrid used for Federated Sharing, including Free/Busy (Availability).
- practical365.com – used for Autodiscover, both for clients on-premises and in Office 365 whilst in Hybrid and for discovery of URLs used by Hybrid, such as the Exchange Web Services URL to use as part of Federated Sharing.
- practical365.com, mrs2.practical365.com and mrs3.practical365.com – used for the Migration Endpoints.
Although the SSL certificate, DNS entries, and external publishing is important, one area we don’t need to reconfigure is Exchange Virtual Directories. The Exchange Web Services Virtual Directories on each server that include the MRSProxy capability – the Migration Endpoint itself – will remain as-is, and in our example will continue to use the mail.practical365.com name.
Instead, when we create each Migration Endpoint in Exchange Online, we’ll manually specify each of the additional Migration Endpoint names. This means the configuration is relatively easy to transition to, as if you currently use the simpler method, outlined in Figure 1 for migration of mailboxes, you can transition to this approach without breaking any migrations in progress.
External Publishing
Publishing each Migration Endpoint may require more thought however, as you will not simply re-use the existing externally published Load Balancer configuration. We will instead be publishing each server individually. There are a number of ways to accomplish this.
The simplest option, should it be available to you, is to configure the firewall to publish each Exchange Server directly, typically with a NAT mapping for each Exchange Server, with HTTPS (Port 443/TCP) open to allow traffic from the Exchange Online IP addresses.
In this case, the external firewall will be configured with a separate external IP address for each Exchange Server, configured on the firewall to forward traffic received from Exchange Online to the internal IP addresses of each Exchange Server. Naturally each Exchange Server used must have the SSL certificate with the updated list of Subject Alternative Names installed and assigned to IIS. Each Migration Endpoint name (such as mrs1.practical365.com) must be registered in external DNS, mapped to the corresponding external IP address:
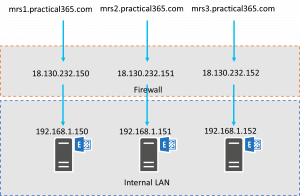
Figure 3: Direct Firewall Mapping
This approach may not be suitable for all organizations – especially if the network architecture doesn’t support publishing servers located on the external network.
If that’s the case in your organization, using the existing Load Balancer with separate Virtual IP Addresses (VIPs) for each Migration Endpoint name, with a configuration designed to replicate the above example will prove suitable.
Using a Load Balancer to accomplish this does introduce another aspect that could affect performance, but it does provide a little more flexibility, as you have the ability to potentially further restrict the published URL to only the MRS Proxy path (/ews/mrsproxy.svc), potentially use Layer 7 capabilities on the Load Balancer to use a single external IP, or to allow the back-end server to be switched in the event of a single server failure.
The great thing about this approach – whichever way you implement it – is that you can see even bigger benefits when you have a multi-national Exchange organization. In such scenarios, publish Migration Endpoints in each region you must migrate mailboxes from. This will allow you avoid mailbox moves traversing the Wide Area Network as you migrate.
Configuring Exchange Online
You will be pleased to know that within Office 365, the configuration required to enable this configuration is straightforward. You must configure the Migration Endpoints, then choose the endpoint you wish to use when you create new Migration Batches. You’ll find more about how to create migration batches in our previous article.
To accomplish this using PowerShell, connect to Exchange Online, then create a New Migration Endpoint for each required:
| $ExchangeCredentials=Get-Credential
New-MigrationEndpoint -Name “Endpoint Name” -RemoteServer “Endpoint FQDN” -ExchangeRemoteMove -Credentials $ExchangeCredentials |
In our example organization, this would look similar to the commands below:
| New-MigrationEndpoint -Name “mrs1.practical365.com” -RemoteServer “mrs1.practical365.com” -ExchangeRemoteMove -Credentials $ExchangeCredentials
New-MigrationEndpoint -Name “mrs2.practical365.com” -RemoteServer “mrs2.practical365.com” -ExchangeRemoteMove -Credentials $ExchangeCredentials New-MigrationEndpoint -Name “mrs3.practical365.com” -RemoteServer “mrs3.practical365.com” -ExchangeRemoteMove -Credentials $ExchangeCredentials |
With the configuration in place, remember to ensure you plan your migration batches to ensure you spread concurrent migration batches across each Migration Endpoint; and in the case of a multi-national deployment, align the mailboxes in each batch to each set of regional Migration Endpoints.


Hi we have 4 existing Mailbox/CAS servers running Exchange 2013. We have spun up two new Exchange 2019 servers to serve as hybrid CAS endpoint and hosting the Arbitration mailboxes and ECP for administration during/after the moves. Do we need MRS Proxy enabled on the Exchange 2013 Mailbox servers too, or just the Exchange 2019 servers where the Hybrid configuration it set to connect to from the External?
I would check the configuration in place, as the HCW should have enabled the MRS Proxy endpoint across all servers including the Exchange 2013 servers already for you.
Hi Steve,
Great post! Quick question to confirm my understanding.
From what i’m reading here, there would be no requirements to modify the existing Exchange server EWS virtual directory external URL to reflect the new migration endpoints, as long as the public certificate presented by the external IP on the firewall has a valid SAN, correct?
As an example, my current configuration would have the servers reply to mail.mycompany.com. I’d add mrs1.mycompany.com and mrs2.mycompany.com in the SAN and NAT those directly to specific servers and call it a day?
Thanks!
Yes, that’s right
Awesome! Thanks for the quick answer!
Steve, one question, we have one customer with europe region already with hybrid deployment and they have a mexico region (same internal AD; same Exchange Org, same domain, same ALL) but the mexican mailboxes are on a server located on Texas USA (connected internally to all exchange org and servers across US, EUROPE)
the question is, can I add an extra MRS proxy at USA server (CAS) and call the remote move request to migrate those mailboxes, instead of sending them through Europe?
Hiya,
Yes absolutely. This should only need the MRSProxy enabled (Hybrid should have done it to all EWS Virtual Directories, but it can be enabled using PowerShell) and to have an externally published FQDN, with a valid SSL certificate and unique name to the region or server. Then add an additional Migration Endpoint in Exchange Online with that FQDN, and test mailbox moves.
Steve
Hi Steve! How are you doing?
We are going to migrate directly from On-Premisses Lotus Notes to O365. Our internet bandwidth is lower than we need, so, maybe only be possible to upload just 5 mailboxes at a time.
Rgds
Hi,
What tools will you be using got your Notes migration?
Steve
Steve, Your SSL cert bullet points seem to be missing the hostname on the first DNS entry on each bullet.
Chris
Thanks, I’ll get it updated
As per the suggey I need clarification on renami g the ews url to mrs1.practical365.com or should I retain the URL same mail.practical365.com.