Many instructions are available to help you to upgrade Exchange servers to Exchange 2019, but I thought it would be a good idea to document practical learnings acquired by fellow MVP Thomas Stensitzki through upgrading customers to Exchange 2019. We discussed these learnings in our MEC 2022 session named “Upgrading to Exchange Server 2019.” This article summarizes the most important lessons learned from that session.
Considerations for Mailbox Servers
Key points to remember for mailbox servers when upgrading to Exchange 2019 include:
- Use the same TLS certificate and TLS configuration for all Exchange Mailbox Servers – This is a well-known best practice; make your life easier and use one certificate for all Exchange mailbox servers. Of course, there might be situations where you require the server’s name in the certificate, but in most cases, you don’t need it. Using a single certificate tremendously eases your management effort, as you need to install and distribute only one certificate to all servers.
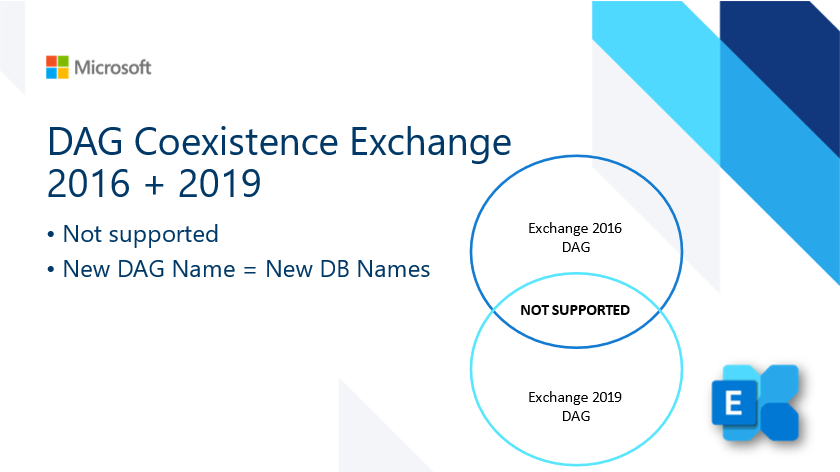
- Never create a Database Availability Group (DAG) that spans Exchange Server versions – It’s always better to create a new DAG and new databases to run a new version of Exchange Server. Even though it might work to add an Exchange 2019 server to an Exchange 2016 DAG (Figure 1), it’s not supported and should never be done! As Microsoft’s Greg Taylor once said, “Never cross the Streams” (a quote from the Ghostbusters movie) – and he’s right!
- Check default database quota settings after creating new Exchange 2019 databases – Don’t forget if you have custom database size settings, they must be adjusted every time you create a database. It’s a good idea to create a custom configuration PowerShell script to configure database settings that can be run when you change the Exchange environment.
- Plan enough space for the mail.que file! – The mail.que file stores copies of sent messages and the shadow queue. The shadow queue keeps a copy of all sent mail, for redundancy and failover purposes. Depending on the size of your environment, the file can occupy many gigabytes. I’ve seen 100 GB mail.que files in mid-size companies. It’s therefore important to plan for sufficient storage to hold the mail.que or perhaps consider moving the file to a separate drive. Don’t keep the mail.que on the default O/S drive, as it might cause issues such as server outages if the drive fills up because of email traffic.
- Check the default connector remote IP address ranges of old Exchange Servers – If you changed or restricted any of the default range of IP addresses on the default connectors, don’t forget to add the IP addresses of your Exchange 2019 servers, otherwise, they cannot communicate with each other.
- Configure the Hypervisor for fixed and reserved CPU and memory resources – Although this is part of the preferred architecture for Exchange, and has been recommended for virtualized environments for a long time, I still see some VM administrators that change the Exchange resources and assign shared resources. I’ve seen server outages caused by this issue as databases exhausted of memory and dismounted. Always assign fixed memory and CPU resources in virtual environments to make sure that the “memory-eating monkeys” (Exchange servers) have enough to run.

Best Practices when implementing MAPI over HTTP
MAPI over HTTP is the primary email client connection protocol for Exchange 2019, but if you upgrade from an Exchange 2013 environment, that version doesn’t use MAPI over HTTP. Thus, you should test Outlook clients to see if they support MAPI over HTTP before you move mailboxes to Exchange 2019. Otherwise, clients might not be able to connect to mailboxes hosted on Exchange 2019. For example, if you move the primary Public Folder mailbox to Exchange 2019, but other Public Folder mailboxes are still on Exchange 2013, Outlook will fail to connect.
Depending on the Outlook version, you might experience different connection issues. For example, errors may occur if Outlook tries to connect to mailboxes enabled for MAPI over HTTP if the mailboxes are hosted by Exchange 2013. This is because of a mismatch between the old RPC over HTTP and the new MAPI over HTTP protocols.
For this reason, you should carefully test if any of the set of clients in active use has issues with the MAPI over HTTP protocol. Enable the protocol initially for specific mailboxes and see if it works. When you are sure that all clients work correctly, you can enable MAPI over HTTP everywhere and move the mailboxes to Exchange 2019.
Here’s how you do the testing:
- Deactivate MAPI over HTTP for the Exchange organization by running the following cmdlet:
Set-OrganizationConfig -MapiHttpEnabled $false
- Enable MAPI over HTTP for selected mailboxes prior to migration using the following cmdlet:
Set-CASMailbox <mailbox> -MapiHttpEnabled $true
- Move the selected mailboxes to Exchange Server 2019, and test the mailbox access
- Enable MAPI over HTTP for your Exchange organization by running the following cmdlet:
Set-OrganizationConfig -MapiHttpEnabled $true
- Activate the MapiHttpEnabled setting for all mailboxes by using the following cmdlet:
Get-CASMailbox | Set-CASMailbox -MapiHttpEnabled $true
Public Folders during Coexistence
If Public Folders are still used, at least the migration to Exchange 2019 is quite simple and works very well. However, for user mailboxes hosted on Exchange Server 2019, the following limitations exist when public folders are hosted by Exchange 2016:
- No access to public folder favorites via OWA.
- Problems accessing organizational forms using Outlook desktop.
To avoid these limitations, it’s recommended that you move Public Folder mailboxes to Exchange 2019 first, before you move user mailboxes.
Edge Transport Considerations
The Edge Transport server role is a dedicated server role that runs in the DMZ or Internet network. In many cases, I’ve seen Edge Transport servers used in hybrid Exchange deployments, as there was a time when Microsoft stated that this was the only fully supported scenario to relay messages between Exchange Online and Exchange on-premises. No other SMTP relay gateway was officially supported.
If you use Edge Transport servers that you want to upgrade to Exchange 2019, consider the following:
- Use a dedicated TLS certificate not used by internal mailbox servers – This will ensure that the certificate is only used for your Edge Transport SMTP traffic purposes and does not disclose any internal namespaces or server names to potential attackers. Also, you may want to consider the “less is better” approach – only adding the names you need to the certificate.
- Ensure Edge TLS certificate is a CAPI1 (Cryptographic API) certificate – As EdgeSync does not support CNG (Cryptography Next Generation) certificates, they cannot be used, and EdgeSync fails to establish a connection to your Edge Transport servers if you use them.
- Do not use TLS offloading or TLS bridging between internal mailbox servers and Edge Transport servers – Make sure you do not use these advanced communication optimization features, as they modify SMTP traffic between mailbox and Edge Transport servers.

Upgrading to Exchange 2019: Moving forward
Even though Exchange migrations get easier and easier as you don’t require, for example, complex Public Folder migrations scripts anymore, there are still some things to remember when you plan and perform an upgrade to Exchange 2019. This article is based on the experiences Thomas and I collected for our session at Microsoft Exchange Community Airlift 2022 in September 2022. A recording of our “Upgrading to Exchange Server 2019 “session is online.
Do you have any additional experiences or best practices you want to share with the Practical 365 community? Feel free to send them to us or post them in the comment section below.


I have a 2016/2019 exchange coexistence environment, I have migrated my mailbox over to the 2019 server, but my outlook client connects intermittently. One day it works and next it will not. All VD are the same, Outlook anywhere auth is set to Neg on all servers. Verified cert in IIS is set correctly. 2016 mailbox have no problem connecting. OWA access works all the time.
I had some Problems with Extended Protection disabled in 2016 and enabled in 2019. OWA Logins from 2016 to 2019 were failing, logins from 2019 to 2016 are working. I had to disable Extended Protection on 2019 to get every thing working.
The Culprit
Check the default connector remote IP address ranges of old Exchange Servers
Many thanks!!!!!
the funny thing is that i was able to migrate small mailboxes before adding ip addresses of all exchange servers in all default connectors remote ip.
how is that possible? how did i manage to migrate several mailboxes until it halted the operation completely and nothing was passing anymore until i added the above.
more than 20GB went through between my posts =)
Any info on mixing Exchange 2016 and 2019 client access servers in a load balancer?
You can have 2016 and 2019 servers in the same LB application pool. The Exchange Server receiving the connection proxies the connection to the Exchange Server holding the active database copy of the mailbox. An Exchange 2019 server can proxy to Exchange 0216 (aka Down-Proxy), and an Exchange 2016 can proxy to Exchange 2019 (aka Up-Proxy).
Exchange 2016 and 2019 servers must share the same Kerberos ASA account.
MAPI over HTTP was added to Exchange 2013 SP1, so you could/should enable that