
Every day around the world, companies are compromised by phishing emails, brute force attacks, and email hacks. Admins now have to work harder than ever to protect and defend their Office 365 environments. In the unfortunate case of an attack, they must figure out how the breach was made, what the hacker did and what data was stolen. Browsing Office 365 audit logs after an attack can be a highly time-consuming and costly process for an organization, especially if you don’t know where to look or how to remediate the incident. As a precautionary measure, companies should have security playbooks in place, for example, I recommended having Account Breach & Search and Destroy Playbooks.
In my previous blog series ‘How to report on suspicious emails Part 1 and Part 2′, I talked about phishing attacks, preventative measures using the Report Message Add-in, and how to deploy this in your Office 365 tenant.
In this three-part series, I walk through how to detect, investigate and remediate account breaches with Cloud App Security and the Hawk PowerShell Module. This first blog of this series is looking closely at ‘Detecting Account Breaches in Cloud App Security’.
Part 1 – Detecting Account Breaches in Cloud App Security
Let’s start with covering what Cloud App Security is and what it can do to assist you in detecting account compromises. Microsoft Cloud App Security is a Cloud Access Security Broker (CASB). It allows you to have visibility into suspicious activity within your Office 365 platform, to investigate, and act against security issues that arise either manually or by automation. You can configure alerts and notifications to suspend an account, or, force the account in question to log back on to Office 365 depending on criteria built within the policies. Cloud App Security is available to tenants with an Office 365 Enterprise E5 license. If you don’t have an E5 license, you can purchase Cloud App Security as an add-on. Please note, you must also be a Global Administrator or Security Administrator or Security Reader to use Cloud App security.
If you already have E5 licenses or the Cloud App Security add-on, then login to Cloud App Security portal and follow the below steps:
- Browse to https://protection.office.com and sign in with your work admin account.
- Click the Alerts Drop down and select Manage Advanced Alerts
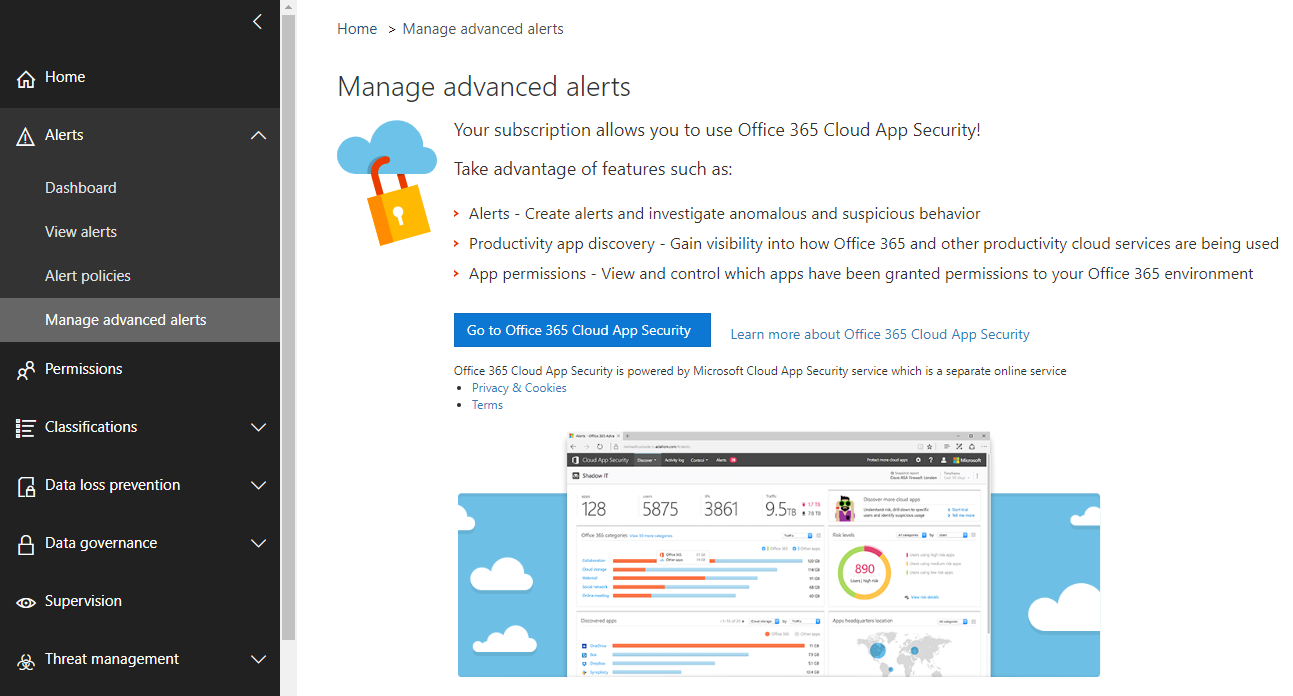
- Click on Go to Office 365 Cloud App Security
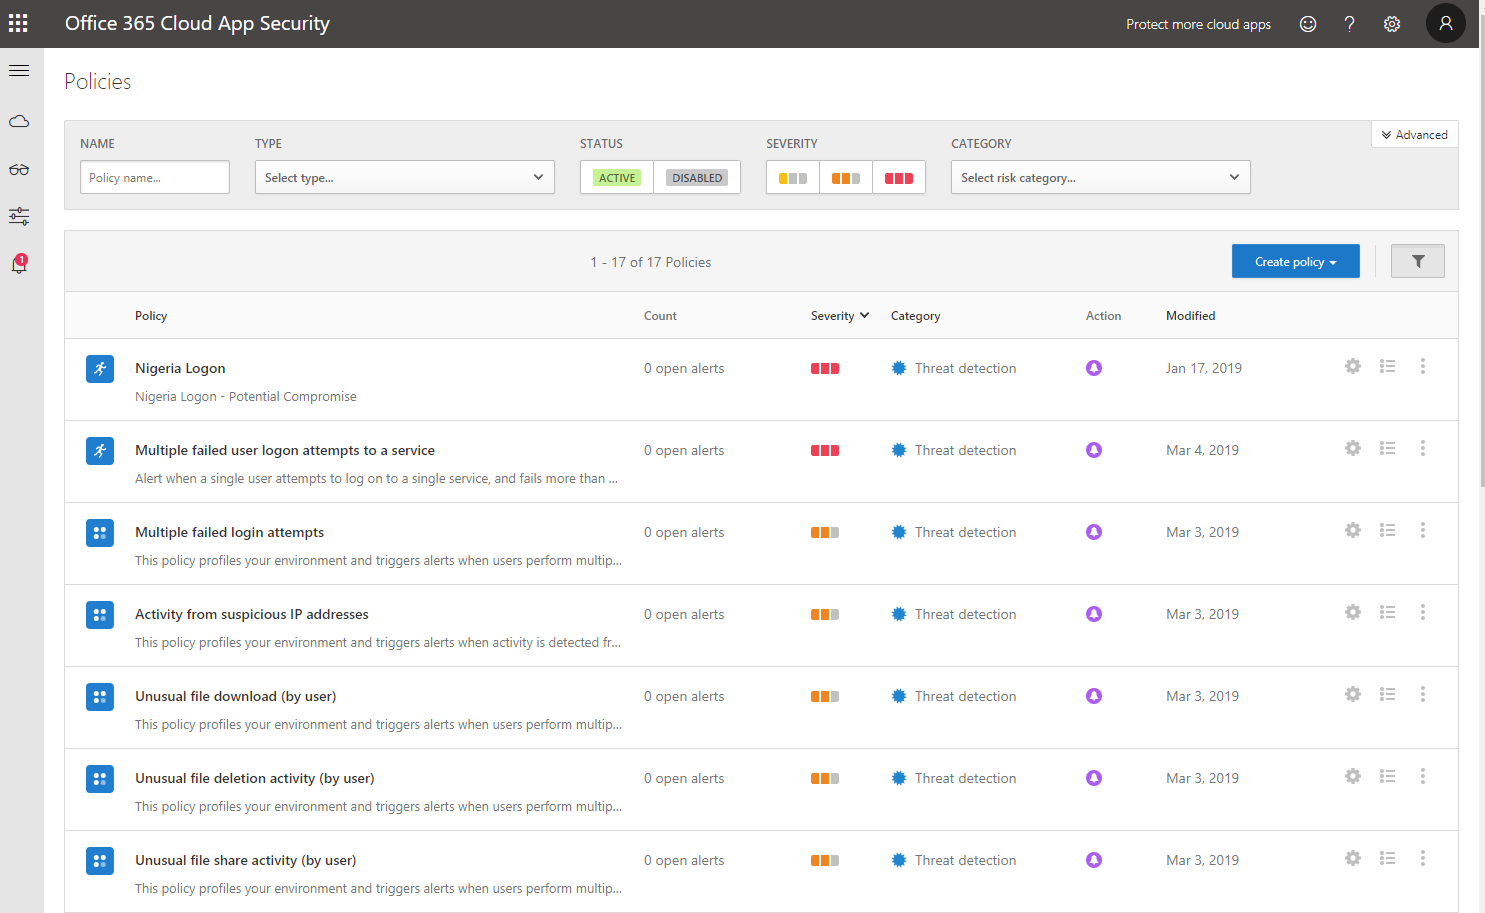
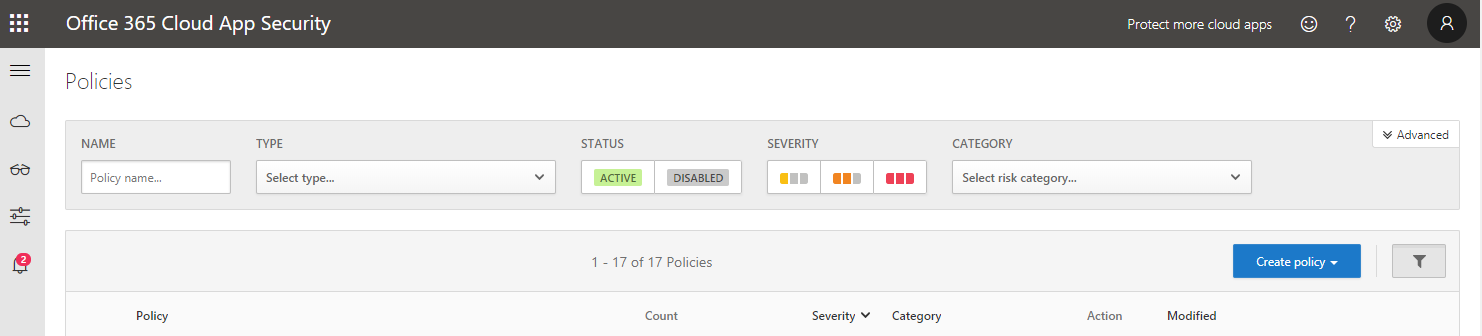
- You will then be taken to the Policies Page within Cloud App Security
Cloud App Security Policies and how it works
Cloud App security uses Entity Behavioral Analytics (UEBA) and Machine Learning (ML) to allow tenants to start using these alerts as soon as Cloud App Security is enabled. Once enabled by license or subscription purchase there is an initial seven day learning period to gain an understanding of the users in your environment. Anomalies are detected by monitoring the user’s activities within Office 365. The overall Risk Score is calculated by looking at over 30 different risk indicators. Examples of these are Risky IPs, Admin Activity, Impossible Travel, Location, Login Failures etc. If something from the user happens outside of their normal baseline an alert can be triggered.
Microsoft provides a base set of Anomaly Policies and templates for starters. These base policies are created to detect ransomware, admin activity from untrusted IPs, impossible travel activity, malicious inbox rules, and more. In this article, I’ll be predominantly focusing on Activity and Anomaly Detection Policies.
Detecting Compromises with Cloud App Security Policies
Impossible Travel Activity Alert
- Within the Cloud App Security Policies default page, find and click on Impossible Travel to review the baseline settings
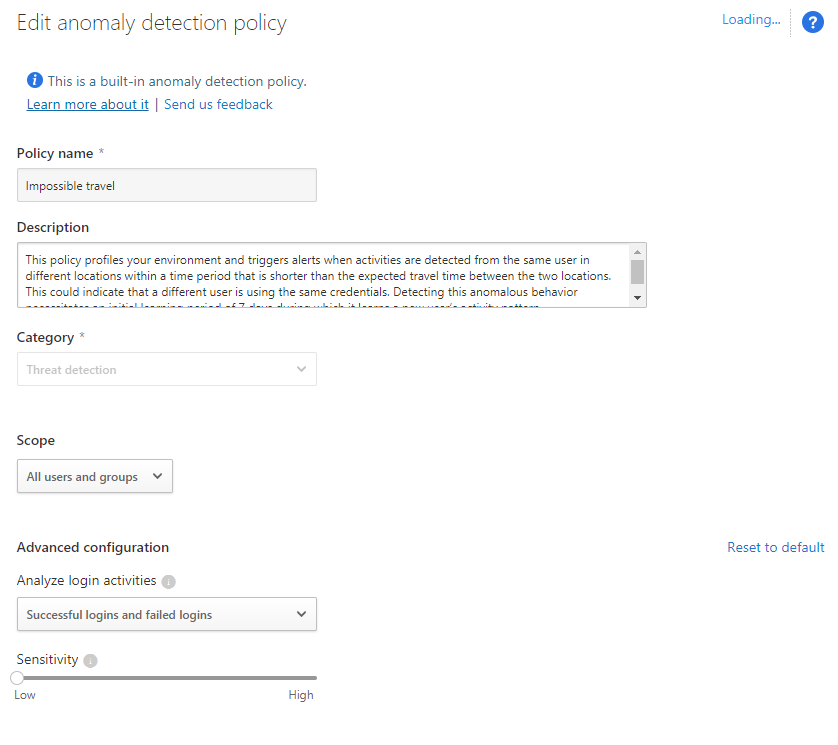
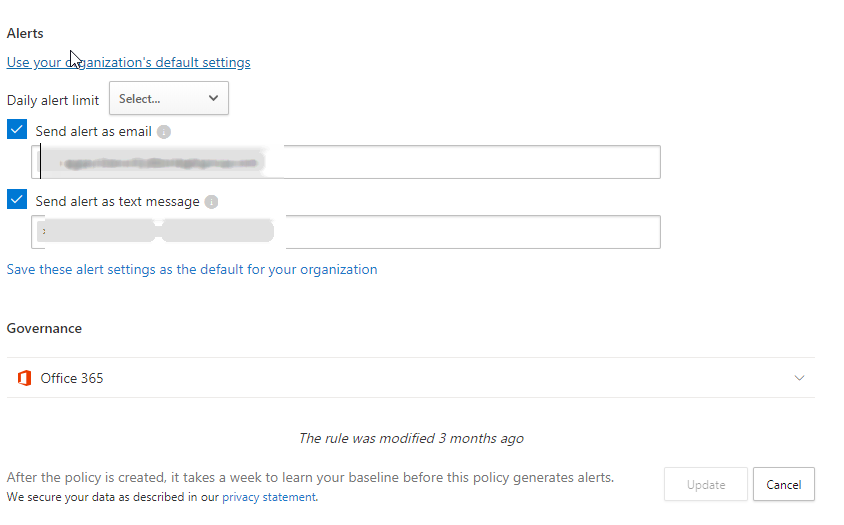
Each Policy can be configured to your entire organization or certain users or groups. I recommend that you leave the base policies in place and restrict certain apps or users if needed. To get the most out of these alerts wherever you are, you should configure the Send alert as Email and Send alert as text message. Also, if you want to be able to configure these policies faster next time, I would configure the Use your organization’s default settings.
With a global organization, the Impossible Travel Activity Alert is very effective in demonstrating the user traveling from one country to another. The general rule of thumb is to contact the user when these alerts have been triggered, so you can confirm whether they are in fact traveling.
Now, let’s look at an example of an Impossible Travel alert from a compromised account.
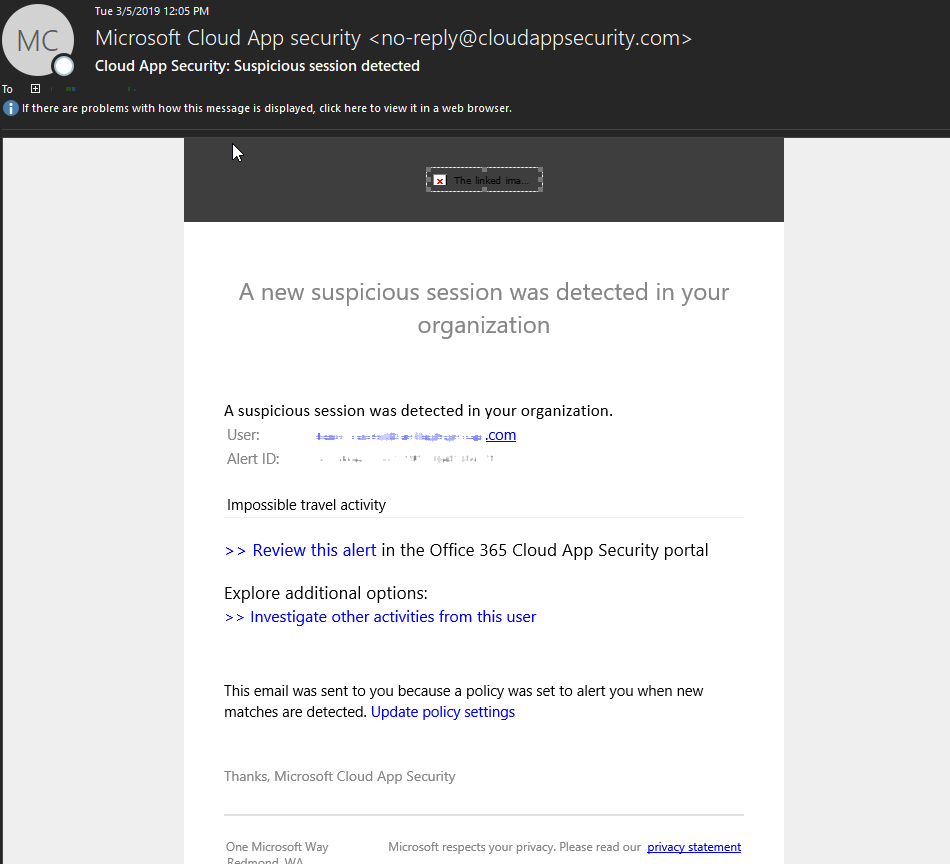
If you have the alert settings configured in the policy, you will receive an email and text message if configured like the below:
Within the Cloud App Security Page select the Alerts Bell on the left pain.
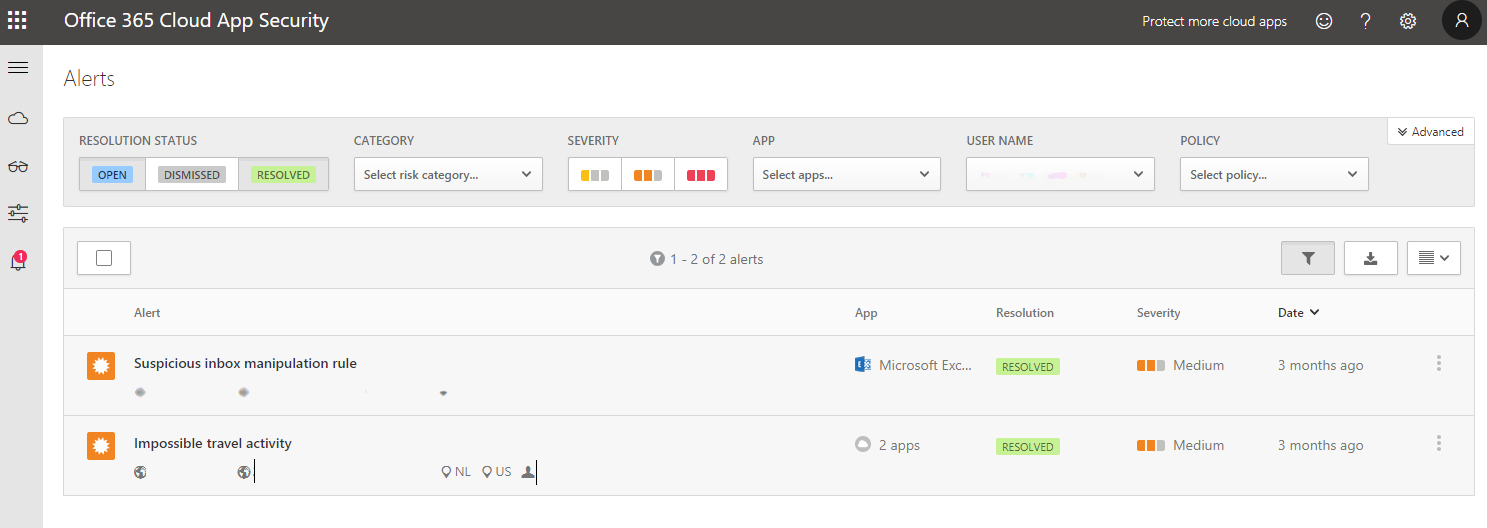
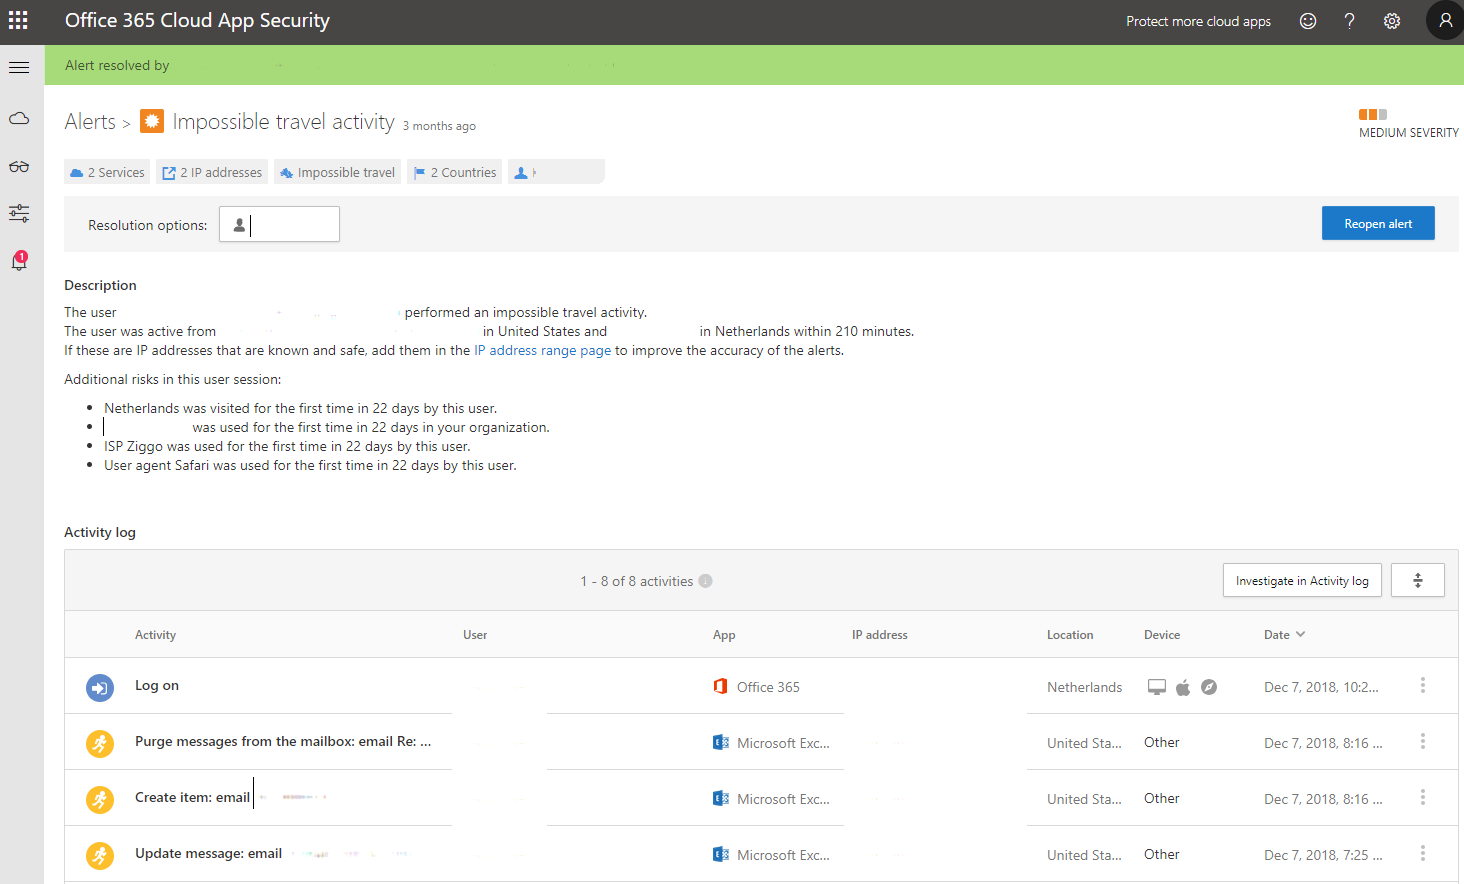
Below, you can see there are two alerts for this user, so the details of this Impossible Travel Alert need to be reviewed. The main areas here are in the Activity Log section, the user shows to be in the United States at 8:16 and then 2 hours later a login was detected in the Netherlands. This alert raises a concern because it is impossible to travel that far and log in again in that amount of time.
The Impossible Travel Alert is the first step in detecting account compromises as it continues to alert you on impossible travel. I would then recommend following up and confirming with users as to whether they are traveling; most people tend to respond quickly to security inquiries. If the user confirms they are not traveling, you can take immediate remediation action and have the user reset their password quickly before any further damage is done by the attacker.
Location Based Logon Activity Policy
Creating a location-based Activity Policy is another highly effective way of locating compromised accounts. In addition to Impossible Travel Activity, I recommended creating an Activity Policy in countries that you don’t have an office or facility locations. Recently, in my organization, we experienced multiple account compromisations coming from Nigeria. This was alarming because we don’t have any facility locations there, and after multiple compromises, we created a detailed policy just for this country. Upon receiving approval from Legal and Risk management it was agreed that any logons coming from Nigeria would result in an immediate account suspend action being enforced to prevent further access and harm on the account. When you use the suspend action for any policy you are preventing the user from signing in to Office 365. I will discuss the Suspend Action further in Part 3 of this series on remediation.
Below are the steps to create a new Activity Policy:
- Select the Control pane and Select Policies.
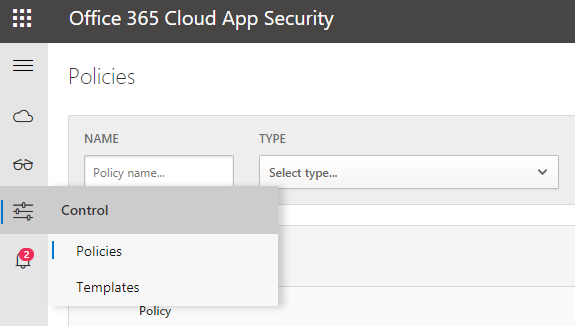
- Click on the Create Policy dropdown and Select Activity Policy.
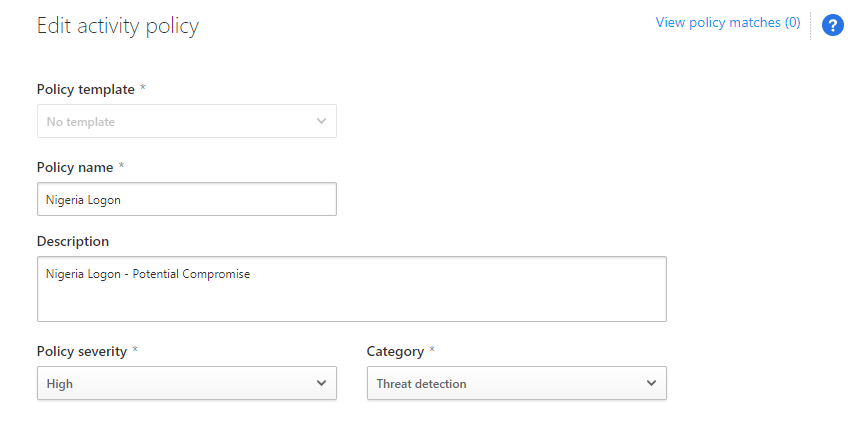
- In the Policy Template leave this as No Template
- In the Name type in what you want to call the policy e.g. Nigeria Logon
- In the Description enter some information about the policy e.g. Nigeria Logon – Potential compromise
- In Policy Severity set this to High
- In Category set this to Threat Detection
- Then go to Create filters for the policy, set Act on to Single Activity
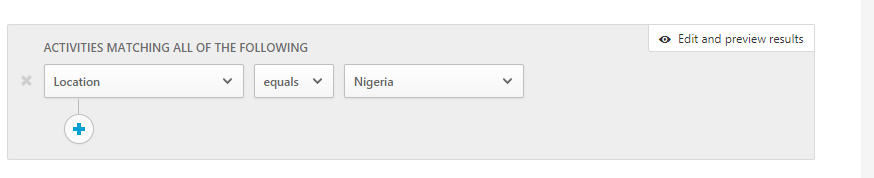
- In the Activities Matching all the following click select a filter and type and select Location
- In the Select Countries type and select the country you want, e.g. Nigeria
- Configure the Alert settings to meet your requirements
- Under Governance Select the drop-down and check the Suspend user box (you can enable this after governance approvals from your legal and risk teams)
- Finally, click the Create Button

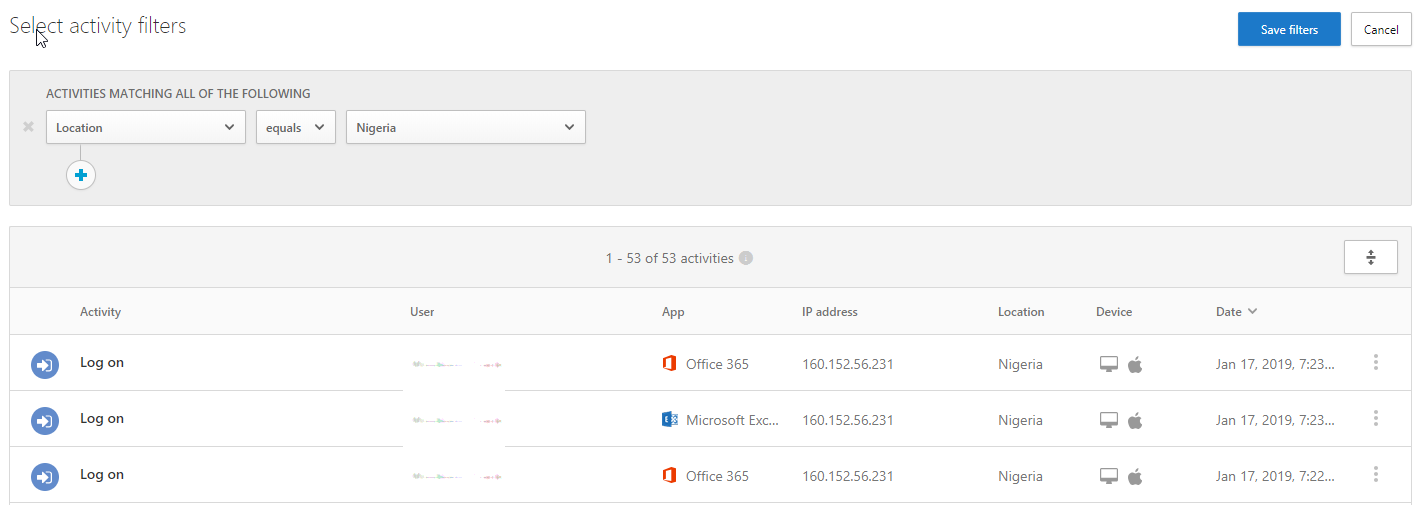
What I like best about creating new Activity Policies, is in the Activity Matching section you can click on the Edit and Preview Results in the right corner. This will show all activity in the past that meet the criteria you are setting now and alert you for future matches. This ensures the Activity Policy will work without the need for testing.
The example of Edit and Preview Results below shows alerts previously triggered for Nigeria location logins.
Suspicious Inbox Manipulation Rule
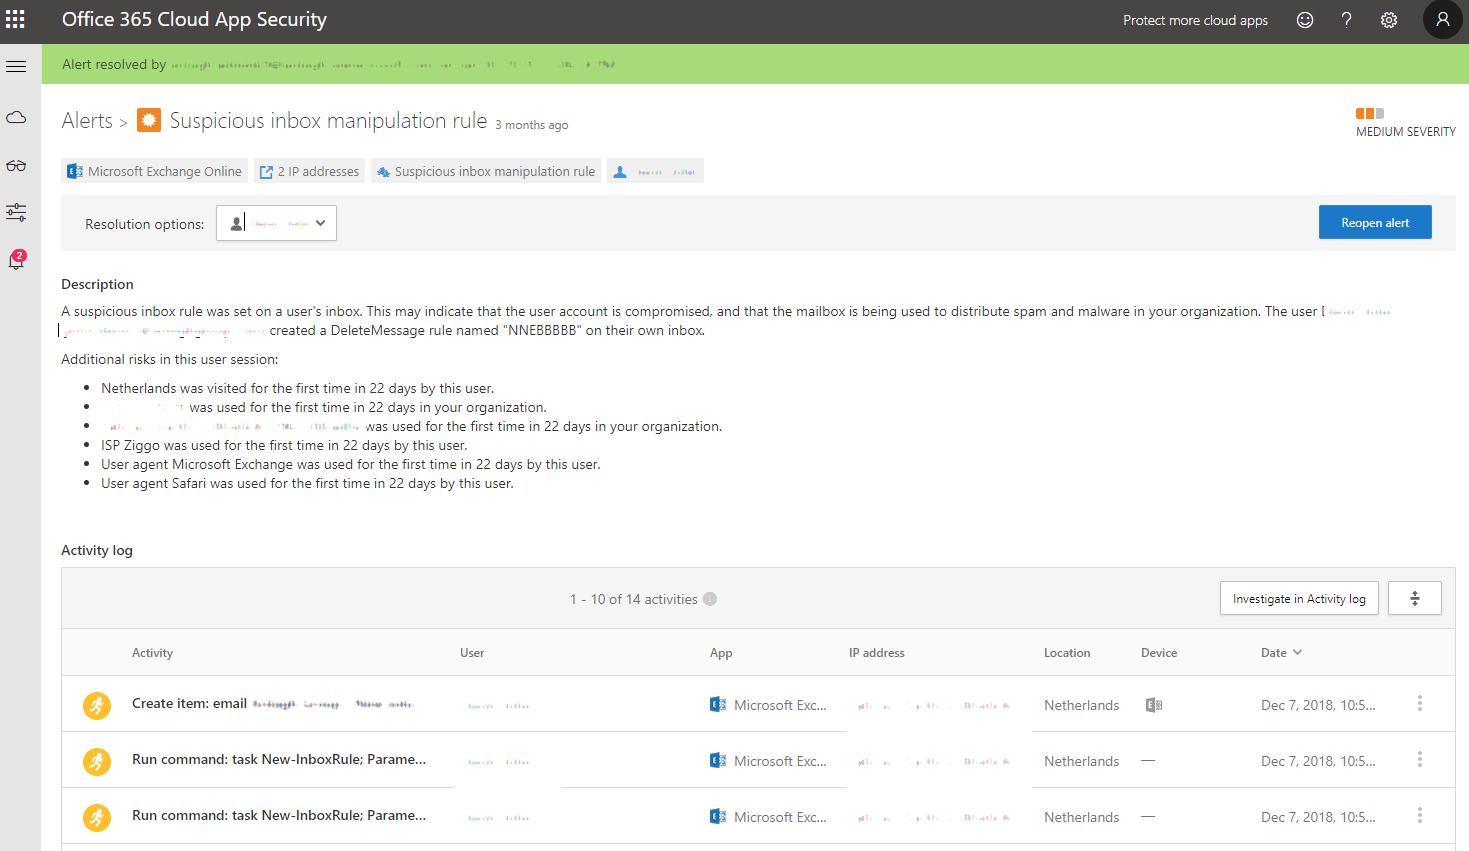
The third Anomaly Detection Policy I recommend is the Inbox Manipulation Rule policy. What this does is helps to identify if an attacker is already in the system just after logging in. It’s common for attackers to create inbox rules to either delete new emails being sent or to redirect them based on their criteria. Below, is an example of a real manipulation inbox rule alert that was triggered in a recent account compromise. You can see that the attacker has created a DeleteMessage rule named “NNEBBBBB”. Within the alert, it also shows in the activity log section the run command: task new-inboxrule.
Seeing malicious inbox rules should flag as a potentially compromised account. To see what it is doing, you will need to investigate the rule that was created.
In part two of this article series, I will do a technical deep dive into the Investigation Process using Cloud App security and the Hawk PowerShell Module. I hope this article helps you to detect account compromises in your environment. Thank you and stay tuned!
You may also like: How to Improve the Security of Office 365 – a guide detailing best practices for creating and implementing security procedures to ensure your Office 365 environment stays safe.


Hi, the first part you can exclude VPN addresses. The portal will highlight the VPN IPs as Blue with and makes it easier to see if someone tries a china login then 1 minute later they are on VPN. You can achieve this by clicking the cog wheel and then IP ranges. You can then add your VPN ranges and mark them as Corporate. It does help with reviewing the impossible travel alerts quicker and there will be less alerts once the AI picks up the VPN addresses and looks for the user patterns.
Here is a bit on the corporate branding:
“When an IP address is tagged as corporate, it is reflected in the portal, and the IP addresses are excluded from triggering specific detections (for example, impossible travel) because these IP addresses are considered trusted.”
We check the failed logins IP and find the range it came from as well and then we see if the IP was used by anyone else within the last 30 days. If not, we add it to the O365 block IP list from connecting to O365. Within cloud app as well we will tag the range as Risky too.
As many travelers we have, we have yet to have anyone complain about a blocked range from a country. 90% of the time the ranges are used by proxy and VPN companies which our users shouldn’t be using as is.
I agree, good article. We have 50k users all over the world and get frequent impossible travel alerts which turn out to be VPN related: e.g. user logs in to email from China, realizes China blocks our library, so they start their VPN and login to the library from USA. Is there any way to exclude VPN addresses as being suspicious? Obviously, not even Microsoft can track every IP address associated with a VPN, but they could probably whitelist the most common ones.
Also, is there any downside to only tracking successful logins? We are also tracking unsuccessful logins, meaning we get some insight into potential attacks, but we also get flooded with alerts we can’t really do anything about. E.g. they warned me that someone in Uzbekistan was trying (and failing) to log in with my credentials. I said what am I supposed to do, go there and stop them? I said feel free to block the IP address they are using, but I’m not sure that’s practical.
Hi, the first part you can exclude VPN addresses. The portal will highlight the VPN IPs as Blue with and makes it easier to see if someone tries a china login then 1 minute later they are on VPN. You can achieve this by clicking the cog wheel and then IP ranges. You can then add your VPN ranges and mark them as Corporate. It does help with reviewing the impossible travel alerts quicker and there will be less alerts once the AI picks up the VPN addresses and looks for the user patterns.
Here is a bit on the corporate branding:
“When an IP address is tagged as corporate, it is reflected in the portal, and the IP addresses are excluded from triggering specific detections (for example, impossible travel) because these IP addresses are considered trusted.”
We check the failed logins IP and find the range it came from as well and then we see if the IP was used by anyone else within the last 30 days. If not, we add it to the O365 block IP list from connecting to O365. Within cloud app as well we will tag the range as Risky too.
As many travelers we have, we have yet to have anyone complain about a blocked range from a country. 90% of the time the ranges are used by proxy and VPN companies which our users shouldn’t be using as is.
You can create a Azure Conditional Access Policy to block by location when coming from any device excluding Azure AD Hybrid Joined or Compliant devices. This will make it so only your corporate enrolled devices can get to the logon screen to enter their password.
So if you blocked Uzbekistan in this policy and a person attempted to logon with an employees username they would get a block message instead of the prompt to enter their password.
Hi Great Tutorial,
However I cannot choose category when I am creating Policy, it is in grey. Any help
thanks
Make sure you have the correct license for the product and permissions as well.
It seems that there is no link to a part 2, even tho part 2 exists.
Part 2 is here: https://www.practical365.com/security/how-to-investigate-account-breaches-using-cloud-app-security/
Hi, When will part 2 be available?
What’s the difference between Cloud App Security (CAS), Office 365 Cloud App Security (OCAS), and Microsoft Cloud App Security (MCAS)? Are there indeed 3 different products? If so, which is referenced here as requiring E5?
Terry, From my experience, as long as you have E5 in your environment, the alerts work for accounts that do not have E5. For example, the Nigeria Rule we created worked on an account that did not have E5.
Do ALL the user’s have to use E5 licenses to be compliant? We have 100s of E5s but don’t turn on any alerts because a lot of ours don’t have E5.
This article is awesome! In my mind, Cloud App Security is the best Security and alert dashboard to date! I’m still getting the hang of it. Looking forward to part 2. Good luck.
Hi Tony,
Will you also blog about the defender integration and also creating and detecting new cloud apps used in the company and how to add and monitor them?
Rkast, at this time, I am focusing on the account breach portion only. As you may be aware Cloud App is a very large scale area. I have yet to look at the defender integration piece.
Hi Tony,
I understand.
Just jumped into MCAS myself and the options and integrations are massive and awesome.
Will certainly follow your Posts!
Great article. Thank you. Expecting Part 2.