Common use cases
Task Publishing in Microsoft Teams allows you to configure a hierarchy for distributing Planner tasks throughout your organization. People higher up in the hierarchy can create task lists, and once published they can choose sections of the organization to receive a copy of each task. As tasks are completed, they can view built-in reports showing the status of each task, such as how many teams have begun the task, assigned it to a team member or who has completed each task.
Task Publishing is a particularly great fit for distributed businesses where staff in central teams need to regularly ask managers around the business to complete tasks such as audits or participate in marketing campaigns. Because these sets of tasks are created by an individual and then published by that person centrally, it’s not ideal for regular tasks (like a set of daily checks) but works great for monthly tasks where there’s slight variations each month.
Task Publishing leverages the built-in Tasks (formerly Planner) app in Teams, which by default shows people a consolidated view of their To-Do and Planner tasks. The configuration we’ll create and apply to Teams in this article will enable the Task Publishing capabilities for our example organization.
To do this, we’ll need to:
- Plan our task publishing hierarchy and how we’ll allow people to filter as they publish
- Plan how we’ll categorize tasks into buckets
- Ensure we’ve got an appropriate Teams information architecture in place
- Enable features on Teams clients for ease of use
- Implement the hierarchy using the Microsoft Teams Module for PowerShell

Our example organization
We’ll use a retailer as our example scenario, Practical Living, who specialize in clothing. They have stores throughout the UK and a single HQ. Everyone – from the CEO to every shop assistant has a Microsoft 365 F1, F3 or E3 license and is enabled for Teams.
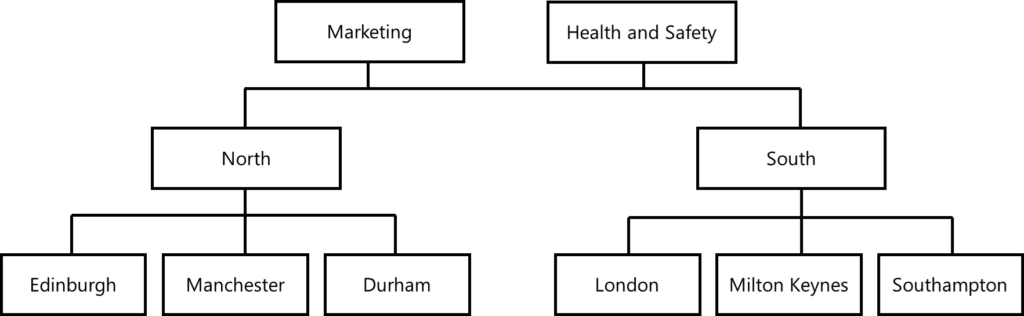
Currently there are two departments that need the ability to send tasks out to the stores, the Marketing department, and the Health & Safety department. The stores are split into North and South areas, and the area managers for each respective set of stores also need to be able to publish tasks, too.
The Task Publishing hierarchy will not reflect the exact organizational structure and line-manager hierarchy in the organization. This is because neither the Marketing department, nor the Health & Safety department are necessarily higher up in the organizational structure, but they are operating on the directive of the senior management team when they request their colleagues in stores perform tasks.
However, the area managers are the direct line managers of each store manager, and each store manager will be responsible for delegating tasks they receive in their own store. Therefore, the hierarchy we create reflects how tasks are distributed, rather than simply who manages who:
Within the hierarchy, we’ve consulted with both Marketing and Health & Safety departments who have highlighted that they both deploy new initiatives (such as new safety signage or marketing campaigns) to flagship stores separately on regular occasions, so we’ll want to be able to filter based upon flagship stores.
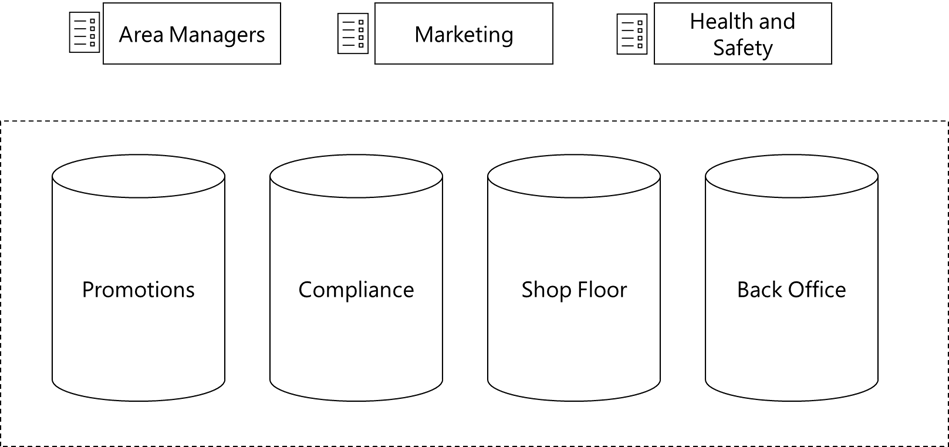
Planner uses the concept of buckets to separate out tasks. We’ll use this to help our store employees understand more about the tasks that have been sent to them so they can delegate efficiently. To understand the task buckets, we spoke to store and area managers to glean some insights into how they currently apportion the work they receive by email from these teams.
Most store managers explain that they have been printing out the emails and placing them into physical in-boxes, with sticker labels that align to the buckets defined below:
Armed with this information, we now understand what needs to be within our Task Publishing hierarchy, and we’ll need to make sure the correct pre-requisites are in-place so that we can align the hierarchy to Teams and deploy it.
Planning hierarchy implementation
The most crucial configuration we need to check before we implement our hierarchy is to ensure we have Teams created that align to the organization. If you’ve rolled out Teams without any planning in the past, you might have suffered from Teams sprawl – Teams created tactically by either IT or employees for specific purposes. We do not want to do this for Task Publishing.
Because the hierarchy reflects distinct departments or teams within the organization, it’s likely these map well to other use-cases in Teams. For example, a store may only require a single Team (with a private channel for the manager and assistant manager) that can be used for other purposes such as Shifts, Walkie Talkie, Apps, Files and – of course – conversations. The same will apply to teams such as the North and South area managers, and the HQ teams at the top of the hierarchy. If these other Teams don’t currently exist, then it’s worthwhile to plan for the creation of these – depending on how you plan to use the Teams created in the future – first.
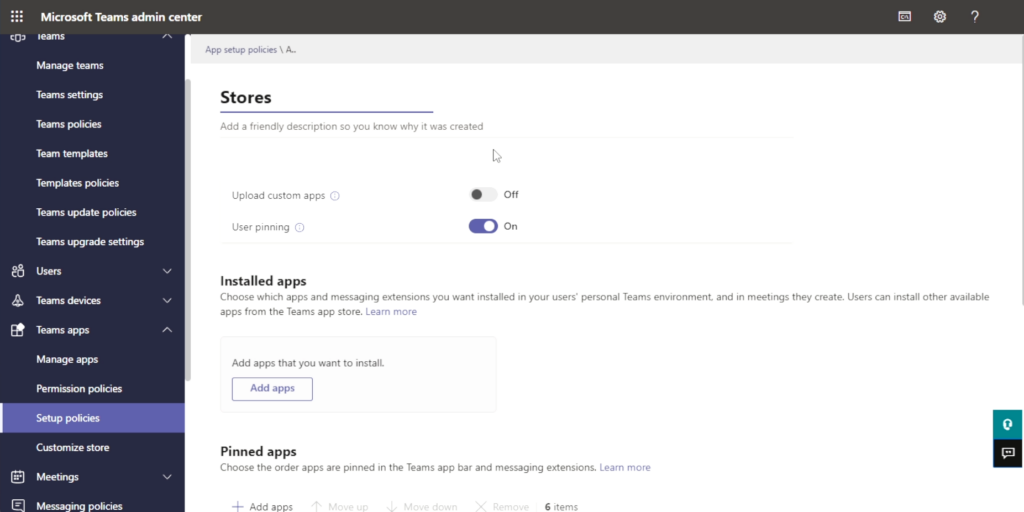
It isn’t necessary, but certainly helpful, if employees who plan to use Task Publishing (either to publish or receive tasks) have easy access to the app in Teams. To do this, we’ll access the Teams admin center and navigate to Teams apps > Setup policies and create a new App setup policy. In our example, this is called Stores:
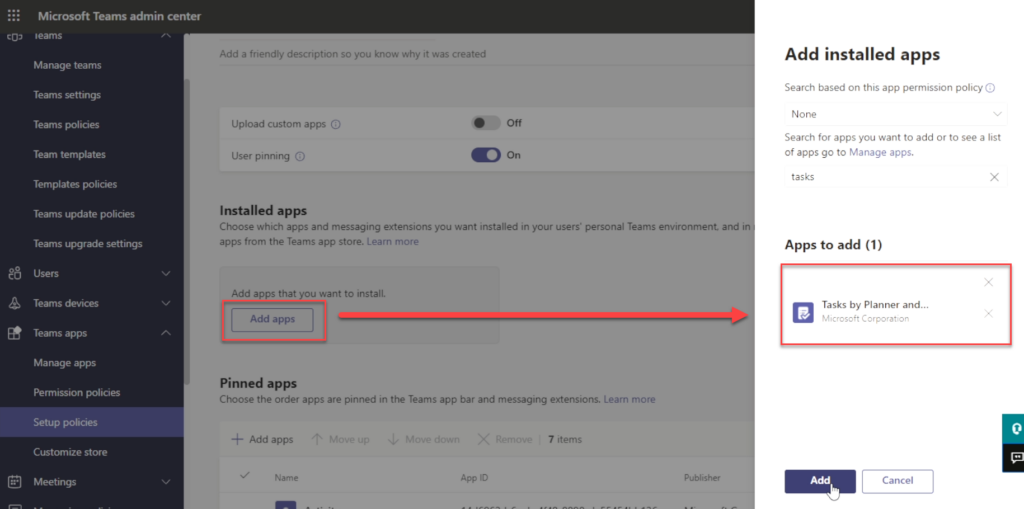
We’ll then add Tasks by Planner and To-Do as first an Installed app, and if you want it to be pinned automatically for users, as a Pinned app:
Creating our hierarchy file
We’ll now use PowerShell and Microsoft Excel to create our hierarchy file, which will mirror the parent-child structure shown in our organigram above and include the filtering options and task buckets.
Here’s the key information you’ll need to know before you begin creating:
- The Team display name and its Microsoft 365 Group ID, which we’ll obtain using PowerShell
- Each team that will have tasks published to it will need at least one parent set. We do this by entering the display name into a separate column, using the semi-colon to add multiple parents in as single column.
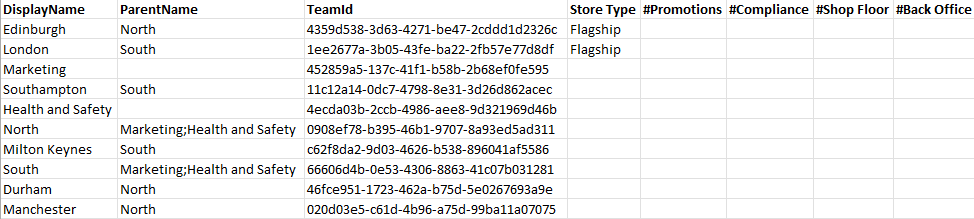
Additional columns we add will represent either filtering options or buckets. These are documented in full on Microsoft Docs, but put simply:
- A plain-text column will be used for filtering, with values completed to show which filtering options can be selected – such as a Store Type column with Flagship entered for particular rows.
- A column with a hashtag (#) as the first character represents a task bucket to define. Add these columns without completing row data, such as #Shop Floor to create a “Shop Floor” bucket
To begin, we’ll need the preview module for Microsoft Teams installed. This is available at the PowerShell gallery. Select the latest version with the -preview suffix listed in the Version History and follow the instructions to install it. This provides access to the specific Task Publishing cmdlets that we need.
Next, connect Teams PowerShell, and retrieve a CSV file of existing Teams using the following PowerShell cmdlet. This retrieves a list of teams, then selects the particular columns we need (adding ParentID and renaming GroupID as TeamID, as required by Task Publishing), then exports the result to a CSV file.
Get-Team | Select DisplayName,ParentID,@{N='TeamID';E={$_.GroupID}} | Export-Csv -Path .\TeamList.CSV -NoTypeInformationIn Excel, we’ll trim the list of Teams to only include those we desire within the hierarchy, then add the information from our planning exercise to create the parent-child relationships, filtering, and bucket columns:
After saving our input file, we’ll use Teams PowerShell to import the hierarchy, using the Set-TeamTargetingHierarchy cmdlet with the -FilePath parameter.
Set-TeamTargetingHierarchy -FilePath <Full Path to CSV file>You will only see an error if the file isn’t found; instead – regardless of whether the hierarchy has applied or not, you’ll see a the requestID on screen.
To check that the hierarchy successfully published, use Get-TeamTargetingHierarchyStatus:
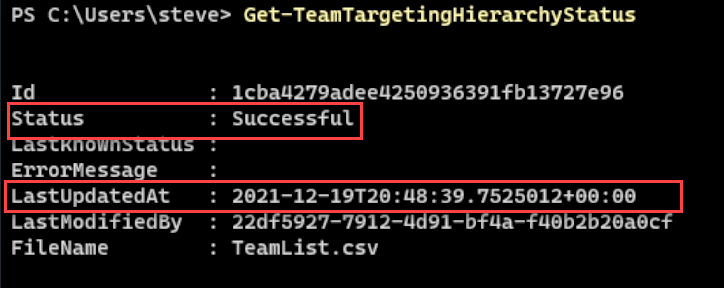
This should show the time it was updated (which should correspond to when we executed Set-TeamTargetingHierarchy) and the status, which we would expect to be successful. If it isn’t, then check the formatting of your fields and file.
To check that task publishing is enabled correctly, ensure you are a member of a parent Team in the hierarchy, and then within the Tasks app, you should see a new Published liststab (1). Navigate to that tab, and then from the ellipses (2) choose Get help with task publishing > Am I enabled for publishing to run tests.
All tests should be carried out successfully. If they fail, then ensure you’ve waited approximately 1-2 hours after uploading the CSV file before you begin troubleshooting for errors.
The end-user experience
Task Publishing has two aspects seen by end-users. First, your colleagues who are publishing tasks will have the ability to create new lists, publish them and monitor their progress. Anyone who is a member of a Team that’s a parent in the hierarchy will have this ability.
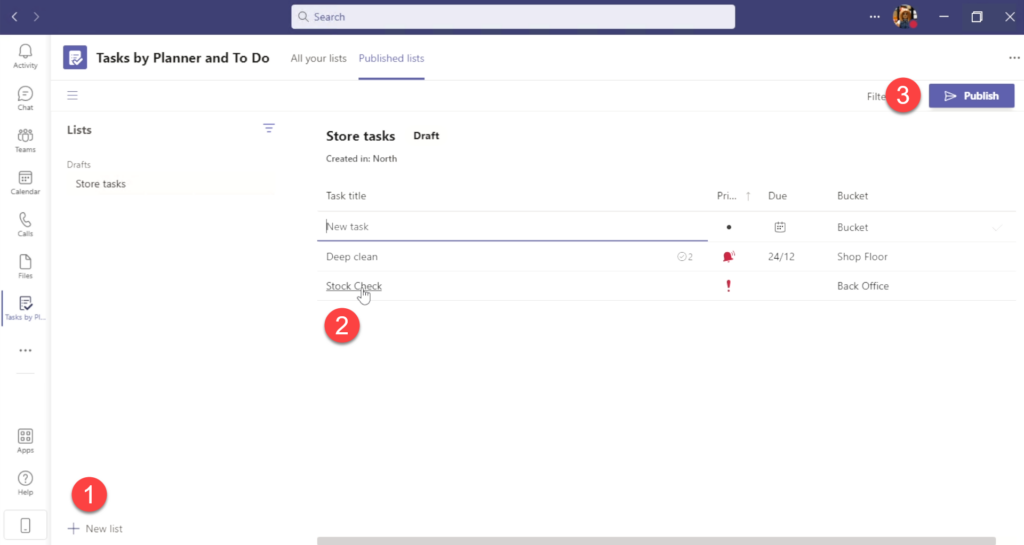
In the steps below, you’ll see the three steps needed to create a new task list, add items – including selecting the buckets for each task and adding addition details (like you would with any Planner task), before then choosing to publish:
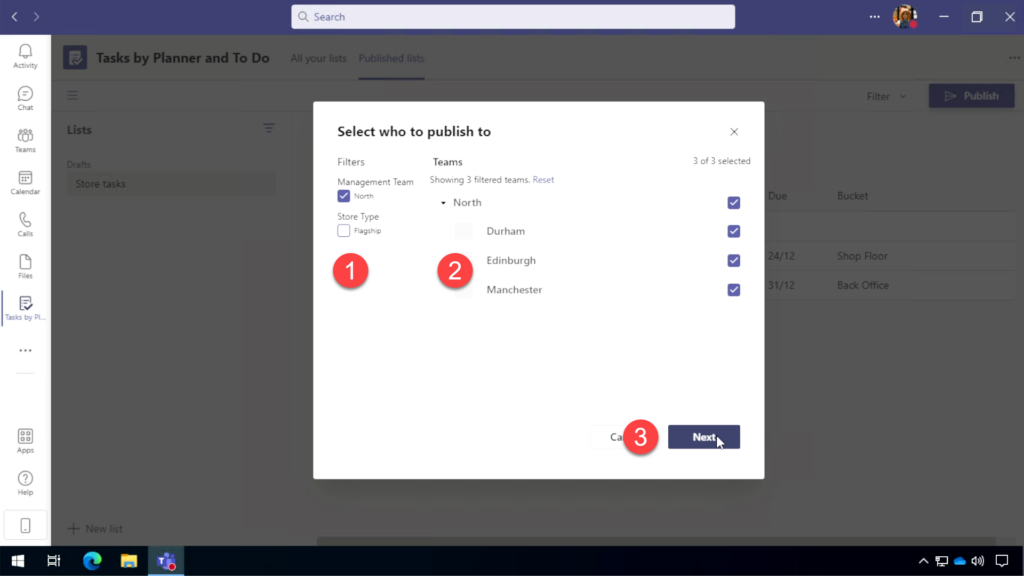
At the publishing stage, the ability to select where the tasks are published is based upon where the user’s Team sits within the hierarchy. In the example below, our user, Rachael, is an area manager in the North Team and therefore can publish to all child Teams. Our filters based on the Store Type are shown (1), along with the ability to select or de-selected individual Teams within the hierarchy (2), before checking everything looks OK when she presses Next:
Colleagues who receive tasks – any in a child Team in the hierarchy will have a different experience and see who published the task in a notification (and if they then recalled it by unpublishing).
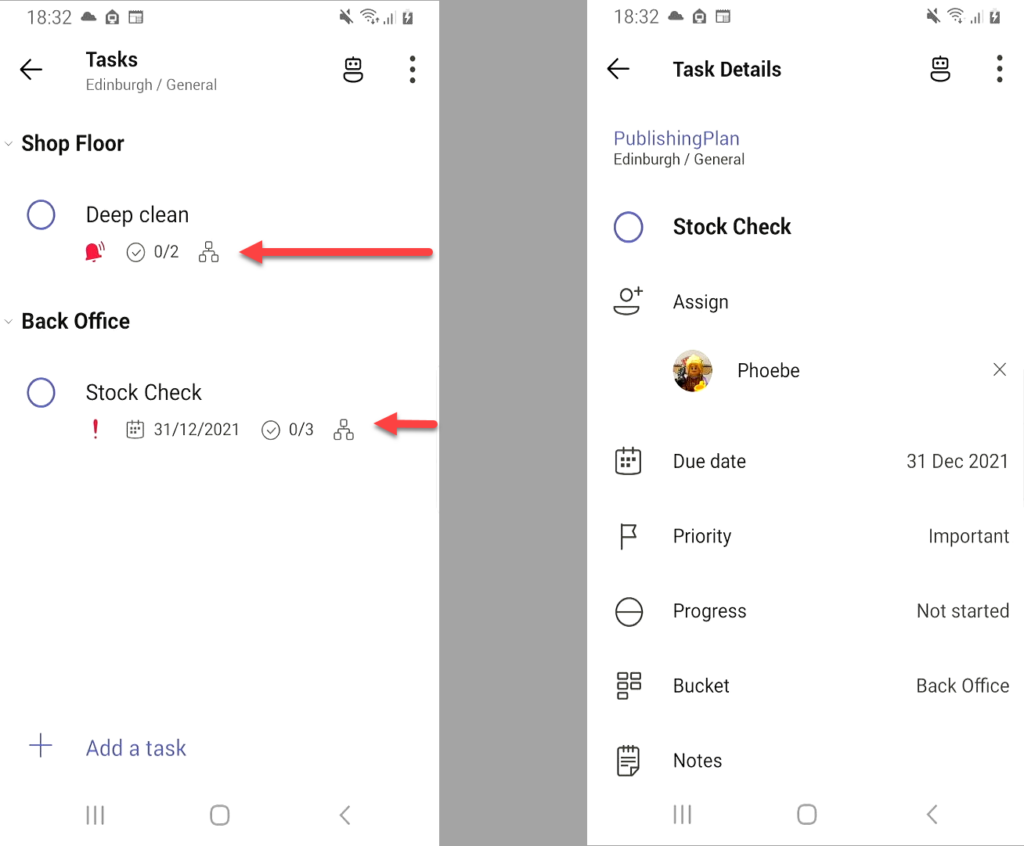
Within Tasks, the user – such as a store manager, in our example, will then see the published Tasks within their Teams’ Planner. Published tasks show with an icon showing a mini organigram to signify their status, as shown below. The user can then select and view the task as normal, and assign it to a member of staff to complete:
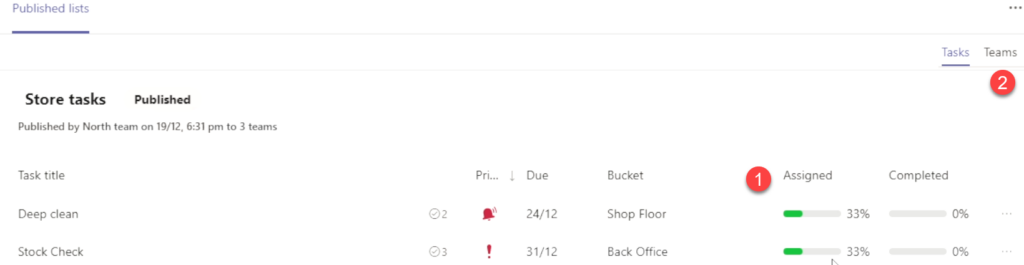
In our example, we’ve published tasks – but our area manager wants to check on status. Once published, they can then look at the task list again, which will have additional tabs and columns. In the example below, we can see that because the tasks were assigned by the store manager, one of three stores have assigned tasks and it updates to 33% assigned (1). By selecting the Teams tab (2), we can drill-down and see which store Team assigned the task, and to whom:
Real-world experience with Task Publishing shows that some operations take longer than others. Publishing tasks typically occurs quite quickly, as rapidly as a minute to publish to ~70-80 child Teams. This means pressing publish will very quickly ping a lot of people’s mobile devices.
Reporting on assignment, progress and completion status can take longer. As you’ll see in our video series – some actions, such as viewing the assignment report do not show in real time. It is important that as part of your user training you highlight that it is an asynchronous process, and not to expect real-time information to be displayed. Overall though, Task Publishing is likely to be a useful tool for most first-line industries like manufacturing, retailers, distribution and hospitality or command-and-control style organizations.


Hello.
The: Get-Team | Select DisplayName,ParentID,@{N=’TeamID’;E={$_.GroupID}} | Export-Csv -Path .\TeamList.CSV -NoTypeInformation isn’t working for me. Would you have another idea on how to get it to work?
Thank you.
Hi , do you know why , after microsoft released ‘recurring tasks’ , the recurring filed does not appear in tasks made in publishing plan ?