Pipelining cmdlets
Working with PowerShell we have many cmdlets that can perform tasks such as queries, configuration changes and more. By themselves, single cmdlets are useful, but being able to feed information from one cmdlet to another is an incredibly useful feature of PowerShell. PowerShell uses a concept called pipelining to combine two or more cmdlets to perform a cohesive task. The pipeline character ‘|’ separates the cmdlets.
When creating a pipeline between cmdlets, information passes from the cmdlet on the left to the cmdlet on the right. Keep in mind that when the information passes from left to right, PowerShell stores the data as objects for the next cmdlet to process and not as plain text. Using objects means that PowerShell has maximum flexibility when the next cmdlet in the pipeline processes the data it receives.

Practical Use
Those with PowerShell for the first time often end up using single cmdlets to construct one-liners to query information like Get-EXOMailbox to list Exchange Online mailboxes or change settings with Set-EXOMailbox. Using a pipeline between these cmdlets expands what we can do. Although no limit exists for the number of cmdlets in a pipeline, be careful not to make it too complex as this could lead to unintended consequences.
These examples show how to use the pipeline in different ways to list Exchange Online mailboxes that are archive enabled:
Get-EXOMailbox -PropertySets Minimum,Archive | Where ArchiveName -ne $NullSame example, but another Pipeline is used to add sorting by the DisplayName Property:
Get-EXOMailbox -PropertySets Minimum,Archive | Where ArchiveName -ne $Null | Sort-Object DisplayNameTaking the previous example and adding additional Pipelines to adjust formatting of the output:
Get-EXOMailbox -PropertySets Minimum,Archive | Where ArchiveName -ne $Null | Sort-Object DisplayName | ft -AutoThere is an order of operations for the use of cmdlets to process information properly. For example, formatting cmdlets (Ft, Fl ,Fw) should be added to the end of the pipeline. If not, PowerShell generates an error:
"out-lineoutput : The object of type "Microsoft.PowerShell.Commands.Internal.Format.FormatEntryData" is not valid or not in the correct sequence."DON’T attempt to format output in the middle of the pipeline:
Get-EXOMailbox -PropertySets Minimum,Retention | Ft DisplayName,Retention* | Sort-Object DisplayNameDO this instead (formatting at the end):
Get-EXOMailbox -PropertySets Minimum,Retention | Sort-Object DisplayName | Ft DisplayName,Retention*Compatible Cmdlets
Not all PowerShell cmdlets can pipeline information from one cmdlet to another, usually because the objects generated by one cmdlet cannot be processed by the next in the pipeline. For example, we cannot pipeline objects from the Get-EXOMailbox Cmdlet to the Get-Remote Domain cmdlet because the second cmdlet will attempt to process mailbox identities as remote domains and will therefore fail.
On the other hand, cmdlets that process similar objects like Get-EXOMailbox and Get-MailboxSpellingConfiguration can pipeline data between them because the second cmdlet can accept the mailbox identities to process.
Understanding what cmdlets work together takes some experience. Logically, we need to understand what a cmdlet accepts for input before piping information from another cmdlet.
The $_ Pipeline Variable
Piping supports the special $_ variable to identify the current object being processed by PowerShell. We can use the object and work with its properties by adding a ‘.’ and the property we want such as DisplayName or Identity.
A common usage of the $_ variable is to reference a property of the object being queried and filter all objects matching this property. This can be done in a one-liner as well as in a Foreach loop:
In this example, we look for mailboxes updated within the last 14 days:
$Date = (Get-Date).AddDays(-14)
Get-EXOMailbox -InactiveMailboxOnly | Where {$_.WhenChanged -lt $Date}  | Ft
We can also use the $_ variable to perform other common tasks. In this example we search for mailboxes located in the US and that have an assigned Retention Policy:
Get-EXOMailbox -PropertySets All | Where {$_.RetentionPolicy -ne $Null} | Where {$_.UsageLocation -eq 'United States'} | Ft DisplayName,PrimarySMTPAddress,RetentionPolicy -AutoList of all Inactive Mailboxes from the United States, sorted by the last changed date and the output formatted:
Get-EXOMailbox -InactiveMailboxOnly -PropertySets All | Where {$_.UsageLocation -eq 'United States'} | Sort-Object WhenChanged | Ft DisplayName, WhenCreated, WhenChangedThis example exposes the Recoverable Items stored in all mailboxes located in the United States. Foreach-Object is used to convert the Mailbox GUID to a Display Name for better output readability:
Get-EXOMailbox -Properties UsageLocation | Where {$_.UsageLocation -eq 'United States'} | Get-ExOMailboxFolderStatistics -FolderScope RecoverableItems | Select-Object ContentMailboxGuid, FolderAndSubfolderSize, ItemsInFolderAndSubfolders | ForEach-Object { $Mailbox = $_.ContentMailboxGuid; $Name = (Get-ExOMailbox $Mailbox).DisplayName;$_.ContentMailboxGuid = $Name ; Return $_}
Real World Examples
Foreach loops are another way where we can utilize the $_ special variable to manipulate data.
When gathering mailbox data, one common task is to review email addresses to make sure that Exchange Online data is correct. For example, perhaps there were object conflicts or aliases were incorrect when the user object synced to Azure AD and the end user’s onmicrosoft.com email address was created incorrectly or not as expected. Listing the EmailAddresses property reveals proxy email addresses with prefixes of ‘SIP:’ or ‘SMTP:’ or ‘smtp:’. We can use $_ to remove the pretext to reveal just the email address:
Get-ExOMailbox | Select-Object DisplayName,RecipientTypeDetails,EmailAddresses | Foreach-Object { $EmailAddresses = $_.EmailAddresses;$TrimmedEmails = @();Foreach ($EmailAddress in $EmailAddresses) { $Email = $EmailAddress.split(':')[1]; $TrimmedEmails += $Email}; $_.EmailAddresses = $TrimmedEmails;Return $_}With some changes, we can use the code to create lists for SMTP, SIP, and SharePoint Online proxy addresses:
SMTP Only
Get-ExOMailbox | Select-Object DisplayName, RecipientTypeDetails,EmailAddresses | Foreach-Object { $EmailAddresses = $_.EmailAddresses;$TrimmedEmails = @();Foreach ($EmailAddress in $EmailAddresses) { if ($EmailAddress -like 'smtp*') { $Email = $EmailAddress.split(':')[1]; $TrimmedEmails += $Email}}; $_.EmailAddresses = $TrimmedEmails;Return $_}
SIP Only
SIP Addresses are used for Teams communications, including phones (Figure 2:)
Get-ExOMailbox | Select-Object DisplayName, RecipientTypeDetails,EmailAddresses | Foreach-Object { $EmailAddresses = $_.EmailAddresses;$TrimmedEmails = @();Foreach ($EmailAddress in $EmailAddresses) { if ($EmailAddress -like 'sip*') { $Email = $EmailAddress.split(':')[1]; $TrimmedEmails += $Email}}; $_.EmailAddresses = $TrimmedEmails;Return $_}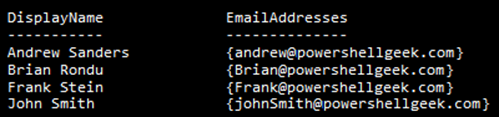
At the very end of the data formatting, note the usage of ‘Return $_’ which allows for the literal return of the reformatted data back to the object in the pipe. In our examples, we return only formatted proxy addresses instead of the values held in the EmailAddresses property of the mailbox object.
Export-CSV
PowerShell pipelines can format output to a file to be used for reporting purposes. For example, we can create a list of all Inactive Mailboxes from the United States, sorted by the last changed date and the output formatted:
Get-EXOMailbox -InactiveMailboxOnly -PropertySets All | Where UsageLocation -eq 'United States' | Sort-Object WhenChanged | Select-Object DisplayName,WhenCreated,WhenChanged | Export-CSV c:\reports\InactiveUSMailboxes.csv -NoTypeOut-GridView
We can also pipe output to the Out-GridView cmdlet to see the data in a pop-up window:
Get-EXOMailBox | Out-GridView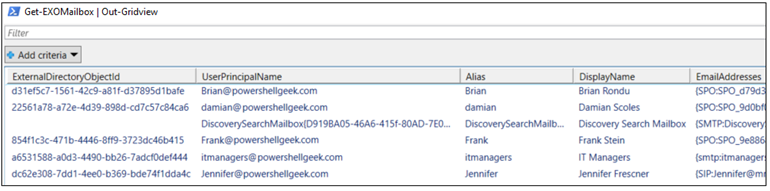
A useful feature of Out-GridView is to use the PassThru switch which allows an operator to select values and pass only those back to PowerShell for further processing by the next cmdlet in the pipeline.
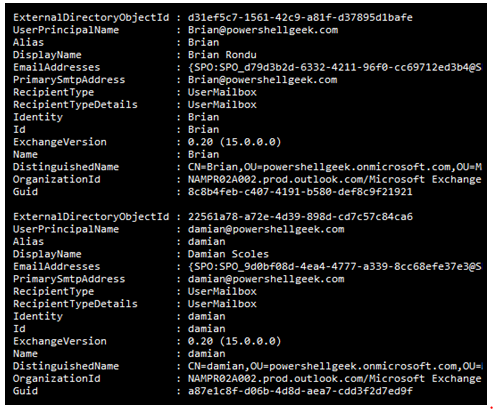
Get-EXOMailbox | Out-GridView -PassThru | Get-EXOCasMailbox | Ft DisplayName,*Enabled
Clicking OK on the pop-up box passes the selected mailboxes for processing by Get-EXOCasMailbox to display which properties a mailbox is allowed to connect on:

Conclusion
The PowerShell pipeline combines singularly useful cmdlets together to process data. Used intelligently, the pipeline is a great way to process data through a series of steps to automate common administrative operations. Mastering the pipeline, or at least becoming comfortable with pipelining cmdlets, is an essential skill for anyone using PowerShell to manage Microsoft 365 tenants.


I don’t believe the set-exomailbox cmdlet exists, unless I can’t find it in the documentation.
I’ve figured it out. Thank you so much for your help!
Get-EXOMailbox -ResultSize unlimited | Foreach-Object { $EmailAddresses = $_.EmailAddresses;$TrimmedEmails = @();Foreach ($EmailAddress in $EmailAddresses) { if ($EmailAddress -like ‘sip*’) { $Email = $EmailAddress.split(‘:’)[1]; $TrimmedEmails += $Email}}; $_.EmailAddresses = $TrimmedEmails;Return $_} | Select-Object DisplayName, RecipientTypeDetails,@{N=”EmailAddresses”;E={[string]::Join(“,”,$_.EmailAddresses)}} | Export-CSV “C:\Reports\SIP_Address_Report.csv” -NoTypeInformation
The following script is working great when viewing the output as a grid:
Get-ExOMailbox -ResultSize unlimited | Select-Object DisplayName, RecipientTypeDetails,EmailAddresses | Foreach-Object { $EmailAddresses = $_.EmailAddresses;$TrimmedEmails = @();Foreach ($EmailAddress in $EmailAddresses) { if ($EmailAddress -like ‘sip*’) { $Email = $EmailAddress.split(‘:’)[1]; $TrimmedEmails += $Email}}; $_.EmailAddresses = $TrimmedEmails;Return $_} | Out-GridView
However, I’m struggling to figure out how to properly export the output to a CSV file. Under the EmailAddresses column, the output is the following:
System.Object[]
The values under DisplayName and RecipientTypeDetails are correct. Does the join operator need to be utilized somewhere or am I on the wrong track?