Making Meeting Artifacts More Secure
With the shift to remote work, virtual meetings are essential for organizations. However, virtual meetings can also pose security risks. Teams Premium is an add-on license that adds to the existing Teams capabilities with personalization, intelligence, and protection. Teams Premium is ideal for organizations that want to add functionality to their Teams meetings and webinars, and get additional options for security and privacy.
In this article, I focus on the security aspects of Teams Premium and guide you through the various security options and settings.
To use Teams Premium, you must have a Teams license. Teams Premium can be added to any Teams license.
All meeting security functionality described here is “organizer-based” in terms of licensing, meaning only the meeting organizer needs a Teams Premium license assigned.
For more information about the full Teams Premium feature set and licensing, see here.

Security Features Overview
Teams Premium includes several security additions for Teams meetings:
- Content watermarking
- End-to-end meeting encryption
- Additional security settings
- Templates and sensitivity labels for meetings
Templates and sensitivity labels allow organizations to enforce and pre-define security settings and other options, according to their needs. They will be discussed in-depth in the next blog in this series.
Several of the features described here must be configured by a Teams administrator before they can be used. At least one Teams Premium license must be activated in the tenant before the Teams Premium-specific settings appear in the Teams Admin Center. You can recognize these settings by the “Premium” label (Figure 1).

Watermarks
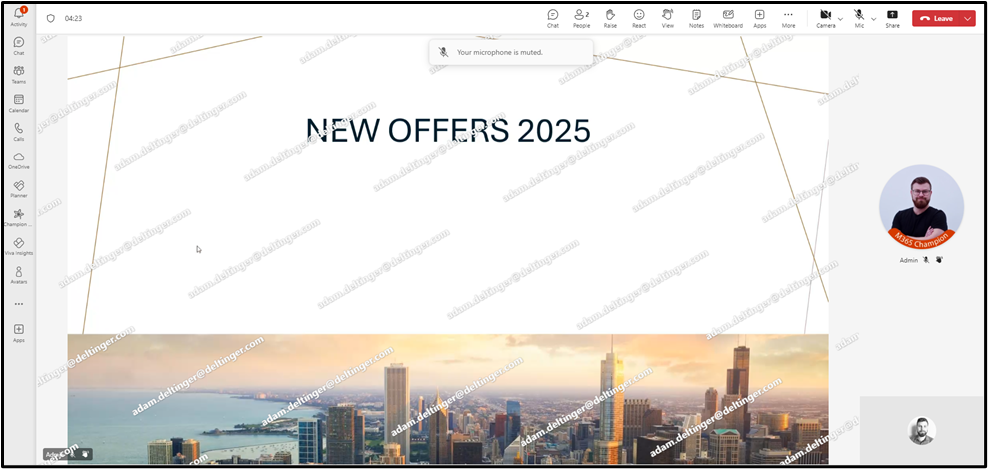
Watermarks is a feature to display the email address of meeting participants on the shared content and/or video in Teams meetings. This feature helps organizations protect confidential information from unauthorized sharing or disclosure since any screen capture displays the email address of the person who took it (figure 2).
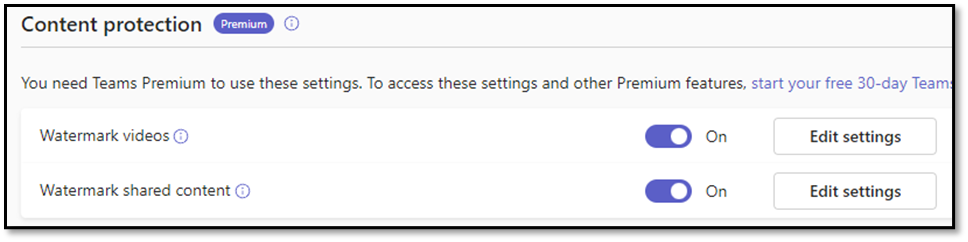
To enable watermarks for a tenant, go to the Teams admin center and select the meeting policy you want to apply watermarks to. You can enable watermarking for both shared content and videos (Figure 3).
You can enable or disable watermarks using PowerShell. For example:
To enable/disable the option in a specified meeting policy, for meeting organizers to configure watermarks for video:
Set-CsTeamsMeetingPolicy -Identity <policy name> - AllowWatermarkForCameraVideo < $True / $False>
To enable/disable the option in a specified meeting policy, for meeting organizers to configure watermarks for shared content:
Set-CsTeamsMeetingPolicy -Identity <policy name> - AllowWatermarkForScreenSharing <$True / $False>
To enable/disable the option in a specified meeting policy, for meeting organizers to customize watermarks settings for shared content:
Set-CsTeamsMeetingPolicy -Identity <policy name> - AllowWatermarkCustomizationForScreenSharing <$True / $False>
To set the watermark opacity for video in a specified meeting policy:
<em>Set-CsTeamsMeetingPolicy -Identity <policy name> -WatermarkForCameraVideoOpacity <1-100></em>
I couldn’t find any official documentation for the exact syntax and possible values for setting the watermark patterns, but this example worked:
Set-CsTeamsMeetingPolicy -Identity <policy name> -WatermarkForScreenSharingPattern <Single / Tiled>
See Figure 2 for “Tiled” type of watermarking pattern. “Single” watermarking pattern only display one instance of the email address.
Once enabled in a tenant, meeting organizers can apply watermarks in multiple ways through meeting options, a meeting template, or a sensitivity label.
Figure 4 shows the meeting options available to a meeting organizer with a Teams Premium license. The options chosen for the meeting enable watermarks.

Watermarks Limitations
Some limitations exist to be aware of when using Watermarks.
- Views like “together mode” and “large gallery view” are unsupported
- Audio-only for users joining with VDI clients, overflow (everyone joining when 1000 participants are in the meeting) and anonymous participants (users without a teams account). Recordings do not show watermarks if the video is edited or moved
- Not supported for PowerPoint/Excel Live or Whiteboard sharing
Meeting organizers should be aware of the mentioned limitations when considering enabling watermarks for a meeting. Depending on the type of meeting and participants joining, watermarks might not make sense to use.
It is possible for the organizer to enable watermarking after a meeting has started but the attendees must leave and re-join before the watermarking setting is effective.
End-to-end Encryption (E2EE)
End-to-end encryption (E2EE) is a secure way of encrypting information so that only the intended recipient can access it. No one, including Microsoft, can access the conversation. E2EE also protects audio, video, and screen sharing in a meeting. Apps, avatars, reactions, chat, and Q&A are not end-to-end encrypted, meaning that data can be extracted by administrators or malicious actors.
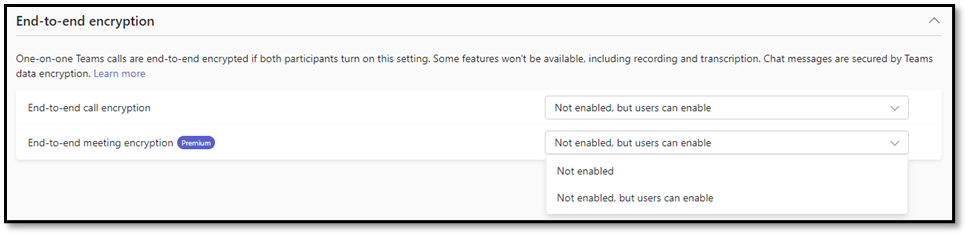
E2EE for meetings is disabled by default. To enable it, select “Enhanced encryption policies” from the Teams admin center (Figure 5).
The PowerShell cmdlet to enable or disable E2EE for a meeting policy is:
<em>Set-CsTeamsEnhancedEncryptionPolicy -Identity <policy name> -MeetingEndToEndEncryption <DisabledUserOverride / Disabled></em>
When enabled, meeting organizers with a Teams Premium license can enable E2EE through meeting options. Administrators can force the use of E2EE by using a meeting template or a sensitivity label, similar to watermarks.
Limitations for E2EE Meetings
E2EE disables some features that rely on cloud processing, such as live captions and transcription, recording, together mode, large gallery, breakout rooms, PowerPoint Live, Excel Live, and Copilot for meetings.
Additionally, E2EE meetings don’t support joining from VDI and web clients. Users will get a message when joining from an unsupported client.
Enabling E2EE also limits the number of possible participants in the meeting to 200. However, if the first participant joins from a Teams Rooms device, the limit is further reduced to 50, according to Microsoft documentation
With E2EE, you can add an additional layer of security to Teams meetings of sensitive nature. However, it might not be wise to use E2EE for every meeting as it reduces the functionality considerably. Some use cases for E2EE are highly confidential meetings, or when you’re affected by certain regulatory requirements that mandate end-to-end encryption.

Additional Security Related Teams Premium Meeting Options
Apart from watermarking and End-to-end meeting encryption, there are a few additional security-related features available to administrators and/or organizers.
Turn off Copying and Forwarding of Meeting Chat
When this setting is enabled in a meeting policy, copy/paste, forwarding, as well as “Share to Outlook” won’t be available from the meeting chat. If trying to do so, the user will see a message stating: “Due to policy, you can’t copy meeting chats.”.
In a meeting policy, administrators can toggle the “Organizer can restrict participants from copying or forwarding meeting chat messages” on or off. If on, organizers can choose to enable this for their meetings via the meeting options. Enforcing this setting can be accomplished by using a meeting template or sensitivity label.
You can enable or disable copy restriction in a meeting policy with PowerShell as well:
<em>Set-CsTeamsMeetingPolicy -Identity <policy name> -CopyRestriction <$False / $True></em>
Enabling copy restriction does not prevent screen capture, or a photo being taken from a phone, but is a good way to remind participants about the confidentiality of the meeting if they try to copy a chat message.
Hide Attendee Names
The meeting option to “Hide attendee names” means that attendees cannot see the names of other participants. Attendee information remains available to organizers and presenters. To enable the setting from meeting options, the organizer must first make sure that “Everyone” is not selected under the setting “Who can present”. If “Everyone” is selected, all attendees will have the presenter role, rendering this option useless.
When hide attendee names is selected, the “People” only shows the organizers and presenters by name. All other participant names are hidden and displayed as “Attendee” (figure 6).

The hide attendee names setting is useful in meetings where the anonymity of attendees is important. In these circumstances, disabling chat might be a good idea. Another use case is external webinars where attendees shouldn’t necessarily know the names of other participants.
Prevent Sharing in Externally Hosted Meetings
This is a new setting for meeting policies. Once set, an organizer can’t override the setting via meeting options.
The setting dictates if a user in your tenant can share content in meetings hosted by other organizations. This might be applicable for users handling very confidential information to prevent purposely or accidentally shared content.
The default value for the setting is “Any org,” meaning that no sharing restrictions exist for externally hosted meetings. “Trusted orgs and guests” allows sharing in meetings hosted by organizations defined in the External access policy, while “No other orgs” disables all sharing in that context.
To configure sharing in externally hosted meetings for a meeting policy using PowerShell, use the following command:
<em>Set-CsTeamsMeetingPolicy -Identity <policy name> -ContentSharingInExternalMeetings < EnabledForAnyone / EnabledForTrustedOrgs /Disabled></em>
Who Can Record and Transcribe
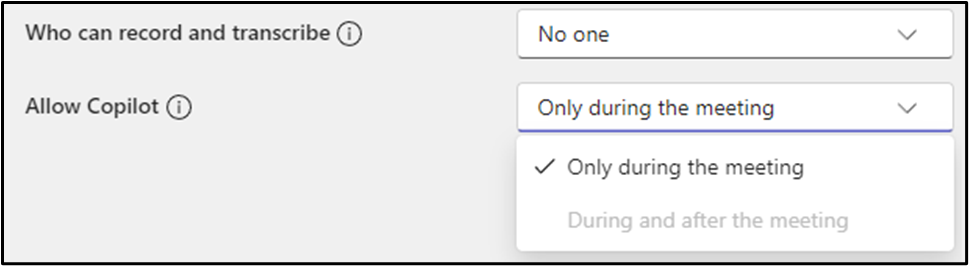
This option allows organizers to decide who can record and transcribe a meeting. Many organizations have the default setting of allowing all internal users to become presenters. Without Teams Premium, everyone with the presenter role can start a recording and transcription. With the Who can record and transcribe setting enabled, meeting organizers can exclude presenters, as well as disable it completely by selecting “No one” (Figure 7).
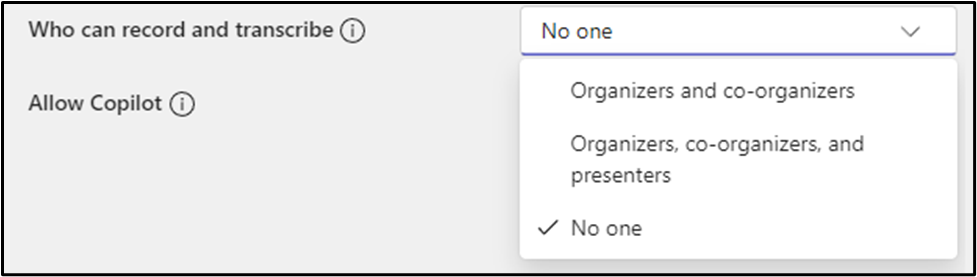
Remember that transcriptions and Copilot for meetings go hand in hand. If the “No one” option is set, the “Allow Copilot” option “During and after the meeting” will be greyed out (Figure 8)
Apart from configuring the setting in meeting options, it can be controlled with meeting templates and sensitivity labels.
Conclusion
Securing Teams meetings with Teams Premium offers organizations options to protect sensitive information. It is important to evaluate the need for these options, and who to be licensed with Teams Premium. All options in this article only need the organizer to be licensed, and depending on the number of users in an organization, Teams Premium can be costly. Only license users that organize sensitive meetings might be a good idea. Additionally, there is more non-security related functionality in Teams Premium not discussed in this article that might impact a decision.
In another article, I will explain how to combine Teams Premium options using meeting templates and sensitivity labels, providing meeting organizers with pre-defined settings that ensure meeting security when it’s required.


