
In this article, I’m going to outline the essential steps to ensure a smooth and successful mailbox migration by using the Get-RecipientPermissions and Search-RecipientPermissions script.
If you’re a mailbox migration novice, think of it like this, doctors and dentists alike will tell you that prevention is easier to manage than a cure. For me growing up in the sunburnt country of Australia we were ingrained with the motto of ‘slip on a shirt, slop on sunscreen, and slap on a hat’ for this very reason. Similar to all big Office 365 and Exchange projects, prior planning and thought are the cornerstones of success, and a relatively small amount of preparation is worth the effort when planning your migration batches.
Correctly Scope your Migration Batches
There is a saying Forewarned is Forearmed meaning that prior knowledge of possible dangers or problems will give you a tactical advantage, which is something you should bear in mind during your migration project.
Although we’ve seen a lot of progression to enhance collaboration between users in an Exchange Hybrid environment it’s important to note that not all permissions are supported.
“If a mailbox receives permissions from multiple mailboxes, that mailbox, and all of the mailboxes granting permissions to it, need to be moved at the same time.”
To aid this process, the Get-RecipientPermissions script was created to provide all the information required to identify not only who has access to which information but, more importantly, who has access to the mailboxes that are about to be moved. Users may have a raft of different permissions on a broad range of objects from a ‘mailbox folder permission’ on a shared mailbox to a ‘Send As’ permission on a Distribution List.
Note: The Microsoft Fasttrack team has also created a script that provides a good set of data that may also be used for a similar purpose.
To identify all the dependencies, all permissions for the Exchange organization should be collected. This may take some time, a general estimate on a single thread is 1 hour per 500 mailboxes although other objects such as distribution lists and contacts should be a lot faster.
Note: For those running Large Exchange Organisations, consider utilizing PowerShell Workflows for multithreading or splitting up the recipients and merging content back into a single CSV file.
Our initial goal is to have a CSV which provides a point in time snapshot of all the Exchange recipient permissions in our organisation.
To do so let’s run the following commands.
Set-Location -Path c:\Scripts
$AllUsers = Get-Recipient -ResultSize 'Unlimited' ; $AllUsers | .\Get-RecipientPermissions.ps1 -ExportCSV
You should now see a new CSV file with a timestamp from today’s date. Open this file in Excel and note the headings.
| SourceRecipient | Is the source object where the permission is applied |
| Recipient | Is the object that has permission to the source object |
You’re probably thinking this needs a bit more clarification, let’s look at an example which will give you more clarity on this.
To view who has permission to our User called ‘Bill’, type in the SamAccount using the excel filter in the column named ‘SourceRecipientSamAccountName’.
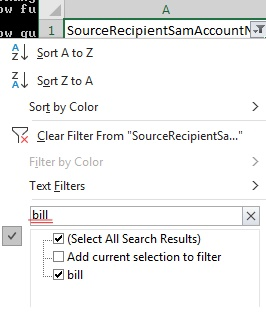
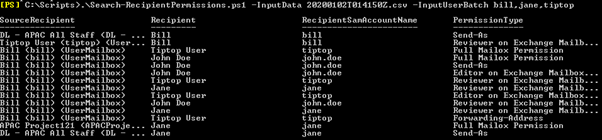
In this example, these are the permissions for our User Bill’s Mailbox.
In the first permission, we see that the (1) Recipient Tip Top User has (2) Full Mailbox Permission on the (3) SourceRecipient UserMailbox for Bill.

But what about the permissions Bill has access too? This has always been the difficult question to answer but now we can reach a conclusion. Once more type the SamAccount using the excel filter but this time in the column named RecipientSamAccountName.

And there you have it, a list is produced showing not only who has access to Bill’s mailbox but more importantly what permissions Bill has access to.
In the first permission, we see that the (1) Recipient user Bill has (2) Send-As Permission on the (3) Distribution Group ‘DL – APAC All Staff’.

On a per-user basis this works efficiently, but what about when you are dealing with larger migration batches how can we simplify the results without wading through thousands of permissions? This is where the companion script Search-RecipientPermissions helps. It allows us to input the data collected from the Get-RecipientPermissions script and will remove all objects not related to our users in the migration batch.
For example, let’s say that Bill and Jane are in the same migration batch. We need all the permissions they have access to, and we also need all the permissions of users that have access to Bill and Jane’s mailboxes. This is a simple task once you’ve completed all the collecting of the permissions and evaluating these results can happen at lightning speed.
.\Search-RecipientPermissions.ps1 -InputData 20200108T014040Z.csv -InputUserBatch bill,jane,tiptop -ExportCSV
But do I really need all permissions related to users even in the same migration batch? Perhaps not. It’s unlikely permissions for users between users in the same batch will be required. So, we can also strip these out of our results as well by adding the -ExcludeUserBatchPermissions switch.
.\Search-RecipientPermissions.ps1 -InputData 20200108T014040Z.csv -InputUserBatch "Bill","Jane" -ExportCSV -ExcludeUserBatchPermissions

As you can see, we now have a reduced number of permissions allowing us to focus on the most important things first such as remove orphaned or invalid permissions.
Orphaned or invalid permissions remain when an object is deleted leaving the unknown SID. But I suppose the question is, why would I care about those inactive permissions and how could they affect my mailbox migration?
About midway through 2016, a change was introduced to Exchange Online whereby if a security principal could not be successfully validated/mapped to an Exchange Online object, it would be marked as a bad item. This means when moving mailboxes to Exchange Online you will likely see the error message TooManyBadItemsPermanentException. Further details about the issue can be found here.
The suggested solution is to start the migration and basically wait and see. Once the migration batch fails you will have two options.
- Fix the permissions and start a new batch or
- The fool’s way out, simply increase the bad item count. Most administrators in this predicament always choose option 2 but if you have ever had to explain to your CEO why he missed a key meeting after his mailbox was migrated you really should think twice but alternately telling the CEO that you have postponed his migration may also be a PR disaster. What a dilemma!
I’d suggest that we need to rethink this approach and I’m glad that the Migration Team for Microsoft was on the same wavelength and recently released a new feature Data Consistency Scoring for mailbox migrations. This new feature allows us to investigate these corrupt items before finalizing the migration batch and provides a new set of data that helps us make better decisions moving forward.
No doubt this new feature has great value, but perhaps one could still argue that it would be better if we cleaned up those invalid permissions before migrating them to Exchange Online? But the question is how? If like me you’re a bit of perfectionist, let’s continue.
Once more back to the Get-RecipientPermissions script. We can remove any deleted objects with an unresolved SID by adding the -PerformRemoval switch. But before we do let’s find those orphaned permissions.
.\Search-RecipientPermissions.ps1 -Identity Bill -ExportCSV
Of interest in the export is the column PeformRemoval values which tells you which permissions will be removed.
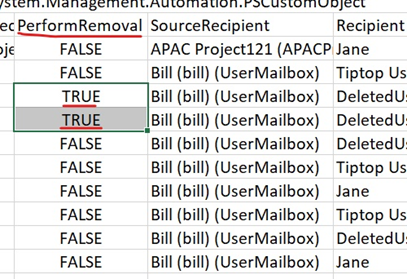
Note: By default only permissions identified as a ‘Deleted User’ will be removed but this can be adjusted to remove other identified objects such as ‘ADObjectNotFound’ by updating the decisions matrix within the script.
Once you have reviewed the permissions (PerformRemoval -eq $True) simply rerun the script and add the -PerformRemoval switch.
.\Search-RecipientPermissions.ps1 -Identity Bill -PerformRemoval
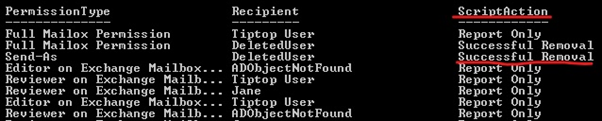
Once completed successfully review the ScriptAction column which should state the removal completed successfully.
Note: We would recommend first testing the removal process using the -WhatIf Parameter. If you need to remove the prompts for large batch removal please use the -confirm:$false switch.
And for the final round up, these simple yet important steps can contribute to a truly successful migration with the end user so delighted, they will want to shout the next round of drinks. Remember progress does not always equal success.


PS C:\Scripts> $AllUsers = Get-Recipient -ResultSize ‘Unlimited’ ; $AllUsers | .\Get-RecipientPermissions.ps1 -ExportCSV
Get-Recipient Get-Mailbox Get-MailboxPermission Get-ADPermission Get-ADUser Get-MailboxFolderStatistics Get-MailUser Get-MailPublicFolder Get-MailboxFolderPermission does not exist
C:\Scripts\Get-RecipientPermissions.ps1 : Script requires a higher level of access. Please Contact IT Support
At line:1 char:65
+ … e ‘Unlimited’ ; $AllUsers | .\Get-RecipientPermissions.ps1 -ExportCSV
+ ~~~~~~~~~~~~~~~~~~~~~~~~~~~~~~~~~~~~~~~~~
+ CategoryInfo : NotSpecified: (:) [Write-Error], WriteErrorException
+ FullyQualifiedErrorId : Microsoft.PowerShell.Commands.WriteErrorException,Get-RecipientPermissions.ps1
@AusSuport
Script requires a higher level of access. Please Contact IT Support.
Run in admin window you mean get need to also change the execution policy
I can’t get this script to work. No matter what I try, the column ‘PerformRemoval’ in the CSV always states ‘false’ and in the output the row with ‘ADObjectNotFound’ always says ‘report only’.
Of course I’m including the -PerformRemoval switch
The account I’m executing the script with has full access permission on the mailbox I’m testing the script with.
You will need to update the Grant-PermissionRemoval Function in the script to allow the removal of ‘ADObjectNotFound’ by default it’s set to leave these permissions.
You will need to change values
From:
$removeADObjectNotFound? = $False
To:
$removeADObjectNotFound? = $True
See the github readme for more details.
https://github.com/JBines/Get-RecipientPermissions.ps1
Hi there
When I run the command
Search-RecipientPermissions.ps1 -Identity ****** -PerformRemoval
I receive the error
WARNING: Can’t remove the access control entry on the object “CN=*********,CN=Users,DC=*******,DC=com” for account
“S-1-5-21-1957994488-412668190-1801674531-3595” because the ACE doesn’t exist on the object.
I have kept all the defaults in the Powershell scripts.
Do you know why I would get this error?
Thanks in advance.
Hi Ben,
I came across this in Exchange Online last week and needed Microsoft to fix this up. For on prem you could consider running below but if you are not running a Exchange resource forest design you might need to manually remove the attribute 🙁
If it’s happening for all your mailboxes please log a issue on github and we can have look.
https://docs.microsoft.com/en-us/exchange/troubleshoot/user-and-shared-mailboxes/cannot-remove-mailbox-permission-office-365
Thank you! This went a long way to making my life easier.
Nice work on this one Joshua. I have done similar things, however without a nice guide / blog post to accommodate it. I don’t think I’m ever going to get around to that, so… in case anyone reading here will benefit, I’ll share it. It is my Get-MailboxTrustee.ps1 / Get-ExoMailboxTrustee.ps1 script set. There are a few scripts in the set:
https://github.com/JeremyTBradshaw/PowerShell/blob/master/Get-MailboxTrustee.ps1
https://github.com/JeremyTBradshaw/PowerShell/blob/master/Get-MailboxTrusteeWeb.ps1
https://github.com/JeremyTBradshaw/PowerShell/blob/master/Get-MailboxTrusteeWebSQLEdition.ps1
https://github.com/JeremyTBradshaw/PowerShell/blob/master/New-MailboxTrusteeReverseLookup.ps1
The SQL edition of the ‘Web’ script is intended for the large organizations with many 1000’s of mailboxes’ worth of permission relationships. It’s impressive how fast PowerShell querying local SQL express DB is compared to just searching through variables in memory (arrays and/or hashtables full of permissions).
Thanks Jeremy and thank you for sharing your scripts great to see others also sharing for the community!
I haven’t tested pushing csv’s to a local SQL DB but I’ll take your word that it is faster 🙂
You might be interested in looking stealing some of my code for the mailbox folders if you are using some non English mailboxes 😉