Highlight the Intended Purpose of Labels for Users
Assigning appropriate colors to sensitivity labels helps users understand the intended purpose of the marker. In the world of paper documents, a big red label placed on a document means that it’s more important than a document with a yellow label. Taking the analogy forward, it’s good to be able to differentiate between sensitivity labels using colors. It’s been possible to assign colors to sensitivity labels using PowerShell for a year or so, but the necessary UI changes in Office applications have only just arrived to make it possible for users to see the colors.
Microsoft 365 roadmap items 88517 and 93217 cover the upgrade to the Microsoft Purview Compliance center to allow administrators to assign colors to labels and the changes made to the Microsoft 365 apps for enterprise (subscription Office desktop products) to display colored labels. The capability is now available in preview (I used version 2211, build 15813.20002 for this article) and tenants should see it in general availability in December 2022. The Office Online apps don’t currently display colored labels, but I am sure that this will come in time.
Apart from Office, Microsoft says that other first- and third-party applications can read and use the color property configured for sensitivity labels. Adobe has just given its Acrobat product (paid-for versions) the ability to set and update sensitivity labels for PDF files. Adding color support is a natural progression for Adobe’s integration.

Figuring Out a Color Scheme
I’m colorblind, so I cheerfully admit that my ability to select a color scheme is doubtful. No one would ever ask me to pick colors for a redecorating project, unless they were prepared to end up with some odd choices. Selecting a color scheme for sensitivity labels also needs thought. What’s the best color to mark a highly confidential document versus one that’s intended for public access?
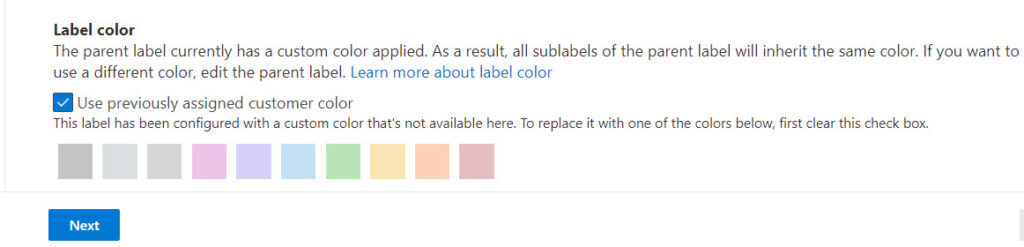
Microsoft makes ten label colors available for sensitivity labels in the Purview Compliance portal (Figure 1). The colors are charcoal, silver, beige, berry, lavender, light blue, light green, marigold, orange, and burgundy. I know this because the name of the color is revealed by hovering over the different options.

I can’t quite get my mind around assigning a color like beige or lavender to a label. If you ask someone what lavender, berry, or charcoal means to them in terms of importance or confidentiality, my guess is that the person will struggle to define a meaning. Nothing exists in day-to-day life that immediately associates beige with some degree of importance. Apart from their artistic merit, I have no idea why Microsoft chose the set available in the portal.
Selecting Other Colors
Fortunately, you can assign any hex color code you like to sensitivity labels with PowerShell. Using one of the several internet sites dedicated to color codes (here’s an example), you can find colors that match your needs. Even better, once assigned to labels, the Office apps faithfully display the selected colors.
You can’t maintain customer-assigned colors through the Purview compliance portal and must use PowerShell instead (Figure 2). Given that color assignment is likely to be a one-off activity, this isn’t a big problem.
Traffic Lights
My chosen color scheme for sensitivity labels uses the same colors as traffic lights. This has the benefit of simplicity (only three colors) and inbuilt user awareness (everyone knows what traffic lights mean). It’s easy to teach someone that:
- Green-labeled items are available to anyone inside or outside the company.
- Yellow-labeled items contain more confidential information. Be wary about sharing this information outside the company.
- Red-labeled items are for internal use only. Never share this information outside the company.
With that choice made, we can proceed to assign the three colors to labels.

Priority Matters
Because we’re going to use custom colors, we must assign the colors through PowerShell. Before we do that, we must decide what label gets what color. An easy way to do this is to use the priority order for labels. Every sensitivity label has a priority number with zero (0) assigned to the least important label. The higher the value of the priority number, the more important a label is. Another way of thinking about this is that the higher-priority labels mark the most confidential and important information in an organization.
Purview uses label priority to detect storage mismatches. This happens when someone stores a file labeled with a higher-priority label in a SharePoint site assigned a lower-priority label.
Using priority numbers means that we can divide labels into three categories based on their number and use that division as the basis to assign label colors. Let’s plunge into PowerShell to explore how to make the assignments.
Assigning Colors to Labels with PowerShell
First, we set up some variables for the priority order thresholds and the hex codes for the colors to use. Any label with a priority number of less or equal to 5 will get the green label, those between 6 and 12 will receive the yellow label, and anything above will be red.
# Define thresholds
[int]$Yellow = 5
[int]$Red = 13

# Define colors to use
$GreenLabel = "#00FF00"
$YellowLabel = "#FFFF00"
Next, connect to the Exchange Online management endpoint and the compliance endpoint.
Connect-ExchangeOnline
Connect-IPPSession
Sensitivity labels have scopes to indicate if they are used to mark items (like files and messages) or for container management (to enforce settings on Teams, Groups, and sites). You can assign colors to all labels, but we only want to deal with labels used for marking here. This code finds the set of labels that we’re interested in and lists their existing colors by reference to a hash table containing hex codes and display names (not shown here).
# Find the set of sensitivity labels and filter out those that can handle items (files, messages)
[array]$Labels = Get-Label
$ItemLabels = [System.Collections.Generic.List[Object]]::new()
ForEach ($Label in $Labels) {
    If ($Label.ContentType -Like "*File, Email*") { # It's a label for items
    $ColorFound = $Null; $ColorDisplay = "No color defined"
    $ColorFound = ($Label.Settings | ? {$_ -match "color"})
    If ($ColorFound) {
    Try {
        $ColorCode = $ColorFound.ToString().Split("#")[1].Split("]")[0] ; $ColorDisplay = $Colors[$ColorCode]
     }
     Catch {
        Write-Host "Error reading configuration for label" $L.DisplayName
     }}
    $DataLine = [PSCustomObject] @{
       LabelId     = $Label.ImmutableId
       DisplayName = $Label.DisplayName
       Priority    = $Label.Priority
       Color       = $ColorDisplay }
      $ItemLabels.Add($DataLine) }
}

Write-Host "Current Sensitivity Labels Defined for Items"
Write-Host "--------------------------------------------"
Write-Host ""
$ItemLabels | Format-Table DisplayName, Priority, Color
Write-Host ""
Write-Host ("{0} sensitivity labels found for item assignments. Updating them with new colors" -f $ItemLabels.Count)
The output is a list of labels to process. Setting the color is a matter of looping through the labels, checking their priority, and assigning the appropriate hex code. A simple Switch construct does the job:
ForEach ($Label in $ItemLabels) {
  Switch ($Label.Priority)
   {
     ({$PSItem -le $Yellow})
      {
       Write-Host ("Setting label {0} to Green" -f $Label.DisplayName)
       Set-Label -Identity $Label.LabelId -AdvancedSettings @{color=$GreenLabel}
      }
     ({$PSItem -gt $Yellow -and $PSItem -le $Red})
      {
       Write-Host ("Setting label {0} to Yellow" -f $Label.DisplayName )
       Set-Label -Identity $Label.LabelId -AdvancedSettings @{color=$YellowLabel}
      }
     ({$PSItem -ge $Red})
      {
       Write-Host ("Setting Label {0} to Red" -f $Label.DisplayName )
       Set-Label -Identity $Label.LabelId -AdvancedSettings @{color=$RedLabel}
      }
   } # End Switch
} # End ForEach Label
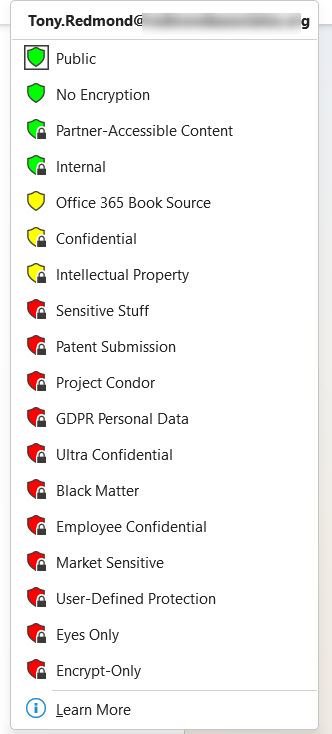
Office apps refresh label information every few hours. After the update, the apps display a nicely ordered set of labels with traffic light colors. The labels that apply encryption to items include a lock symbol in their icon (Figure 3).
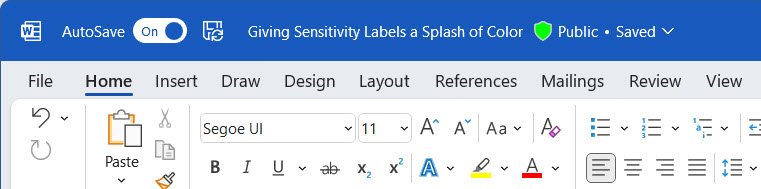
In addition, the Office apps show colored labels in their menu bar (Figure 4).
The complete script is available on GitHub.
Simplicity is Always a Good Thing
By all means, go ahead and use lavender, beige, and marigold in your sensitivity label color scheme. I’m sure you’ll be very happy with the chosen spectrum. I like the simplicity and effectiveness of traffic lights and consider it a good foundational scheme. Perhaps some special sensitivity labels can receive different colors to indicate their purpose, but before rushing to assign more than a few colors to labels, consider how you’ll explain the meaning of each color. If you can’t give a simple definition of when someone should use a label, perhaps it’s time to withdraw the label (and its special color) from general use.
Microsoft Platform Migration Planning and Consolidation
Simplify migration planning, overcome migration challenges, and finish projects faster while minimizing the costs, risks and disruptions to users.


Is there a way to set different locale settings for content markings? We currently have them set in English, but need them to show up in another language for a couple of users.
Do you know if there are plans for label colors to apply to container labels, visible in Teams / SharePoint / Outlook groups?
Nope. Office did the work to make the GUI reveal label color. So far, the container workloads have not.
Ok thanks for the response. I’ll talk to our TAM and see if I can get a read on that.
Is there a way to change the content marking header font colour ?
I do not believe so.
Hi, after some research I found that you can use any HEX color code for your already created labels, instead of the 6 colors MS provides. Only downside is that you need to do it via powershell.
Connect-IPPSSession -UserPrincipalName username@domain.tld
Get-Label | Format-Table -Property DisplayName, Name, Guid, ContentType
Set-Label -Identity GUID -ApplyContentMarkingFooterFontColor “#FFA500”
That is correct. Using Set-Label like this is documented in the Office 365 for IT Pros eBook.
The point that you can use any hex code you like if you update the label settings with PowerShell is made in the article. Do you have another point that you had in mind?
Found this https://learn.microsoft.com/en-us/powershell/module/exchange/set-label?view=exchange-ps
and this seems to be accepted, syntactically at least:
Set-Label -Identity -AdvancedSettings @{color=”#d53600″}
The ApplyContentMarkingFooterFontColor -based API does not seem to work (anymore?).
And changing the actual markup colour, based on this example https://learn.microsoft.com/en-us/powershell/module/exchange/set-label?view=exchange-ps , changing the header markup colour:
$headerlabel = [PSCustomObject]@{type=’applycontentmarking’;SubType=’header’;
Settings=@(
@{key=’fontcolor’;Value=’#d53600′;})}
Set-Label -Identity $LabelID -LabelActions (ConvertTo-Json $headerlabel -Depth 2 -Compress)
This code shows how to update multiple settings for automatic marking at the one time.
Set-Label -Identity $labelId -LabelActions ‘{
“Type”:”applycontentmarking”,
“SubType”:”footer”,
“Settings”:[
{“Key”:”fontsize”,”Value”:”12″},
{“Key”:”placement”,”Value”:”Footer”},
{“Key”:”alignment”,”Value”:”Center”},
{“Key”:”text”,”Value”:”*** Confidential Information ***”},
{“Key”:”fontcolor”,”Value”:”#A80000″}
]}’
hi @Tony, great article, thank you! i am facing an issue, that i don’t see the traffic light symbols on word doc or anywhere even after assigning the colors? any special setting required for that? though i see the label color on watermark, header and footer.
It depends on the version of the Office desktop apps. Right now I am on the road and the PC has build 2211. No colored labels appear. However, back at home base, my PC has a different build (can’t say what it is because I’m not there) and colors are available. I suspect that build 2212 is the one you need.
Hey Tony, Hope you are doing good. Still stuck with my issue, this group is restricted and I never receive the signup email. Would you mind if you make the request for me ?
Lots of thanks 🙏
Fabrice
I don’t have any control over the Yammer network used by the MIP development group. I suspect that not much is happening this week because of the U.S. holidays.
Hello Tony,
Thanks for your great content. I m implementing TLP 2.0 standard from FIRST (https://www.first.org/tlp/). Customised color helped me to set the hexa-code color. But when there is too little color contrast between text and background, those with low vision struggle to read text or cannot see it at all. TLP is designed to accommodate those with low vision. I want to adhere to the TLP color-coding to ensure enough color contrast for such readers BUT for that i need to set a black background-color and a typo of 12-point.
Do you know how to do that ?
Thanks in advance,
Fabrice
I don’t think you have any control over the background. You could raise this point to the developers at https://www.yammer.com/askipteam/#/threads/inGroup?type=in_group&feedId=30181138432.